Light Fix
Page 1
Drive Activity Light Fix (rev. 1) D-Link Systems, Inc. February 7, 2008 Page 1 D-Link Systems, Inc.™ xStack Storage DSN-3200 & DSN-3400 ECN -
Drive Activity Light Fix (rev. 1) D-Link Systems, Inc. February 7, 2008 Page 1 D-Link Systems, Inc.™ xStack Storage DSN-3200 & DSN-3400 ECN -
Light Fix
Page 2
...trademark of Microsoft Corporation. xStack Storage DSN-3200 & DSN-3400 ECN - This document contains proprietary information, which is a U.S. UNIX® is subject to identify products or services, of D-Link Systems, Inc. trademark of The Open Group. Copyright © 2008 D-Link Systems, Inc.™ Trademarks...implied warranties of any kind and is a registered trademark of Oracle Corporation, Redwood City, California. Drive Activity Light Fix © 2008 D-Link Systems, Inc. makes no warranty of merchantability and fitness for incidental or consequential damages in the ...
...trademark of Microsoft Corporation. xStack Storage DSN-3200 & DSN-3400 ECN - This document contains proprietary information, which is a U.S. UNIX® is subject to identify products or services, of D-Link Systems, Inc. trademark of The Open Group. Copyright © 2008 D-Link Systems, Inc.™ Trademarks...implied warranties of any kind and is a registered trademark of Oracle Corporation, Redwood City, California. Drive Activity Light Fix © 2008 D-Link Systems, Inc. makes no warranty of merchantability and fitness for incidental or consequential damages in the ...
Light Fix
Page 3
... the DSN-3200/3400 through your xStack Storage User's Guide. February 7, 2007 Page 3 Please follow these steps for a detailed description of how to determine if your system is in need to the step-by-step update guide in your management GUI. Drive Activity Light Fix 1 Introduction Note: For the remainder of the Seagate ST31000340NS 1TB hard drive. D-Link...
... the DSN-3200/3400 through your xStack Storage User's Guide. February 7, 2007 Page 3 Please follow these steps for a detailed description of how to determine if your system is in need to the step-by-step update guide in your management GUI. Drive Activity Light Fix 1 Introduction Note: For the remainder of the Seagate ST31000340NS 1TB hard drive. D-Link...

Light Fix
Page 4
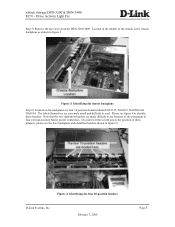
xStack Storage DSN-3200 & DSN-3400 ECN - Here you will see something similar to that found in figure 1. You may now reinsert the drive trays. If your backplane has revision 1.4 or later, then your system has Revision 1.1, 1.2 or 1.3, then you will need to continue to date and needs no changes. Drive...Printed Circuit Board) located at the rear of the space. Figure 2: Identifying the backplane revision number D-Link Systems, Inc. Figure 1: Remove the two right-most drives from the enclosure as shown in figure 2. You should see a revision number. If your system is ...
xStack Storage DSN-3200 & DSN-3400 ECN - Here you will see something similar to that found in figure 1. You may now reinsert the drive trays. If your backplane has revision 1.4 or later, then your system has Revision 1.1, 1.2 or 1.3, then you will need to continue to date and needs no changes. Drive...Printed Circuit Board) located at the rear of the space. Figure 2: Identifying the backplane revision number D-Link Systems, Inc. Figure 1: Remove the two right-most drives from the enclosure as shown in figure 2. You should see a revision number. If your system is ...
Light Fix
Page 5
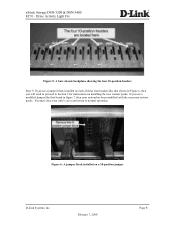
... Identifying the four 10-position headers D-Link Systems, Inc. The labels themselves are four 10-position headers labeled NA1315, NA0912, NA0508 and NA0104. Drive Activity Light Fix Step 5) Remove the top cover from the DSN-3200/3400. Please see the bare backplane and... identified headers shown in figure 3. February 7, 2008 Page 5 Note that the two right-most headers are made difficult to see because of the placement of four (4) four-position Molex power connectors. (In order to better orient you to read. xStack Storage DSN-3200 & DSN...
... Identifying the four 10-position headers D-Link Systems, Inc. The labels themselves are four 10-position headers labeled NA1315, NA0912, NA0508 and NA0104. Drive Activity Light Fix Step 5) Remove the top cover from the DSN-3200/3400. Please see the bare backplane and... identified headers shown in figure 3. February 7, 2008 Page 5 Note that the two right-most headers are made difficult to see because of the placement of four (4) four-position Molex power connectors. (In order to better orient you to read. xStack Storage DSN-3200 & DSN...
Light Fix
Page 6
Drive Activity Light Fix Figure 5: A bare chassis backplane showing the four 10-position headers Step 7) If you will need to proceed to normal operation. February 7, 2008 Page 6 Figure 6: A jumper block installed on installing the new resistor packs. xStack Storage DSN-3200 & DSN-3400 ECN - You may close your system has been modified with the necessary resistor packs... on each of these four headers like that shown in figure 7, then your unit's cover and return to Section 2 for instructions on a 10-position jumper D-Link Systems, Inc.
Drive Activity Light Fix Figure 5: A bare chassis backplane showing the four 10-position headers Step 7) If you will need to proceed to normal operation. February 7, 2008 Page 6 Figure 6: A jumper block installed on installing the new resistor packs. xStack Storage DSN-3200 & DSN-3400 ECN - You may close your system has been modified with the necessary resistor packs... on each of these four headers like that shown in figure 7, then your unit's cover and return to Section 2 for instructions on a 10-position jumper D-Link Systems, Inc.

Light Fix
Page 7
February 7, 2008 Page 7 Drive Activity Light Fix Figure 7: A resistor pack installed on a 10-position jumper. xStack Storage DSN-3200 & DSN-3400 ECN - D-Link Systems, Inc.
February 7, 2008 Page 7 Drive Activity Light Fix Figure 7: A resistor pack installed on a 10-position jumper. xStack Storage DSN-3200 & DSN-3400 ECN - D-Link Systems, Inc.
Light Fix
Page 8
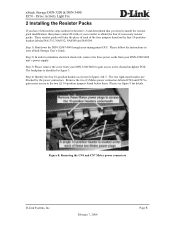
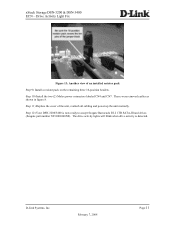
... from your xStack Storage User's Guide. Remove the two (2) Molex power connectors labeled CN4 and CN7 to gain easier access to obtain the four (4) necessary resistor packs. Drive Activity Light Fix 2 Installing the Resistor Packs If you have followed the steps outlined in your DSN-3200/3400 unit...place of each of the four jumpers found below them. Figure 8: Removing the CN4 and CN7 Molex power connectors D-Link Systems, Inc. xStack Storage DSN-3200 & DSN-3400 ECN - Please follow the instructions in Section 1.3 and determined that you need to install the resistor pack modification,...
... from your xStack Storage User's Guide. Remove the two (2) Molex power connectors labeled CN4 and CN7 to gain easier access to obtain the four (4) necessary resistor packs. Drive Activity Light Fix 2 Installing the Resistor Packs If you have followed the steps outlined in your DSN-3200/3400 unit...place of each of the four jumpers found below them. Figure 8: Removing the CN4 and CN7 Molex power connectors D-Link Systems, Inc. xStack Storage DSN-3200 & DSN-3400 ECN - Please follow the instructions in Section 1.3 and determined that you need to install the resistor pack modification,...
Light Fix
Page 9
February 7, 2008 Page 9 Drive Activity Light Fix Step 6) For each 10-position header, you must remove the 4-position jumper block as seen in figure 10. Note that shown in ... as seen in figure 6. Also be aware that one of the positions are empty as shown in figure 9. Figure 10: The resistor pack: side view D-Link Systems, Inc. xStack Storage DSN-3200 & DSN-3400 ECN -
February 7, 2008 Page 9 Drive Activity Light Fix Step 6) For each 10-position header, you must remove the 4-position jumper block as seen in figure 10. Note that shown in ... as seen in figure 6. Also be aware that one of the positions are empty as shown in figure 9. Figure 10: The resistor pack: side view D-Link Systems, Inc. xStack Storage DSN-3200 & DSN-3400 ECN -
Light Fix
Page 10
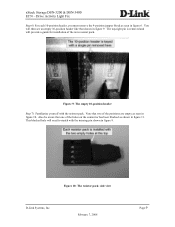
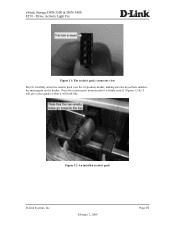
Figures 12 & 13 will give you a guide to what it is firmly seated. Figure 12: An installed resistor pack D-Link Systems, Inc. February 7, 2008 Page 10 Drive Activity Light Fix Figure 11: The resistor pack: connector view Step 8) Carefully orient the resistor pack over the 10-position header, making sure the keyed hole matches the missing pin on the header. xStack Storage DSN-3200 & DSN-3400 ECN - Press the resistor pack inwards until it will look like.
Figures 12 & 13 will give you a guide to what it is firmly seated. Figure 12: An installed resistor pack D-Link Systems, Inc. February 7, 2008 Page 10 Drive Activity Light Fix Figure 11: The resistor pack: connector view Step 8) Carefully orient the resistor pack over the 10-position header, making sure the keyed hole matches the missing pin on the header. xStack Storage DSN-3200 & DSN-3400 ECN - Press the resistor pack inwards until it will look like.
Light Fix
Page 11
...power connectors labeled CN4 and CN7. The drive activity lights will blink when drive activity is now ready to accept Seagate Barracuda ES.2 1TB SATA-II hard drives (Seagate part number ST31000340NS). February 7, ...2008 Page 11 Step 11) Replace the cover of an installed resistor pack Step 9) Install a resistor pack on the remaining three 10-position headers. These were removed earlier as shown in figure 8. Step 12) Your DSN-3200/3400 is detected. D-Link Systems, Inc. xStack Storage DSN-3200 & DSN-3400 ECN - Drive...
...power connectors labeled CN4 and CN7. The drive activity lights will blink when drive activity is now ready to accept Seagate Barracuda ES.2 1TB SATA-II hard drives (Seagate part number ST31000340NS). February 7, ...2008 Page 11 Step 11) Replace the cover of an installed resistor pack Step 9) Install a resistor pack on the remaining three 10-position headers. These were removed earlier as shown in figure 8. Step 12) Your DSN-3200/3400 is detected. D-Link Systems, Inc. xStack Storage DSN-3200 & DSN-3400 ECN - Drive...