Manual
Page 2
... Web UI Login 37 Web UI General Layout 38 Home 38 Applications 39 Management 40 Management 41 Setup Wizard (Web UI 41 D-Link ShareCenter DNS-345 User Manual Disk Management 45 Hard Drive Configuration 45 Hard Drive Configuration Wizard 46 JBOD 52 RAID 0 57 RAID 1 61 RAID 5 69 RAID 5 + Spare 76 ...
... Web UI Login 37 Web UI General Layout 38 Home 38 Applications 39 Management 40 Management 41 Setup Wizard (Web UI 41 D-Link ShareCenter DNS-345 User Manual Disk Management 45 Hard Drive Configuration 45 Hard Drive Configuration Wizard 46 JBOD 52 RAID 0 57 RAID 1 61 RAID 5 69 RAID 5 + Spare 76 ...

Manual
Page 3
... and LLTD Settings 180 DDNS 181 Port Forwarding 182 Application Management 186 FTP server 186 UPnP AV Server 190 iTunes Server 193 Add-Ons 194 D-Link ShareCenter DNS-345 User Manual AFP Service 197 NFS Service 197 System Management 198 Language 198 Time and Date 199 Device 200 System Settings 201 Power Management 202...
... and LLTD Settings 180 DDNS 181 Port Forwarding 182 Application Management 186 FTP server 186 UPnP AV Server 190 iTunes Server 193 Add-Ons 194 D-Link ShareCenter DNS-345 User Manual AFP Service 197 NFS Service 197 System Management 198 Language 198 Time and Date 199 Device 200 System Settings 201 Power Management 202...
Manual
Page 4
... Favorites 259 My Shared Files 260 Edit 263 Delete 264 User Access 265 View Share 266 Files 266 History 267 Email URL 268 Advanced 269 D-Link ShareCenter DNS-345 User Manual Downloads 270 My Synced Files 271 Running mydlink Cloud Sync 276 Guest Users 278 Applications 279 Manage 279 App Store 280 Miscellaneous 283...
... Favorites 259 My Shared Files 260 Edit 263 Delete 264 User Access 265 View Share 266 Files 266 History 267 Email URL 268 Advanced 269 D-Link ShareCenter DNS-345 User Manual Downloads 270 My Synced Files 271 Running mydlink Cloud Sync 276 Guest Users 278 Applications 279 Manage 279 App Store 280 Miscellaneous 283...

Manual
Page 5
Widget Display 346 Contacting Technical Support 347 Warranty 348 Registration 353 D-Link ShareCenter DNS-345 User Manual iv Table of Contents Local Backups 306 Time Machine 307 USB Backups 308 MTP Backups 309 USB Backups 309 MTP Backup Process 310 ... is RAID 331 RAID Options 333 What is Ethernet Bonding 335 UPS Connectivity 336 Deleting a UPS Slave 340 USB Print Server 342 Yahoo! Widget Installation 345 Yahoo!
Widget Display 346 Contacting Technical Support 347 Warranty 348 Registration 353 D-Link ShareCenter DNS-345 User Manual iv Table of Contents Local Backups 306 Time Machine 307 USB Backups 308 MTP Backups 309 USB Backups 309 MTP Backup Process 310 ... is RAID 331 RAID Options 333 What is Ethernet Bonding 335 UPS Connectivity 336 Deleting a UPS Slave 340 USB Print Server 342 Yahoo! Widget Installation 345 Yahoo!
Manual
Page 6
... Parity data is very convenient as disk mirroring, the system will be needed for safekeeping. D-Link ShareCenter DNS-345 User Manual 1 When used with the combined capacity of the drives. The DNS-345 has seven RAID modes: • Standard - creates a single volume from one drive. &#... need to add supported software applications. uses all the drives • RAID 1 - Product Overview Product Overview The D-Link ShareCenter DNS-345 is used to the DNS-345 for the same function. To further enhance your music, photos, and video collections to regenerate lost data during a drive...
... Parity data is very convenient as disk mirroring, the system will be needed for safekeeping. D-Link ShareCenter DNS-345 User Manual 1 When used with the combined capacity of the drives. The DNS-345 has seven RAID modes: • Standard - creates a single volume from one drive. &#... need to add supported software applications. uses all the drives • RAID 1 - Product Overview Product Overview The D-Link ShareCenter DNS-345 is used to the DNS-345 for the same function. To further enhance your music, photos, and video collections to regenerate lost data during a drive...

Manual
Page 7
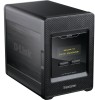
Product Overview Package Contents • D-Link ShareCenter® 4-Bay Cloud Storage 4000 (DNS-345) • CD-ROM with Manual and Software • Quick Installation Guide • Power Adapter • CAT5E Ethernet Cable Note: Using a power ... used to configure and use the ShareCenter: Computer with: • 1Ghz processor / 512MB RAM / 200MB available space / CD-ROM drive • Windows® 7, Vista®, or XP (with the ShareCenter® will cause damage and void the warranty for the appropriate Windows® operating systems. D-Link ShareCenter DNS-345 User Manual 2 Section 1 -...
Product Overview Package Contents • D-Link ShareCenter® 4-Bay Cloud Storage 4000 (DNS-345) • CD-ROM with Manual and Software • Quick Installation Guide • Power Adapter • CAT5E Ethernet Cable Note: Using a power ... used to configure and use the ShareCenter: Computer with: • 1Ghz processor / 512MB RAM / 200MB available space / CD-ROM drive • Windows® 7, Vista®, or XP (with the ShareCenter® will cause damage and void the warranty for the appropriate Windows® operating systems. D-Link ShareCenter DNS-345 User Manual 2 Section 1 -...
Manual
Page 8
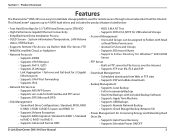
Section 1 - JBOD; RAID 0; RAID 1; RAID 5; Product Overview Features The ShareCenter® DNS-345 is an easy to Folders with Read or Read/Write Permissions • Quotas for Users and Groups • Supports ISO mount Shares • ... Access via Built-in FTP server for Conserving Energy and Extending Hard Drive life • Supports Auto Power Recovery • Supports Schedule Power ON/OFF D-Link ShareCenter DNS-345 User Manual 3 and RAID 10 • Supports Volume Encryption • Supports RAID migration: Standard to RAID 1, Standard to RAID 5, RAID 1 to RAID 5 • ...
Section 1 - JBOD; RAID 0; RAID 1; RAID 5; Product Overview Features The ShareCenter® DNS-345 is an easy to Folders with Read or Read/Write Permissions • Quotas for Users and Groups • Supports ISO mount Shares • ... Access via Built-in FTP server for Conserving Energy and Extending Hard Drive life • Supports Auto Power Recovery • Supports Schedule Power ON/OFF D-Link ShareCenter DNS-345 User Manual 3 and RAID 10 • Supports Volume Encryption • Supports RAID migration: Standard to RAID 1, Standard to RAID 5, RAID 1 to RAID 5 • ...

Manual
Page 9
...; My Files - Allows user(s) to automatically find and play music directly from the ShareCenter® • Supports Add-On Software and Multi-Language Packages • Blogging with guest users D-Link ShareCenter DNS-345 User Manual 4 Product Overview • Media Streaming • UPnP AV Server for ... and mobile devices • Download and remote stream your photos, music, and video files • Sync files/folders between the ShareCenter and multiple computers • Share content with WordPress • Logitech Squeeze Center • Audio Streamer • AjaXplorer • ...
...; My Files - Allows user(s) to automatically find and play music directly from the ShareCenter® • Supports Add-On Software and Multi-Language Packages • Blogging with guest users D-Link ShareCenter DNS-345 User Manual 4 Product Overview • Media Streaming • UPnP AV Server for ... and mobile devices • Download and remote stream your photos, music, and video files • Sync files/folders between the ShareCenter and multiple computers • Share content with WordPress • Logitech Squeeze Center • Audio Streamer • AjaXplorer • ...

Manual
Page 10
... • Understand the basic requirements for a router or switch Selecting Hard Drives: You can use your data against one hard drive. The D-Link ShareCenter supports standard 3.5" internal SATA drives. D-Link ShareCenter DNS-345 User Manual 5 This provides more data drives, better striping performance, and helps distribute loads more effectively. Product Overview Checking the Hardware Requirements To...
... • Understand the basic requirements for a router or switch Selecting Hard Drives: You can use your data against one hard drive. The D-Link ShareCenter supports standard 3.5" internal SATA drives. D-Link ShareCenter DNS-345 User Manual 5 This provides more data drives, better striping performance, and helps distribute loads more effectively. Product Overview Checking the Hardware Requirements To...
Manual
Page 11
Using an Uninterrupted Power Supply (UPS): We highly recommend that you are connecting your ShareCenter to a router or switch, your router or switch needs to your router or switch. D-Link ShareCenter DNS-345 User Manual 6 If you use for maximum performance. The ShareCenter will protect against sudden loss in conjunction with an uninterrupted power supply (UPS), which...
Using an Uninterrupted Power Supply (UPS): We highly recommend that you are connecting your ShareCenter to a router or switch, your router or switch needs to your router or switch. D-Link ShareCenter DNS-345 User Manual 6 If you use for maximum performance. The ShareCenter will protect against sudden loss in conjunction with an uninterrupted power supply (UPS), which...

Manual
Page 12
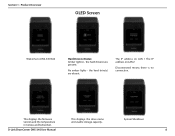
..., hard disk information, IP address information for both LAN ports, firmware version, temperature, and hard drive modes. Refer to insert or remove your hard drive(s). D-Link ShareCenter DNS-345 User Manual 7 Unhook the front panel to the next page. Press once to power on the rear of the... up. With the front cover off, SATA hard drives can be slid in and out of its connector and tray. Use the tabs on the ShareCenter or confirm USB Backup functions. Press and hold the button until the OLED screen displays "Shutdown System" to scroll between various modes or cancel USB...
..., hard disk information, IP address information for both LAN ports, firmware version, temperature, and hard drive modes. Refer to insert or remove your hard drive(s). D-Link ShareCenter DNS-345 User Manual 7 Unhook the front panel to the next page. Press once to power on the rear of the... up. With the front cover off, SATA hard drives can be slid in and out of its connector and tray. Use the tabs on the ShareCenter or confirm USB Backup functions. Press and hold the button until the OLED screen displays "Shutdown System" to scroll between various modes or cancel USB...
Manual
Page 13
This displays the firmware version and the temperature in Celsius and Fahrenheit. This displays the drive name and usable storage capacity. Product Overview OLED Screen Welcome to DNS-345 NAS Hard Drive(s) Status: Amber light(s) - The IP address on LAN 1 The IP address on LAN 2 Disconnected means there is no connection. the hard drive(s) are absent. System Shutdown D-Link ShareCenter DNS-345 User Manual 8 the hard drive(s) are present. Section 1 - No amber lights -
This displays the firmware version and the temperature in Celsius and Fahrenheit. This displays the drive name and usable storage capacity. Product Overview OLED Screen Welcome to DNS-345 NAS Hard Drive(s) Status: Amber light(s) - The IP address on LAN 1 The IP address on LAN 2 Disconnected means there is no connection. the hard drive(s) are absent. System Shutdown D-Link ShareCenter DNS-345 User Manual 8 the hard drive(s) are present. Section 1 - No amber lights -

Manual
Page 14
Section 1 - Product Overview Backup from NAS to USB Backups are complete Enter Backup Mode D-Link ShareCenter DNS-345 User Manual 9
Section 1 - Product Overview Backup from NAS to USB Backups are complete Enter Backup Mode D-Link ShareCenter DNS-345 User Manual 9

Manual
Page 15
... and will blink during data transmission. A single USB 2.0 (Type A) connector. The USB Host port is off when connected to . D-Link ShareCenter DNS-345 User Manual 10 Use the Gigabit Ethernet ports to connect the ShareCenter to the receptacle. Each port is used to eject the HDD drive . Dual LANs support Port Bonding. Connect the supplied...
... and will blink during data transmission. A single USB 2.0 (Type A) connector. The USB Host port is off when connected to . D-Link ShareCenter DNS-345 User Manual 10 Use the Gigabit Ethernet ports to connect the ShareCenter to the receptacle. Each port is used to eject the HDD drive . Dual LANs support Port Bonding. Connect the supplied...
Manual
Page 16
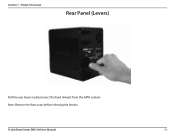
Product Overview Rear Panel (Levers) Pull the rear levers to disconnect the hard drive(s) from the SATA sockets. D-Link ShareCenter DNS-345 User Manual 11 Note: Remove the front cover before releasing the latches. Section 1 -
Product Overview Rear Panel (Levers) Pull the rear levers to disconnect the hard drive(s) from the SATA sockets. D-Link ShareCenter DNS-345 User Manual 11 Note: Remove the front cover before releasing the latches. Section 1 -
Manual
Page 17
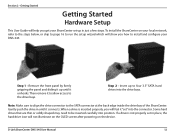
...properly set up until it "set" into the connector. If a drive is inserted properly, you how to be inserted carefully into the drive bays. D-Link ShareCenter DNS-345 User Manual 12 Step 2 - Remove the front panel by firmly gripping the panel and sliding it up in just a few steps. Gently push the drive... your DNS-345. Getting Started Getting Started Hardware Setup This User Guide will help you get your local network, refer to the steps below, or skip to page 16 to run the setup wizard which will show you will not illuminate on the OLED screen after powering on your ShareCenter set...
...properly set up until it "set" into the connector. If a drive is inserted properly, you how to be inserted carefully into the drive bays. D-Link ShareCenter DNS-345 User Manual 12 Step 2 - Remove the front panel by firmly gripping the panel and sliding it up in just a few steps. Gently push the drive... your DNS-345. Getting Started Getting Started Hardware Setup This User Guide will help you get your local network, refer to the steps below, or skip to page 16 to run the setup wizard which will show you will not illuminate on the OLED screen after powering on your ShareCenter set...
Manual
Page 18
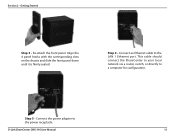
D-Link ShareCenter DNS-345 User Manual 13 Re-attach the front panel. Step 4 - Step 5 - Section 2 - Connect an Ethernet cable to the power receptacle. Connect the power adapter to the LAN 1 Ethernet port. Align the 4 panel hooks with the corresponding slots on the chassis and slide the front panel down until it is firmly seated. This cable should connect the ShareCenter to your local network via a router, switch, or directly to a computer for configuration. Getting Started Step 3 -
D-Link ShareCenter DNS-345 User Manual 13 Re-attach the front panel. Step 4 - Step 5 - Section 2 - Connect an Ethernet cable to the power receptacle. Connect the power adapter to the LAN 1 Ethernet port. Align the 4 panel hooks with the corresponding slots on the chassis and slide the front panel down until it is firmly seated. This cable should connect the ShareCenter to your local network via a router, switch, or directly to a computer for configuration. Getting Started Step 3 -
Manual
Page 19
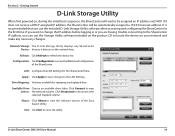
...locate the device on your network and make any ShareCenter Device: devices it does not receive a DHCP assigned IP address, the ShareCenter will wait to access theWeb based configuration of the Easy Search Utility. D-Link ShareCenter DNS-345 User Manual 14 If you use the Storage Utility... software included on , during the initial boot sequence, the ShareCenter will be assigned an IP address via DHCP. Network Storage The D-Link Storage Utility displays any necessary changes....
...locate the device on your network and make any ShareCenter Device: devices it does not receive a DHCP assigned IP address, the ShareCenter will wait to access theWeb based configuration of the Easy Search Utility. D-Link ShareCenter DNS-345 User Manual 14 If you use the Storage Utility... software included on , during the initial boot sequence, the ShareCenter will be assigned an IP address via DHCP. Network Storage The D-Link Storage Utility displays any necessary changes....
Manual
Page 20
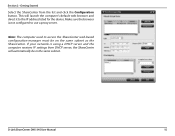
D-Link ShareCenter DNS-345 User Manual 15 Getting Started Select the ShareCenter from DHCP server, the ShareCenter will launch the computer's default web browser and direct it to the IP address listed for the device. Note: The computer used to use a proxy ... server and the computer receives IP settings from the list and click the Configuration button. This will automatically be on the same subnet as the ShareCenter. If your network is not configured to access the ShareCenter web-based configuration manager must be in the same subnet. Section 2 -
D-Link ShareCenter DNS-345 User Manual 15 Getting Started Select the ShareCenter from DHCP server, the ShareCenter will launch the computer's default web browser and direct it to the IP address listed for the device. Note: The computer used to use a proxy ... server and the computer receives IP settings from the list and click the Configuration button. This will automatically be on the same subnet as the ShareCenter. If your network is not configured to access the ShareCenter web-based configuration manager must be in the same subnet. Section 2 -

Manual
Page 21
When the autorun screen appears, click Install Note: Windows Firewall presents you with a warning message to the NAS. D-Link ShareCenter DNS-345 User Manual 16 Installation Installation Setup Wizard To run the Setup Wizard, insert the ShareCenter CD into your choice and then click the Start button. Step 2 - Select the Language of your CD-ROM drive. Step 1 - Section 3 - Click Unblock to give your computer access to unblock the device.
When the autorun screen appears, click Install Note: Windows Firewall presents you with a warning message to the NAS. D-Link ShareCenter DNS-345 User Manual 16 Installation Installation Setup Wizard To run the Setup Wizard, insert the ShareCenter CD into your choice and then click the Start button. Step 2 - Select the Language of your CD-ROM drive. Step 1 - Section 3 - Click Unblock to give your computer access to unblock the device.
