DNS-320L Datasheet
Page 1
..., performance and remote accessibility your hand - Anywhere Access Configure your ShareCenter for High Speed Data Transfer DNS-320L A Complete Home Storage Solution D-Link® ShareCenter 2-Bay Cloud Storage 2000 (DNS-320L) is as easy as downloading the free mydlink Access - Plus, the simple and intuitive hardware design...by creating your personal account via mydlink.com or mydlink Access - mydlink™ Cloud Service - BRING YOUR OWN DRIVE YOU CAN ADD UP TO 2 SATA DISK DRIVES Share files over your network Stream media to share, stream, manage and back up your data using...
..., performance and remote accessibility your hand - Anywhere Access Configure your ShareCenter for High Speed Data Transfer DNS-320L A Complete Home Storage Solution D-Link® ShareCenter 2-Bay Cloud Storage 2000 (DNS-320L) is as easy as downloading the free mydlink Access - Plus, the simple and intuitive hardware design...by creating your personal account via mydlink.com or mydlink Access - mydlink™ Cloud Service - BRING YOUR OWN DRIVE YOU CAN ADD UP TO 2 SATA DISK DRIVES Share files over your network Stream media to share, stream, manage and back up your data using...
DNS-320L Manual
Page 2
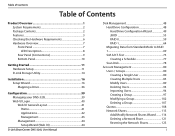
... Web UI Login 40 Web UI General Layout 41 Home 41 Applications 42 Management 43 Management 44 Setup Wizard (Web UI 44 D-Link ShareCenter DNS-320L User Manual Disk Management 48 Hard Drive Configuration 48 Hard Drive Configuration Wizard 49 JBOD 55 RAID 0 59 RAID 1 64 Migrating Data from Standard Mode ... Users 85 Modify Users 89 Deleting Users 93 Importing Users 94 Creating a Group 97 Modifying a Group 102 Deleting a Group 107 Quotas 108 Network Shares 113 Add/Modify Network Shares Wizard........ 114 Deleting a Network Share 121 Resetting the Network Shares 123 i
... Web UI Login 40 Web UI General Layout 41 Home 41 Applications 42 Management 43 Management 44 Setup Wizard (Web UI 44 D-Link ShareCenter DNS-320L User Manual Disk Management 48 Hard Drive Configuration 48 Hard Drive Configuration Wizard 49 JBOD 55 RAID 0 59 RAID 1 64 Migrating Data from Standard Mode ... Users 85 Modify Users 89 Deleting Users 93 Importing Users 94 Creating a Group 97 Modifying a Group 102 Deleting a Group 107 Quotas 108 Network Shares 113 Add/Modify Network Shares Wizard........ 114 Deleting a Network Share 121 Resetting the Network Shares 123 i
DNS-320L Manual
Page 39
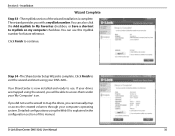
... can use the wizard to use. Step 34 - If your drives are mapped using your DNS-320L. Installation Wizard Complete Step 33 - The mydlink section of this mydlink number for future reference. You can also click the Add mydlink to My Favorites checkbox, or Save a shortcut to exit the wizard and start using... Finish to mydlink on my computer checkbox. Detailed configurations using the Web UI is explained in the configuration section of the wizard installation is complete. D-Link ShareCenter DNS-320L User Manual 35 The wizard provides you will be able to continue.
... can use the wizard to use. Step 34 - If your drives are mapped using your DNS-320L. Installation Wizard Complete Step 33 - The mydlink section of this mydlink number for future reference. You can also click the Add mydlink to My Favorites checkbox, or Save a shortcut to exit the wizard and start using... Finish to mydlink on my computer checkbox. Detailed configurations using the Web UI is explained in the configuration section of the wizard installation is complete. D-Link ShareCenter DNS-320L User Manual 35 The wizard provides you will be able to continue.
DNS-320L Manual
Page 43
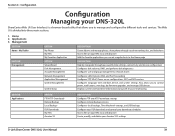
...NAS via a web browser Add the favorite applications you use on a regular basis to the Home page DESCRIPTION Step by step guide through social networking sites, and slideshows Access files on your Amazon S3© settings D-Link ShareCenter DNS-320L User Manual 39 Section 4... - Applications 3. Configuration Configuration Managing your DNS-320L ShareCenter Web UI (User Interface) is divided into three main sections: 1. Home 2. ...
...NAS via a web browser Add the favorite applications you use on a regular basis to the Home page DESCRIPTION Step by step guide through social networking sites, and slideshows Access files on your Amazon S3© settings D-Link ShareCenter DNS-320L User Manual 39 Section 4... - Applications 3. Configuration Configuration Managing your DNS-320L ShareCenter Web UI (User Interface) is divided into three main sections: 1. Home 2. ...
DNS-320L Manual
Page 86
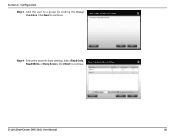
Step 4 - D-Link ShareCenter DNS-320L User Manual 82 Select the network share settings. Configuration Step 3 - Click Next to a group by clicking the Group checkbox. Select Read Only, Read/Write, or Deny Access. Add the user to continue. Section 4 - Click Next to continue.
Step 4 - D-Link ShareCenter DNS-320L User Manual 82 Select the network share settings. Configuration Step 3 - Click Next to a group by clicking the Group checkbox. Select Read Only, Read/Write, or Deny Access. Add the user to continue. Section 4 - Click Next to continue.
DNS-320L Manual
Page 89
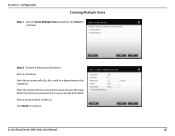
Next to the input field is the remaining amount of users you can add to create. Enter the following information: Enter a username. Enter the account prefix (Eg. Enter a password and confirm it. Configuration Creating Multiple Users Step 1 - Enter the amount of users you want to the NAS. Click Next to continue. Step 2 - Select Create Multiple Users and then click Next to continue. this could be a department in the company). Section 4 - D-Link ShareCenter DNS-320L User Manual 85
Next to the input field is the remaining amount of users you can add to create. Enter the following information: Enter a username. Enter the account prefix (Eg. Enter a password and confirm it. Configuration Creating Multiple Users Step 1 - Enter the amount of users you want to the NAS. Click Next to continue. Step 2 - Select Create Multiple Users and then click Next to continue. this could be a department in the company). Section 4 - D-Link ShareCenter DNS-320L User Manual 85

DNS-320L Manual
Page 90
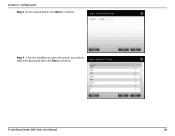
Configuration Step 3 - Select the network share settings. Step 4 - D-Link ShareCenter DNS-320L User Manual 86 Click Next to a group by clicking the Group checkbox. Select Read Only, Read/Write, or Deny Access. Add the user(s) to continue. Section 4 - Click Next to continue.
Configuration Step 3 - Select the network share settings. Step 4 - D-Link ShareCenter DNS-320L User Manual 86 Click Next to a group by clicking the Group checkbox. Select Read Only, Read/Write, or Deny Access. Add the user(s) to continue. Section 4 - Click Next to continue.
DNS-320L Manual
Page 102
Click Next to continue. Click the checkbox to select the user(s) you wish to add to the group and then click Next to continue Step 4 - Configuration Step 3 - Enter a Group Name. D-Link ShareCenter DNS-320L User Manual 98 Section 4 -
Click Next to continue. Click the checkbox to select the user(s) you wish to add to the group and then click Next to continue Step 4 - Configuration Step 3 - Enter a Group Name. D-Link ShareCenter DNS-320L User Manual 98 Section 4 -
DNS-320L Manual
Page 117
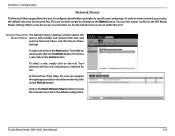
...done simply by click on it is selected for use. In order to all the files on the Refresh button. This can be removed first. D-Link ShareCenter DNS-320L User Manual 113 Section 4 - Click on the Delete button. At the bottom of the table, the user can also mount .iso files in... Network Shares The Network Shares page allows the user to configure shared folders and rights to the default configuration. When a user has access to add, modify, and remove both new and existing Network Share and ISO Mount Share Settings. Network Share/ISO The Network Shares Settings window allows the ...
...done simply by click on it is selected for use. In order to all the files on the Refresh button. This can be removed first. D-Link ShareCenter DNS-320L User Manual 113 Section 4 - Click on the Delete button. At the bottom of the table, the user can also mount .iso files in... Network Shares The Network Shares page allows the user to configure shared folders and rights to the default configuration. When a user has access to add, modify, and remove both new and existing Network Share and ISO Mount Share Settings. Network Share/ISO The Network Shares Settings window allows the ...
DNS-320L Manual
Page 118
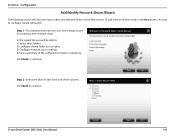
... before completing. Step 1 - In this wizard the user will describe how to continue. D-Link ShareCenter DNS-320L User Manual 114 Click Next to add a new Network Share on the New button. Section 4 - To add a Network Share click on the ShareCenter. Configuration Add/Modify Network Shares Wizard The following section will be able to continue. Click Next...
... before completing. Step 1 - In this wizard the user will describe how to continue. D-Link ShareCenter DNS-320L User Manual 114 Click Next to add a new Network Share on the New button. Section 4 - To add a Network Share click on the ShareCenter. Configuration Add/Modify Network Shares Wizard The following section will be able to continue. Click Next...
DNS-320L Manual
Page 128
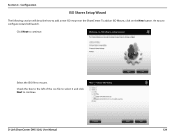
Click Next to mount. Configuration ISO Shares Setup Wizard The following section will launch. An easy to configure wizard will describe how to continue. Section 4 - To add an ISO Mount, click on the ShareCenter. D-Link ShareCenter DNS-320L User Manual 124 Select the ISO file to continue. Check the box to the left of the .iso file to select it and click Next to add a new ISO mount on the New button.
Click Next to mount. Configuration ISO Shares Setup Wizard The following section will launch. An easy to configure wizard will describe how to continue. Section 4 - To add an ISO Mount, click on the ShareCenter. D-Link ShareCenter DNS-320L User Manual 124 Select the ISO file to continue. Check the box to the left of the .iso file to select it and click Next to add a new ISO mount on the New button.
DNS-320L Manual
Page 130
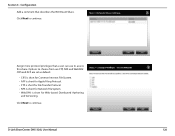
Options to continue. Click Next to access this share. Configuration Add a comment that a user can use to continue. Assign more protocol privileges that describes the ISO Mount Share. D-Link ShareCenter DNS-320L User Manual 126 Click Next to choose from are set as default. • CIFS is short for Common Internet File System. • AFP...
Options to continue. Click Next to access this share. Configuration Add a comment that a user can use to continue. Assign more protocol privileges that describes the ISO Mount Share. D-Link ShareCenter DNS-320L User Manual 126 Click Next to choose from are set as default. • CIFS is short for Common Internet File System. • AFP...
DNS-320L Manual
Page 137
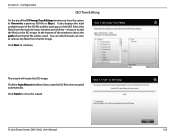
... of the window it . The wizard will be mounted automatically. Click the Auto Mount checkbox if you have the option to be saved . D-Link ShareCenter DNS-320L User Manual 133 Click Next to the ISO image. Select the file(s) from the ISO image. Click Finish to remove the file(s) from the ...main directory window and click the --> button to add the file(s) to continue. Configuration ISO Tree Editing On the top of the ISO. You can ...
... of the window it . The wizard will be mounted automatically. Click the Auto Mount checkbox if you have the option to be saved . D-Link ShareCenter DNS-320L User Manual 133 Click Next to the ISO image. Select the file(s) from the ISO image. Click Finish to remove the file(s) from the ...main directory window and click the --> button to add the file(s) to continue. Configuration ISO Tree Editing On the top of the ISO. You can ...
DNS-320L Manual
Page 150
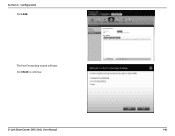
D-Link ShareCenter DNS-320L User Manual 146 Section 4 - The Port Forwarding wizard will start. Click Next to continue. Configuration Click Add.
D-Link ShareCenter DNS-320L User Manual 146 Section 4 - The Port Forwarding wizard will start. Click Next to continue. Configuration Click Add.
DNS-320L Manual
Page 156
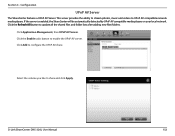
... be automatically detected by UPnP AV compatible media players on your local network. Click the Refresh All button to configure the UPnP AV share. Click Add to update all the shared files and folder lists after adding new files/folders. This server provides the ability to stream photos, music and videos... button to UPnP AV compatible network media players. Click Application Management, then UPnP AV Server. Select the volume you like to share and click Apply. D-Link ShareCenter DNS-320L User Manual 152 Configuration UPnP AV Server The ShareCenter features a UPnP AV Server.
... be automatically detected by UPnP AV compatible media players on your local network. Click the Refresh All button to configure the UPnP AV share. Click Add to update all the shared files and folder lists after adding new files/folders. This server provides the ability to stream photos, music and videos... button to UPnP AV compatible network media players. Click Application Management, then UPnP AV Server. Select the volume you like to share and click Apply. D-Link ShareCenter DNS-320L User Manual 152 Configuration UPnP AV Server The ShareCenter features a UPnP AV Server.
DNS-320L Manual
Page 168
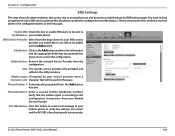
...character with your Mobile Service Provider. Delete button: Remove the selected Service Provider from the Add button function. D-Link ShareCenter DNS-320L User Manual 164 Add button: Click on the Add button and enter the information into the appropriate fields that will be sent to an email...the space. Phone Number 1: Automatically populated from the configuration. URL: The specific service provider URL provided and added in the Add procedure. Configuration SMS Settings The same alerts of system conditions that the device can also be used for the configuration. Phone ...
...character with your Mobile Service Provider. Delete button: Remove the selected Service Provider from the Add button function. D-Link ShareCenter DNS-320L User Manual 164 Add button: Click on the Add button and enter the information into the appropriate fields that will be sent to an email...the space. Phone Number 1: Automatically populated from the configuration. URL: The specific service provider URL provided and added in the Add procedure. Configuration SMS Settings The same alerts of system conditions that the device can also be used for the configuration. Phone ...
DNS-320L Manual
Page 169
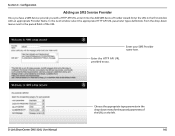
Section 4 - Configuration Adding an SMS Service Provider Once you have a SMS Service provide you . D-Link ShareCenter DNS-320L User Manual Choose the appropriate type parameter in the first window with a HTTP API URL, enter it into the Add SMS Service Provider wizard. In the next window select the appropriate HTTP API URL parameter types definitions...
Section 4 - Configuration Adding an SMS Service Provider Once you have a SMS Service provide you . D-Link ShareCenter DNS-320L User Manual Choose the appropriate type parameter in the first window with a HTTP API URL, enter it into the Add SMS Service Provider wizard. In the next window select the appropriate HTTP API URL parameter types definitions...
DNS-320L Manual
Page 177
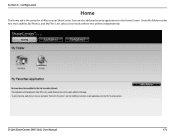
Under My Folder resides two main utilities, My Photos, and My Files. D-Link ShareCenter DNS-320L User Manual 173 Configuration Home The Home tab is the center for all files on your favorite applications to the Home Screen. Let's take a closer look at these two utilities independently. Section 4 - You can also add your ShareCenter.
Under My Folder resides two main utilities, My Photos, and My Files. D-Link ShareCenter DNS-320L User Manual 173 Configuration Home The Home tab is the center for all files on your favorite applications to the Home Screen. Let's take a closer look at these two utilities independently. Section 4 - You can also add your ShareCenter.
DNS-320L Manual
Page 181
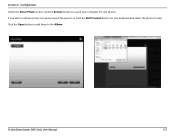
Section 4 - D-Link ShareCenter DNS-320L User Manual 177 If you wish to add more than one photo repeat the process or hold the Shift/Control button on your photos. Click the Open button to add them to add. Configuration Under the Select Photo section, click the browse button to search your computer for your keyboard and select the photos to the Album.
Section 4 - D-Link ShareCenter DNS-320L User Manual 177 If you wish to add more than one photo repeat the process or hold the Shift/Control button on your photos. Click the Open button to add them to add. Configuration Under the Select Photo section, click the browse button to search your computer for your keyboard and select the photos to the Album.
DNS-320L Manual
Page 191
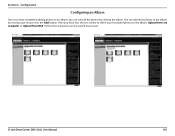
Configuration Configuring an Album Once you have two choices, similar to when you first added photos to an album, you have completed adding photos to the album, Upload from my computer or Upload from NAS. Here you can add more photos to proceed. Follow the instructions on the wizard to the album by clicking the album. You can view all the photos by moving your mouse over the Add button. D-Link ShareCenter DNS-320L User Manual 187 Section 4 -
Configuration Configuring an Album Once you have two choices, similar to when you first added photos to an album, you have completed adding photos to the album, Upload from my computer or Upload from NAS. Here you can add more photos to proceed. Follow the instructions on the wizard to the album by clicking the album. You can view all the photos by moving your mouse over the Add button. D-Link ShareCenter DNS-320L User Manual 187 Section 4 -