DNS-320L Manual
Page 1
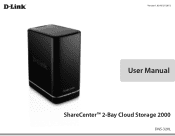
Version 1.0 | 06/21/2012 User Manual ShareCenter™ 2-Bay Cloud Storage 2000 DNS-320L
Version 1.0 | 06/21/2012 User Manual ShareCenter™ 2-Bay Cloud Storage 2000 DNS-320L
DNS-320L Manual
Page 2
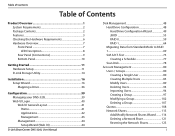
... Web UI Login 40 Web UI General Layout 41 Home 41 Applications 42 Management 43 Management 44 Setup Wizard (Web UI 44 D-Link ShareCenter DNS-320L User Manual Disk Management 48 Hard Drive Configuration 48 Hard Drive Configuration Wizard 49 JBOD 55 RAID 0 59 RAID 1 64 Migrating Data from Standard Mode to RAID 1 ...
... Web UI Login 40 Web UI General Layout 41 Home 41 Applications 42 Management 43 Management 44 Setup Wizard (Web UI 44 D-Link ShareCenter DNS-320L User Manual Disk Management 48 Hard Drive Configuration 48 Hard Drive Configuration Wizard 49 JBOD 55 RAID 0 59 RAID 1 64 Migrating Data from Standard Mode to RAID 1 ...
DNS-320L Manual
Page 3
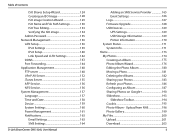
... Editing 133 Verifying the ISO image 134 Admin Password 135 Network Management 136 LAN Setup 136 IPv6 Settings 139 IPv6 Setup 140 Link Speed and LLTD Settings 142 DDNS 143 Port Forwarding 144 Application Management 148 FTP server 148 UPnP AV Server 152 iTunes Server...Language 157 Time and Date 158 Device 159 System Settings 160 Power Management 161 Notifications 163 Email Settings 163 SMS Settings 164 D-Link ShareCenter DNS-320L User Manual Adding an SMS Service Provider 165 Event Settings 166 Logs 167 Firmware Upgrade 168 USB Devices 169 UPS Settings 169 USB Storage...
... Editing 133 Verifying the ISO image 134 Admin Password 135 Network Management 136 LAN Setup 136 IPv6 Settings 139 IPv6 Setup 140 Link Speed and LLTD Settings 142 DDNS 143 Port Forwarding 144 Application Management 148 FTP server 148 UPnP AV Server 152 iTunes Server...Language 157 Time and Date 158 Device 159 System Settings 160 Power Management 161 Notifications 163 Email Settings 163 SMS Settings 164 D-Link ShareCenter DNS-320L User Manual Adding an SMS Service Provider 165 Event Settings 166 Logs 167 Firmware Upgrade 168 USB Devices 169 UPS Settings 169 USB Storage...
DNS-320L Manual
Page 4
... Connectivity 246 Deleting a UPS Slave 250 USB Print Server 252 Contacting Technical Support 255 Warranty 256 Registration 261 Knowledge Base 242 What is RAID 242 D-Link ShareCenter DNS-320L User Manual iii
... Connectivity 246 Deleting a UPS Slave 250 USB Print Server 252 Contacting Technical Support 255 Warranty 256 Registration 261 Knowledge Base 242 What is RAID 242 D-Link ShareCenter DNS-320L User Manual iii
DNS-320L Manual
Page 5
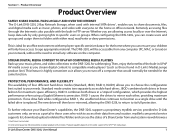
...download, upload or delete files/folders and can create users and groups and assign them to those found in linear fashion for safekeeping. Product Overview Product Overview SAFELY SHARE DIGITAL FILES LOCALLY AND OVER THE INTERNET The D-Link DNS-320L 2-Bay Network Storage, when used with employee-specific ... guarantee full compatibility or proper playback with everyone on the codec support of the UPnP™ AV media player. D-Link ShareCenter DNS-320L User Manual 1 STREAM DIGITAL MEDIA CONTENT TO UPnP AV COMPATIBLE MEDIA PLAYERS Back up your network, without the need to function as ...
...download, upload or delete files/folders and can create users and groups and assign them to those found in linear fashion for safekeeping. Product Overview Product Overview SAFELY SHARE DIGITAL FILES LOCALLY AND OVER THE INTERNET The D-Link DNS-320L 2-Bay Network Storage, when used with employee-specific ... guarantee full compatibility or proper playback with everyone on the codec support of the UPnP™ AV media player. D-Link ShareCenter DNS-320L User Manual 1 STREAM DIGITAL MEDIA CONTENT TO UPnP AV COMPATIBLE MEDIA PLAYERS Back up your network, without the need to function as ...
DNS-320L Manual
Page 6
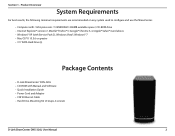
... (with Service Pack 2), Windows Vista®, Windows® 7 • Mac OS® X 10.5.6 or greater • 3.5" SATA Hard Drive(s) Package Contents • D-Link ShareCenter™ DNS-320L • CD-ROM with Manual and Software • Quick Installation Guide • Power Cord and Adapter • CAT5 Ethernet Cable • Hard Drive Mounting Kit (2 straps, 4 screws...
... (with Service Pack 2), Windows Vista®, Windows® 7 • Mac OS® X 10.5.6 or greater • 3.5" SATA Hard Drive(s) Package Contents • D-Link ShareCenter™ DNS-320L • CD-ROM with Manual and Software • Quick Installation Guide • Power Cord and Adapter • CAT5 Ethernet Cable • Hard Drive Mounting Kit (2 straps, 4 screws...
DNS-320L Manual
Page 7
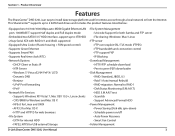
...Disk idle spin-down) • Schedule power on/off • Auto Power Recovery • Smart Fan Control • Folder Management D-Link ShareCenter DNS-320L User Manual 3 This ShareCenter™ supports up to 2 SATA hard drives and includes the product features listed below: • Equipped one 10/100... download • Peer to peer (P2P) downloader • Disk Management • RAID: Standard, JBOD, 0,1 • Raid 1 Auto/manual Rebuild • RAID migration: Normal to install data storage platform used for remote access through a local network or from the Internet. Section 1 -
...Disk idle spin-down) • Schedule power on/off • Auto Power Recovery • Smart Fan Control • Folder Management D-Link ShareCenter DNS-320L User Manual 3 This ShareCenter™ supports up to 2 SATA hard drives and includes the product features listed below: • Equipped one 10/100... download • Peer to peer (P2P) downloader • Disk Management • RAID: Standard, JBOD, 0,1 • Raid 1 Auto/manual Rebuild • RAID migration: Normal to install data storage platform used for remote access through a local network or from the Internet. Section 1 -
DNS-320L Manual
Page 8
...) - Product Overview • Share Folder Level Permission • Public Folder • Supports ISO Mount • Remote File Sharing • Web File Server (My Files) - Slideshows D-Link ShareCenter DNS-320L User Manual 4 Section 1 - Search and login to access files on the NAS using a web browser. • FTP Server • WebDAV • Smart phone access...
...) - Product Overview • Share Folder Level Permission • Public Folder • Supports ISO Mount • Remote File Sharing • Web File Server (My Files) - Slideshows D-Link ShareCenter DNS-320L User Manual 4 Section 1 - Search and login to access files on the NAS using a web browser. • FTP Server • WebDAV • Smart phone access...
DNS-320L Manual
Page 9
Table of Contents • Supports Multilingual GUI • Web Browsers Supported • Internet Explorer 7+ • Mozilla Firefox 3+ • Apple Safari 4+ • Google Chrome3+ • Opera 10+ D-Link ShareCenter DNS-320L User Manual 5
Table of Contents • Supports Multilingual GUI • Web Browsers Supported • Internet Explorer 7+ • Mozilla Firefox 3+ • Apple Safari 4+ • Google Chrome3+ • Opera 10+ D-Link ShareCenter DNS-320L User Manual 5
DNS-320L Manual
Page 10
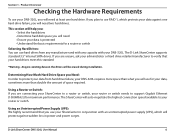
... space required. Section 1 - The D-Link ShareCenter supports standard 3.5" internal SATA drives. Using a Router or Switch: If you are connecting your ShareCenter to verify that you use hard drives from hard drive failure, your DNS-320L requires more than what you will need...during installation. Determining How Much Hard Drive Space you Need: In order to support Gigabit Ethernet (1000Mbit/s) for maximum performance. D-Link ShareCenter DNS-320L User Manual 6 This section will help you: • Select the hard drives • Determine hard disk space you will need two ...
... space required. Section 1 - The D-Link ShareCenter supports standard 3.5" internal SATA drives. Using a Router or Switch: If you are connecting your ShareCenter to verify that you use hard drives from hard drive failure, your DNS-320L requires more than what you will need...during installation. Determining How Much Hard Drive Space you Need: In order to support Gigabit Ethernet (1000Mbit/s) for maximum performance. D-Link ShareCenter DNS-320L User Manual 6 This section will help you: • Select the hard drives • Determine hard disk space you will need two ...
DNS-320L Manual
Page 11
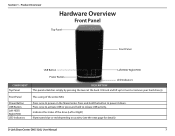
Press once to activate USB or press and hold the button to power on activity (see the next page for details) D-Link ShareCenter DNS-320L User Manual 7 Unhook and lift up to release USB activity. Press and hold to insert or remove your hard drive(s). Front Panel Power Button USB Button Left ...
Press once to activate USB or press and hold the button to power on activity (see the next page for details) D-Link ShareCenter DNS-320L User Manual 7 Unhook and lift up to release USB activity. Press and hold to insert or remove your hard drive(s). Front Panel Power Button USB Button Left ...
DNS-320L Manual
Page 12
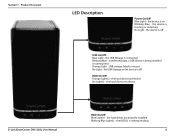
... - USB storage failed to mount No Light - the HDD(s) is booting or restarting No Light - the device is writing/reading 8 the hard drives are absent D-Link ShareCenter DNS-320L User Manual HDD On/Off: Blue Light(s) - the hard drives have failed No Light(s) - Product Overview LED Description Power On/Off: Blue Light - No USB Storage...
... - USB storage failed to mount No Light - the HDD(s) is booting or restarting No Light - the device is writing/reading 8 the hard drives are absent D-Link ShareCenter DNS-320L User Manual HDD On/Off: Blue Light(s) - the hard drives have failed No Light(s) - Product Overview LED Description Power On/Off: Blue Light - No USB Storage...
DNS-320L Manual
Page 13
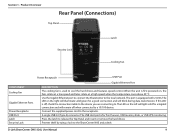
Section 1 - Use the Gigabit Ethernet port to connect the ShareCenter to . If this LED is off when connected to the ShareCenter NAS and a desk D-Link ShareCenter DNS-320L User Manual 9 When the unit is used to the receptacle. The LED on the right will illuminate solid green for Print Servers, USB memory disks, or USB ...
Section 1 - Use the Gigabit Ethernet port to connect the ShareCenter to . If this LED is off when connected to the ShareCenter NAS and a desk D-Link ShareCenter DNS-320L User Manual 9 When the unit is used to the receptacle. The LED on the right will illuminate solid green for Print Servers, USB memory disks, or USB ...

DNS-320L Manual
Page 14
Serial Number, Part Number, Manufacturer Number Press and hold this button for more than 5 seconds to reset the unit to factory defaults. Product Overview Bottom Panel Reset Button Product Details COMPONENT Product Details Reset Button DESCRIPTION Information about the product - D-Link ShareCenter DNS-320L User Manual 10 DNS-320L. Section 1 -
Serial Number, Part Number, Manufacturer Number Press and hold this button for more than 5 seconds to reset the unit to factory defaults. Product Overview Bottom Panel Reset Button Product Details COMPONENT Product Details Reset Button DESCRIPTION Information about the product - D-Link ShareCenter DNS-320L User Manual 10 DNS-320L. Section 1 -
DNS-320L Manual
Page 15
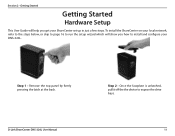
Getting Started Getting Started Hardware Setup This User Guide will show you get your DNS-320L. Once the faceplate is unlatched, pull it off the the device to install and configure your ShareCenter set up in just a few steps. Remove the top panel by firmly pressing the latch at the back. D-Link ShareCenter DNS-320L User Manual Step 2 - Step 1 - To install the ShareCenter on your local network, refer to the steps below, or skip to page 16 to run the setup wizard which will help you how to expose the drive bays. 11 Section 2 -
Getting Started Getting Started Hardware Setup This User Guide will show you get your DNS-320L. Once the faceplate is unlatched, pull it off the the device to install and configure your ShareCenter set up in just a few steps. Remove the top panel by firmly pressing the latch at the back. D-Link ShareCenter DNS-320L User Manual Step 2 - Step 1 - To install the ShareCenter on your local network, refer to the steps below, or skip to page 16 to run the setup wizard which will help you how to expose the drive bays. 11 Section 2 -
DNS-320L Manual
Page 16
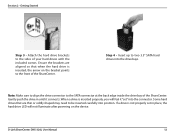
Attach the hard drive brackets to the sides of the ShareCenter. D-Link ShareCenter DNS-320L User Manual 12 Getting Started Step 3 - Insert up to the front of the ShareCenter. Some hard drives that are aligned so that when the hard drive is ...
Attach the hard drive brackets to the sides of the ShareCenter. D-Link ShareCenter DNS-320L User Manual 12 Getting Started Step 3 - Insert up to the front of the ShareCenter. Some hard drives that are aligned so that when the hard drive is ...
DNS-320L Manual
Page 17
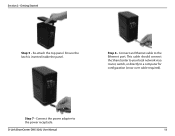
Connect the power adapter to the Ethernet port. Getting Started Step 5 - Ensure the latch is inserted inside the panel. Connect an Ethernet cable to the power receptacle. Step 6 - Step 7 - This cable should connect the ShareCenter to your local network via a router, switch, or directly to a computer for configuration (cross-over cable required). D-Link ShareCenter DNS-320L User Manual 13 Section 2 - Re-attach the top panel.
Connect the power adapter to the Ethernet port. Getting Started Step 5 - Ensure the latch is inserted inside the panel. Connect an Ethernet cable to the power receptacle. Step 6 - Step 7 - This cable should connect the ShareCenter to your local network via a router, switch, or directly to a computer for configuration (cross-over cable required). D-Link ShareCenter DNS-320L User Manual 13 Section 2 - Re-attach the top panel.
DNS-320L Manual
Page 18
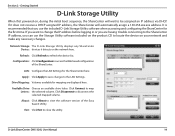
... to be assigned an IP address via DHCP. If you want to change the IP address before logging in or you can use the included D-Link Storage Utility software when accessing and configuring the ShareCenter for mapping are having trouble connecting to the ShareCenter IP address, you are displayed here. Network... changes to view the software version of the ShareCenter. Click Disconnect to refresh the device list. LAN: Configure the LAN Settings for the ShareCenter here. D-Link ShareCenter DNS-320L User Manual 14 Refresh: Click Refresh to disconnect the selected mapped volume.
... to be assigned an IP address via DHCP. If you want to change the IP address before logging in or you can use the included D-Link Storage Utility software when accessing and configuring the ShareCenter for mapping are having trouble connecting to the ShareCenter IP address, you are displayed here. Network... changes to view the software version of the ShareCenter. Click Disconnect to refresh the device list. LAN: Configure the LAN Settings for the ShareCenter here. D-Link ShareCenter DNS-320L User Manual 14 Refresh: Click Refresh to disconnect the selected mapped volume.
DNS-320L Manual
Page 19
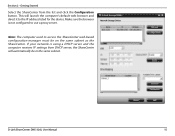
... subnet. Getting Started Select the ShareCenter from DHCP server, the ShareCenter will launch the computer's default web browser and direct it to use a proxy server. D-Link ShareCenter DNS-320L User Manual 15 If your network is not configured to the IP address listed for the device. Section 2 -
... subnet. Getting Started Select the ShareCenter from DHCP server, the ShareCenter will launch the computer's default web browser and direct it to use a proxy server. D-Link ShareCenter DNS-320L User Manual 15 If your network is not configured to the IP address listed for the device. Section 2 -
DNS-320L Manual
Page 20
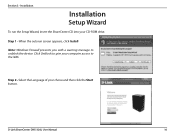
Step 1 - When the autorun screen appears, click Install Note: Windows Firewall presents you with a warning message to the NAS. Step 2 - Click Unblock to give your choice and then click the Start button. D-Link ShareCenter DNS-320L User Manual 16 Select the Language of your computer access to unblock the device. Section 3 - Installation Installation Setup Wizard To run the Setup Wizard, insert the ShareCenter CD into your CD-ROM drive.
Step 1 - When the autorun screen appears, click Install Note: Windows Firewall presents you with a warning message to the NAS. Step 2 - Click Unblock to give your choice and then click the Start button. D-Link ShareCenter DNS-320L User Manual 16 Select the Language of your computer access to unblock the device. Section 3 - Installation Installation Setup Wizard To run the Setup Wizard, insert the ShareCenter CD into your CD-ROM drive.