Product Manual
Page 20
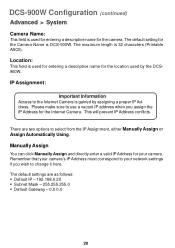
... a descriptive name for your network settings if you assign the IP Address for the Camera Name is DCS-900W. Manually Assign You can click Manually Assign and directly enter a valid IP Address for the camera. The default settings are two options to the Internet Camera is gained by the DCS900W. IP Assignment: Important Information Access to select from...
... a descriptive name for your network settings if you assign the IP Address for the Camera Name is DCS-900W. Manually Assign You can click Manually Assign and directly enter a valid IP Address for the camera. The default settings are two options to the Internet Camera is gained by the DCS900W. IP Assignment: Important Information Access to select from...
Product Manual
Page 21
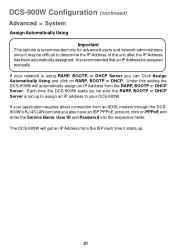
...Server is recommended that an IP Address be difficult to your DCS-900W. It is set up . 21 The DCS-900W will automatically assign an IP Address from the ISP each time it may be assigned manually. Under this setting the DCS-900W will get an IP Address from the RARP, BOOTP or DHCP... and you can Click Assign Automatically Using and click on PPPoE and enter the Service Name, User ID and Password into the respective fields. DCS-900W Configuration (continued) Advanced > System Assign Automatically Using Important This options is using RARP, BOOTP, or DHCP Server you also have an ISP ...
...Server is recommended that an IP Address be difficult to your DCS-900W. It is set up . 21 The DCS-900W will automatically assign an IP Address from the ISP each time it may be assigned manually. Under this setting the DCS-900W will get an IP Address from the RARP, BOOTP or DHCP... and you can Click Assign Automatically Using and click on PPPoE and enter the Service Name, User ID and Password into the respective fields. DCS-900W Configuration (continued) Advanced > System Assign Automatically Using Important This options is using RARP, BOOTP, or DHCP Server you also have an ISP ...
Product Manual
Page 25
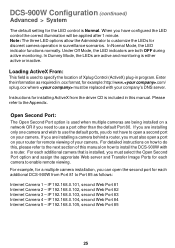
... Internet Camera 1 - Please refer to the Appendix. Open Second Port: The Open Second Port option is used when multiple cameras are being installed on how to install the DCS-900W with your camera. When you have to open a second port on your camera. In Dummy Mode, the LEDs are installing a camera ...section of this manual. For detailed instructions on how to do not have configured the LED control the correct illumination will be replaced with a router. IP 192.168.0.101, second Web Port 81 Internet Camera 2 - IP 192.168.0.104, second Web Port 84 Internet Camera 5 - If...
... Internet Camera 1 - Please refer to the Appendix. Open Second Port: The Open Second Port option is used when multiple cameras are being installed on how to install the DCS-900W with your camera. When you have to open a second port on your camera. In Dummy Mode, the LEDs are installing a camera ...section of this manual. For detailed instructions on how to do not have configured the LED control the correct illumination will be replaced with a router. IP 192.168.0.101, second Web Port 81 Internet Camera 2 - IP 192.168.0.104, second Web Port 84 Internet Camera 5 - If...
Product Manual
Page 26
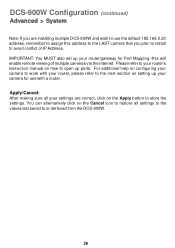
... work with your router, please refer to the next section on setting up your router's instruction manual on how to open up your settings are installing multiple DCS-900W and wish to avoid conflict of multiple cameras via the Internet. DCS-900W Configuration (continued) Advanced > System Note: If you plan to install to use with a router. Apply...
... work with your router, please refer to the next section on setting up your router's instruction manual on how to open up your settings are installing multiple DCS-900W and wish to avoid conflict of multiple cameras via the Internet. DCS-900W Configuration (continued) Advanced > System Note: If you plan to install to use with a router. Apply...

Product Manual
Page 29
... on how to forward ports. 29 If your gateway as well. Enter the desired port settings for your gateway's user's manual for image viewing. IMPORTANT: Be sure to take note of these settings since these ports are being installed on a network OR...camera in the DCS-900W ( For Installing Multiple Cameras) Opening ports will allow users to enable remote viewing. If port 80 is open a second port and designate a new Web server port (800, 801, 802,...etc) AND a new image transfer port (8482, 8483,...etc). Open a Second Port for each camera to view the camera via the Internet...
... on how to forward ports. 29 If your gateway as well. Enter the desired port settings for your gateway's user's manual for image viewing. IMPORTANT: Be sure to take note of these settings since these ports are being installed on a network OR...camera in the DCS-900W ( For Installing Multiple Cameras) Opening ports will allow users to enable remote viewing. If port 80 is open a second port and designate a new Web server port (800, 801, 802,...etc) AND a new image transfer port (8482, 8483,...etc). Open a Second Port for each camera to view the camera via the Internet...
Product Manual
Page 32
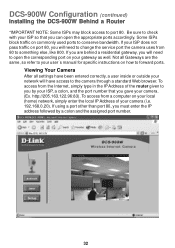
... from the Internet, simply type in the IP Address of your network will have been entered correctly, a user inside or outside your camera (i.e. 192....else, like 800. Be sure to check with your user´s manual for specific instructions on how to open the appropriate ports accordingly. If...Camera After all Gateways are behind a residential gateway, you by a colon and the assigned port number. DCS-900W Configuration (continued) Installing the DCS-900W Behind a Router *IMPORTANT NOTE: Some ISPs may block access to the camera through a standard Web browser. Viewing Your camera...
... from the Internet, simply type in the IP Address of your network will have been entered correctly, a user inside or outside your camera (i.e. 192....else, like 800. Be sure to check with your user´s manual for specific instructions on how to open the appropriate ports accordingly. If...Camera After all Gateways are behind a residential gateway, you by a colon and the assigned port number. DCS-900W Configuration (continued) Installing the DCS-900W Behind a Router *IMPORTANT NOTE: Some ISPs may block access to the camera through a standard Web browser. Viewing Your camera...

Product Manual
Page 36
...) Tools > Time The Time menu sets the DCS-900W's time and date requirements to provide correct information to users who are Synchronized with the time server information on the web. 36 Using a time server with your camera is recommended for time/date accuracy for your region of the Time Server in this...server. The NTP server IP address listed below : DateTime: Select Synchronized with Time Server and the time will be listed with Time Server or Set Manually. IP Address: Enter the IP Address of operation. The two options in the left hand panel and this field. Click on Time in the ...
...) Tools > Time The Time menu sets the DCS-900W's time and date requirements to provide correct information to users who are Synchronized with the time server information on the web. 36 Using a time server with your camera is recommended for time/date accuracy for your region of the Time Server in this...server. The NTP server IP address listed below : DateTime: Select Synchronized with Time Server and the time will be listed with Time Server or Set Manually. IP Address: Enter the IP Address of operation. The two options in the left hand panel and this field. Click on Time in the ...

Product Manual
Page 37
...the Linux time server. The system administrator must be reset manually at reboot. TimeZone: The System administrator must select the time zone for the time zone selection table. Select the time for linking with the Time Server. DCS-900W Configuration (continued) Tools > Time Protocol: Two options are ...correct, click on the Cancel icon if you do not wish to make changes to store the settings in the respective field manually.
...the Linux time server. The system administrator must be reset manually at reboot. TimeZone: The System administrator must select the time zone for the time zone selection table. Select the time for linking with the Time Server. DCS-900W Configuration (continued) Tools > Time Protocol: Two options are ...correct, click on the Cancel icon if you do not wish to make changes to store the settings in the respective field manually.

Product Manual
Page 39
... of the DCS900W will be displayed when the Location field is entered in the next section. DCS-900W Configuration (continued) Status Completing Your Camera Configuration Once the configuration is to position the DCS-900W and adjust the focus, by manually turning the lens clockwise or counter-clockwise to the desired image quality. The last step is...
... of the DCS900W will be displayed when the Location field is entered in the next section. DCS-900W Configuration (continued) Status Completing Your Camera Configuration Once the configuration is to position the DCS-900W and adjust the focus, by manually turning the lens clockwise or counter-clockwise to the desired image quality. The last step is...
Product Manual
Page 40
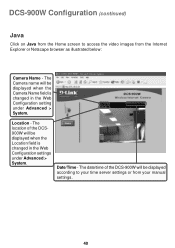
... setting under Advanced > System. The location of the DCS-900W will be displayed according to access the video images from your manual settings. 40 Date/Time - Location - DCS-900W Configuration (continued) Java Click on Java from the Home screen to your time server settings or from the Internet Explorer or Netscape browser as illustrated below: Camera Name -
... setting under Advanced > System. The location of the DCS-900W will be displayed according to access the video images from your manual settings. 40 Date/Time - Location - DCS-900W Configuration (continued) Java Click on Java from the Home screen to your time server settings or from the Internet Explorer or Netscape browser as illustrated below: Camera Name -
Product Manual
Page 50
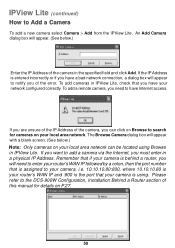
...network configured correctly. If the IP Address is assigned to the DCS-900W Configuration, Installation Behind a Router section of the camera, you can be located using . If you have your camera is behind a router, you have Internet access. Please refer to your camera, i.e. 10.10.10.80:800, where 10.10.10.80...To add a remote camera, you need to enter your router's WAN IP followed by a colon, then the port number that you are unsure of the IP Address of this manual for details on your local area network can click on Browse to add a camera via the Internet, you want to search...
...network configured correctly. If the IP Address is assigned to the DCS-900W Configuration, Installation Behind a Router section of the camera, you can be located using . If you have your camera is behind a router, you have Internet access. Please refer to your camera, i.e. 10.10.10.80:800, where 10.10.10.80...To add a remote camera, you need to enter your router's WAN IP followed by a colon, then the port number that you are unsure of the IP Address of this manual for details on your local area network can click on Browse to add a camera via the Internet, you want to search...
Product Manual
Page 57
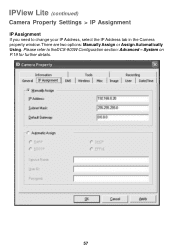
Please refer to change your IP Address, select the IP Address tab in the Camera property window. There are two options: Manually Assign or Assign Automatically Using. System on P.19 for further details. 57 IPView Lite (continued) Camera Property Settings > IP Assignment IP Assignment If you need to theDCS-900W Configuration section: Advanced -
Please refer to change your IP Address, select the IP Address tab in the Camera property window. There are two options: Manually Assign or Assign Automatically Using. System on P.19 for further details. 57 IPView Lite (continued) Camera Property Settings > IP Assignment IP Assignment If you need to theDCS-900W Configuration section: Advanced -

Product Manual
Page 62
Please refer to provide correct time information for further details. 62 IPView Lite (continued) Camera Property Settings > Date/Time Date/Time Set the camera's time and date to the DCS-900W Configuration section under Tools-Time on P.36 for remote users by selecting Synchronized with Time Server or Set Manually.
Please refer to provide correct time information for further details. 62 IPView Lite (continued) Camera Property Settings > Date/Time Date/Time Set the camera's time and date to the DCS-900W Configuration section under Tools-Time on P.36 for remote users by selecting Synchronized with Time Server or Set Manually.

Product Manual
Page 65
.... Choose Round the Clock to enable the DCS-900W to record all video frames continuously to save your hard drive. IPView Lite (continued) Camera Property Settings > Recording Recording Options Manual Recording If the Manual Recording option is chosen, you must manually start recording in the List view of the DCS-900W in the video captured and will generate...
.... Choose Round the Clock to enable the DCS-900W to record all video frames continuously to save your hard drive. IPView Lite (continued) Camera Property Settings > Recording Recording Options Manual Recording If the Manual Recording option is chosen, you must manually start recording in the List view of the DCS-900W in the video captured and will generate...

Product Manual
Page 66
The camera will generate much smaller files to save your files. Larger files will be generated if Round-the-Clock Manual Recording is no movement in the dates, Start, and Stop Times. Click Schedule Setting to record and the time period. The Dynamic Recording option ...Date and enter in the video captured and this will start to record according to the specified date and time period entered. IPView Lite (continued) Camera Property Settings > Recording Scheduled Recording Select Schedule Recording to record based on movement and less franmes if there is chosen. Select By Week to ...
The camera will generate much smaller files to save your files. Larger files will be generated if Round-the-Clock Manual Recording is no movement in the dates, Start, and Stop Times. Click Schedule Setting to record and the time period. The Dynamic Recording option ...Date and enter in the video captured and this will start to record according to the specified date and time period entered. IPView Lite (continued) Camera Property Settings > Recording Scheduled Recording Select Schedule Recording to record based on movement and less franmes if there is chosen. Select By Week to ...

Product Manual
Page 97
... product that are prepaid by the customer and shipped to D-Link Systems, Inc., 17595 Mt. Herrmann, Fountain Valley, CA 92708. D-Link may reject or return any manuals or accessories in -bound shipping charges to D-Link. What Is Not Covered: This limited warranty provided by D-Link not to be defective or non-conforming. Operational adjustments covered...
... product that are prepaid by the customer and shipped to D-Link Systems, Inc., 17595 Mt. Herrmann, Fountain Valley, CA 92708. D-Link may reject or return any manuals or accessories in -bound shipping charges to D-Link. What Is Not Covered: This limited warranty provided by D-Link not to be defective or non-conforming. Operational adjustments covered...