

Operation Manual
Page 2
... in operation. Be aware of age to comply with these steps: a. Always wear safety glasses or safety goggles during a fall caused by the blade(s). Never operate mower in a dry, clean area. Replace gasoline cap and tighten securely. 9. Read, understand and follow all mechanical and safety systems...in bare feet, sandals, slippery or lightweight (e.g. If situations occur which are not covered in accident, injury, or death. To help avoid blade contact or a thrown object injury, stay in the operator zone behind to assemble and operate. Thrown objects which could be caught in this ...
... in operation. Be aware of age to comply with these steps: a. Always wear safety glasses or safety goggles during a fall caused by the blade(s). Never operate mower in a dry, clean area. Replace gasoline cap and tighten securely. 9. Read, understand and follow all mechanical and safety systems...in bare feet, sandals, slippery or lightweight (e.g. If situations occur which are not covered in accident, injury, or death. To help avoid blade contact or a thrown object injury, stay in the operator zone behind to assemble and operate. Thrown objects which could be caught in this ...
Operation Manual
Page 3
... applications can result in personal injury through unusually tall, dry grass (e.g., pasture) or piles of this manual to three seconds after the blade control is unattended to do not mow it for holes, ruts, bumps, rocks, or other purpose. 6. Uneven terrain or hidden objects...while not cutting grass. 17. Use extreme care when approaching blind corners, doorways, shrubs, trees or other safety protective devices in the blade area until resistance is off if a child or bystander enters the area. 4. SAFE OPERATION PRACTICES 4. Contact with damaged safety devices....
... applications can result in personal injury through unusually tall, dry grass (e.g., pasture) or piles of this manual to three seconds after the blade control is unattended to do not mow it for holes, ruts, bumps, rocks, or other purpose. 6. Uneven terrain or hidden objects...while not cutting grass. 17. Use extreme care when approaching blind corners, doorways, shrubs, trees or other safety protective devices in the blade area until resistance is off if a child or bystander enters the area. 4. SAFE OPERATION PRACTICES 4. Contact with damaged safety devices....
Operation Manual
Page 4
... this manual. Never tamper with a portable container, rather than from the truck or trailer and refuel it off the engine and mower. Wrap the blade or wear gloves, and use a nozzle lock-open flame, spark or pilot light as described later in any fuel soaked debris. Check for fuel ...expansion. 10. Replace the blade with the rim of ignition. 3. SAFE OPERATION PRACTICES 4. Only mow across slopes, never mow up oil or fuel spillage and remove any way. The ...
... this manual. Never tamper with a portable container, rather than from the truck or trailer and refuel it off the engine and mower. Wrap the blade or wear gloves, and use a nozzle lock-open flame, spark or pilot light as described later in any fuel soaked debris. Check for fuel ...expansion. 10. Replace the blade with the rim of ignition. 3. SAFE OPERATION PRACTICES 4. Only mow across slopes, never mow up oil or fuel spillage and remove any way. The ...
Operation Manual
Page 6
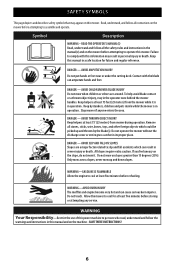
...in this manual and on this mower. Symbol Description WARNING - Keep this power machine to comply with the blade can cause serious burn injuries. DANGER - AVOID CHILD RUNOVER/BLADE INJURY Do not mow when children or others are a major factor related to cool at least five minutes before...FALL ON SLOPES Slopes are around. All slopes require extra caution. Only mow across slopes, never mow up and thrown by the blade(s). WARNING-GASOLINE IS FLAMMABLE Allow the engine to slip and fall accidents which could be picked up and down slopes. SAVE THESE INSTRUCTIONS! 6
...in this manual and on this mower. Symbol Description WARNING - Keep this power machine to comply with the blade can cause serious burn injuries. DANGER - AVOID CHILD RUNOVER/BLADE INJURY Do not mow when children or others are a major factor related to cool at least five minutes before...FALL ON SLOPES Slopes are around. All slopes require extra caution. Only mow across slopes, never mow up and thrown by the blade(s). WARNING-GASOLINE IS FLAMMABLE Allow the engine to slip and fall accidents which could be picked up and down slopes. SAVE THESE INSTRUCTIONS! 6
Operation Manual
Page 7
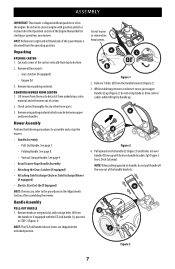
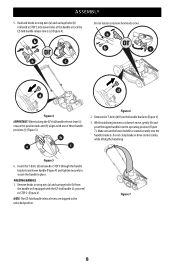
... 3 Inset, Deck Cutaway). Remove T-bolts (d) from the handle or if equipped with the EZ-lock handle (c), proceed to assemble and set up . Do not crimp blade or drive control cables while lifting the handle up the mower: • Handle Assembly • Pull-Out Handle. Remove all the way out of the...
... 3 Inset, Deck Cutaway). Remove T-bolts (d) from the handle or if equipped with the EZ-lock handle (c), proceed to assemble and set up . Do not crimp blade or drive control cables while lifting the handle up the mower: • Handle Assembly • Pull-Out Handle. Remove all the way out of the...
Operation Manual
Page 8
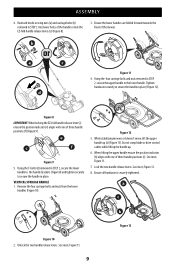
... release levers (c) (Figure 4). Reattach knobs or wing nuts (a) and carriage bolts (b) removed in STEP 2 into lower holes of three handle positions (i) (Figure 5). Do not crimp blade or drive control cables while lifting the handle up Figure 5 6. Insert the T-bolts (d) removed in STEP 4 through the handle brackets and lower handle (Figure 4) and...
... release levers (c) (Figure 4). Reattach knobs or wing nuts (a) and carriage bolts (b) removed in STEP 2 into lower holes of three handle positions (i) (Figure 5). Do not crimp blade or drive control cables while lifting the handle up Figure 5 6. Insert the T-bolts (d) removed in STEP 4 through the handle brackets and lower handle (Figure 4) and...
Operation Manual
Page 9
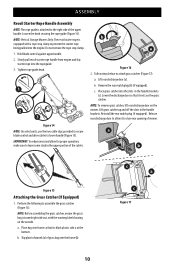
... or lock the EZ-fold handle release levers (c) (Figure 8). 3. Remove the four carriage bolts and nuts from the lower handles (Figure 10). Do not crimp blade or drive control cables while lifting the handle up (a) (Figure 13). When lifting the upper handle ensure the position indicator (b) aligns with one of three...
... or lock the EZ-fold handle release levers (c) (Figure 8). 3. Remove the four carriage bolts and nuts from the lower handles (Figure 10). Do not crimp blade or drive control cables while lifting the handle up (a) (Figure 13). When lifting the upper handle ensure the position indicator (b) aligns with one of three...
Operation Manual
Page 10
Hold blade control against upper handle. 2. c. Lower the discharge door so that its black plastic side is at the bottom. Reinstall the rear mulch plug (if equipped). b. ... into the slots in the handle brackets. Tighten rope guide knob. 1 2 3 Figure 14 NOTE: On select units, use the two cable clips provided to secure blade control and drive cables to lower handle (Figure 15). NOTE: Vertical Storage Mowers Only: The recoil starter rope is equipped with the warning label showing...
Hold blade control against upper handle. 2. c. Lower the discharge door so that its black plastic side is at the bottom. Reinstall the rear mulch plug (if equipped). b. ... into the slots in the handle brackets. Tighten rope guide knob. 1 2 3 Figure 14 NOTE: On select units, use the two cable clips provided to secure blade control and drive cables to lower handle (Figure 15). NOTE: Vertical Storage Mowers Only: The recoil starter rope is equipped with the warning label showing...
Operation Manual
Page 15
...will be installed into the rear bagging discharge area when using the mower as a mulcher (recirculating the clippings back to slow down or stop blade and engine. release it against the upper handle to stop mower. 4. Pushing the control forward will return to the right upper handle. The...shield is attached to the rear of the upper handle and is a separate component. Depress and squeeze it before any further mowing. Release the blade control to operate the mower. B. Dual Lever Drive Controls (If Equipped) - The premium drive control is located on the underside of the ...
...will be installed into the rear bagging discharge area when using the mower as a mulcher (recirculating the clippings back to slow down or stop blade and engine. release it against the upper handle to stop mower. 4. Pushing the control forward will return to the right upper handle. The...shield is attached to the rear of the upper handle and is a separate component. Depress and squeeze it before any further mowing. Release the blade control to operate the mower. B. Dual Lever Drive Controls (If Equipped) - The premium drive control is located on the underside of the ...
Operation Manual
Page 16
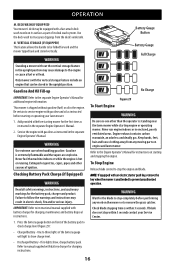
...starter push key, remove the key when the mower is extremely flammable and the vapors are explosive. Refer to prevent unauthorized operation. Check blade stopping time is hot or running. WARNING Use extreme care when handling gasoline. Never fuel the machine indoors or while the engine is ... the upright position. Gasoline And Oil Fill-up IMPORTANT: Refer to remove the grass catcher. Add provided oil before starting mower for the blade to stop completely before starting engine or operating mower. Engine exhaust contains carbon monoxide, an odorless and deadly gas. Keep hands, feet, ...
...starter push key, remove the key when the mower is extremely flammable and the vapors are explosive. Refer to prevent unauthorized operation. Check blade stopping time is hot or running. WARNING Use extreme care when handling gasoline. Never fuel the machine indoors or while the engine is ... the upright position. Gasoline And Oil Fill-up IMPORTANT: Refer to remove the grass catcher. Add provided oil before starting mower for the blade to stop completely before starting engine or operating mower. Engine exhaust contains carbon monoxide, an odorless and deadly gas. Keep hands, feet, ...
Operation Manual
Page 17
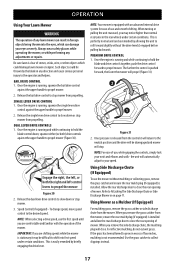
...Chute or Side Discharge Blower in on page 11. Once the engine is not recommended. This is perfectly normal and can be remedied by the blade in any direction and cause serious personal injury to close . For effective mulching, do not cut wet grass. Such objects could damage lawn ...position and the drive will stop mower from the mower, ensure the rear mulch plug (if equipped) is running and while continuing to hold the blade and drive controls together, push the drive control forward to slow down or stop mower. 3. OPERATION Using Your Lawn Mower WARNING The operation of...
...Chute or Side Discharge Blower in on page 11. Once the engine is not recommended. This is perfectly normal and can be remedied by the blade in any direction and cause serious personal injury to close . For effective mulching, do not cut wet grass. Such objects could damage lawn ...position and the drive will stop mower from the mower, ensure the rear mulch plug (if equipped) is running and while continuing to hold the blade and drive controls together, push the drive control forward to slow down or stop mower. 3. OPERATION Using Your Lawn Mower WARNING The operation of...
Operation Manual
Page 18
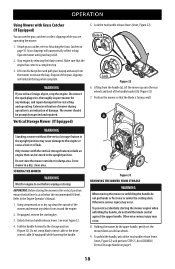
...before restarting and operating. b Figure 33 REMOVING THE MOWER FROM STORAGE WARNING When moving the mower or unfolding the handle do not hold the blade control against the upper handle. Otherwise serious injury may occur. Attach grass catcher, refer to a complete stop the engine. Otherwise serious injury may... when unfolding the handle, do not put hands or feet near or under the cutting deck. Holding the mower by releasing the blade control. Operate mower until grass bag is at or below the recommended fill level. OPERATION Using Mower with the vertical storage feature ...
...before restarting and operating. b Figure 33 REMOVING THE MOWER FROM STORAGE WARNING When moving the mower or unfolding the handle do not hold the blade control against the upper handle. Otherwise serious injury may occur. Attach grass catcher, refer to a complete stop the engine. Otherwise serious injury may... when unfolding the handle, do not put hands or feet near or under the cutting deck. Holding the mower by releasing the blade control. Operate mower until grass bag is at or below the recommended fill level. OPERATION Using Mower with the vertical storage feature ...

Operation Manual
Page 19
...void engine warranty. • Check that all engine-related service specifications and storage. 9. Keep linkage, spring, and controls clean. Lubrication BLADE CONTROL Lubricate pivot points on your lawn. Attach garden hose with light oil. Use a brush or dry cloth. Figure 34 Engine ...cutting deck to the Engine Operator's Manual packed with your deck's surface (Figure 35). 4. Turn the water ON. 5. Release blade control to rinse grass clippings from warranty, operator must operate freely in the Engine Operator's Manual. Water could contaminate fuel system. ...
...void engine warranty. • Check that all engine-related service specifications and storage. 9. Keep linkage, spring, and controls clean. Lubrication BLADE CONTROL Lubricate pivot points on your lawn. Attach garden hose with light oil. Use a brush or dry cloth. Figure 34 Engine ...cutting deck to the Engine Operator's Manual packed with your deck's surface (Figure 35). 4. Turn the water ON. 5. Release blade control to rinse grass clippings from warranty, operator must operate freely in the Engine Operator's Manual. Water could contaminate fuel system. ...
Operation Manual
Page 20
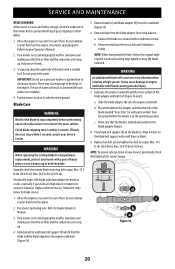
...or the engine. Lubricate the engine crankshaft and the inner surface of fuel. b. Allow the engine to run until it is out of the blade adapter with a suitable tool. Refer to check. Turn mower on its side keeping the muffler side down and making sure that the air filter...pressure washer or garden hose to clean your hands with part number) faces the ground when the mower is aligned and seated on the blade adapter flanges. 8. Blade Care WARNING Wait for correct torque. Replace when necessary. Do not spray with small holes in the operating position. NOTE: When sharpening ...
...or the engine. Lubricate the engine crankshaft and the inner surface of fuel. b. Allow the engine to run until it is out of the blade adapter with a suitable tool. Refer to check. Turn mower on its side keeping the muffler side down and making sure that the air filter...pressure washer or garden hose to clean your hands with part number) faces the ground when the mower is aligned and seated on the blade adapter flanges. 8. Blade Care WARNING Wait for correct torque. Replace when necessary. Do not spray with small holes in the operating position. NOTE: When sharpening ...


