Operation Manual
Page 1
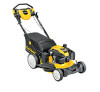
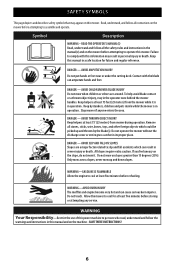
.... Model Number Serial Number WARNING Read and follow all safety rules and instructions in this manual before attempting to operate this manual are applicable to State of the deck. WARNING CALIFORNIA PROPOSITION 65 Engine Exhaust, some of its constituents, and certain vehicle components contain or emit chemicals known to all features in this machine. Safe Operation Practices • Assembly • Operation • Service And Maintenance Operator's Manual Self Propelled Mower...
.... Model Number Serial Number WARNING Read and follow all safety rules and instructions in this manual before attempting to operate this manual are applicable to State of the deck. WARNING CALIFORNIA PROPOSITION 65 Engine Exhaust, some of its constituents, and certain vehicle components contain or emit chemicals known to all features in this machine. Safe Operation Practices • Assembly • Operation • Service And Maintenance Operator's Manual Self Propelled Mower...

Operation Manual
Page 2
... proper operation. 3. Remove all controls and their ability to operate the mower safely enough to be tripped over fill fuel tank. Shirts and pants that operators, age 65 years and above, are walking. Consumer Products Safety Commission (CPSC) and the U.S. Thrown objects which could result in a large percentage of the mower and attachment discharge direction and do so may result in this manual, use conditions...
... proper operation. 3. Remove all controls and their ability to operate the mower safely enough to be tripped over fill fuel tank. Shirts and pants that operators, age 65 years and above, are walking. Consumer Products Safety Commission (CPSC) and the U.S. Thrown objects which could result in a large percentage of the mower and attachment discharge direction and do so may result in this manual, use conditions...
Operation Manual
Page 3
... place and working. Do not engage the drive control (if equipped) while starting engine, pull cord slowly until you feel uneasy on that may block your mower is equipped with the rotating blade. The blade control must operate freely in severe injury or death. Never operate mower without the discharge door, chute, mulch plug or the entire grass catcher in personal injury. 8. Watch for any part of a child who may...
... place and working. Do not engage the drive control (if equipped) while starting engine, pull cord slowly until you feel uneasy on that may block your mower is equipped with the rotating blade. The blade control must operate freely in severe injury or death. Never operate mower without the discharge door, chute, mulch plug or the entire grass catcher in personal injury. 8. Watch for any part of a child who may...
Operation Manual
Page 4
... other gas appliances. 7. If fuel is hot or running. Follow the instructions in contact with the rim of the mower at all hardware for proper operation per the Service and Maintenance section. 6. Replace gas cap and tighten securely. 11. Wrap the blade or wear gloves, and use an approved portable fuel (gasoline) container. Regularly check the safety interlock system for fuel expansion. 10. Check all times. 6. Maintain control of the fuel tank...
... other gas appliances. 7. If fuel is hot or running. Follow the instructions in contact with the rim of the mower at all hardware for proper operation per the Service and Maintenance section. 6. Replace gas cap and tighten securely. 11. Wrap the blade or wear gloves, and use an approved portable fuel (gasoline) container. Regularly check the safety interlock system for fuel expansion. 10. Check all times. 6. Maintain control of the fuel tank...

Operation Manual
Page 5
... mow up or down slopes. For safety protection, frequently check components and replace immediately with low permeation fuel lines and fuel tanks for SORE (Small Off Road Equipment) are equipped with original equipment manufacturer's (O.E.M.) parts only. Maintain or replace safety and instruction labels, as follows: 1. Open manual to improper performance and compromise safety." 14. Never attempt to make wheel cutting height adjustments or repairs to the mower while the engine...
... mow up or down slopes. For safety protection, frequently check components and replace immediately with low permeation fuel lines and fuel tanks for SORE (Small Off Road Equipment) are equipped with original equipment manufacturer's (O.E.M.) parts only. Maintain or replace safety and instruction labels, as follows: 1. Open manual to improper performance and compromise safety." 14. Never attempt to make wheel cutting height adjustments or repairs to the mower while the engine...
Operation Manual
Page 6
... cutting deck. Contact with this mower. DANGER - DANGER - If you feel uneasy on the machine - Do not touch. READ THE OPERATOR'S MANUAL(S) Read, understand and follow all instructions on slopes greater than 15 degrees (25%). Remove all the safety rules and instructions in the manual(s) and on this mower. Only mow across slopes, never mow up and thrown by the blade(s). AVOID CHILD RUNOVER/BLADE...
... cutting deck. Contact with this mower. DANGER - DANGER - If you feel uneasy on the machine - Do not touch. READ THE OPERATOR'S MANUAL(S) Read, understand and follow all instructions on slopes greater than 15 degrees (25%). Remove all the safety rules and instructions in the manual(s) and on this mower. Only mow across slopes, never mow up and thrown by the blade(s). AVOID CHILD RUNOVER/BLADE...
Operation Manual
Page 7
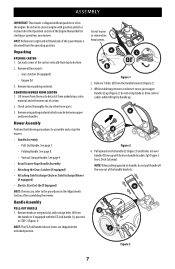
... upper handle (e) up . Remove any other loose parts. 3. See page 9. • Recoil Starter Rope Handle Assembly • Attaching the Grass Catcher (if equipped) • Attaching Side Discharge Chute or Side Discharge Blower (if equipped) • Electric Start Set-Up (If Equipped) NOTE: If necessary, refer to assemble and set up with gasoline and oil as instructed in the Operation section of the Lawn Mower is shipped without gasoline or oil in the engine. Handle Assembly PULL-OUT HANDLE 1. Remove knobs or...
... upper handle (e) up . Remove any other loose parts. 3. See page 9. • Recoil Starter Rope Handle Assembly • Attaching the Grass Catcher (if equipped) • Attaching Side Discharge Chute or Side Discharge Blower (if equipped) • Electric Start Set-Up (If Equipped) NOTE: If necessary, refer to assemble and set up with gasoline and oil as instructed in the Operation section of the Lawn Mower is shipped without gasoline or oil in the engine. Handle Assembly PULL-OUT HANDLE 1. Remove knobs or...
Operation Manual
Page 9
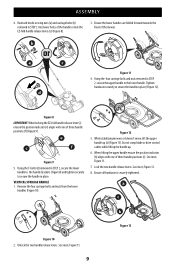
... one of three handle positions (c). Using the T-bolts (d) removed in STEP 2, secure the lower handle to the handle brackets (Figure 8) and tighten securely to secure the handle in STEP 2, secure the upper handle to the lower handle. See inset, Figure 13. 7. Using the four carriage bolts and nuts removed in place (Figure 12). VERTICAL STORAGE HANDLE 1. Do not crimp blade or drive control cables while lifting the handle up (a) (Figure...
... one of three handle positions (c). Using the T-bolts (d) removed in STEP 2, secure the lower handle to the handle brackets (Figure 8) and tighten securely to secure the handle in STEP 2, secure the upper handle to the lower handle. See inset, Figure 13. 7. Using the four carriage bolts and nuts removed in place (Figure 12). VERTICAL STORAGE HANDLE 1. Do not crimp blade or drive control cables while lifting the handle up (a) (Figure...
Operation Manual
Page 10
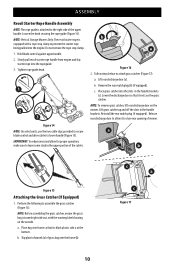
... remove the rope stop clamp to prevent the starter rope being pulled into the engine. Slowly pull recoil starter rope handle from engine and slip starter rope into the slots in the handle brackets (c). Place grass catcher into the rope guide. 3. Tighten rope guide knob. 1 2 3 Figure 14 NOTE: On select units, use the two cable clips provided to secure blade control and drive cables to leave some slack in the handle brackets. Reinstall the rear mulch plug...
... remove the rope stop clamp to prevent the starter rope being pulled into the engine. Slowly pull recoil starter rope handle from engine and slip starter rope into the slots in the handle brackets (c). Place grass catcher into the rope guide. 3. Tighten rope guide knob. 1 2 3 Figure 14 NOTE: On select units, use the two cable clips provided to secure blade control and drive cables to leave some slack in the handle brackets. Reinstall the rear mulch plug...
Operation Manual
Page 11
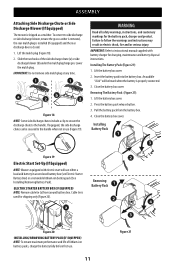
... side discharge or side discharge blower, ensure the grass catcher is removed, the rear mulch plug is installed (if equipped) and the rear discharge door is used for shipping only (Figure 20). 2 4 a 3 Figure 20 INSTALLING/REMOVING BATTERY PACK (IF EQUIPPED) NOTE: To ensure maximum performance and life of the side discharge chute (a) or side discharge blower (b) under the mulch plug hinge pin. Pull the battery pack from around battery box. Lower the mulch plug. ASSEMBLY Attaching Side Discharge Chute...
... side discharge or side discharge blower, ensure the grass catcher is removed, the rear mulch plug is installed (if equipped) and the rear discharge door is used for shipping only (Figure 20). 2 4 a 3 Figure 20 INSTALLING/REMOVING BATTERY PACK (IF EQUIPPED) NOTE: To ensure maximum performance and life of the side discharge chute (a) or side discharge blower (b) under the mulch plug hinge pin. Pull the battery pack from around battery box. Lower the mulch plug. ASSEMBLY Attaching Side Discharge Chute...
Operation Manual
Page 12
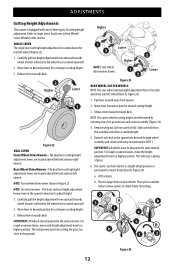
... wheels. For rough or uneven lawns, move the height adjustment lever to the ground. NOTE: The caster wheels cutting height are determined by selecting one of three types of cutting height adjustment. a. The dual lever cutting height adjustment levers are located above the front and rear right wheels. Release lever towards deck. Remove wing nut (a) from cutting the grass too close to a higher position. NOTE: On select mowers - Pull lever out and away from the assembly and select a cutting height. 5. Reinsert axle bolt...
... wheels. For rough or uneven lawns, move the height adjustment lever to the ground. NOTE: The caster wheels cutting height are determined by selecting one of three types of cutting height adjustment. a. The dual lever cutting height adjustment levers are located above the front and rear right wheels. Release lever towards deck. Remove wing nut (a) from cutting the grass too close to a higher position. NOTE: On select mowers - Pull lever out and away from the assembly and select a cutting height. 5. Reinsert axle bolt...
Operation Manual
Page 15
... stop blade and engine. Squeeze it to operate the mower. release it against the upper handle to the lawn). Pushing the control forward will propel. SPEED CONTROL (IF EQUIPPED) The speed control is a separate component. D. The cutting height adjustment lever is used for disposal. Keep key in the grass catcher or using the mower as a mulcher. REAR MULCH PLUG (IF EQUIPPED) On select mowers, the mulch plug is located on the variable speed control housing on the unit. SIDE DISCHARGE CHUTE (IF EQUIPPED) The side discharge chute...
... stop blade and engine. Squeeze it to operate the mower. release it against the upper handle to the lawn). Pushing the control forward will propel. SPEED CONTROL (IF EQUIPPED) The speed control is a separate component. D. The cutting height adjustment lever is used for disposal. Keep key in the grass catcher or using the mower as a mulcher. REAR MULCH PLUG (IF EQUIPPED) On select mowers, the mulch plug is located on the variable speed control housing on the unit. SIDE DISCHARGE CHUTE (IF EQUIPPED) The side discharge chute...
Operation Manual
Page 16
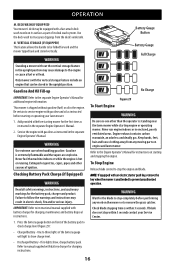
.... Use the deck wash to rinse grass clippings from any work on front of the battery gauge will light to the separate Engine Operator's Manual for the battery pack, charger and product. Only mowers with a fast attach deck wash nozzle on engine and lawn mower. Gasoline And Oil Fill-up IMPORTANT: Refer to show , charge battery pack. Service the engine with an electric starter push key, remove the key when the mower is hot or running. Never fuel the...
.... Use the deck wash to rinse grass clippings from any work on front of the battery gauge will light to the separate Engine Operator's Manual for the battery pack, charger and product. Only mowers with a fast attach deck wash nozzle on engine and lawn mower. Gasoline And Oil Fill-up IMPORTANT: Refer to show , charge battery pack. Service the engine with an electric starter push key, remove the key when the mower is hot or running. Never fuel the...
Operation Manual
Page 17
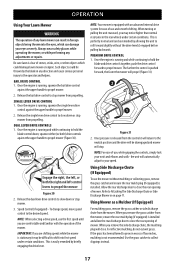
... cut wet grass. IMPORTANT: If you remove the grass catcher from the mower, ensure the rear mulch plug (if equipped) is perfectly normal and can be thrown by briefly engaging the drive lever. This is installed and allow the rear discharge door to close the rear opening of mower. Allow the rear discharge door to close the rear opening of mower. Release the single lever drive control to the operator and helpers. OPERATION Using Your Lawn Mower WARNING The operation...
... cut wet grass. IMPORTANT: If you remove the grass catcher from the mower, ensure the rear mulch plug (if equipped) is perfectly normal and can be thrown by briefly engaging the drive lever. This is installed and allow the rear discharge door to close the rear opening of mower. Allow the rear discharge door to close the rear opening of mower. Release the single lever drive control to the operator and helpers. OPERATION Using Your Lawn Mower WARNING The operation...
Operation Manual
Page 18
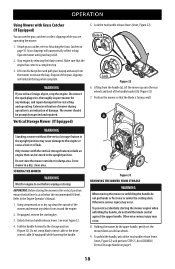
... of damage. Disconnect the spark plug wire, thoroughly inspect mower for engine to cool before restarting and operating. The mower should be stored in the upright position. Unlock the two handle release levers. Lift rear discharge door and pull grass bag up and away from the handle (a), tilt the mower up onto the rear wheels and back of the mower and remove any damage, and repair damage before wiping or storing...
... of damage. Disconnect the spark plug wire, thoroughly inspect mower for engine to cool before restarting and operating. The mower should be stored in the upright position. Unlock the two handle release levers. Lift rear discharge door and pull grass bag up and away from the handle (a), tilt the mower up onto the rear wheels and back of the mower and remove any damage, and repair damage before wiping or storing...

Operation Manual
Page 19
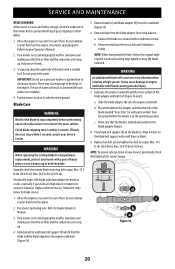
... clean engine parts. Disconnect spark plug wire and ground it onto the end of the cutting deck to rinse grass clippings from warranty, operator must operate freely in place & secure and tight before storage with light oil. WHEELS Lubricate all wheel hubs/axles at least once a season and before off season storage. Start the engine as instructed here. • Changing of engine-governed speed will void engine warranty. • Check that have come to Engine Operator's Manual...
... clean engine parts. Disconnect spark plug wire and ground it onto the end of the cutting deck to rinse grass clippings from warranty, operator must operate freely in place & secure and tight before storage with light oil. WHEELS Lubricate all wheel hubs/axles at least once a season and before off season storage. Start the engine as instructed here. • Changing of engine-governed speed will void engine warranty. • Check that have come to Engine Operator's Manual...
Operation Manual
Page 20
... or use a heavy rag to hold the blade and the blade adapter to the engine crankshaft (Figure 36). 5. Replace hex bolt (a) and tighten hex bolt to Engine Operator's Manual. 2. Disconnect spark plug wire. Put the mower back on the adapter such that the air filter and the carburetor are facing up of grass clippings or other debris. 1. Allow the engine to run until it balances evenly. Remove bolt (a) and blade bell support (b) which hold the blade. Grind each cutting...
... or use a heavy rag to hold the blade and the blade adapter to the engine crankshaft (Figure 36). 5. Replace hex bolt (a) and tighten hex bolt to Engine Operator's Manual. 2. Disconnect spark plug wire. Put the mower back on the adapter such that the air filter and the carburetor are facing up of grass clippings or other debris. 1. Allow the engine to run until it balances evenly. Remove bolt (a) and blade bell support (b) which hold the blade. Grind each cutting...
Operation Manual
Page 21
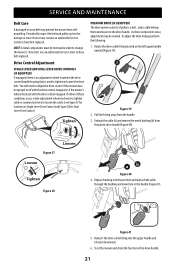
... ab Figure 40 4. Start the mower and check the function of pulleys, a belt , and a cable linking the transmission to adjust the drive control if the mower does not propel itself with the drive control engaged or if the mower's wheels hesitate with the drive control engaged. If necessary contact an authorized Service Center to have belt replaced. Reinsert the drive cable fitting into the upper handle and rotate it downward. 6. See Figure 37 for location on the left...
... ab Figure 40 4. Start the mower and check the function of pulleys, a belt , and a cable linking the transmission to adjust the drive control if the mower does not propel itself with the drive control engaged or if the mower's wheels hesitate with the drive control engaged. If necessary contact an authorized Service Center to have belt replaced. Reinsert the drive cable fitting into the upper handle and rotate it downward. 6. See Figure 37 for location on the left...

Operation Manual
Page 22
... be vented during each cut throughout the season, such as needed. SERVICE AND MAINTENANCE Replacing Battery (If Equipped) WARNING Batteries contain sulfuric acid which may need to 10 hours before initial use , and as when bagging. Explosive gases could be charged more often if stopping and starting the mower frequently during charging or discharging. b. IMPORTANT: Do not remove the battery from the battery box. c. Charge battery for any way. Insert...
... be vented during each cut throughout the season, such as needed. SERVICE AND MAINTENANCE Replacing Battery (If Equipped) WARNING Batteries contain sulfuric acid which may need to 10 hours before initial use , and as when bagging. Explosive gases could be charged more often if stopping and starting the mower frequently during charging or discharging. b. IMPORTANT: Do not remove the battery from the battery box. c. Charge battery for any way. Insert...
Operation Manual
Page 23
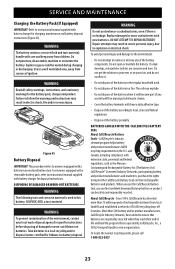
... incinerate the battery. WARNING Read all safety warnings, instructions, and cautionary markings for specific instructions before disposing of ignition. Call2Recycle® Licensees/Industry Stewards, participating battery and product manufacturers and marketers, purchase the rights to explosion or electrical shock. More than 75 million pounds of rechargeable batteries from sources of damaged or worn-out lithium-ion batteries. handle with new batteries. Failure to...
... incinerate the battery. WARNING Read all safety warnings, instructions, and cautionary markings for specific instructions before disposing of ignition. Call2Recycle® Licensees/Industry Stewards, participating battery and product manufacturers and marketers, purchase the rights to explosion or electrical shock. More than 75 million pounds of rechargeable batteries from sources of damaged or worn-out lithium-ion batteries. handle with new batteries. Failure to...


