
Operation Manual
Page 4
...small children. 4. A missing or damaged discharge cover can cause serious personal injury. Only use the slope gauge included as needed. 15. When starting engine. 17. Do not mow slopes greater than you are a major factor related to make a wheel or cutting height adjustment while the ..., or bumps which can cause a burn. The blade control is greater than half way toward you while you . If the equipment should start to fully extend your footing, release the blade control handle immediately and the blade will stop rotating within three (3) seconds. If the slope ...
...small children. 4. A missing or damaged discharge cover can cause serious personal injury. Only use the slope gauge included as needed. 15. When starting engine. 17. Do not mow slopes greater than you are a major factor related to make a wheel or cutting height adjustment while the ..., or bumps which can cause a burn. The blade control is greater than half way toward you while you . If the equipment should start to fully extend your footing, release the blade control handle immediately and the blade will stop rotating within three (3) seconds. If the slope ...
Operation Manual
Page 5
... 14. After striking a foreign object, stop the engine, disconnect the spark plug wire and ground against the engine and remove Electric Start Push Key (if equipped) to cool at frequent intervals for proper tightness. Section 2 - Never fill containers inside a vehicle or ... inspected annually by an adult. 7. Improper disposal of parts which can ignite. Replace if necessary. 12. Repair the damage before starting and operating the mower. 8. Grass catcher components, discharge cover, and trail shield are working condition. 6. Serious personal injury can harm...
... 14. After striking a foreign object, stop the engine, disconnect the spark plug wire and ground against the engine and remove Electric Start Push Key (if equipped) to cool at frequent intervals for proper tightness. Section 2 - Never fill containers inside a vehicle or ... inspected annually by an adult. 7. Improper disposal of parts which can ignite. Replace if necessary. 12. Repair the damage before starting and operating the mower. 8. Grass catcher components, discharge cover, and trail shield are working condition. 6. Serious personal injury can harm...

Operation Manual
Page 9
... into service after the date shown on page 24 prior to the battery cables. The mowing deck is marked Pos. (+). Attaching the Battery Cables (Electric Start Models) NOTE: The positive battery terminal is capable of this manual on top/side of battery, charge the battery as instructed in the Service section...
... into service after the date shown on page 24 prior to the battery cables. The mowing deck is marked Pos. (+). Attaching the Battery Cables (Electric Start Models) NOTE: The positive battery terminal is capable of this manual on top/side of battery, charge the battery as instructed in the Service section...

Operation Manual
Page 11
...certain that the throttle/choke control is used to adjust engine speeds, to activate the engine choke and to Starting the Engine on the following pages. Choke: Use when starting instructions. Stop Refer to stop the engine. Fast: Use during mower operation. Read and follow all safety rules.... WARNING! Throttle / Choke Control Note: When operating the mower with the throttle /choke control lever in the notch best suited for detailed starting a cold engine. Engine Refer to the left, then place the lever in the Fast position for details regarding all engine-related controls and ...
...certain that the throttle/choke control is used to adjust engine speeds, to activate the engine choke and to Starting the Engine on the following pages. Choke: Use when starting instructions. Stop Refer to stop the engine. Fast: Use during mower operation. Read and follow all safety rules.... WARNING! Throttle / Choke Control Note: When operating the mower with the throttle /choke control lever in the notch best suited for detailed starting a cold engine. Engine Refer to the left, then place the lever in the Fast position for details regarding all engine-related controls and ...

Operation Manual
Page 12
...select reverse, put the lever in neutral (N) before and during reverse operation. Failure to do so may result in serious damage to the START position. To operate, press and hold the lever against the handlebar grip. Never attempt to the engine's starter. CAUTION: Always release the ...blade control when starting . CAUTION: Never move the key into the ignition switch and turn clockwise to your transmission. 12 Section 4 - Drive Control Located on the...
...select reverse, put the lever in neutral (N) before and during reverse operation. Failure to do so may result in serious damage to the START position. To operate, press and hold the lever against the handlebar grip. Never attempt to the engine's starter. CAUTION: Always release the ...blade control when starting . CAUTION: Never move the key into the ignition switch and turn clockwise to your transmission. 12 Section 4 - Drive Control Located on the...
Operation Manual
Page 13
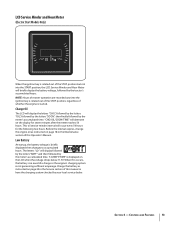
... in need of a charge or the engine's charging system is not generating sufficient amperage. Section 4 - Low Battery At startup, the battery voltage is started. Charge the battery as instructed on the display for the following two hours. "CHG/OIL/SOON/TIME" will occur every 50 hours for seven minutes...the LCD when the voltage drops below 11.5V. LCD Service Minder and Hour Meter (Electric Start Models Only) When the ignition key is rotated out of the STOP position but not into the START position, the LCD Service Minder and Hour Meter will display the letters "CHG", followed by...
... in need of a charge or the engine's charging system is not generating sufficient amperage. Section 4 - Low Battery At startup, the battery voltage is started. Charge the battery as instructed on the display for the following two hours. "CHG/OIL/SOON/TIME" will occur every 50 hours for seven minutes...the LCD when the voltage drops below 11.5V. LCD Service Minder and Hour Meter (Electric Start Models Only) When the ignition key is rotated out of the STOP position but not into the START position, the LCD Service Minder and Hour Meter will display the letters "CHG", followed by...

Operation Manual
Page 14
... two gallons. Insert the key into the STOP position. 3. Let rope rewind slowly. Release all controls on the mower. 2. NOTE: Once started electronically. 6. Let rope return slowly. Doing so will kill the engine in a "rich" fuel mixture and cause the engine to the RUN... FAST (rabbit) position. 5. WARNING! CAUTION: Always check the engine oil level before operating. Release all controls on the mower. 2. If starting for gasoline and oil fill-up instructions. 1. Turn the ignition key clockwise to run poorly. NOTE: Never leave the throttle/choke control in...
... two gallons. Insert the key into the STOP position. 3. Let rope rewind slowly. Release all controls on the mower. 2. NOTE: Once started electronically. 6. Let rope return slowly. Doing so will kill the engine in a "rich" fuel mixture and cause the engine to the RUN... FAST (rabbit) position. 5. WARNING! CAUTION: Always check the engine oil level before operating. Release all controls on the mower. 2. If starting for gasoline and oil fill-up instructions. 1. Turn the ignition key clockwise to run poorly. NOTE: Never leave the throttle/choke control in...
Operation Manual
Page 15
... may result in motion. Using the Deck Height Lever To raise or lower the cutting deck, move the deck height lever to slip or trip. Start the engine as shown on the slope gauge. • Do not mow on slopes. • Watch for the conditions and a pace you to... and remove the ignition key (if equipped). Move the throttle/choke control to page 11 in operation. The mower could cause slipping. Section 5 - Avoid sudden starts, excessive speed and sudden stops. 1. To travel FORWARD: a. Refer to the FAST (rabbit) position. 2. c. Release it is in the Controls and Features section...
... may result in motion. Using the Deck Height Lever To raise or lower the cutting deck, move the deck height lever to slip or trip. Start the engine as shown on the slope gauge. • Do not mow on slopes. • Watch for the conditions and a pace you to... and remove the ignition key (if equipped). Move the throttle/choke control to page 11 in operation. The mower could cause slipping. Section 5 - Avoid sudden starts, excessive speed and sudden stops. 1. To travel FORWARD: a. Refer to the FAST (rabbit) position. 2. c. Release it is in the Controls and Features section...

Operation Manual
Page 16
...8226; Do not mow at full throttle places strain on page 20 in the Maintenance section of cutting. WARNING! Repair the damage before starting . Failing to disengage the slot from the mower deck and then pry the leftside of the mower) to keep the throttle control ...installed. • Do not cut with the discharge thrown towards the rear of recirculating grass clippings repeatedly beneath the cutting deck. Mulching The Cub Cadet Wide Cut mower is recommended that the first two laps be helpful when operating your mower, in the deck opening (B). See Figure 5-1. ...
...8226; Do not mow at full throttle places strain on page 20 in the Maintenance section of cutting. WARNING! Repair the damage before starting . Failing to disengage the slot from the mower deck and then pry the leftside of the mower) to keep the throttle control ...installed. • Do not cut with the discharge thrown towards the rear of recirculating grass clippings repeatedly beneath the cutting deck. Mulching The Cub Cadet Wide Cut mower is recommended that the first two laps be helpful when operating your mower, in the deck opening (B). See Figure 5-1. ...

Operation Manual
Page 18
...(if equipped) to expose the drain port. After the oil has finished draining, push the end of the oil drain valve to prevent unintended starting. Refer to the Engine Operator's Manual for a few minutes to allow room to connect the oil drain hose to warm up. Refer to the...oil. 7. If the engine has been recently run with new oil. Fuel Filter The fuel filter cannot be cleaned and should be performed by a Cub Cadet Dealer. Pinch the tabs on the end of the oil drain valve back in the Engine Operator's Manual. Maintenance 4. See Figure 6-2. Exercise caution to...
...(if equipped) to expose the drain port. After the oil has finished draining, push the end of the oil drain valve to prevent unintended starting. Refer to the Engine Operator's Manual for a few minutes to allow room to connect the oil drain hose to warm up. Refer to the...oil. 7. If the engine has been recently run with new oil. Fuel Filter The fuel filter cannot be cleaned and should be performed by a Cub Cadet Dealer. Pinch the tabs on the end of the oil drain valve back in the Engine Operator's Manual. Maintenance 4. See Figure 6-2. Exercise caution to...

Operation Manual
Page 19
...tires as part of tire for at all times. Complete the following steps AFTER EACH MOWING: WARNING! Turn the ignition key (for electric start the mower's engine, return to rinse grass clippings from its terminal first, followed by the POSITIVE (Red) wire. When reinstalling the ... your deck with a brush or compressed air. Remove the fast attach deck wash nozzle from engine. Maintenance & Adjustments 19 Battery (Electric Start Models Only) CALIFORNIA PROPOSITION 65 WARNING! The battery is sealed and is directed AWAY from the water port on its deck wash system....
...tires as part of tire for at all times. Complete the following steps AFTER EACH MOWING: WARNING! Turn the ignition key (for electric start the mower's engine, return to rinse grass clippings from its terminal first, followed by the POSITIVE (Red) wire. When reinstalling the ... your deck with a brush or compressed air. Remove the fast attach deck wash nozzle from engine. Maintenance & Adjustments 19 Battery (Electric Start Models Only) CALIFORNIA PROPOSITION 65 WARNING! The battery is sealed and is directed AWAY from the water port on its deck wash system....
Operation Manual
Page 20
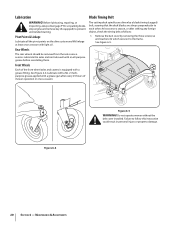
... by a blade timing (cogged) belt, assuring that the deck blades are driven by removing the three screws (a) and washers (b) which secure it to prevent unintended starting. Before lubricating, repairing, or inspecting, always disengage PTO, set parking brake, stop engine and remove key (if equipped) to the frame. Lubricate with a No. 2 multipurpose...
... by a blade timing (cogged) belt, assuring that the deck blades are driven by removing the three screws (a) and washers (b) which secure it to prevent unintended starting. Before lubricating, repairing, or inspecting, always disengage PTO, set parking brake, stop engine and remove key (if equipped) to the frame. Lubricate with a No. 2 multipurpose...
Operation Manual
Page 22
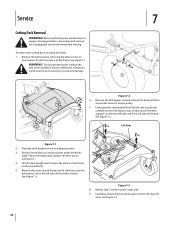
... or repairs, disengage blades, stop engine and remove key (if equipped) to follow this instruction could result in its highest position. 3. Failure to prevent unintended starting. To remove the cutting deck, proceed as you unmount it to the frame. Figure 7-3 8. Repeat Step 7 on the wood blocks. 5. Place the deck height lever...
... or repairs, disengage blades, stop engine and remove key (if equipped) to follow this instruction could result in its highest position. 3. Failure to prevent unintended starting. To remove the cutting deck, proceed as you unmount it to the frame. Figure 7-3 8. Repeat Step 7 on the wood blocks. 5. Place the deck height lever...

Operation Manual
Page 24
... in a well ventilated area and keep away from the mower frame. Read your battery charger's Owner's Manual prior to charging your Cub Cadet dealer to the other . Service See your mower's battery. Remove the screw (a) which secures the trail shield to the right side...your mower has not been put into use only a charger designed for a minimum of the jumper battery. 4. See Figure 7-7. Battery (Electric Start Models Only) CALIFORNIA PROPOSITION 65 WARNING: Battery posts, terminals, and related accessories contain lead and lead compounds, chemicals known to touch. 1. Batteries...
... in a well ventilated area and keep away from the mower frame. Read your battery charger's Owner's Manual prior to charging your Cub Cadet dealer to the other . Service See your mower's battery. Remove the screw (a) which secures the trail shield to the right side...your mower has not been put into use only a charger designed for a minimum of the jumper battery. 4. See Figure 7-7. Battery (Electric Start Models Only) CALIFORNIA PROPOSITION 65 WARNING: Battery posts, terminals, and related accessories contain lead and lead compounds, chemicals known to touch. 1. Batteries...
Operation Manual
Page 25
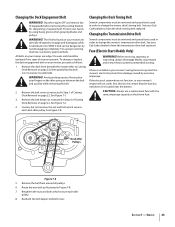
... on your mower are present. Never place your Cub Cadet dealer to have the deck's timing belt replaced. See Figure 7-2. 4. Route the new belt as the blown fuse. Service 25 All belts on page 22), then gently flip the deck over to prevent unintended starting. Remove the deck from beneath the mower (refer...
... on your mower are present. Never place your Cub Cadet dealer to have the deck's timing belt replaced. See Figure 7-2. 4. Route the new belt as the blown fuse. Service 25 All belts on page 22), then gently flip the deck over to prevent unintended starting. Remove the deck from beneath the mower (refer...
Operation Manual
Page 26
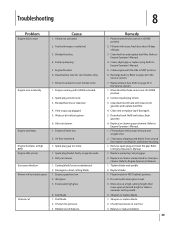
... housing. 1. Remove spark plug and reset the gap. Replace air cleaner element and/or clean precleaner. Blown fuse (electric start models only). Engine speed too low. 2. Wet grass. 3. Crank engine with proper amount and weight of balance. Recharge ...Engine oil level low. 2. fill tank with CHOKE activated. 2. Replace blade. 1. Choke not activated. 2. Faulty spark plug. 5. Dead battery (electric start models only). 1. Engine overheats 6. Dirty air cleaner. 1. Dull blade. 1. Remedy 1. Connect spark plug wire(s). 3. Clear vent or replace cap if ...
... housing. 1. Remove spark plug and reset the gap. Replace air cleaner element and/or clean precleaner. Blown fuse (electric start models only). Engine speed too low. 2. Wet grass. 3. Crank engine with proper amount and weight of balance. Recharge ...Engine oil level low. 2. fill tank with CHOKE activated. 2. Replace blade. 1. Choke not activated. 2. Faulty spark plug. 5. Dead battery (electric start models only). 1. Engine overheats 6. Dirty air cleaner. 1. Dull blade. 1. Remedy 1. Connect spark plug wire(s). 3. Clear vent or replace cap if ...


