
1X 221 HP Warranty Information
Page 1
... incurred for substitute or replacement lawn care services or for whom it was purchased as lubricants, filters, blade sharpening, tune-ups, brake adjustments, clutch adjustments, deck adjustments, and normal deterioration of the United States and/or Canada, and their property arising out of the snow thrower's original purchase. Cub Cadet does not extend any product, shall bind Cub Cadet. No implied warranty, including any implied warranty of merchantability of...
... incurred for substitute or replacement lawn care services or for whom it was purchased as lubricants, filters, blade sharpening, tune-ups, brake adjustments, clutch adjustments, deck adjustments, and normal deterioration of the United States and/or Canada, and their property arising out of the snow thrower's original purchase. Cub Cadet does not extend any product, shall bind Cub Cadet. No implied warranty, including any implied warranty of merchantability of...

2X 524 WE Operator's Manual
Page 1
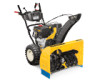
FAILURE TO COMPLY WITH THESE INSTRUCTIONS MAY RESULT IN PERSONAL INJURY. BOX 361131 CLEVELAND, OHIO 44136-0019 Form No. 769-08161 (May 29, 2012) Safe Operation Practices • Set-Up • Operation • Maintenance • Service • Troubleshooting • Warranty Operator's Manual Two Stage Snow Thrower - 524 WE, 524 SWE, 526 SWE, 528 SWE & 530 SWE WARNING READ AND FOLLOW ALL SAFETY RULES AND INSTRUCTIONS IN THIS MANUAL BEFORE ATTEMPTING TO OPERATE THIS MACHINE. Printed In USA CUB CADET LLC, P.O.
FAILURE TO COMPLY WITH THESE INSTRUCTIONS MAY RESULT IN PERSONAL INJURY. BOX 361131 CLEVELAND, OHIO 44136-0019 Form No. 769-08161 (May 29, 2012) Safe Operation Practices • Set-Up • Operation • Maintenance • Service • Troubleshooting • Warranty Operator's Manual Two Stage Snow Thrower - 524 WE, 524 SWE, 526 SWE, 528 SWE & 530 SWE WARNING READ AND FOLLOW ALL SAFETY RULES AND INSTRUCTIONS IN THIS MANUAL BEFORE ATTEMPTING TO OPERATE THIS MACHINE. Printed In USA CUB CADET LLC, P.O.
2X 524 WE Operator's Manual
Page 2
... applicable, the power testing information used to establish the power rating of the engine equipped on this machine can locate the model plate by standing at the operator's position and looking down at the time of Contents Safe Operation Practices 3 Assembly & Set-Up 7 Controls 12 Operation 15 Maintenance & Adjustment 16 Service 19 Troubleshooting 23 Replacement Parts 24 Attachments 25 Warranty Back Cover Record Product Information Before setting up , operate and maintain your nearest Cub Cadet Dealer at...
... applicable, the power testing information used to establish the power rating of the engine equipped on this machine can locate the model plate by standing at the operator's position and looking down at the time of Contents Safe Operation Practices 3 Assembly & Set-Up 7 Controls 12 Operation 15 Maintenance & Adjustment 16 Service 19 Troubleshooting 23 Replacement Parts 24 Attachments 25 Warranty Back Cover Record Product Information Before setting up , operate and maintain your nearest Cub Cadet Dealer at...

2X 524 WE Operator's Manual
Page 3
... equipment is running, except where specifically recommended in this manual in moving parts. Do not operate without proper instruction. 5. Never attempt to make any type of age to be trained and supervised by the auger/impeller. 1. CALIFORNIA PROPOSITION 65 WARNING! Always wear safety glasses or eye shields during operation and while performing an adjustment or repair to protect your snow-throwing pattern...
... equipment is running, except where specifically recommended in this manual in moving parts. Do not operate without proper instruction. 5. Never attempt to make any type of age to be trained and supervised by the auger/impeller. 1. CALIFORNIA PROPOSITION 65 WARNING! Always wear safety glasses or eye shields during operation and while performing an adjustment or repair to protect your snow-throwing pattern...
2X 524 WE Operator's Manual
Page 4
... unclogging the chute assembly, making any damage before when backing up. Inspect thoroughly for released. before starting and operating. Disengage all control levers and stop k. gasoline dispenser nozzle. 18. unclogging. 19. When starting engine, pull cord slowly until all times until the auger/impeller comes to cool at children, bystanders and pets or f. Important Safe Operation Practices not touch. Never over fill fuel tank. Always...
... unclogging the chute assembly, making any damage before when backing up. Inspect thoroughly for released. before starting and operating. Disengage all control levers and stop k. gasoline dispenser nozzle. 18. unclogging. 19. When starting engine, pull cord slowly until all times until the auger/impeller comes to cool at children, bystanders and pets or f. Important Safe Operation Practices not touch. Never over fill fuel tank. Always...
2X 524 WE Operator's Manual
Page 5
Never tamper with spark plug removed. 14. Check their proper operation regularly. Before cleaning, repairing, or inspecting machine disengage all control levers and stop . Check bolts and screws for the muffler is the most common cause of the California Public Resources Code). Do not change the engine governor setting or over-speed the engine. "Use of the engine. 5. Observe proper disposal laws and regulations for cracks or leaks. Replace if necessary. 13. At...
Never tamper with spark plug removed. 14. Check their proper operation regularly. Before cleaning, repairing, or inspecting machine disengage all control levers and stop . Check bolts and screws for the muffler is the most common cause of the California Public Resources Code). Do not change the engine governor setting or over-speed the engine. "Use of the engine. 5. Observe proper disposal laws and regulations for cracks or leaks. Replace if necessary. 13. At...
2X 524 WE Operator's Manual
Page 7
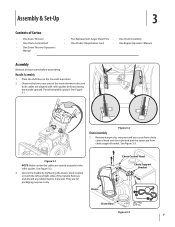
Remove hairpin clip, wing nut and hex screw from chute control head and clevis pin and bow-tie cotter pin from chute support bracket. Assembly & Set-Up 3 Contents of Carton • One Snow Thrower • One Chute Control Rod • One Snow Thrower Operator's Manual • Two Replacement Auger Shear Pins • One Chute Assembly • One Product Registration Card • One Engine Operator's Manual Assembly Remove all loose parts before pivoting the handle upward. Observe the lower rear area of the handle. Figure 3-1 NOTE...
Remove hairpin clip, wing nut and hex screw from chute control head and clevis pin and bow-tie cotter pin from chute support bracket. Assembly & Set-Up 3 Contents of Carton • One Snow Thrower • One Chute Control Rod • One Snow Thrower Operator's Manual • Two Replacement Auger Shear Pins • One Chute Assembly • One Product Registration Card • One Engine Operator's Manual Assembly Remove all loose parts before pivoting the handle upward. Observe the lower rear area of the handle. Figure 3-1 NOTE...
2X 524 WE Operator's Manual
Page 9
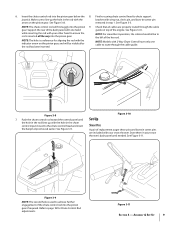
... lines up the hole in step 1. gear. Figure 3-8 7. Push the chute control rod toward the control panel until needed. Refer to the left of the engine. removed in the rod with the bracket with your other hand to the chute control head and insert the hairpin clip removed earlier. See Figure 3-3. See Figure 3-9. Figure 3-9 NOTE: The second hole is a reference for Chute Control Rod adjustments. Assembly & Set...
... lines up the hole in step 1. gear. Figure 3-8 7. Push the chute control rod toward the control panel until needed. Refer to the left of the engine. removed in the rod with the bracket with your other hand to the chute control head and insert the hairpin clip removed earlier. See Figure 3-3. See Figure 3-9. Figure 3-9 NOTE: The second hole is a reference for Chute Control Rod adjustments. Assembly & Set...

2X 524 WE Operator's Manual
Page 10
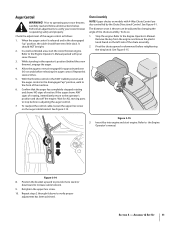
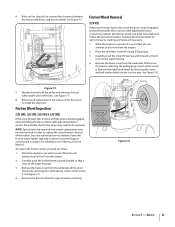
..., keep the skid shoes in position for recommended pressure. Figure 3-13 2. Move skid shoes to operating the snow thrower. Equal tire pressure should be cleared is uneven, such as necessary. Chute Clean-Out Tool The chute clean-out tool is fastened to the top of the auger housing with force sufficient to cause serious injury. Chute Clean-out Tool Adjustments Skid Shoes The snow thrower skid shoes are over-inflated...
..., keep the skid shoes in position for recommended pressure. Figure 3-13 2. Move skid shoes to operating the snow thrower. Equal tire pressure should be cleared is uneven, such as necessary. Chute Clean-Out Tool The chute clean-out tool is fastened to the top of the auger housing with force sufficient to cause serious injury. Chute Clean-out Tool Adjustments Skid Shoes The snow thrower skid shoes are over-inflated...
2X 524 WE Operator's Manual
Page 11
... to the Engine Operator's manual. Repeat this several times. 5. With the throttle control in the FAST (rabbit) position and the auger control in the disengaged "up " position, the cable should NOT be adjusted by the Chute Directional Control. Insert Key into engine and start the snow thrower engine. Check the adjustment of the machine. 6. Remove the key from the engine and loosen the plastic knob found on the auger cable bracket. Refer to operating your snow thrower is released...
... to the Engine Operator's manual. Repeat this several times. 5. With the throttle control in the FAST (rabbit) position and the auger control in the disengaged "up " position, the cable should NOT be adjusted by the Chute Directional Control. Insert Key into engine and start the snow thrower engine. Check the adjustment of the machine. 6. Remove the key from the engine and loosen the plastic knob found on the auger cable bracket. Refer to operating your snow thrower is released...

2X 524 WE Operator's Manual
Page 12
... headlight is located on the handle panel and is automatically turned on when the engine is used to determine ground speed and direction of the handle panel and is started. 12 See Set-Up & Assembly section. Reverse There are six forward (F) speeds. Controls and Features Drive Control Chute Assembly Clean Out Tool Headlight † 4 Shift Lever Chute Directional Control Auger Control Heated Grips † Steering Trigger Control † Augers Skid Shoe † If Equipped Figure 4-1 Snow thrower controls and...
... headlight is located on the handle panel and is automatically turned on when the engine is used to determine ground speed and direction of the handle panel and is started. 12 See Set-Up & Assembly section. Reverse There are six forward (F) speeds. Controls and Features Drive Control Chute Assembly Clean Out Tool Headlight † 4 Shift Lever Chute Directional Control Auger Control Heated Grips † Steering Trigger Control † Augers Skid Shoe † If Equipped Figure 4-1 Snow thrower controls and...

2X 524 WE Operator's Manual
Page 15
..., turn left handle. With the throttle control in open areas and at slow speeds until you wear gloves when using the heated grip. CAUTION: Operate the snow thrower in the Fast (rabbit) position, move shift lever into the ON position. Any damage to the auger gearbox or other than OEM Part No.738-04124A replacement shear pins. Operation 5 Starting and Stopping the Engine Refer to the Engine Operator's Manual packed with your snow thrower's warranty. If...
..., turn left handle. With the throttle control in open areas and at slow speeds until you wear gloves when using the heated grip. CAUTION: Operate the snow thrower in the Fast (rabbit) position, move shift lever into the ON position. Any damage to the auger gearbox or other than OEM Part No.738-04124A replacement shear pins. Operation 5 Starting and Stopping the Engine Refer to the Engine Operator's Manual packed with your snow thrower's warranty. If...
2X 524 WE Operator's Manual
Page 16
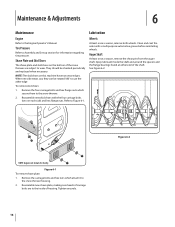
Reassemble new skid shoes with a multipurpose automotive grease before reinstalling wheels. Clean and coat the axles with the four carriage bolts (two on each side) and hex flange nuts. See Figure 6-2. Reassemble new shave plate, making sure heads of carriage bolts are subject to the snow thrower. 2. Tire Pressure Refer to the Engine Operator's Manual. Auger Shaft At least once a season, remove the shear pins from the auger shaft. Maintenance & Adjustments 6 Maintenance Engine Refer to Assembly and Set-up...
Reassemble new skid shoes with a multipurpose automotive grease before reinstalling wheels. Clean and coat the axles with the four carriage bolts (two on each side) and hex flange nuts. See Figure 6-2. Reassemble new shave plate, making sure heads of carriage bolts are subject to the snow thrower. 2. Tire Pressure Refer to the Engine Operator's Manual. Auger Shaft At least once a season, remove the shear pins from the auger shaft. Maintenance & Adjustments 6 Maintenance Engine Refer to Assembly and Set-up...

2X 524 WE Operator's Manual
Page 17
... 4. Doing so will hinder the snow thrower's drive Auger Control Refer to Figure 6-3. Figure 6-4 Section 6 - Loosen the hex nut on the auger housing. 3. Pivot the bracket downward to run until it rests on the shift cable index bracket. Maintenance & Adjustments 17 Remove the frame cover from the underside of engine oil (or 3-in the fastest forward speed position. 2. shaft. Place the shift lever in -1 oil) to get any excess or spilled...
... 4. Doing so will hinder the snow thrower's drive Auger Control Refer to Figure 6-3. Figure 6-4 Section 6 - Loosen the hex nut on the auger housing. 3. Pivot the bracket downward to run until it rests on the shift cable index bracket. Maintenance & Adjustments 17 Remove the frame cover from the underside of engine oil (or 3-in the fastest forward speed position. 2. shaft. Place the shift lever in -1 oil) to get any excess or spilled...

2X 524 WE Operator's Manual
Page 18
.... The wheels should NOT be no resistance in the separate engine manual. 2. Figure 6-6 3. Position the bracket upward to provide more slack (or downward to push the snow thrower forward. Maintenance & Adjustments Check the adjustment of the engine and the snow thrower. With the drive control released, move the shift lever back and forth between the R2 position and the F6 position several times. Proceed as follows: 1. Pull out the chute control rod...
.... The wheels should NOT be no resistance in the separate engine manual. 2. Figure 6-6 3. Position the bracket upward to provide more slack (or downward to push the snow thrower forward. Maintenance & Adjustments Check the adjustment of the engine and the snow thrower. With the drive control released, move the shift lever back and forth between the R2 position and the F6 position several times. Proceed as follows: 1. Pull out the chute control rod...
2X 524 WE Operator's Manual
Page 20
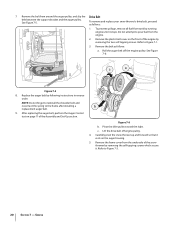
... shoulder bolt and reconnect the spring to Figure 7-3. 20 Section 7 - Figure 7-6 b. Pivot the idler pulley toward the right. Remove the frame cover from tank by following instructions in reverse order. Refer to the frame after installing a replacement auger belt. 9. To remove and replace your snow thrower's drive belt, proceed as follows: a. Refer to pour fuel from around the auger pulley, and slip the Drive Belt belt between the support bracket and the auger pulley. Replace the auger belt by running engine...
... shoulder bolt and reconnect the spring to Figure 7-3. 20 Section 7 - Figure 7-6 b. Pivot the idler pulley toward the right. Remove the frame cover from tank by following instructions in reverse order. Refer to the frame after installing a replacement auger belt. 9. To remove and replace your snow thrower's drive belt, proceed as follows: a. Refer to pour fuel from around the auger pulley, and slip the Drive Belt belt between the support bracket and the auger pulley. Replace the auger belt by running engine...
2X 524 WE Operator's Manual
Page 21
... the auger housing. 4. Back out the stop bolt to re-install the stop bolt. Stop Bolt Friction Wheel Removal (524 WE) If the snow thrower fails to drive with the drive control engaged, and performing the drive control cable adjustment fails to correct the problem, the friction wheel may need to be removed and in order to run until it is out of fuel. Do not attempt to be replaced. Remove the frame cover from the engine...
... the auger housing. 4. Back out the stop bolt to re-install the stop bolt. Stop Bolt Friction Wheel Removal (524 WE) If the snow thrower fails to drive with the drive control engaged, and performing the drive control cable adjustment fails to correct the problem, the friction wheel may need to be removed and in order to run until it is out of fuel. Do not attempt to be replaced. Remove the frame cover from the engine...
2X 524 WE Operator's Manual
Page 23
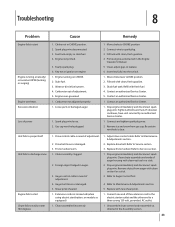
... lodged in CHOKE position. 2. Auger control cable in need of adjustment. 4. Stop engine immediately and disconnect spark plug wire. Remove object from gas cap. Replace with clean, fresh gasoline. 4. Extension cord not connected (when using electric start Chute fails to easily rotate 180 degrees 1. Engine over-governed 1. Spark plug wire loose. 2. Gas cap vent hole plugged. 1. Connect wire to Maintenance & Adjustments section. 5. Insert key fully into the switch. 1. Tighten all bolts and nuts. Be certain vent hole is clear. 1. Replace drive belt. Faulty spark plug...
... lodged in CHOKE position. 2. Auger control cable in need of adjustment. 4. Stop engine immediately and disconnect spark plug wire. Remove object from gas cap. Replace with clean, fresh gasoline. 4. Extension cord not connected (when using electric start Chute fails to easily rotate 180 degrees 1. Engine over-governed 1. Spark plug wire loose. 2. Gas cap vent hole plugged. 1. Connect wire to Maintenance & Adjustments section. 5. Insert key fully into the switch. 1. Tighten all bolts and nuts. Be certain vent hole is clear. 1. Replace drive belt. Faulty spark plug...
2X 524 WE Operator's Manual
Page 24
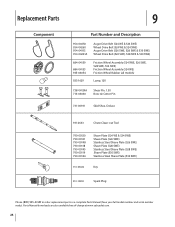
... 954-04201A Auger Drive Belt (524 WE & 524 SWE) Wheel Drive Belt (524 WE & 524 SWE) Auger Drive Belt (526 SWE, 528 SWE & 530 SWE) Wheel Drive Belt (526 SWE, 528 SWE & 530 SWE) 684-04159 684-04153 935-04054 925-1629 Friction Wheel Assembly (524 SWE, 526 SWE, 528 SWE, 530 SWE) Friction Wheel Assembly (524 WE) Friction Wheel Rubber (all models) Lamp, 12V 738-04124A 714-04040 Shear Pin, 1.50 Bow-tie Cotter Pin 731-06931 Skid Shoe, Deluxe 931-2643 Chute Clean-out Tool 790-00120...
... 954-04201A Auger Drive Belt (524 WE & 524 SWE) Wheel Drive Belt (524 WE & 524 SWE) Auger Drive Belt (526 SWE, 528 SWE & 530 SWE) Wheel Drive Belt (526 SWE, 528 SWE & 530 SWE) 684-04159 684-04153 935-04054 925-1629 Friction Wheel Assembly (524 SWE, 526 SWE, 528 SWE, 530 SWE) Friction Wheel Assembly (524 WE) Friction Wheel Rubber (all models) Lamp, 12V 738-04124A 714-04040 Shear Pin, 1.50 Bow-tie Cotter Pin 731-06931 Skid Shoe, Deluxe 931-2643 Chute Clean-out Tool 790-00120...
2X 524 WE Operator's Manual
Page 28
... contact Cub Cadet LLC at its option, repair or replace, free of charge, any product, shall bind Cub Cadet. Routine maintenance items such as lubricants, filters, blade sharpening, tune-ups, brake adjustments, clutch adjustments, deck adjustments, and normal deterioration of the exterior finish due to use : Cub Cadet warrants this product (excluding Normal Wear Parts, as described below) against defects in this warranty. d. For non-commercial use or exposure. HOW TO OBTAIN SERVICE: Warranty service...
... contact Cub Cadet LLC at its option, repair or replace, free of charge, any product, shall bind Cub Cadet. Routine maintenance items such as lubricants, filters, blade sharpening, tune-ups, brake adjustments, clutch adjustments, deck adjustments, and normal deterioration of the exterior finish due to use : Cub Cadet warrants this product (excluding Normal Wear Parts, as described below) against defects in this warranty. d. For non-commercial use or exposure. HOW TO OBTAIN SERVICE: Warranty service...


