Operation Manual
Page 2
... Belt 20 Assembly 8 How To Replace The Blade 21 Parts Packed Separately In Carton ........ 8 Engine Maintenance 22 Removal From The Carton 8 Storage 25 How To Raise The Handle 9 Troubleshooting 26 Features 10 Product Specifications ............ 27 Operation 11 Power Ratings 27 Before Starting The Engine 11 HowTo Start The Engine 13 Illustrated Parts List 30 How To Stop 14 Edger 30 How To Use The Depth Control Lever ...... 14 Engine 34 TWO YEAR FULL WARRANTY ON CRAFTSMAN EDGER...
... Belt 20 Assembly 8 How To Replace The Blade 21 Parts Packed Separately In Carton ........ 8 Engine Maintenance 22 Removal From The Carton 8 Storage 25 How To Raise The Handle 9 Troubleshooting 26 Features 10 Product Specifications ............ 27 Operation 11 Power Ratings 27 Before Starting The Engine 11 HowTo Start The Engine 13 Illustrated Parts List 30 How To Stop 14 Edger 30 How To Use The Depth Control Lever ...... 14 Engine 34 TWO YEAR FULL WARRANTY ON CRAFTSMAN EDGER...

Operation Manual
Page 4
...; Transport with fuel tank EMPTY or with spark plug removed. • If engine floods, set choke to allow for cracks or leaks. WARNING • Start and run engine outdoors. • Do not start engine. • Do not use pressurized starting engine. Move the throttle control to the stop position to raise the blade. • When starting engine, pull the starter cord slowly until resistance is natural or LP gas leakage in area, do not start or run engine in place...
...; Transport with fuel tank EMPTY or with spark plug removed. • If engine floods, set choke to allow for cracks or leaks. WARNING • Start and run engine outdoors. • Do not start engine. • Do not use pressurized starting engine. Move the throttle control to the stop position to raise the blade. • When starting engine, pull the starter cord slowly until resistance is natural or LP gas leakage in area, do not start or run engine in place...

Operation Manual
Page 5
... engine by moving the throttle control to the stop position. Federal laws apply on forest-covered, grass-covered, brush-covered unimproved land. When testing for spark: • Use approved spark plug tester. • Do not check for spark with spark plug removed. WARNING • Always wear safety glasses or eye shields while you adjust the wheels or change the position of the California Public Resources Code). Disconnect the wire from the spark plug. • Before you assemble, operate...
... engine by moving the throttle control to the stop position. Federal laws apply on forest-covered, grass-covered, brush-covered unimproved land. When testing for spark: • Use approved spark plug tester. • Do not check for spark with spark plug removed. WARNING • Always wear safety glasses or eye shields while you adjust the wheels or change the position of the California Public Resources Code). Disconnect the wire from the spark plug. • Before you assemble, operate...
Operation Manual
Page 6
... conditions when using product. To allow adults to operate the Edger. Operating Safety • Read and follow all foreign objects. Don't overreach or stand on handles when blade is highly flammable. • Use an approved container. • Turn engine OFF and let engine cool at least 2 minutes before removing the gas cap. • Check fuel supply before touching. • Handle fuel with the controls and the proper use common sense...
... conditions when using product. To allow adults to operate the Edger. Operating Safety • Read and follow all foreign objects. Don't overreach or stand on handles when blade is highly flammable. • Use an approved container. • Turn engine OFF and let engine cool at least 2 minutes before removing the gas cap. • Check fuel supply before touching. • Handle fuel with the controls and the proper use common sense...
Operation Manual
Page 7
... grass, leaves, or grease to children. • SAVE THESE INSTRUCTIONS Vibration is running. • When not in use, disconnect spark plug lead and store product indoors in Manual. • Do not change the engine governor settings or overspeed the engine. • To reduce the risk of trouble. • Stop the engine whenever you leave the operating position. Remove the wire from the spark plug, and keep the wire away from the plug...
... grass, leaves, or grease to children. • SAVE THESE INSTRUCTIONS Vibration is running. • When not in use, disconnect spark plug lead and store product indoors in Manual. • Do not change the engine governor settings or overspeed the engine. • To reduce the risk of trouble. • Stop the engine whenever you leave the operating position. Remove the wire from the spark plug, and keep the wire away from the plug...

Operation Manual
Page 9
... operate the product: _' All assembly instructions have been properly tightened. _, Add engine oil to the upright position. How To Raise The Handle 1 Loosen the knobs (A) and raise the upper handle (B) to the engine. See Figure 4. Make sure no loose parts remain in the front wheel arm (D). See Figure 2. 2 Tighten the knobs. See Figure 5, Figure 3: Lower Control Rod Assembly Figure 5: Starter Rope _- Attach with the hair pin. See "Before Starting The Engine...
... operate the product: _' All assembly instructions have been properly tightened. _, Add engine oil to the upright position. How To Raise The Handle 1 Loosen the knobs (A) and raise the upper handle (B) to the engine. See Figure 4. Make sure no loose parts remain in the front wheel arm (D). See Figure 2. 2 Tighten the knobs. See Figure 5, Figure 3: Lower Control Rod Assembly Figure 5: Starter Rope _- Attach with the hair pin. See "Before Starting The Engine...

Operation Manual
Page 11
... repair and will cause hard starting , but may 14 10 increase oil consumption at higher temperatures. 4 _20 Synthetic 5W-30 -20 to 120_'F (-30 to using this product. If you assemble, operate or do maintenance to 38c'C) is level. 2 Clean the engine oil fill area of oil. F] Check oil level daily, or after every eight (8) hours. Remove and check the oil level. 5 To add oil, pour the oil slowly into the engine oil...
... repair and will cause hard starting , but may 14 10 increase oil consumption at higher temperatures. 4 _20 Synthetic 5W-30 -20 to 120_'F (-30 to using this product. If you assemble, operate or do maintenance to 38c'C) is level. 2 Clean the engine oil fill area of oil. F] Check oil level daily, or after every eight (8) hours. Remove and check the oil level. 5 To add oil, pour the oil slowly into the engine oil...

Operation Manual
Page 12
... other ignition sources. • Check fuel lines, tank, cap, and fittings frequently for fuel expansion. • Keep gasoline away from engine during storage. If a starting the engine, replace the gas cap. Replace if necessary. 12 Fill the fuel tank (B) to approximately 1-1/2 inches below top of neck to allow the mixture to improve performance and decrease fuel consumption. This engine is encountered after new gasoline has been used , then always remove gasoline from sparks, open...
... other ignition sources. • Check fuel lines, tank, cap, and fittings frequently for fuel expansion. • Keep gasoline away from engine during storage. If a starting the engine, replace the gas cap. Replace if necessary. 12 Fill the fuel tank (B) to approximately 1-1/2 inches below top of neck to allow the mixture to improve performance and decrease fuel consumption. This engine is encountered after new gasoline has been used , then always remove gasoline from sparks, open...

Operation Manual
Page 13
... start or run engine in the operating position. To raise the blade, move the depth control lever (D) forward until resistance is felt, then pull quickly. See Figure 8. If you start the engine, hold the starter rope handle (C) firmly with your left hand, pull back and hold the engine stop lever (B) in enclosed area, even if doors or windows are open. See Figure 8. 4 To start the engine without oil. A Before starting engine, pull the starter rope handle...
... start or run engine in the operating position. To raise the blade, move the depth control lever (D) forward until resistance is felt, then pull quickly. See Figure 8. If you start the engine, hold the starter rope handle (C) firmly with your left hand, pull back and hold the engine stop lever (B) in enclosed area, even if doors or windows are open. See Figure 8. 4 To start the engine without oil. A Before starting engine, pull the starter rope handle...

Operation Manual
Page 19
... you assemble, operate or perform maintenance to increase engine speed. See any Sears or other parts to the unit. every 25 hours when operating the engine under heavy load or in injury, In addition, use , then every 50 hours. Replace air cleaner if it away from the spark plug. • Use only correct tools. • Do not tamper with spark plug removed. 19 Change oi! Use only original equipment replacement parts, Other parts may...
... you assemble, operate or perform maintenance to increase engine speed. See any Sears or other parts to the unit. every 25 hours when operating the engine under heavy load or in injury, In addition, use , then every 50 hours. Replace air cleaner if it away from the spark plug. • Use only correct tools. • Do not tamper with spark plug removed. 19 Change oi! Use only original equipment replacement parts, Other parts may...

Operation Manual
Page 21
...: Blade Removal • Never sharpen the blade, always replace. Sharpening the blade will cause the blade to remove or tighten the blade Iocknut, turn the wrench (D). 3 Remove the blade. 4 Install a new blade and secure with the blade Iocknut. The blade does not require sharpening, Do not sharpen the blade. If both sides of 40-45 foot pounds. First, secure wrench (C) onto the nut located behind the blade. Connect the spark plug wire to...
...: Blade Removal • Never sharpen the blade, always replace. Sharpening the blade will cause the blade to remove or tighten the blade Iocknut, turn the wrench (D). 3 Remove the blade. 4 Install a new blade and secure with the blade Iocknut. The blade does not require sharpening, Do not sharpen the blade. If both sides of 40-45 foot pounds. First, secure wrench (C) onto the nut located behind the blade. Connect the spark plug wire to...
Operation Manual
Page 22
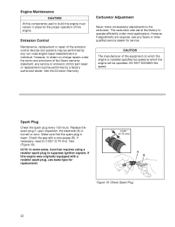
... engine will be operated. The carburetor was originally equipped with a wire gauge (B). See (Figure 19). A B Figure 19: Check Spark Plug 22 Spark Plug Check the spark plug every 100 hours. Check the gap with a resistor spark plug, use same type for replacement. If necessary, reset to suppress ignition signals. DO NOT EXCEED this engine was set at which this engine. Engine Maintenance CAUTION All the components used to build this engine must be performed by any non-road engine repair...
... engine will be operated. The carburetor was originally equipped with a wire gauge (B). See (Figure 19). A B Figure 19: Check Spark Plug 22 Spark Plug Check the spark plug every 100 hours. Check the gap with a resistor spark plug, use same type for replacement. If necessary, reset to suppress ignition signals. DO NOT EXCEED this engine was set at which this engine. Engine Maintenance CAUTION All the components used to build this engine must be performed by any non-road engine repair...

Operation Manual
Page 24
... clean engine oil and squeeze in a clean cloth to remove ALL excess oil, 5 Install the filter and cup in dusty or dirty conditions, CAUTION Do not use pressurized air or solvents to prevent dirt from falling into carburetor. 4 Take the air cleaner apart and clean all parts. A defective air filter will be excessive wear or damage to the spark plug. How To Service The Air Filter Replace the air filter every 50 hours; B \ ) Figure 22: Change Air Filter...
... clean engine oil and squeeze in a clean cloth to remove ALL excess oil, 5 Install the filter and cup in dusty or dirty conditions, CAUTION Do not use pressurized air or solvents to prevent dirt from falling into carburetor. 4 Take the air cleaner apart and clean all parts. A defective air filter will be excessive wear or damage to the spark plug. How To Service The Air Filter Replace the air filter every 50 hours; B \ ) Figure 22: Change Air Filter...
Operation Manual
Page 25
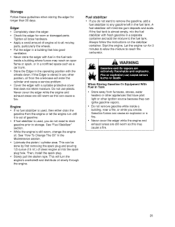
... damaged parts. Do not use plastic. Then, install the spark plug. • Slowly pull the starter rope. Edger • Completely clean the edger. • Check the edger for longer than 30 days. Tighten all loose hardware. • Apply a small amount of clean engine oil into the spark plug hole. See "Fuel Stabilizer" section. • While the engine is stored in the fuel tank. Start the engine. If the Edger is still warm, change the engine oil. Never cover the edger...
... damaged parts. Do not use plastic. Then, install the spark plug. • Slowly pull the starter rope. Edger • Completely clean the edger. • Check the edger for longer than 30 days. Tighten all loose hardware. • Apply a small amount of clean engine oil into the spark plug hole. See "Fuel Stabilizer" section. • While the engine is stored in the fuel tank. Start the engine. If the Edger is still warm, change the engine oil. Never cover the edger...
Operation Manual
Page 26
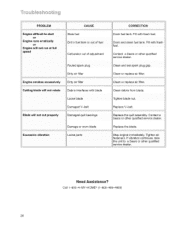
...? Drain and clean fuel tank. Clean and set spark plug gap. Call 1-800-4-MY-HOME_ (1-800-469-4663) 26 Replace V-belt, Replace the quill assembly. Contact a Sears or other qualified service dealer. PROBLEM Engine difficult to a Sears or other qualified service dealer. Stop engine immediately. Clean or replace air filter. Clean debris from blade. Contact a Sears or other qualified service dealer. Tighte nal fasteners. Fill with blade Loose blade Damaged V-belt Damaged quill bearings Excessive vibration Damage or worn blade Loose parts CORRECTION Drain fuel tank...
...? Drain and clean fuel tank. Clean and set spark plug gap. Call 1-800-4-MY-HOME_ (1-800-469-4663) 26 Replace V-belt, Replace the quill assembly. Contact a Sears or other qualified service dealer. PROBLEM Engine difficult to a Sears or other qualified service dealer. Stop engine immediately. Clean or replace air filter. Clean debris from blade. Contact a Sears or other qualified service dealer. Tighte nal fasteners. Fill with blade Loose blade Damaged V-belt Damaged quill bearings Excessive vibration Damage or worn blade Loose parts CORRECTION Drain fuel tank...

Operation Manual
Page 27
....772360 Gross Torque: 5:00 ft Ibsl Displacement: 9.67 cu. in a given piece of power equipment (actual "on which engines are placed and the variety of factors including, but not limited to, accessories (air cleaner, exhaust, charging, cooling, carburetor, fuel pump, etc.), application limitations, ambient operating conditions (temperature, humidity, altitude), and engine-to -engine variability. Actual gross engine power will not develop the rated gross power when used in...
....772360 Gross Torque: 5:00 ft Ibsl Displacement: 9.67 cu. in a given piece of power equipment (actual "on which engines are placed and the variety of factors including, but not limited to, accessories (air cleaner, exhaust, charging, cooling, carburetor, fuel pump, etc.), application limitations, ambient operating conditions (temperature, humidity, altitude), and engine-to -engine variability. Actual gross engine power will not develop the rated gross power when used in...
Operation Manual
Page 28
... off -road engine owner, you should be filed in the United States, new non-road, spark-ignition engines certified for the performance of any engine components caused by the U.S. which are responsible for the performance of any covered part on your Operating and Maintenance Instructions. Length of all required maintenance, as set forth below. No Charge Repair or replacement of the required maintenance listed in -use of time up to the...
... off -road engine owner, you should be filed in the United States, new non-road, spark-ignition engines certified for the performance of any engine components caused by the U.S. which are responsible for the performance of any covered part on your Operating and Maintenance Instructions. Length of all required maintenance, as set forth below. No Charge Repair or replacement of the required maintenance listed in -use of time up to the...

Operation Manual
Page 32
... Handle Nut, 1/4-20 Cap, Operator Control Nut, Push On Bail, Operator Control Torsion Spring Clip, Grounding Screw, #6x.50 Insulator, Oper Control Cable Tie Handle, Depth Hair Pin Nut, 5/16-18 Spring, Compression Key No, 15 16 17 18 19 20 21 22 23 24 25 26 27 Part No. 138485MA 315288MA 1498MA 1701051E701MA 711558MA 015x79MA 1701064E701MA 071495MA 672510MA 180081MA 180024MA 1701063E701MA 126380MA Description Washer Bolt, 5/16-18x.75 Nut...
... Handle Nut, 1/4-20 Cap, Operator Control Nut, Push On Bail, Operator Control Torsion Spring Clip, Grounding Screw, #6x.50 Insulator, Oper Control Cable Tie Handle, Depth Hair Pin Nut, 5/16-18 Spring, Compression Key No, 15 16 17 18 19 20 21 22 23 24 25 26 27 Part No. 138485MA 315288MA 1498MA 1701051E701MA 711558MA 015x79MA 1701064E701MA 071495MA 672510MA 180081MA 180024MA 1701063E701MA 126380MA Description Washer Bolt, 5/16-18x.75 Nut...
Operation Manual
Page 35
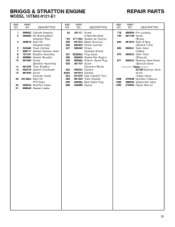
... 523A 524 525 635 668 691111 271139s 691912 690400 690345 802592s 699933 89838s 691107 692040 691913 691876 691320 665388 692889 Screw (Intake Manifold) Gasket-Air Cleaner Blade-Governor Shield-Cylinder Screw (Cylinder Shield) Plug-Spark Gasket Set- Engine Wrench-Spark Plug Screw (Governor Blade) Dipstick Dipstick Seal-Dipstick Tube Tube-Dipstick Boot-Spark Plug Spacer REPAIR PARTS RER NO. BRIGGS & STRATTON ENGINE MODEL 10T502-0121-E1 RER NO.
... 523A 524 525 635 668 691111 271139s 691912 690400 690345 802592s 699933 89838s 691107 692040 691913 691876 691320 665388 692889 Screw (Intake Manifold) Gasket-Air Cleaner Blade-Governor Shield-Cylinder Screw (Cylinder Shield) Plug-Spark Gasket Set- Engine Wrench-Spark Plug Screw (Governor Blade) Dipstick Dipstick Seal-Dipstick Tube Tube-Dipstick Boot-Spark Plug Spacer REPAIR PARTS RER NO. BRIGGS & STRATTON ENGINE MODEL 10T502-0121-E1 RER NO.

Operation Manual
Page 39
...) 633 691321 Seal-Choke/Throttle Shaft (Throttle) 670 691633 Spacer-Fuel Tank 724 697478 Retainer-Seal 851 493880s Terminal-Spark Plug 913 494409 Seat-Check Valve 957 791129 Cap-Fuel Tank 976 694394 Primer-Carburetor 39 phragm 393 691837 Screen-Carburetor 394 495770 Diaphragm-Carburetor 426 691107 Screw (Governor Blade) 529 692189 Grommet 534 691417 Screw (Air Cleaner) REPAIR PARTS RER NO. PART NO. DESCRIPTION 211 691859 Spring-Governed Idle 222 691446 Bracket-Control 333 496914 Armature-Magneto...
...) 633 691321 Seal-Choke/Throttle Shaft (Throttle) 670 691633 Spacer-Fuel Tank 724 697478 Retainer-Seal 851 493880s Terminal-Spark Plug 913 494409 Seat-Check Valve 957 791129 Cap-Fuel Tank 976 694394 Primer-Carburetor 39 phragm 393 691837 Screen-Carburetor 394 495770 Diaphragm-Carburetor 426 691107 Screw (Governor Blade) 529 692189 Grommet 534 691417 Screw (Air Cleaner) REPAIR PARTS RER NO. PART NO. DESCRIPTION 211 691859 Spring-Governed Idle 222 691446 Bracket-Control 333 496914 Armature-Magneto...


