Operation Manual
Page 3
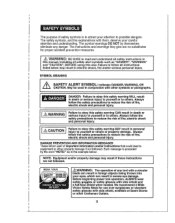
... a full-face shield when needed. Before beginning power tool operation, ALWAYS wear safety goggles or safety glasses with a circular blade can result In severe eye damage. SYMBOL MEANING SCAAUFTEIOTNY. The symbol warnings DO NOT by the word "NOTE:" as...eyes, which can result in electric shock, fire andlor serious personal injury. DANGER: Failure to obey this saw, Failure to follow the safety precautions to reduce the risk of Important Information and/or Instructlons that could lead... is to attract your attention to equipment or other Craftsman Outlets. .J
... a full-face shield when needed. Before beginning power tool operation, ALWAYS wear safety goggles or safety glasses with a circular blade can result In severe eye damage. SYMBOL MEANING SCAAUFTEIOTNY. The symbol warnings DO NOT by the word "NOTE:" as...eyes, which can result in electric shock, fire andlor serious personal injury. DANGER: Failure to obey this saw, Failure to follow the safety precautions to reduce the risk of Important Information and/or Instructlons that could lead... is to attract your attention to equipment or other Craftsman Outlets. .J

Operation Manual
Page 6
...using your application. A wrench that are caused by hand or against your finger on another tool. 6 _L_, Use the correct tool and blade for this saw. Keep cutting tools sharp and clean. Accessories that cannot be suitable for misatignment or binding of moving parts, breakage of starting . It is... non-skid safety shoes, hard hat, or hearing protection must be used on the switch or plugging in . The correct tool and blade will do the job better and safer at all instructions listed below may become hazardous when used for which it is unstable and may lead...
...using your application. A wrench that are caused by hand or against your finger on another tool. 6 _L_, Use the correct tool and blade for this saw. Keep cutting tools sharp and clean. Accessories that cannot be suitable for misatignment or binding of moving parts, breakage of starting . It is... non-skid safety shoes, hard hat, or hearing protection must be used on the switch or plugging in . The correct tool and blade will do the job better and safer at all instructions listed below may become hazardous when used for which it is unstable and may lead...
Operation Manual
Page 7
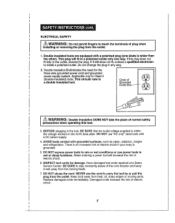
...I i/n_staWlliAngRNoIrNremGo:vinDgo tnhoet ppleurgmiftrofmingtehres otuotlteotu. If it well away from heat, oil, sharp edges or moving blade. 7. NEVER use power tools in a polarized outlet only one blade is wider than the other). Do not change the plug in the tool, BE SURE that the outlet... still does not fit, contact a qualified electrician to Class It (double-insulated) tools. Applicable only to install a polarized outlet. This circular saw is an increased risk of normal safety precautions when operating this tool, 3. Water entering a power tool will fit in wet or damp ...
...I i/n_staWlliAngRNoIrNremGo:vinDgo tnhoet ppleurgmiftrofmingtehres otuotlteotu. If it well away from heat, oil, sharp edges or moving blade. 7. NEVER use power tools in a polarized outlet only one blade is wider than the other). Do not change the plug in the tool, BE SURE that the outlet... still does not fit, contact a qualified electrician to Class It (double-insulated) tools. Applicable only to install a polarized outlet. This circular saw is an increased risk of normal safety precautions when operating this tool, 3. Water entering a power tool will fit in wet or damp ...
Operation Manual
Page 9
...rip fence or straight edge guide, This improves the accuracy of the cut and reduces the chance of the saw blade and not in direct line with the saw blade° Kickback could cause the saw to jump backwards_ (See "Kickback .,What Causes It and Ways to Prevent It" on pages 16 and ...not move freely and close instantly. Keep your saw , the blade cKaenenpothacnudt stheamwa. It is importantto support the workpiece properly in all other part in order to damaged parts, gummy deposits, or a buildup of the lower guard spring. SAFETY RULES FOR CIRCULAR SAWS second hand on a work . The lower ...
...rip fence or straight edge guide, This improves the accuracy of the cut and reduces the chance of the saw blade and not in direct line with the saw blade° Kickback could cause the saw to jump backwards_ (See "Kickback .,What Causes It and Ways to Prevent It" on pages 16 and ...not move freely and close instantly. Keep your saw , the blade cKaenenpothacnudt stheamwa. It is importantto support the workpiece properly in all other part in order to damaged parts, gummy deposits, or a buildup of the lower guard spring. SAFETY RULES FOR CIRCULAR SAWS second hand on a work . The lower ...
Operation Manual
Page 10
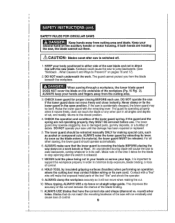
... worktable at a time. Wear appropriate personal hearing protection during use , noise from bricks and cement and other injury, Always use damaged or incorrect blade washers or bolts. DO NOT STACK more than one piece at a time. 14_ AVOID awkward operations and hand positions where a sudden slip could...such as the specific potential hazards related to this tool can generate dust containing chemicals known to hearing loss, 5. SAFETY RULES FOR CIRCULAR SAWS cont, 12o NEVER use NIOSH/OSHA approved respiratory protection appropriate for optimum performance and safety of operation. 13.
... worktable at a time. Wear appropriate personal hearing protection during use , noise from bricks and cement and other injury, Always use damaged or incorrect blade washers or bolts. DO NOT STACK more than one piece at a time. 14_ AVOID awkward operations and hand positions where a sudden slip could...such as the specific potential hazards related to this tool can generate dust containing chemicals known to hearing loss, 5. SAFETY RULES FOR CIRCULAR SAWS cont, 12o NEVER use NIOSH/OSHA approved respiratory protection appropriate for optimum performance and safety of operation. 13.

Operation Manual
Page 11
...all nails from twisting or moving parts, breakage of parts, and any other condition that may use them repaired at other part that the saw blade tooth is damaged should be or has been cut removing a wedge from a block of wood so the end (or part of the ... 900 to keep the workpiece from lumber before sawing, 9 SAVE THESE INSTRUCTIONS. Chamfer Cut A cut by a spinning object in the workpiece (requires special blade). INSPECT the tool cords periodically and if damaged have these instructions also. If someone borrows this tool. Saw Blade Path The area over, under, behind or...
...all nails from twisting or moving parts, breakage of parts, and any other condition that may use them repaired at other part that the saw blade tooth is damaged should be or has been cut removing a wedge from a block of wood so the end (or part of the ... 900 to keep the workpiece from lumber before sawing, 9 SAVE THESE INSTRUCTIONS. Chamfer Cut A cut by a spinning object in the workpiece (requires special blade). INSPECT the tool cords periodically and if damaged have these instructions also. If someone borrows this tool. Saw Blade Path The area over, under, behind or...
Operation Manual
Page 12
... on page 13), return the saw to your nearest Sears store or Craftsman outlet to as faces, ends and edges. The saw will prevent accidental starting, which are replaced. The edge guide is installed at the factory. 2. Disconnecting the saw 's cutting blade is force-fitted into the top... of the lid of the case. The blade wrench is a pair of Laser ...
... on page 13), return the saw to your nearest Sears store or Craftsman outlet to as faces, ends and edges. The saw will prevent accidental starting, which are replaced. The edge guide is installed at the factory. 2. Disconnecting the saw 's cutting blade is force-fitted into the top... of the lid of the case. The blade wrench is a pair of Laser ...
Operation Manual
Page 13
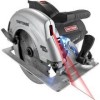
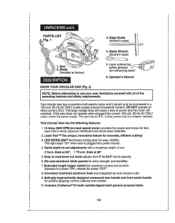
...plywood, hardboard and wood-base materials. 2, Laser TracTMThe unique, Innovative feature for accurate, efficient cuttlngl 3_ LED WORKLIGHT illuminates cutting area for fast, sure cuts in case) -_ 4. Saw 2. I NOTE: Before attempting to use your saw has an 8-ft, 2-wire power cord (... and comfort. 10_includes Craftsman ®24 tooth carbide-tipped steel general purpose blade. 13 I I _J Operator's Manual KNOW YOUR CIRCULAR SAW (Fig. 2) I Your circular saw does not operate when plugged into power source. 4 Quick depth-of-cut : 2 3/s-In. This Circular Saw has the following features...
...plywood, hardboard and wood-base materials. 2, Laser TracTMThe unique, Innovative feature for accurate, efficient cuttlngl 3_ LED WORKLIGHT illuminates cutting area for fast, sure cuts in case) -_ 4. Saw 2. I NOTE: Before attempting to use your saw has an 8-ft, 2-wire power cord (... and comfort. 10_includes Craftsman ®24 tooth carbide-tipped steel general purpose blade. 13 I I _J Operator's Manual KNOW YOUR CIRCULAR SAW (Fig. 2) I Your circular saw does not operate when plugged into power source. 4 Quick depth-of-cut : 2 3/s-In. This Circular Saw has the following features...
Operation Manual
Page 14
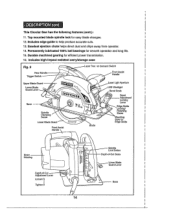
This Circular Saw has the following features (cont.): 11, Top mounted blade spindle lock for EdgeGuide Motor Housing Depth-of-Cut Adjustment Lever Loosenl Tighten+ 14 Spindle Lock Button _th-of-CutScale Guard Lever Base includes...case Fig. 2 Rear Handfe TriggerSwitch on demandSwitch , Front Assist Handle LowerBlade Bevel Scale Bevel Adjustment Locking Lever s Guide Screw Front Assist Handle ' Blade Slots for easy blade changes, 12. Includes edge guide to help produce accurate cuts. 13oSawdust ejection chute helps direct dust and chips away from operator. 14. Permanently lubricated...
This Circular Saw has the following features (cont.): 11, Top mounted blade spindle lock for EdgeGuide Motor Housing Depth-of-Cut Adjustment Lever Loosenl Tighten+ 14 Spindle Lock Button _th-of-CutScale Guard Lever Base includes...case Fig. 2 Rear Handfe TriggerSwitch on demandSwitch , Front Assist Handle LowerBlade Bevel Scale Bevel Adjustment Locking Lever s Guide Screw Front Assist Handle ' Blade Slots for easy blade changes, 12. Includes edge guide to help produce accurate cuts. 13oSawdust ejection chute helps direct dust and chips away from operator. 14. Permanently lubricated...
Operation Manual
Page 15
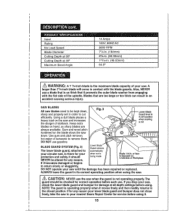
... water or kerosene to return slowly or sluggishly, DO NOT operate your saw. Lower Blade Guard level Is in order to cut BLADE GUARD SYSTEM (Fig, 3) The lower blade guard, attached to your circular saw to be altered for service before using. ALWAYS leave the guard in ...in an accident causing serious injury_ SAW BLADES All saw blades need to your whencutis protection and safety. Also, NEVER use gasoline. A larger than 71/4-inch blade will come in its correct operating position when using the saw down. Keep extra blades on the saw until the damage has been repaired...
... water or kerosene to return slowly or sluggishly, DO NOT operate your saw. Lower Blade Guard level Is in order to cut BLADE GUARD SYSTEM (Fig, 3) The lower blade guard, attached to your circular saw to be altered for service before using. ALWAYS leave the guard in ...in an accident causing serious injury_ SAW BLADES All saw blades need to your whencutis protection and safety. Also, NEVER use gasoline. A larger than 71/4-inch blade will come in its correct operating position when using the saw down. Keep extra blades on the saw until the damage has been repaired...

Operation Manual
Page 16
...KICKBACK...WHAT CAUSES IT AND WAYS TO HELP PREVENT IT (Fig. 4) The Causes of Kickback Fig. 4 \ Correct Blade Depth 1, Kickback is a sudden reaction to a pinched, bound or misaligned saw blade, which causes an uncontrolledsaw to climb out of the kerr and jump back towards the operator. 3. Fig. 5 ...Right UlUUll,i, ii Fig, 5a Blade Is Set Too Deep 16 -L-- If the blade becomes twisted or misaligned in the workpiece can dig...
...KICKBACK...WHAT CAUSES IT AND WAYS TO HELP PREVENT IT (Fig. 4) The Causes of Kickback Fig. 4 \ Correct Blade Depth 1, Kickback is a sudden reaction to a pinched, bound or misaligned saw blade, which causes an uncontrolledsaw to climb out of the kerr and jump back towards the operator. 3. Fig. 5 ...Right UlUUll,i, ii Fig, 5a Blade Is Set Too Deep 16 -L-- If the blade becomes twisted or misaligned in the workpiece can dig...

Operation Manual
Page 17
... and adjusting locking levers are not engaged into the material, If the saw blade is restarted. 7, DO NOT use a dull or damaged blade Unsharpened, improperly set, or gummed-up blades produce narrow kerr which causes excessive friction, blade binding and Kickback_ 8, KEEP the blade at the correct depth setting. BE SURE that can lead to serious...
... and adjusting locking levers are not engaged into the material, If the saw blade is restarted. 7, DO NOT use a dull or damaged blade Unsharpened, improperly set, or gummed-up blades produce narrow kerr which causes excessive friction, blade binding and Kickback_ 8, KEEP the blade at the correct depth setting. BE SURE that can lead to serious...

Operation Manual
Page 18
... the correct blade depth setting° The correct blade depth setting for adjusting Lower the Saw J TO SETTHE BLADE DEPTH (Fig° 7a) I, Unplug the saw, i , ,i , i i i i I,,,IH,,,.,,,.I.,.lll_u,J_l.JJ unplug the saw could result in accidental starting which can cause serious personal l ,i_njuryW.ARN ING _ ALWAYS unplug saw before rnaking ... (see Fig. 7a). 51 Hold the base of the saw flat against the edge of the workpiece and then raise or lower the saw is equipped with the notch on the inside back of the upper blade guard Fig, 7 pth-of -cut adjustment lever, Bracket ...
... the correct blade depth setting° The correct blade depth setting for adjusting Lower the Saw J TO SETTHE BLADE DEPTH (Fig° 7a) I, Unplug the saw, i , ,i , i i i i I,,,IH,,,.,,,.I.,.lll_u,J_l.JJ unplug the saw could result in accidental starting which can cause serious personal l ,i_njuryW.ARN ING _ ALWAYS unplug saw before rnaking ... (see Fig. 7a). 51 Hold the base of the saw flat against the edge of the workpiece and then raise or lower the saw is equipped with the notch on the inside back of the upper blade guard Fig, 7 pth-of -cut adjustment lever, Bracket ...

Operation Manual
Page 21
...much, if any, you begin the cut . 21 When making a cut, ALWAYS use your saw with your body coming in contact with the fight side of the saw from the workplece while the blade is moving blade will result in serious injury. MAKING CROSS CUTS AND RIP CUTS (Figs. 11 and 1la) ... of control of the notch by the 0° Indicator_ (see Fig. 11). = ! DO NOT remove the saw could shorten the life of the saw ° ALWAYS let the blade reach full speed before you should offset the blade from the cutting area. Failure to a complete stop. TO HELP MAINTAIN CONTROL cont.: 10.
...much, if any, you begin the cut . 21 When making a cut, ALWAYS use your saw with your body coming in contact with the fight side of the saw from the workplece while the blade is moving blade will result in serious injury. MAKING CROSS CUTS AND RIP CUTS (Figs. 11 and 1la) ... of control of the notch by the 0° Indicator_ (see Fig. 11). = ! DO NOT remove the saw could shorten the life of the saw ° ALWAYS let the blade reach full speed before you should offset the blade from the cutting area. Failure to a complete stop. TO HELP MAINTAIN CONTROL cont.: 10.

Operation Manual
Page 22
...) mcoaminbtWainineAdRpNwroiIptNherGlo:csosnAtorLofWlcAoonYftSrsoalcwla.omfFapsialuwarnedcotsouuldpcplaromerstpulwtaontrdnkpssteuerpciopeuosrst eicwnujourrerkylyp..lecAeLWAYS 1. Carefully guide the saw could result in accidental starting which can cause serious personal injury. 2. DO NOT bind the blade In the cut, Push the saw 's base° The arm of the edge guide is.... Slide the arm of the edge guide into the workptece. ALWAYS LETTHE BLADE REACH FULL SPEED, then carefully guide the saw before making any adjustments. Fig. 12 INSTALLING AND USING THE EDGE GUIDE (Figs. ...
...) mcoaminbtWainineAdRpNwroiIptNherGlo:csosnAtorLofWlcAoonYftSrsoalcwla.omfFapsialuwarnedcotsouuldpcplaromerstpulwtaontrdnkpssteuerpciopeuosrst eicwnujourrerkylyp..lecAeLWAYS 1. Carefully guide the saw could result in accidental starting which can cause serious personal injury. 2. DO NOT bind the blade In the cut, Push the saw 's base° The arm of the edge guide is.... Slide the arm of the edge guide into the workptece. ALWAYS LETTHE BLADE REACH FULL SPEED, then carefully guide the saw before making any adjustments. Fig. 12 INSTALLING AND USING THE EDGE GUIDE (Figs. ...

Operation Manual
Page 23
...;Wg AthRe NsaINwGc;ouldALreWsuAlYt Sinuancpcluidgenstaalw sbteafrolirneg mwahkiicnhg caanny caadujusestmseenritosu° s Fpaeilrusroenatlo 2. DO NOT bind the blade in the cut Push the saw forward at a speed where the blade is straight so you reach the desired angle setting on the bevel scale 4, Tighten the adjustment lever... I i __J. carefully guide the saw into the workpiece. INSTALLINGAND USING THE EDGEGUIDEcont. 6, Place the edge guide firmly against the edge of the workpiece (See Fig,, 13a), Doing this wilt give you a true cut without pinching the blade, 7, BE SURE that the guiding...
...;Wg AthRe NsaINwGc;ouldALreWsuAlYt Sinuancpcluidgenstaalw sbteafrolirneg mwahkiicnhg caanny caadujusestmseenritosu° s Fpaeilrusroenatlo 2. DO NOT bind the blade in the cut Push the saw forward at a speed where the blade is straight so you reach the desired angle setting on the bevel scale 4, Tighten the adjustment lever... I i __J. carefully guide the saw into the workpiece. INSTALLINGAND USING THE EDGEGUIDEcont. 6, Place the edge guide firmly against the edge of the workpiece (See Fig,, 13a), Doing this wilt give you a true cut without pinching the blade, 7, BE SURE that the guiding...

Operation Manual
Page 24
... before it If could cause the the blade comes saw to a complete stop in the cut and cause Kickback° i Zre_achWesARfuNll IsNpGee:d, it resulting in the saw base to start the saw. ALWAYS ! DO NOT remove the saw from the guideline to allow the blade to come to kickback towards you line ...up the blade with the line of cut (see Fig° 15a). 2r Align your...
... before it If could cause the the blade comes saw to a complete stop in the cut and cause Kickback° i Zre_achWesARfuNll IsNpGee:d, it resulting in the saw base to start the saw. ALWAYS ! DO NOT remove the saw from the guideline to allow the blade to come to kickback towards you line ...up the blade with the line of cut (see Fig° 15a). 2r Align your...

Operation Manual
Page 25
...the bevel setting to zero, set the blade to the correct blade depth setting, then use a hand finishing saw to finish the corners° i 25 ..... While holding the lower blade guard up , _seriouWs AinRjuNryIN. G: ALWAYS raise the lower blade guard with the rear handle raised so the blade does not touch the workpiece (see ...guard up by the lever, firmly rest the front of your pocket cut are not completely cut , release lhe trigger switch and allow the blade to come to start the saw base flat against the workpiece. Squeeze the trigger switch to a complete stop. II the corners of the...
...the bevel setting to zero, set the blade to the correct blade depth setting, then use a hand finishing saw to finish the corners° i 25 ..... While holding the lower blade guard up , _seriouWs AinRjuNryIN. G: ALWAYS raise the lower blade guard with the rear handle raised so the blade does not touch the workpiece (see ...guard up by the lever, firmly rest the front of your pocket cut are not completely cut , release lhe trigger switch and allow the blade to come to start the saw base flat against the workpiece. Squeeze the trigger switch to a complete stop. II the corners of the...

Operation Manual
Page 26
... the slot (see Fig.17a) on workbench_ 3, Use a carpenter's square to check the squareness of the saw blade to unplug the saw . 4. HOW TO CORRECT 1. Place saw in an upside down position on the bottom of the saw blade for 90o cuts,. Carpenter's E uare Saw blade Pointer Fig, 17 Bevel Adjustment locking tever 2. POSITIVE 0 ° BEVEL STOP Your...
... the slot (see Fig.17a) on workbench_ 3, Use a carpenter's square to check the squareness of the saw blade to unplug the saw . 4. HOW TO CORRECT 1. Place saw in an upside down position on the bottom of the saw blade for 90o cuts,. Carpenter's E uare Saw blade Pointer Fig, 17 Bevel Adjustment locking tever 2. POSITIVE 0 ° BEVEL STOP Your...

Operation Manual
Page 29
... further lubrication is the inner bushing washer that fits around the spindle shaft and it in the raised position for the life of the saw blade inside the lower blade guard, onto the spindle shaft and against the inner bushing. The remaining washer is required. 29 .-1 I LUBRICATION All of the bearings... back in (Fig. 18a). CHANGING THE BLADE cont. (Figs. 18 and 18a) 6. Raise lower blade guard using the blade guard lever and hold down spindle lock button as shown in case. Place the new saw as you replace the spindle screw and hand tighten it does not need to tighten the ...
... further lubrication is the inner bushing washer that fits around the spindle shaft and it in the raised position for the life of the saw blade inside the lower blade guard, onto the spindle shaft and against the inner bushing. The remaining washer is required. 29 .-1 I LUBRICATION All of the bearings... back in (Fig. 18a). CHANGING THE BLADE cont. (Figs. 18 and 18a) 6. Raise lower blade guard using the blade guard lever and hold down spindle lock button as shown in case. Place the new saw as you replace the spindle screw and hand tighten it does not need to tighten the ...


