

Operation Manual
Page 1
FORMNO.769-04643A November17,2009 Operator's Manual CRRF[SM ® 19=inch Electric Rotary Mower Model No. 247.370160 CAUTION: Before using this product, read this manual and follow all safety rules and operating instructions. ,, SAFETY o ASSEMBLY o OPERATION o MAINTENANCE o PARTS LIST o ESPANOL R 24 o mheisanssymit bisolisotnedthbeyproduct's nameplate LISTEDUNDERWRITERSLABORATORIESINC, Sears, Roebuck and Co., Hoffman Estates, Visit our web site: www.craftsman.com IL 60179, U.S.A.
FORMNO.769-04643A November17,2009 Operator's Manual CRRF[SM ® 19=inch Electric Rotary Mower Model No. 247.370160 CAUTION: Before using this product, read this manual and follow all safety rules and operating instructions. ,, SAFETY o ASSEMBLY o OPERATION o MAINTENANCE o PARTS LIST o ESPANOL R 24 o mheisanssymit bisolisotnedthbeyproduct's nameplate LISTEDUNDERWRITERSLABORATORIESINC, Sears, Roebuck and Co., Hoffman Estates, Visit our web site: www.craftsman.com IL 60179, U.S.A.
Operation Manual
Page 2
... Roebuck and Co., Hoffman Estates, IL 60179 Motor: 12Amperes Model Number SerM Number Dateof Purchase Recordthe modelnumber,serialnumber, and dateof purchaseabove. © Sears Brands,LLC 2 Troubleshootin..g 1..9....... Repairsnecessarybecauseof operatorabuseor negligence... ServiceNumbers B..a..c..kCover Craftsman Two Year Limited Warranty If this Craftsmanproductfails due to a defectin materialor workmanshipwithintwo years fromthe date of purchase,returnitto any Searsstore, SearsServiceCenter,or otherCraftsmanoutlet inthe UnitedStatesfor free repair. This warrantygivesyou specificlegal...
... Roebuck and Co., Hoffman Estates, IL 60179 Motor: 12Amperes Model Number SerM Number Dateof Purchase Recordthe modelnumber,serialnumber, and dateof purchaseabove. © Sears Brands,LLC 2 Troubleshootin..g 1..9....... Repairsnecessarybecauseof operatorabuseor negligence... ServiceNumbers B..a..c..kCover Craftsman Two Year Limited Warranty If this Craftsmanproductfails due to a defectin materialor workmanshipwithintwo years fromthe date of purchase,returnitto any Searsstore, SearsServiceCenter,or otherCraftsmanoutlet inthe UnitedStatesfor free repair. This warrantygivesyou specificlegal...
Operation Manual
Page 3
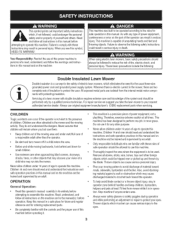
... Responsibility: Restrictthe useof this manual.As with anytype of powerequipment, carelessnessor error on the machineand be used. Only responsibleindividualswho are familiarwith these instructionsmay result in themanual(s) before operation.Keepthis manualina safe placefor futureand regular referenceand for the usualthree-wire groundedpowercordand groundedpowersupplysystem.Whereverthereis electriccurrentin the mower,thereare two completesetsof insulationto protectthe user.All exposedmetal parts are isolatedfrom the internalmetal...
... Responsibility: Restrictthe useof this manual.As with anytype of powerequipment, carelessnessor error on the machineand be used. Only responsibleindividualswho are familiarwith these instructionsmay result in themanual(s) before operation.Keepthis manualina safe placefor futureand regular referenceand for the usualthree-wire groundedpowercordand groundedpowersupplysystem.Whereverthereis electriccurrentin the mower,thereare two completesetsof insulationto protectthe user.All exposedmetal parts are isolatedfrom the internalmetal...
Operation Manual
Page 4
... a warningof trouble. Neverplaceany partof the bodyin the blade area untilyouare surethe bladehas stoppedrotating. • Neveroperatemowerwithoutpropertrail shield, discharge chute,grass catcher,motor/bladecontrol handleor other )and will only fit into thepolarizedextensioncordone way.If the plug does not • Themotor/bladecontrolhandleis a safetydevice.Neverattempt fit fully intothe extensioncord, reversethe plug. Donot abusethecord by pullingthe mowerbythe cord or yanking it to bypassits operation.Doingso...
... a warningof trouble. Neverplaceany partof the bodyin the blade area untilyouare surethe bladehas stoppedrotating. • Neveroperatemowerwithoutpropertrail shield, discharge chute,grass catcher,motor/bladecontrol handleor other )and will only fit into thepolarizedextensioncordone way.If the plug does not • Themotor/bladecontrolhandleis a safetydevice.Neverattempt fit fully intothe extensioncord, reversethe plug. Donot abusethecord by pullingthe mowerbythe cord or yanking it to bypassits operation.Doingso...
Operation Manual
Page 5
...: 1. Repairthe damagebeforeoperatingthe mower. • Grass catchercomponents,dischargecover,and trail shieldare subjectto wearand damagewhich couldexposemovingpartsor allowobjectsto be thrown.Forsafety protection,frequentlycheck componentsand replaceimmediatelywithoriginalequipment manufacturer's(OEM)parts only,listed in this manual. • Whennot in use originalequipmentmanufacturer (OEM) replacemenpt arts listed in this manual."Useof parts which do so can cut, wrapthe bladeor wearglovesand useextra caution when servicingthem. • Keepall nuts, bolts,and screwstight...
...: 1. Repairthe damagebeforeoperatingthe mower. • Grass catchercomponents,dischargecover,and trail shieldare subjectto wearand damagewhich couldexposemovingpartsor allowobjectsto be thrown.Forsafety protection,frequentlycheck componentsand replaceimmediatelywithoriginalequipment manufacturer's(OEM)parts only,listed in this manual. • Whennot in use originalequipmentmanufacturer (OEM) replacemenpt arts listed in this manual."Useof parts which do so can cut, wrapthe bladeor wearglovesand useextra caution when servicingthem. • Keepall nuts, bolts,and screwstight...
Operation Manual
Page 6
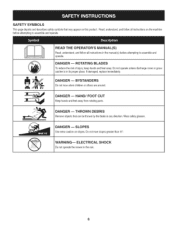
... BLADES To reducethe risk of injury,keephandsand feet away.Donotoperateunlessdischargecoveror grass catcheris in its properplace. DANGER m BYSTANDERS Donot mowwhenchildrenor others are around. DANGER = HAND/FOOT CUT Keephandsand feetaway from rotatingparts. WARNING= ELECTRICAL Donot operatethe mowerin the rain. If damaged,replaceimmediately. Read,understand,and follow all instructionson the machine beforeattemptingto assembleand operate. A • ® READ THE OPERATOR'S MANUAL...
... BLADES To reducethe risk of injury,keephandsand feet away.Donotoperateunlessdischargecoveror grass catcheris in its properplace. DANGER m BYSTANDERS Donot mowwhenchildrenor others are around. DANGER = HAND/FOOT CUT Keephandsand feetaway from rotatingparts. WARNING= ELECTRICAL Donot operatethe mowerin the rain. If damaged,replaceimmediately. Read,understand,and follow all instructionson the machine beforeattemptingto assembleand operate. A • ® READ THE OPERATOR'S MANUAL...

Operation Manual
Page 10
... of the carton. 3. ASSEMBLING THE HANDLE NOTE: Removeany packingmaterialwhich maybe betweenupper and lowerhandles. 1. CORD GUIDE BAR Attachthe cordguide bar with extensioncord retainerto the upper handleas shownin Figure3. Gentlylift and pivotthe upper handleintothe operatingposition as shownin Figure1.Makecertainthe lowerhandleis seated J Figure2 securelyintothe handlemountingbrackets. f Figure1 / Figure3 10 LOOSE PARTS IN CARTON Thefollowingitemsare packagedloosein thecarton: Operator'sManual,Grass Catcher REMOVING THE UNIT FROM THE...
... of the carton. 3. ASSEMBLING THE HANDLE NOTE: Removeany packingmaterialwhich maybe betweenupper and lowerhandles. 1. CORD GUIDE BAR Attachthe cordguide bar with extensioncord retainerto the upper handleas shownin Figure3. Gentlylift and pivotthe upper handleintothe operatingposition as shownin Figure1.Makecertainthe lowerhandleis seated J Figure2 securelyintothe handlemountingbrackets. f Figure1 / Figure3 10 LOOSE PARTS IN CARTON Thefollowingitemsare packagedloosein thecarton: Operator'sManual,Grass Catcher REMOVING THE UNIT FROM THE...

Operation Manual
Page 12
... Toconvertto side discharge,makesuregrass catcheris off of the unit, the rear mulchingbaffleis installed,and reardischargedoor isclosed. 1. See Figure7. CUTTING HEIGHT ADJUSTMENT The cuttingheightadjustmentleveris locatedabovethe rear left wheel. f ...... \ "\ \ ( Figure6 Toremovegrass catcher,lift rear dischargedoor on mulchingplug assembly. On the sideof the mower,lift the mulchingplug. 2. , Followstepsbelowto attachgrass catcher: a, Lift reardischargedoor, b, Removerear mulchingbaffle, Placegrasscatcheron the pivot rod.Let go of...
... Toconvertto side discharge,makesuregrass catcheris off of the unit, the rear mulchingbaffleis installed,and reardischargedoor isclosed. 1. See Figure7. CUTTING HEIGHT ADJUSTMENT The cuttingheightadjustmentleveris locatedabovethe rear left wheel. f ...... \ "\ \ ( Figure6 Toremovegrass catcher,lift rear dischargedoor on mulchingplug assembly. On the sideof the mower,lift the mulchingplug. 2. , Followstepsbelowto attachgrass catcher: a, Lift reardischargedoor, b, Removerear mulchingbaffle, Placegrasscatcheron the pivot rod.Let go of...

Operation Manual
Page 13
... use a higherratedfuse or breakerwithoutconsultingyour powercompany. 13 CUTTING HEIGHT ADJUSTMENT LEVER Thecuttingheightadjustmentleveris locatedabovethe left rear wheel.Toadjustthe cuttingheight, referto the AssemblySection. OVERLOAD PROTECTION SWITCH The moweris equippedwith an overloadprotectionswitch,locatedon the motor/bladecontrol.This overloadprotectionswitchmay pop out whentoo muchstrain is placedon the motor.Referto Maintenance& AdjustmentsSectionto resetthis switch. Toavoidseriousinjury,the operator and unitshouldbe in the operatingposition behindthe mowerwhen usingit. CORD...
... use a higherratedfuse or breakerwithoutconsultingyour powercompany. 13 CUTTING HEIGHT ADJUSTMENT LEVER Thecuttingheightadjustmentleveris locatedabovethe left rear wheel.Toadjustthe cuttingheight, referto the AssemblySection. OVERLOAD PROTECTION SWITCH The moweris equippedwith an overloadprotectionswitch,locatedon the motor/bladecontrol.This overloadprotectionswitchmay pop out whentoo muchstrain is placedon the motor.Referto Maintenance& AdjustmentsSectionto resetthis switch. Toavoidseriousinjury,the operator and unitshouldbe in the operatingposition behindthe mowerwhen usingit. CORD...

Operation Manual
Page 14
... starterbuttonin whilepivotingthe motor/bladecontrol handle upward. 5. NOTE:Startingthe mower'smotoralsoengagesthe blade. 4. f If you run mower.Operatemowertill grass bag is connected.Nevermowaroundthe lawn in circles;travel backand forth acrossthe lawn,startingfrom the pointclosestto the outlet and thenmovingawayfrom theoutlet so the cordlies in a seriesof equal loopson eachsideof your handto preventsnarling. Excessivevibrationof the mowerduringoperationis an indicationof damage.The unit shouldbe promptlyinspectedand repaired. USING GRASS CATCHER _, ,J Figure11 NOTE...
... starterbuttonin whilepivotingthe motor/bladecontrol handle upward. 5. NOTE:Startingthe mower'smotoralsoengagesthe blade. 4. f If you run mower.Operatemowertill grass bag is connected.Nevermowaroundthe lawn in circles;travel backand forth acrossthe lawn,startingfrom the pointclosestto the outlet and thenmovingawayfrom theoutlet so the cordlies in a seriesof equal loopson eachsideof your handto preventsnarling. Excessivevibrationof the mowerduringoperationis an indicationof damage.The unit shouldbe promptlyinspectedand repaired. USING GRASS CATCHER _, ,J Figure11 NOTE...
Operation Manual
Page 15
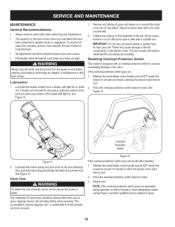
... lightoil (or motor oil). Releasethe motor/bladecontrolhandleand do not exposethe mowerto water. Lubricatethe torsionspringand pivot pointon the rear discharge door and sidemulch plug periodicallywith lightoil to cleanyour unit. The undersideof mowerdeck shouldbe cleanedafter each useas grassclippings,leaves,dirt andotherdebriswill accumulate.This accumulationof grass clippings,etc.,is undesirableas it cleanwith a suitabletool. Resetting Overload Protection Switch Alwaysstopthe motorand...
... lightoil (or motor oil). Releasethe motor/bladecontrolhandleand do not exposethe mowerto water. Lubricatethe torsionspringand pivot pointon the rear discharge door and sidemulch plug periodicallywith lightoil to cleanyour unit. The undersideof mowerdeck shouldbe cleanedafter each useas grassclippings,leaves,dirt andotherdebriswill accumulate.This accumulationof grass clippings,etc.,is undesirableas it cleanwith a suitabletool. Resetting Overload Protection Switch Alwaysstopthe motorand...
Operation Manual
Page 16
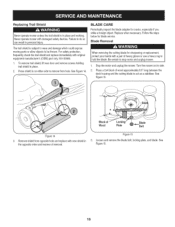
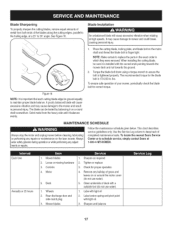
... a pair of woodapproximately8.5" long betweenthe deck housingand the cuttingbladeto act as a stabilizer.See Figure15. Loosenand removethe blade bolt, lockingplate,and blade.See Figure15. 16 Toremovetrail shield,lift rear door and removescrewsholding trailshieldin place. 2. Replacewhennecessary.Followthe steps belowfor blade service. Stopthe motorand unplugthe mower.Turnthe moweron its side. 2. Replacing Trail Shield Neveroperatemowerunlessthe trail shieldisin placeand working. Neveroperatemowerwith damagedsafetydevices.Failureto...
... a pair of woodapproximately8.5" long betweenthe deck housingand the cuttingbladeto act as a stabilizer.See Figure15. Loosenand removethe blade bolt, lockingplate,and blade.See Figure15. 16 Toremovetrail shield,lift rear door and removescrewsholding trailshieldin place. 2. Replacewhennecessary.Followthe steps belowfor blade service. Stopthe motorand unplugthe mower.Turnthe moweron its side. 2. Replacing Trail Shield Neveroperatemowerunlessthe trail shieldisin placeand working. Neveroperatemowerwith damagedsafetydevices.Failureto...
Operation Manual
Page 17
... tightenedproperly.The recommendedtorquefor the blade bolt is installedwith the curvedends pointingtowardsthe mowerdeck and not towardstheground. 2. Deck 1. Reardischargedoor and side mulchplug 3. Sharpenas required 2. Tightenor replace 3. Checkfor properoperation 4. Motor 5. Sharpenand balance 17 MAINTENANCE SCHEDULE Alwaysstopthe motorand unplug mowerbeforecleaning,lubricating or performingany repairsor maintenanceon the lawn mower.Always wearsafetyglassesduringoperationor whileperforminganyadjustmentsor repairs. Wheels 2. Mowerblades 1. Removeany buildupof...
... tightenedproperly.The recommendedtorquefor the blade bolt is installedwith the curvedends pointingtowardsthe mowerdeck and not towardstheground. 2. Deck 1. Reardischargedoor and side mulchplug 3. Sharpenas required 2. Tightenor replace 3. Checkfor properoperation 4. Motor 5. Sharpenand balance 17 MAINTENANCE SCHEDULE Alwaysstopthe motorand unplug mowerbeforecleaning,lubricating or performingany repairsor maintenanceon the lawn mower.Always wearsafetyglassesduringoperationor whileperforminganyadjustmentsor repairs. Wheels 2. Mowerblades 1. Removeany buildupof...
Operation Manual
Page 19
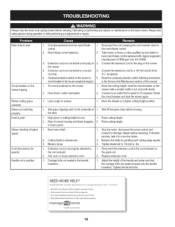
... and all your other product manuals online, Get answers from our team of power. Connectto an outlet that is unbalanced. 3. Raisecuttingheight. in position 1. Bladeis loose. 1. Replaceextensioncord. 1. NEED MORE HELP? Motor/bladecontroldefective. 2. Fuseblown;outlet overloaded. 2. Highgrassor cuttingheighttoo low. 1. Bentmotorshaft. 2. Balancethe bladeby grindingeachcuttingedgeequally. 3. Reconnecthe extensioncordto the cord restrainton the guide rod. 2. Find information and tools to the motor/bladecontrol. 2. Corddisconnectedfrom the motor/blade control...
... and all your other product manuals online, Get answers from our team of power. Connectto an outlet that is unbalanced. 3. Raisecuttingheight. in position 1. Bladeis loose. 1. Replaceextensioncord. 1. NEED MORE HELP? Motor/bladecontroldefective. 2. Fuseblown;outlet overloaded. 2. Highgrassor cuttingheighttoo low. 1. Bentmotorshaft. 2. Balancethe bladeby grindingeachcuttingedgeequally. 3. Reconnecthe extensioncordto the cord restrainton the guide rod. 2. Find information and tools to the motor/bladecontrol. 2. Corddisconnectedfrom the motor/blade control...
Operation Manual
Page 20
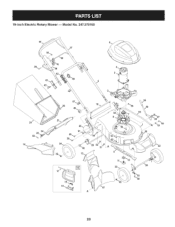
19=inch Electric Rotary Mower B Model No. 247.370160 44 25 3O 31 % 2O
19=inch Electric Rotary Mower B Model No. 247.370160 44 25 3O 31 % 2O
Operation Manual
Page 21
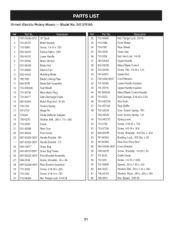
... UpperHandleInsulator Motor/BladeControlHandle 710-0572 720-04072A BoltCarriage,5/16-18x 2.50 StarKnob 731-05710A RearBaffle 732-04534 DoorTorsionSpring- LH SpringLever Screw,5/16-12x .750 710-0779A Screw,#10-16x .500 938-0507B 741-0492A 747-04589 Screw,Shoulder,.500 Dia.x .434 Bushing,Lock,.505 Dia. RH 732-04535 732-04377C 710-0726 DoorTorsionSpring- 19=inch Electric Rotary Mower B Model No...
... UpperHandleInsulator Motor/BladeControlHandle 710-0572 720-04072A BoltCarriage,5/16-18x 2.50 StarKnob 731-05710A RearBaffle 732-04534 DoorTorsionSpring- LH SpringLever Screw,5/16-12x .750 710-0779A Screw,#10-16x .500 938-0507B 741-0492A 747-04589 Screw,Shoulder,.500 Dia.x .434 Bushing,Lock,.505 Dia. RH 732-04535 732-04377C 710-0726 DoorTorsionSpring- 19=inch Electric Rotary Mower B Model No...

Operation Manual
Page 22
777S32911 777122747 TO START TO STOP 777D13261 777Dl1051 777122946 777122813 777S32816 • TO REDUCE THE RISK OF ELECTRICSHOCK, DO NOT EXPOSE • REMOVEOBJECTSTHATCANBE THROWNBY THE BLADEIN ... LOOK DOWN • KEEP HANDS AND FEET AWAY FROM ROTATING PARTS. SERVICE CENTER. 22 WEAR SAFETYGLASSES. REPLACEDAMAGED CORD IMMEDIATELY. • USE EXTRA CAUTION ON SLOPES. MOW ACROSS, NEVER UP AND DOWN. AND BEHIND BEFOREAND WHILE MOVING BACKWARDS. • DO NOT MOW WHEN CHILDREN OR OTHERS ARE AROUND. ANYDIRECTION. REMOVING BLADE. NEVER PULL MOWER CLOSETO YOUR FEET.
777S32911 777122747 TO START TO STOP 777D13261 777Dl1051 777122946 777122813 777S32816 • TO REDUCE THE RISK OF ELECTRICSHOCK, DO NOT EXPOSE • REMOVEOBJECTSTHATCANBE THROWNBY THE BLADEIN ... LOOK DOWN • KEEP HANDS AND FEET AWAY FROM ROTATING PARTS. SERVICE CENTER. 22 WEAR SAFETYGLASSES. REPLACEDAMAGED CORD IMMEDIATELY. • USE EXTRA CAUTION ON SLOPES. MOW ACROSS, NEVER UP AND DOWN. AND BEHIND BEFOREAND WHILE MOVING BACKWARDS. • DO NOT MOW WHEN CHILDREN OR OTHERS ARE AROUND. ANYDIRECTION. REMOVING BLADE. NEVER PULL MOWER CLOSETO YOUR FEET.

Operation Manual
Page 23
... the RepairProtectionAgreement*includes: * Expert service by our 10,000professionalrepairspecialists * Unlimited service and no charge for any reasonduringthe productwarrantyperiod,wewill providea full refund.Or,a proratedrefundanytimeafter the productwarrantyperiod expires.Purchaseyour RepairProtectionAgreementtoday! Onceyou purchasethe Agreement,a simplephonecall is all coveredrepairs * Product replacement up to time.That's whenhavinga RepairProtectionAgreementcan saveyou moneyand aggravation. Sears installationService ForSearsprofessionalinstallationof homeappliances,garagedoor openers...
... the RepairProtectionAgreement*includes: * Expert service by our 10,000professionalrepairspecialists * Unlimited service and no charge for any reasonduringthe productwarrantyperiod,wewill providea full refund.Or,a proratedrefundanytimeafter the productwarrantyperiod expires.Purchaseyour RepairProtectionAgreementtoday! Onceyou purchasethe Agreement,a simplephonecall is all coveredrepairs * Product replacement up to time.That's whenhavinga RepairProtectionAgreementcan saveyou moneyand aggravation. Sears installationService ForSearsprofessionalinstallationof homeappliances,garagedoor openers...

Operation Manual
Page 30
NEVER PULL MOWER CLOSE TO YOUR FEET. LOOK DOWN • KEEP HANDS AND FEET AWAY FROM ROTATING PARTS. • TO REDUCE THE RISK OF ELECTRIC SHOCK, DO NOT EXPOSE UNIT TO WATER OR OPERATE UNIT ON WET GROUND. MOW ACROSS, NEVER UP AND DOWN. REPLACE DAMAGED CORD IMMEDIATELY. • DISCONNECT FROM SUPPLY CIRCUIT BEFORE SERVICING OR REMOVING BLADE. • REMOVE OB3ECTS THAT...
NEVER PULL MOWER CLOSE TO YOUR FEET. LOOK DOWN • KEEP HANDS AND FEET AWAY FROM ROTATING PARTS. • TO REDUCE THE RISK OF ELECTRIC SHOCK, DO NOT EXPOSE UNIT TO WATER OR OPERATE UNIT ON WET GROUND. MOW ACROSS, NEVER UP AND DOWN. REPLACE DAMAGED CORD IMMEDIATELY. • DISCONNECT FROM SUPPLY CIRCUIT BEFORE SERVICING OR REMOVING BLADE. • REMOVE OB3ECTS THAT...

Operation Manual
Page 44
For the replacement parts, accessories and owner's manuals that you need to do-it ! For Sears professional installation of home appliances and items like vacuums, lawn equipment, and electronics, call anytime for the location of carry-in your nearest Sears Parts & Repair Service Center 1-800-488-1222 (U.S.A.) 1-800-469-4663 (Canada) www.sears.com www.sears.ca To purchase a protection agreement on a product serviced by Sears: 1-800-827...
For the replacement parts, accessories and owner's manuals that you need to do-it ! For Sears professional installation of home appliances and items like vacuums, lawn equipment, and electronics, call anytime for the location of carry-in your nearest Sears Parts & Repair Service Center 1-800-488-1222 (U.S.A.) 1-800-469-4663 (Canada) www.sears.com www.sears.ca To purchase a protection agreement on a product serviced by Sears: 1-800-827...


