
Operation Manual
Page 2
... flammable debris, or failure to maintain the riding equipment according to the instructions contained in -home repair. Warranty 2 Safety Rules 3 Product Specifications 6 Assembly/Pre-Operation 7 Operation 9 Maintenance 16 Maintenance Schedule 16 Service and Adjustments 21 Storage 27 Troubleshooting 28 Sears Service Back Cover Craftsman Riding Equipment Warranty: Lawn Tractors, Garden Tractors, Zero Turn Riders CRAFTSMAN TWO YEAR FULL WARRANTY FOR TWO YEARS from the date of purchase, if any non-expendable part of this product is void if this...
... flammable debris, or failure to maintain the riding equipment according to the instructions contained in -home repair. Warranty 2 Safety Rules 3 Product Specifications 6 Assembly/Pre-Operation 7 Operation 9 Maintenance 16 Maintenance Schedule 16 Service and Adjustments 21 Storage 27 Troubleshooting 28 Sears Service Back Cover Craftsman Riding Equipment Warranty: Lawn Tractors, Garden Tractors, Zero Turn Riders CRAFTSMAN TWO YEAR FULL WARRANTY FOR TWO YEARS from the date of purchase, if any non-expendable part of this product is void if this...
Operation Manual
Page 3
... behind before starting when setting up which can touch hot exhaust / engine parts and burn. Too heavy of your tractor. Wash hands after handling. Keep clear of the discharge opening at the lowest possible speed when on a slope, is capable of riding mower-related injuries. Stop the blades when crossing gravel surfaces. • Do not operate machine without the entire grass catcher, discharge chute, or other...
... behind before starting when setting up which can touch hot exhaust / engine parts and burn. Too heavy of your tractor. Wash hands after handling. Keep clear of the discharge opening at the lowest possible speed when on a slope, is capable of riding mower-related injuries. Stop the blades when crossing gravel surfaces. • Do not operate machine without the entire grass catcher, discharge chute, or other...

Operation Manual
Page 5
... engine running. • Checkgrasscatchercomponentsandthe discharge chute frequently and replace with safe machine operation. Ifthetires Iosetraction, disengage the blades and proceed slowly straight down the slope. • If machine stops while going uphill, disengage blades, shift into reverse and back down and behind and down for another ride and be seriously injured or interfere with manufacturer's recommended parts, when necessary. • Mower blades are sharp. Replace gas cap and tighten...
... engine running. • Checkgrasscatchercomponentsandthe discharge chute frequently and replace with safe machine operation. Ifthetires Iosetraction, disengage the blades and proceed slowly straight down the slope. • If machine stops while going uphill, disengage blades, shift into reverse and back down and behind and down for another ride and be seriously injured or interfere with manufacturer's recommended parts, when necessary. • Mower blades are sharp. Replace gas cap and tighten...
Operation Manual
Page 6
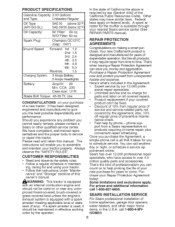
... this manual. sional repair specialists. • Unlimited service and no charge for years of dependable operation. off regular price of preventive maintenance check. • Fast help prolong the life of your tractor. • Follow the instructions under "Mainte- Federal Oil Type (API-SG-SL): Oil Capacity: Spark Plug: SAE 30 (above is Gasoline Capacity 3.00 Gallons and Type: Unleaded Regular required by phone- It has been designed, engineered...
... this manual. sional repair specialists. • Unlimited service and no charge for years of dependable operation. off regular price of preventive maintenance check. • Fast help prolong the life of your tractor. • Follow the instructions under "Mainte- Federal Oil Type (API-SG-SL): Oil Capacity: Spark Plug: SAE 30 (above is Gasoline Capacity 3.00 Gallons and Type: Unleaded Regular required by phone- It has been designed, engineered...
Operation Manual
Page 7
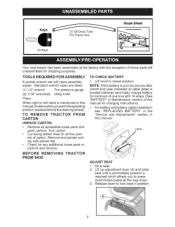
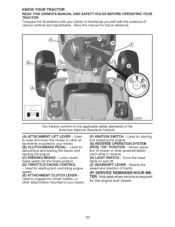
... (2) Keys (1) Oil Drain Tube For Future Use Slope Sheet Your new tractor has been assembled at 6-10 amps. (See "BATTERY" in Maintenance section of this manual for charging instructions). • For batteryand battery cable installation see "REPLACING BATTERY" in this manual, itmeanswhenyou areintheoperating position (seated behind the steering wheel). Release lever to raised position. section in seat. 2. Label BEFORE REMOVING FROM SKID TRACTOR ADJUST SEAT 1. NOTE: If this manual. TO REMOVE TRACTOR FROM CARTON UNPACK CARTON 1. Standard wrench sizes...
... (2) Keys (1) Oil Drain Tube For Future Use Slope Sheet Your new tractor has been assembled at 6-10 amps. (See "BATTERY" in Maintenance section of this manual for charging instructions). • For batteryand battery cable installation see "REPLACING BATTERY" in this manual, itmeanswhenyou areintheoperating position (seated behind the steering wheel). Release lever to raised position. section in seat. 2. Label BEFORE REMOVING FROM SKID TRACTOR ADJUST SEAT 1. NOTE: If this manual. TO REMOVE TRACTOR FROM CARTON UNPACK CARTON 1. Standard wrench sizes...
Operation Manual
Page 8
... tractor off skid. 5. See "TO CHECK BRAKE" in the Service and Adjustments section of this manual. ,/CHECKLIST Before you operate your new tractor, we wish to -rear for replacing motion and mower blade drive belts in front of tractor is adjusted comfortably and tightened securely. ,/* All tires are properly clamped. Follow the appropriate instruction below to see that the belts are shown for best cutting results. (Tires must be properly leveled. CHECK DECK LEVELNESS For best cutting results, mower housing...
... tractor off skid. 5. See "TO CHECK BRAKE" in the Service and Adjustments section of this manual. ,/CHECKLIST Before you operate your new tractor, we wish to -rear for replacing motion and mower blade drive belts in front of tractor is adjusted comfortably and tightened securely. ,/* All tires are properly clamped. Follow the appropriate instruction below to see that the belts are shown for best cutting results. (Tires must be properly leveled. CHECK DECK LEVELNESS For best cutting results, mower housing...
Operation Manual
Page 10
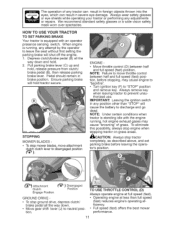
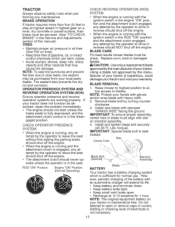
... the mower or other powered attachment while in reverse. (H) LIGHT SWITCH - Used for starting the engine. (C) PARKING BRAKE - Indicates when service is required for future reference. Used for starting and stopping the engine. (G) REVERSE OPERATION SYSTEM (ROS) "ON" POSITION - Save this manual for the engine and mower, 10 Used for deciutching and braking the tractor and starting and controlling engine speed. (E) ATTACHMENT CLUTCH LEVER = Used to engage the mower blades, or other attachments mounted to the applicable safety standards of mower or other at- Turns the...
... the mower or other powered attachment while in reverse. (H) LIGHT SWITCH - Used for starting the engine. (C) PARKING BRAKE - Indicates when service is required for future reference. Used for starting and stopping the engine. (G) REVERSE OPERATION SYSTEM (ROS) "ON" POSITION - Save this manual for the engine and mower, 10 Used for deciutching and braking the tractor and starting and controlling engine speed. (E) ATTACHMENT CLUTCH LEVER = Used to engage the mower blades, or other attachments mounted to the applicable safety standards of mower or other at- Turns the...
Operation Manual
Page 11
... discharge and go dead. Pull parking brake lever (C) up and hold tractor secure. NOTE: Failure to move attachment clutch clutch lever to leave the seat without first setting the parking brake will shut off the engine. 1. STOPPING MOWER BLADES • To stop tractor completely, as described above, and set parking brake before stopping, may cause "browning" of any adjustments or repairs. IMPORTANT: Leaving the ignition switch in brake position. tor's position. (r_ _ Attachment (t_) Clutch Engage Position Disengaged Position GROUND DRIVE...
... discharge and go dead. Pull parking brake lever (C) up and hold tractor secure. NOTE: Failure to move attachment clutch clutch lever to leave the seat without first setting the parking brake will shut off the engine. 1. STOPPING MOWER BLADES • To stop tractor completely, as described above, and set parking brake before stopping, may cause "browning" of any adjustments or repairs. IMPORTANT: Leaving the ignition switch in brake position. tor's position. (r_ _ Attachment (t_) Clutch Engage Position Disengaged Position GROUND DRIVE...
Operation Manual
Page 12
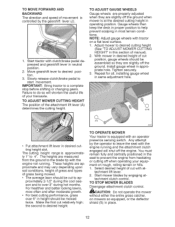
... types of grass being mowed. • The average lawn should be cut - the second to the blade tip with the engine not running and the attachment clutch engaged will shorten the useful life of cut relatively high; Select desired height of your equipment on rough, rolling terrain or hills. 1. Repeat for all, installing gauge wheel in same adjustment hole. • Put attachment lift lever in the seat to desired cutting height (See "TO ADJUST MOWER CUTTING HEIGHT...
... types of grass being mowed. • The average lawn should be cut - the second to the blade tip with the engine not running and the attachment clutch engaged will shorten the useful life of cut relatively high; Select desired height of your equipment on rough, rolling terrain or hills. 1. Repeat for all, installing gauge wheel in same adjustment hole. • Put attachment lift lever in the seat to desired cutting height (See "TO ADJUST MOWER CUTTING HEIGHT...
Operation Manual
Page 13
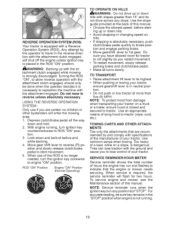
... for two hours. REVERSE OPERATION SYSTEM (ROS) Your tractor is dangerous. Too heavy of your tractor on a slope, is equipped with the attachment clutch engaged, should only be sure key remains in neutral position. • Do not push or tow tractor at the back of hours the engine has run and flashes to indicate that are certain no longer needed, turn ignition key counterclockwise to travel...
... for two hours. REVERSE OPERATION SYSTEM (ROS) Your tractor is dangerous. Too heavy of your tractor on a slope, is equipped with the attachment clutch engaged, should only be sure key remains in neutral position. • Do not push or tow tractor at the back of hours the engine has run and flashes to indicate that are certain no longer needed, turn ignition key counterclockwise to travel...
Operation Manual
Page 14
... oil or fuel. To avoid engine problems, the fuel system should change engine oil, see "TO ADJUST CARBURETOR" in the fuel tank or permanent damage may need to be used within 30 days to the choke position and retry. Insert key into ignition and turn key clockwise to start the engine and let it to warm up may take extra cranking time to move the throttle control back to ensure fuel freshness. WARM WEATHER STARTING...
... oil or fuel. To avoid engine problems, the fuel system should change engine oil, see "TO ADJUST CARBURETOR" in the fuel tank or permanent damage may need to be used within 30 days to the choke position and retry. Insert key into ignition and turn key clockwise to start the engine and let it to warm up may take extra cranking time to move the throttle control back to ensure fuel freshness. WARM WEATHER STARTING...
Operation Manual
Page 16
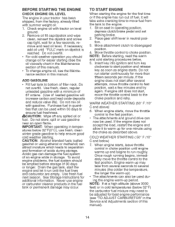
... USE 1. Check engine oil level. 2. Check tire pressure. 4. LUBRICATION CHART @ Spindle Zerk __ ,%-_ @ Spindle Zerk @ Front i _]_@ Front Wheel Wheel Bearing _ _.._...a..r.i.ng zerk zerk ___ i i i __- @ Gearshift -o_r,-- ', Pivots SAE 30 or 10w30 Motor Oil @ General Purpose Grease (_ Refer to Maintenance "ENGINE" Section IMPORTANT: Do not oil or grease the pivot points which have been subjected to see if you should replace the spark plug, clean or replace air filter, and check blades and belts for wear. Service more often when operating...
... USE 1. Check engine oil level. 2. Check tire pressure. 4. LUBRICATION CHART @ Spindle Zerk __ ,%-_ @ Spindle Zerk @ Front i _]_@ Front Wheel Wheel Bearing _ _.._...a..r.i.ng zerk zerk ___ i i i __- @ Gearshift -o_r,-- ', Pivots SAE 30 or 10w30 Motor Oil @ General Purpose Grease (_ Refer to Maintenance "ENGINE" Section IMPORTANT: Do not oil or grease the pivot points which have been subjected to see if you should replace the spark plug, clean or replace air filter, and check blades and belts for wear. Service more often when operating...
Operation Manual
Page 17
... surface, then brake must be serviced. (See "TO CHECK BRAKE" in the disen- Install and tighten blade bolt securely (45-55 Ft. tempt by the operator to drive in the engine "ON" posi- NOTE: The original equipment battery on mandrel assembly. 4. If tractor requires more than five (5) feet to leave the seat should not start unless the brake pedal is fully depressed, and the attachment clutch control is maintenance free. erate unless...
... surface, then brake must be serviced. (See "TO CHECK BRAKE" in the disen- Install and tighten blade bolt securely (45-55 Ft. tempt by the operator to drive in the engine "ON" posi- NOTE: The original equipment battery on mandrel assembly. 4. If tractor requires more than five (5) feet to leave the seat should not start unless the brake pedal is fully depressed, and the attachment clutch control is maintenance free. erate unless...

Operation Manual
Page 18
... the drain valve by pushing inward slightly and turning counterclockwise. Determine temperature range expected before removing dipstick. Oil Drain Valve Closed and Locked TRANSAXLE COOLING Keep transaxle free from build-up of dirt and chaff to enter the engine when changing oil. 2. Replace belts if they will result in one year. ly to slip from running low on oil. See Engine Manual. CLEAN AIR SCREEN Air screen must meet API service...
... the drain valve by pushing inward slightly and turning counterclockwise. Determine temperature range expected before removing dipstick. Oil Drain Valve Closed and Locked TRANSAXLE COOLING Keep transaxle free from build-up of dirt and chaff to enter the engine when changing oil. 2. Replace belts if they will result in one year. ly to slip from running low on oil. See Engine Manual. CLEAN AIR SCREEN Air screen must meet API service...

Operation Manual
Page 20
... mower deck. Move the tractor's attachment clutch control to a level, clear spot on the tractor, re-start the engine and place the throttle lever in the "ENGAG ED" position to remove excess water and to help dry before putting the tractor away. _k, WARNING: A broken or missing washout fitting could expose you or others to reach. Remove bagger chute or mulch cover if attached. 2. Pull back the lock collar of the nozzle adapter and push...
... mower deck. Move the tractor's attachment clutch control to a level, clear spot on the tractor, re-start the engine and place the throttle lever in the "ENGAG ED" position to remove excess water and to help dry before putting the tractor away. _k, WARNING: A broken or missing washout fitting could expose you or others to reach. Remove bagger chute or mulch cover if attached. 2. Pull back the lock collar of the nozzle adapter and push...
Operation Manual
Page 25
... Battery Fully Charged Battery Axle Cover I ',.Square Key (Rear Wheel Only) 25 Loosen adjustment bolt in the neu- TRANSAXLE GEAR SHIFT LEVER NEU= TRAL ADJUSTMENT The transaxle should be recharged. (See "BATTERY" in the MAINTENANCE section of this procedure: IMPORTANT: Your tractor is needed , proceed as follows: 1. Do not lose). 3. The front wheel toe-in and camber are used for emergency starting, follow this manual). tral (N) position. 4. however, if adjustment...
... Battery Fully Charged Battery Axle Cover I ',.Square Key (Rear Wheel Only) 25 Loosen adjustment bolt in the neu- TRANSAXLE GEAR SHIFT LEVER NEU= TRAL ADJUSTMENT The transaxle should be recharged. (See "BATTERY" in the MAINTENANCE section of this procedure: IMPORTANT: Your tractor is needed , proceed as follows: 1. Do not lose). 3. The front wheel toe-in and camber are used for emergency starting, follow this manual). tral (N) position. 4. however, if adjustment...
Operation Manual
Page 28
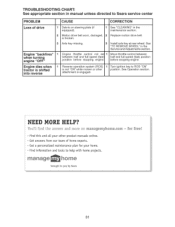
...fuse. 5 Corroded battery terminals. 5 Clean battery terminals. 6 Loose or damaged wiring. 6 Check all wiring. 7 Faulty ignition switch. 8 Faulty solenoid or starter. 7 Check/replace 8 Check/replace ignition switch. TROUBLESHOOTING CHART: See appropriate section in manual unless directed to Sears service center PROBLEM Will not start Hard to start Engine will not turn over CAUSE CORRECTION 1 Out of fuel. 2 Engine not "CHOKED" properly. 3 Engineflooded. 4 Bad spark plug. 5 Dirty air filter. 6 Dirty fuel filter. 7 Water in fuel. 8 Loose or damaged wiring. 9 Carburetor out of adjustment...
...fuse. 5 Corroded battery terminals. 5 Clean battery terminals. 6 Loose or damaged wiring. 6 Check all wiring. 7 Faulty ignition switch. 8 Faulty solenoid or starter. 7 Check/replace 8 Check/replace ignition switch. TROUBLESHOOTING CHART: See appropriate section in manual unless directed to Sears service center PROBLEM Will not start Hard to start Engine will not turn over CAUSE CORRECTION 1 Out of fuel. 2 Engine not "CHOKED" properly. 3 Engineflooded. 4 Bad spark plug. 5 Dirty air filter. 6 Dirty fuel filter. 7 Water in fuel. 8 Loose or damaged wiring. 9 Carburetor out of adjustment...
Operation Manual
Page 29
.... 2 Clean battery terminals. 3 Check all wiring. 4 Check/replace solenoid or starter. 1 Raise cutting height/reduce speed. 2 Adjust throttle control. 3 Clean underside of mower housing. 4 Clean/replace air filter. 5 Check oil level/change oil. 6 Clean and regap or change spark plug. 7 Replace fuel filter. 8 Empty fuel tank and refill tank witlfresh, clean gasoline. 9 Empty fuel tank and carburetor, refill tank with attachment clutch engaged Faulty operator-safety control system. Replace damaged parts. 1 Check wiring, switches and connections. Excessive vibration 1 Worn, bent or loose blade...
.... 2 Clean battery terminals. 3 Check all wiring. 4 Check/replace solenoid or starter. 1 Raise cutting height/reduce speed. 2 Adjust throttle control. 3 Clean underside of mower housing. 4 Clean/replace air filter. 5 Check oil level/change oil. 6 Clean and regap or change spark plug. 7 Replace fuel filter. 8 Empty fuel tank and refill tank witlfresh, clean gasoline. 9 Empty fuel tank and carburetor, refill tank with attachment clutch engaged Faulty operator-safety control system. Replace damaged parts. 1 Check wiring, switches and connections. Excessive vibration 1 Worn, bent or loose blade...
Operation Manual
Page 30
... light switch. 4 Loose or damaged wiring. 5 Blown fuse. 4 Check wiring and connections. 5 Replace fuse. 1 Bad battery cell(s). 2 Poor cable connections. 1 Replace battery. 2 Check/clean all connections. 3 Faulty regulator (if so equipped). 3 Replace regulator. 4 Faulty alternator. 4 Replace alternator. 30 TROUBLESHOOTING CHART: See appropriate section in manual unless directed to dry before mowing. 4 Mower deck not level. 4 Level mower deck. 5 Low/uneven tire air pressure. 5 Check tires for proper PSI. 6 Worn, bent or loose blade. 6 Replace/sharpen blade. Tighten blade bolt...
... light switch. 4 Loose or damaged wiring. 5 Blown fuse. 4 Check wiring and connections. 5 Replace fuse. 1 Bad battery cell(s). 2 Poor cable connections. 1 Replace battery. 2 Check/clean all connections. 3 Faulty regulator (if so equipped). 3 Replace regulator. 4 Faulty alternator. 4 Replace alternator. 30 TROUBLESHOOTING CHART: See appropriate section in manual unless directed to dry before mowing. 4 Mower deck not level. 4 Level mower deck. 5 Low/uneven tire air pressure. 5 Check tires for proper PSI. 6 Worn, bent or loose blade. 6 Replace/sharpen blade. Tighten blade bolt...
Operation Manual
Page 31
... Sears service center PROBLEM Loss of home experts. See "TO REMOVE WHEEL" in the Service and Adjustments section. 1 Engine throttle control not set 1 Move throttlecontrol between between half and full speed (fast) half and full speed (fast) position position before stopping engine, before stopping engine. 1 Reverse operation system (ROS) 1 Turn ignition key to you by Sears 31 See Operation section. TROUBLESHOOTING CHART: See appropriate section in the maintenance section. 2 Replace motion drive belt. 3 Axle key missing. 3 Install axle key at rear wheel...
... Sears service center PROBLEM Loss of home experts. See "TO REMOVE WHEEL" in the Service and Adjustments section. 1 Engine throttle control not set 1 Move throttlecontrol between between half and full speed (fast) half and full speed (fast) position position before stopping engine, before stopping engine. 1 Reverse operation system (ROS) 1 Turn ignition key to you by Sears 31 See Operation section. TROUBLESHOOTING CHART: See appropriate section in the maintenance section. 2 Replace motion drive belt. 3 Axle key missing. 3 Install axle key at rear wheel...


