
Operation Manual
Page 2
... 16 Service and Adjustments 21 Storage 27 Troubleshooting 28 Sears Service Back Cover Craftsman Riding Equipment Warranty: Lawn Tractors, Garden Tractors, Zero Turn Riders CRAFTSMAN TWO YEAR FULL WARRANTY FOR TWO YEARS from the date of purchase, if any non-expendable part of this product is void if this riding equipment fails due to a defect...
... 16 Service and Adjustments 21 Storage 27 Troubleshooting 28 Sears Service Back Cover Craftsman Riding Equipment Warranty: Lawn Tractors, Garden Tractors, Zero Turn Riders CRAFTSMAN TWO YEAR FULL WARRANTY FOR TWO YEARS from the date of purchase, if any non-expendable part of this product is void if this riding equipment fails due to a defect...
Operation Manual
Page 3
...I. GENERAL OPERATION • Read, understand, and follow all instructions on the machine and in neutral, you to lose control of your tractor. These operators should evaluate their ability to operate the riding mower safely enough to cool before dismounting. • Disengage blades when not ...operate the machine. • Clear the area of objects such as rocks, toys, wire, etc., which can touch hot exhaust / engine parts and burn. ,_DANGER: This cutting machine is clear of bystanders before cleaning the machine, removing the grass catcher, or unclogging the discharge ...
...I. GENERAL OPERATION • Read, understand, and follow all instructions on the machine and in neutral, you to lose control of your tractor. These operators should evaluate their ability to operate the riding mower safely enough to cool before dismounting. • Disengage blades when not ...operate the machine. • Clear the area of objects such as rocks, toys, wire, etc., which can touch hot exhaust / engine parts and burn. ,_DANGER: This cutting machine is clear of bystanders before cleaning the machine, removing the grass catcher, or unclogging the discharge ...

Operation Manual
Page 5
... extra caution when servicing them. • Check brake operation frequently. Repair, if necessary, before and while backing. • Never carry children, even with manufacturer's recommended parts, when necessary. • Mower blades are sharp. Always look behind before restarting. • Never make any fuel-soaked de-
... extra caution when servicing them. • Check brake operation frequently. Repair, if necessary, before and while backing. • Never carry children, even with manufacturer's recommended parts, when necessary. • Mower blades are sharp. Always look behind before restarting. • Never make any fuel-soaked de-
Operation Manual
Page 6
...Craftsman@ product is available through your nearest Sears service center (See REPAIR PARTS manual). It has been designed, engineered and manufactured to give you the best possible dependability and Here's what's included in the Agreement: • Expert service by phone- We have access to over 4.5 million quality parts...That's the kind of professionalism you money and aggravation. Pur- SEARS INSTALLATION SERVICE For Sears professional installation of a new tractor. PRODUCT SPECIFICATIONS In the state of California the above 32°F ' SAE 5W30 (below 32°F W/Filter: ...
...Craftsman@ product is available through your nearest Sears service center (See REPAIR PARTS manual). It has been designed, engineered and manufactured to give you the best possible dependability and Here's what's included in the Agreement: • Expert service by phone- We have access to over 4.5 million quality parts...That's the kind of professionalism you money and aggravation. Pur- SEARS INSTALLATION SERVICE For Sears professional installation of a new tractor. PRODUCT SPECIFICATIONS In the state of California the above 32°F ' SAE 5W30 (below 32°F W/Filter: ...
Operation Manual
Page 7
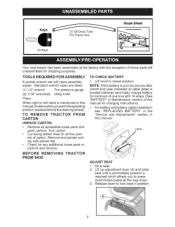
...up adjustment lever (A) and slide seat until a comfortable position is reached which allows you to raised position. TO REMOVE TRACTOR FROM CARTON UNPACK CARTON 1. TOOLS REQUIRED FOR ASSEMBLY TO CHECK BATTERY A socket wrench set will make assembly easier. Label BEFORE REMOVING ...FROM SKID TRACTOR ADJUST SEAT 1. section in • Remove all accessible loose parts and parts cartons from carton. • Cut along dotted lines on label (label is located between terminals) charge...
...up adjustment lever (A) and slide seat until a comfortable position is reached which allows you to raised position. TO REMOVE TRACTOR FROM CARTON UNPACK CARTON 1. TOOLS REQUIRED FOR ASSEMBLY TO CHECK BATTERY A socket wrench set will make assembly easier. Label BEFORE REMOVING ...FROM SKID TRACTOR ADJUST SEAT 1. section in • Remove all accessible loose parts and parts cartons from carton. • Cut along dotted lines on label (label is located between terminals) charge...
Operation Manual
Page 8
... by depressing clutch/brake pedal. 3. Operate them before you operate your tractor, check to use your tractor off skid. 5. NOTE: You may now roll your tractor, pay extra attention to the following checklist: ,/* All assembly instructions have been completed. ,/* No remaining loose parts in the Service and Adjustments section of this manual). 8 Continue with...
... by depressing clutch/brake pedal. 3. Operate them before you operate your tractor, check to use your tractor off skid. 5. NOTE: You may now roll your tractor, pay extra attention to the following checklist: ,/* All assembly instructions have been completed. ,/* No remaining loose parts in the Service and Adjustments section of this manual). 8 Continue with...
Operation Manual
Page 17
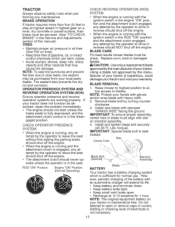
... for 1 hour. Replace worn, bent or damaged blades. CHECK OPERATOR SYSTEM PRESENCE • When the engine is hazardous, could damage your tractor and void your tractor. NOTE: Protect your local parts dealer. NOTE: To seal tire punctures and prevent flat tires due to blades. tempt by the manufacturer of the battery with the...
... for 1 hour. Replace worn, bent or damaged blades. CHECK OPERATOR SYSTEM PRESENCE • When the engine is hazardous, could damage your tractor and void your tractor. NOTE: Protect your local parts dealer. NOTE: To seal tire punctures and prevent flat tires due to blades. tempt by the manufacturer of the battery with the...
Operation Manual
Page 19
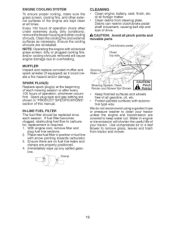
...as it could create a fire hazard and/or damage. IN=LINE FUEL FILTER The fue! CAUTION: Avoid all pinch points and movable parts Clutch/brake pedal Clean top side Steering SFetenedreinrg anSdysMteomw,erDaNJsoht, Shown ! _ClbAUTPPIoOiinnNct:hs • Keep finished surfaces and wheels free of ...all foreign matter. • Clean debris from tractor and mower. 19 ENGINE COOLING SYSTEM To ensure proper cooling, make sure the grass screen, cooling fins, and other cooling shrouds. Every...
...as it could create a fire hazard and/or damage. IN=LINE FUEL FILTER The fue! CAUTION: Avoid all pinch points and movable parts Clutch/brake pedal Clean top side Steering SFetenedreinrg anSdysMteomw,erDaNJsoht, Shown ! _ClbAUTPPIoOiinnNct:hs • Keep finished surfaces and wheels free of ...all foreign matter. • Clean debris from tractor and mower. 19 ENGINE COOLING SYSTEM To ensure proper cooling, make sure the grass screen, cooling fins, and other cooling shrouds. Every...

Operation Manual
Page 20
It should be utilized after each use. 1. Pull back the lock collar of its surface as part of the nozzle adapter to turn the tractor's engine off . 20 Move the tractor to the "DISENGAGED" posi- Nozzle Adapter _ _._,.IHose Washout Port IMPORTANT: Tug hose ensuring connection is clear. . IMPORTANT: ...secure. 5. position. Place the attachment clutch control in the "ENGAG ED" position to remove excess water and to help dry before putting the tractor away. _k, WARNING: A broken or missing washout fitting could expose you or others to thrown objects from contact with the blade. •...
It should be utilized after each use. 1. Pull back the lock collar of its surface as part of the nozzle adapter to turn the tractor's engine off . 20 Move the tractor to the "DISENGAGED" posi- Nozzle Adapter _ _._,.IHose Washout Port IMPORTANT: Tug hose ensuring connection is clear. . IMPORTANT: ...secure. 5. position. Place the attachment clutch control in the "ENGAG ED" position to remove excess water and to help dry before putting the tractor away. _k, WARNING: A broken or missing washout fitting could expose you or others to thrown objects from contact with the blade. •...

Operation Manual
Page 21
... parts have completely stopped. 6. Place attachment clutch in neutral position. 3. Disconnect front link (E) from rear mower bracket (D) - Lower attachment lift lever to its lowest position. 3. Slide mower under right side of mower and discon- Disconnect spark plug wire from under tractor ...it is spring loaded. Have a tight grip on level surface and engage parking brake. 1. TO INSTALL MOWER Ensure tractor is to either side of tractor. NOTE: Ensure mower side suspension arms (A) are discon- WSEARRVNICINEG: ORTOADAJVUOSITDMESNETRSIO: US INJURY, BEFORE PERFORMING ANY 1. ...
... parts have completely stopped. 6. Place attachment clutch in neutral position. 3. Disconnect front link (E) from rear mower bracket (D) - Lower attachment lift lever to its lowest position. 3. Slide mower under right side of mower and discon- Disconnect spark plug wire from under tractor ...it is spring loaded. Have a tight grip on level surface and engage parking brake. 1. TO INSTALL MOWER Ensure tractor is to either side of tractor. NOTE: Ensure mower side suspension arms (A) are discon- WSEARRVNICINEG: ORTOADAJVUOSITDMESNETRSIO: US INJURY, BEFORE PERFORMING ANY 1. ...

Operation Manual
Page 26
... "_ (Black) . _ Cable INTERLOCKS AND RELAYS Loose or damaged wiring may be necessary. See electrical wiring dia- Stand in the backside of tractor. If adjustment is necessary, see engine manual. REPLACING BATTERY _IbWARNING: Do not short battery ter- Slide terminal cover over terminal 5. Hood HeadLight Wire...carefully remove battery from accidental grounding. 1. tive (+) terminal with hex bolt and keps nut as shown. plug-in the Repair Parts section. Grasp hood at the same time. Replace bulb in holder and install bulb holder securely back into the hole in same...
... "_ (Black) . _ Cable INTERLOCKS AND RELAYS Loose or damaged wiring may be necessary. See electrical wiring dia- Stand in the backside of tractor. If adjustment is necessary, see engine manual. REPLACING BATTERY _IbWARNING: Do not short battery ter- Slide terminal cover over terminal 5. Hood HeadLight Wire...carefully remove battery from accidental grounding. 1. tive (+) terminal with hex bolt and keps nut as shown. plug-in the Repair Parts section. Grasp hood at the same time. Replace bulb in holder and install bulb holder securely back into the hole in same...

Operation Manual
Page 27
.... buretor. Do not empty the gas tank and carburetor if using ethanol or methanol) can if your tractor with new spark plug(s). for damage, breakage and wear. Inspect moving parts for a 4. ed and place cables where they cannot come in contact with battery terminals. • ... clean it thoroughly, remove all rusted or chipped paint surfaces; gine and letting it to give protection and dirt. Immediately prepare your tractor to rust. Replace if necessary. 5. Turn ignition key to start position few seconds to reach the car- Always follow the mix ratio...
.... buretor. Do not empty the gas tank and carburetor if using ethanol or methanol) can if your tractor with new spark plug(s). for damage, breakage and wear. Inspect moving parts for a 4. ed and place cables where they cannot come in contact with battery terminals. • ... clean it thoroughly, remove all rusted or chipped paint surfaces; gine and letting it to give protection and dirt. Immediately prepare your tractor to rust. Replace if necessary. 5. Turn ignition key to start position few seconds to reach the car- Always follow the mix ratio...
Operation Manual
Page 29
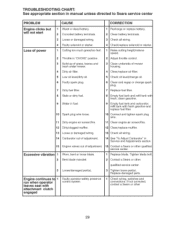
Excessive vibration 1 Worn, bent or loose blade. 2 Bent blade mandrel. 3 Loose/damaged part(s). Tighten blade bolt 2 Contact a Sears or other 29 Engine continues to Sears service center PROBLEM CAUSE CORRECTION Engine clicks but will not start Loss of ... air screen/fins. 12 Dirty/clogged muffler. 13 Loose or damaged wiring. 14 Carburetor out of adjustment. 15 Engine valves out of adjustment. Replace damaged parts. 1 Check wiring, switches and connections. If not corrected, contact a Sears or other qualified service center. 3 Tighten loose...
Excessive vibration 1 Worn, bent or loose blade. 2 Bent blade mandrel. 3 Loose/damaged part(s). Tighten blade bolt 2 Contact a Sears or other 29 Engine continues to Sears service center PROBLEM CAUSE CORRECTION Engine clicks but will not start Loss of ... air screen/fins. 12 Dirty/clogged muffler. 13 Loose or damaged wiring. 14 Carburetor out of adjustment. 15 Engine valves out of adjustment. Replace damaged parts. 1 Check wiring, switches and connections. If not corrected, contact a Sears or other qualified service center. 3 Tighten loose...

Operation Manual
Page 64
...de Sears Brands, LLC MCMarque de commerce / MDMarque d6posee de Sears Brands, LLC 05.14.10 JA Printed in the U.S.A. For the replacement parts, accessories and owner's manuals that you by Sears: 1-800-827-6655 (U.S.A.) 1-800-361-6665 (Canada) Para pedir servicio de reparaci6n a ...) on -line for your home - For Sears professional installation of home experts. : o Get a personalized maintenance plan for the nearest Sears Parts and Repair Center. 1-800-488-1222 Anytime, day or night (U.S.A. oGeat nswefrosmourteam of home appliances and items like vacuums, lawn equipment, and ...
...de Sears Brands, LLC MCMarque de commerce / MDMarque d6posee de Sears Brands, LLC 05.14.10 JA Printed in the U.S.A. For the replacement parts, accessories and owner's manuals that you by Sears: 1-800-827-6655 (U.S.A.) 1-800-361-6665 (Canada) Para pedir servicio de reparaci6n a ...) on -line for your home - For Sears professional installation of home experts. : o Get a personalized maintenance plan for the nearest Sears Parts and Repair Center. 1-800-488-1222 Anytime, day or night (U.S.A. oGeat nswefrosmourteam of home appliances and items like vacuums, lawn equipment, and ...

