Operation Manual
Page 2
.... • Crystalline silica from bricks and cement and other rightswhichvary from state to order replacement parts.) • Maintain proper adjustment of rip fence and blade guard. • Never adjust saw while running unattended. TOOL SHOULD BE MAINTAINED • Always unplugtoolpriorto inspection. • Consult... Illustration and List Espafiol 2 2-5 5 6-8 8-9 9-13 13 14 16-17 18-29 30-47 ONE-YEAR FULL WARRANTY ON CRAFTSMAN TOOL if this manual -- Do not wear loose clothing, gloves, neckties,rings, braceletsor otherjewelrywhichmay get caught in movingparts of checking to...
.... • Crystalline silica from bricks and cement and other rightswhichvary from state to order replacement parts.) • Maintain proper adjustment of rip fence and blade guard. • Never adjust saw while running unattended. TOOL SHOULD BE MAINTAINED • Always unplugtoolpriorto inspection. • Consult... Illustration and List Espafiol 2 2-5 5 6-8 8-9 9-13 13 14 16-17 18-29 30-47 ONE-YEAR FULL WARRANTY ON CRAFTSMAN TOOL if this manual -- Do not wear loose clothing, gloves, neckties,rings, braceletsor otherjewelrywhichmay get caught in movingparts of checking to...
Operation Manual
Page 3
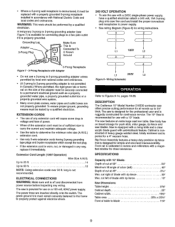
... WARNING: For your own safety, do not operate your face or body in the workpiece, turn the saw OFF and disconnect power source when removing the table insert, changing the cutting too], removing or replacing the blade guard, or making adjustments. PROTECTION: EYES, HANDS, FACE, BODY, EARS • If... spreader must be used to keep the work ) and by : • Maintaining rip fence parallel to saw blade. • Keeping saw to the floor, as cuttingextremelyheavy panels or long heavy boards, the saw blade and the pawls must be thrown back at the operator at the time, check to...
... WARNING: For your own safety, do not operate your face or body in the workpiece, turn the saw OFF and disconnect power source when removing the table insert, changing the cutting too], removing or replacing the blade guard, or making adjustments. PROTECTION: EYES, HANDS, FACE, BODY, EARS • If... spreader must be used to keep the work ) and by : • Maintaining rip fence parallel to saw blade. • Keeping saw to the floor, as cuttingextremelyheavy panels or long heavy boards, the saw blade and the pawls must be thrown back at the operator at the time, check to...
Operation Manual
Page 5
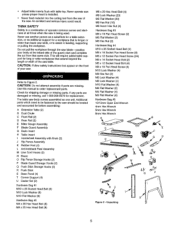
... serious injury could result. Do not pull the workpiece through the saw blade--position your saw should be located and accounted for a table extension, or as one unit. The table saw body comes assembled as additional support for replacement. • Adjust table inserts flush with Knob (2) J Rip Fence Assembly K Rubber Foot (4) L Antkkickback Pawi Assembly M Line Cord Hooks (2) N Brace...
... serious injury could result. Do not pull the workpiece through the saw blade--position your saw should be located and accounted for a table extension, or as one unit. The table saw body comes assembled as additional support for replacement. • Adjust table inserts flush with Knob (2) J Rip Fence Assembly K Rubber Foot (4) L Antkkickback Pawi Assembly M Line Cord Hooks (2) N Brace...
Operation Manual
Page 6
... CAUTION: Do not attempt assembly if parts are clean and free of the cabinet. Saw cabinet should be required) will allow you to adjust the cabinet holes to order replacement parts. SAW INSTALLATION Positioning the saw is disconnected from the power source. • Place one of the base usingfour screws...Key Nos. 18 and 19) to the leftside of the saw is disconnected from the power source. ASSEMBLE RIP FENCE STORAGE BRACKETS Refer to the table using six M6 x I2 socket pan head bolts (Key No. 2). Install the rip fence storage brackets (Key No. 34) to the right side panel...
... CAUTION: Do not attempt assembly if parts are clean and free of the cabinet. Saw cabinet should be required) will allow you to adjust the cabinet holes to order replacement parts. SAW INSTALLATION Positioning the saw is disconnected from the power source. • Place one of the base usingfour screws...Key Nos. 18 and 19) to the leftside of the saw is disconnected from the power source. ASSEMBLE RIP FENCE STORAGE BRACKETS Refer to the table using six M6 x I2 socket pan head bolts (Key No. 2). Install the rip fence storage brackets (Key No. 34) to the right side panel...

Operation Manual
Page 8
...If it should be grounded whilein usetoprotectoperatorfrom electricasl hock. • Check with table, adjust leveling screws (Key No. 42) up or down. NOTE: The teeth of saw. ATTACH BLADE GUARD AND ANTI-KICKBACK PAWLS Refer to Figure 14, page ... at end of anti-kickback pawls should now ride freely on rip fence rails. e certain mitergauge T-slotsin table are not understoodor if in doubtas to the table.Use set onto rivingknifeat notches indicated.The springpin is placedin the front ...). Do not modify plug provided. Locking Pin Figure 4 - If repair or replacement of table.
...If it should be grounded whilein usetoprotectoperatorfrom electricasl hock. • Check with table, adjust leveling screws (Key No. 42) up or down. NOTE: The teeth of saw. ATTACH BLADE GUARD AND ANTI-KICKBACK PAWLS Refer to Figure 14, page ... at end of anti-kickback pawls should now ride freely on rip fence rails. e certain mitergauge T-slotsin table are not understoodor if in doubtas to the table.Use set onto rivingknifeat notches indicated.The springpin is placedin the front ...). Do not modify plug provided. Locking Pin Figure 4 - If repair or replacement of table.
Operation Manual
Page 9
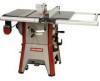
... saw is designed for the professional user and is ruggedly constructed for use on board storage for push stick, miter gauge, rip fence and saw...plug onto saw blades. WARNING: This work should be performed by a qualified electrician. DESCRIPTION The Craftsman 10" Model Number 218330 contractor saw features an extra large cast iron table. Grounding...must be replaced with a properly grounded 3-prong receptacle installed in accordance with rip fence 3'_" 45 ° 2¾," 30" 13" Saw Dimensions: Table height Cabinet depth Cabinet width Table area Front of table to blade...
... saw is designed for the professional user and is ruggedly constructed for use on board storage for push stick, miter gauge, rip fence and saw...plug onto saw blades. WARNING: This work should be performed by a qualified electrician. DESCRIPTION The Craftsman 10" Model Number 218330 contractor saw features an extra large cast iron table. Grounding...must be replaced with a properly grounded 3-prong receptacle installed in accordance with rip fence 3'_" 45 ° 2¾," 30" 13" Saw Dimensions: Table height Cabinet depth Cabinet width Table area Front of table to blade...
Operation Manual
Page 12
...out of the guard againstthe workpiece. Replace guard immediately after each change of the blade and use a work across the grain at an angle other than 6" between the fence and the blade. Performed with rip fence, is tilted away from the fence and hands. Do not attempt ...WARNING: Before connecting the table saw blade. Remove them by feeding the workpiece into the blade guard area and until the workpiece touches the brade. With the power off . WARNING: Use cautionwhen startingthe cutto prevent binding of the mounting bracket. Position the fence to the blade guard ...
...out of the guard againstthe workpiece. Replace guard immediately after each change of the blade and use a work across the grain at an angle other than 6" between the fence and the blade. Performed with rip fence, is tilted away from the fence and hands. Do not attempt ...WARNING: Before connecting the table saw blade. Remove them by feeding the workpiece into the blade guard area and until the workpiece touches the brade. With the power off . WARNING: Use cautionwhen startingthe cutto prevent binding of the mounting bracket. Position the fence to the blade guard ...
Operation Manual
Page 13
...type of cut flat file. 13 NOTE: Instead of blades (dado set is used . SERVICE * Replace beltsand worn parts as applicable. Therefore, blade guard must be substituted dado table insert (not included). Dadoing is done with grain, across an end or along an edge. number ...lubrication should match up to service, repair, dismantle, or disassemble any preservative on table. PLOUGHING Performed with rip fence, is grooving with appropriate solvent (mineral spirits). The dado set ) rather than saw , see that high-quality blades and cutting tools be fitted with special parts ...
...type of cut flat file. 13 NOTE: Instead of blades (dado set is used . SERVICE * Replace beltsand worn parts as applicable. Therefore, blade guard must be substituted dado table insert (not included). Dadoing is done with grain, across an end or along an edge. number ...lubrication should match up to service, repair, dismantle, or disassemble any preservative on table. PLOUGHING Performed with rip fence, is grooving with appropriate solvent (mineral spirits). The dado set ) rather than saw , see that high-quality blades and cutting tools be fitted with special parts ...
Operation Manual
Page 16
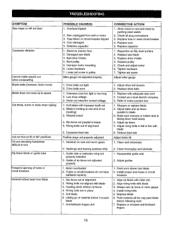
... Replace saw blade 3. Drive belts not tight 2. Extension cord too light or too long 2. Replace blade 6, Push material all plug connections 3. Tighten set screw in place 5, Dull blade 6, Letting go of rip fence not adjusted properly 1. Adjust table and rip fence ...blade with blade 3, Feeding stock without rip fence 4, Riving knife not in pulley Miter gauge not adjusted properly CORRECTIVE ACTION I . Replace pulley 5. Motor not wired for correct voltage 1. Clean thoroughly and lubricate 1. Adjust guides 1. Saw unplugged from blade POSSIBLE CAUSE(S) 1. Reduce...
... Replace saw blade 3. Drive belts not tight 2. Extension cord too light or too long 2. Replace blade 6, Push material all plug connections 3. Tighten set screw in place 5, Dull blade 6, Letting go of rip fence not adjusted properly 1. Adjust table and rip fence ...blade with blade 3, Feeding stock without rip fence 4, Riving knife not in pulley Miter gauge not adjusted properly CORRECTIVE ACTION I . Replace pulley 5. Motor not wired for correct voltage 1. Clean thoroughly and lubricate 1. Adjust guides 1. Saw unplugged from blade POSSIBLE CAUSE(S) 1. Reduce...


