
Operation Manual
Page 1
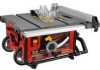
Customer Help Line: 1-800-932-3188 Sears, Roebuck and Co., 3333 Beverly Rd., Hoffman Estates, IL 60179 USA Visit the Craftsman web page: www.sears.com/craftsman 987000-344 9-1-08 (REV:00) Save this product. PERATOR'S AL 10 in. TABLE SAW Model No. 315.218280 ,& WARNING: To reduce the risk of injury, the user must read and understand the operator's manual before using this manual for future reference
Customer Help Line: 1-800-932-3188 Sears, Roebuck and Co., 3333 Beverly Rd., Hoffman Estates, IL 60179 USA Visit the Craftsman web page: www.sears.com/craftsman 987000-344 9-1-08 (REV:00) Save this product. PERATOR'S AL 10 in. TABLE SAW Model No. 315.218280 ,& WARNING: To reduce the risk of injury, the user must read and understand the operator's manual before using this manual for future reference

Operation Manual
Page 4
... TOOL DRY, CLEAN, AND FREE FROM OIL AND GREASE. Failure to whether the tool is 10 in serious personal injury. Stay constantly aware of accessories that accept the tool's plug. [] DO... NOT MODIFY the plug provided, if it well away from lumber before transporting saw or workpiece before connecting to clean tool. [] STAY ALERT AND EXERCISE CONTROL. Never use brake...the risk of blade pinching and kickback, always support large panels. [] REMOVE ALL FENCES AND AUXILIARY TABLES before cutting. [] NEVER TOUCH BLADE or other moving . [] BLADE COASTS AFTER BEING TURNED OFF....
... TOOL DRY, CLEAN, AND FREE FROM OIL AND GREASE. Failure to whether the tool is 10 in serious personal injury. Stay constantly aware of accessories that accept the tool's plug. [] DO... NOT MODIFY the plug provided, if it well away from lumber before transporting saw or workpiece before connecting to clean tool. [] STAY ALERT AND EXERCISE CONTROL. Never use brake...the risk of blade pinching and kickback, always support large panels. [] REMOVE ALL FENCES AND AUXILIARY TABLES before cutting. [] NEVER TOUCH BLADE or other moving . [] BLADE COASTS AFTER BEING TURNED OFF....

Operation Manual
Page 5
A push stick is a device used , including all the way past the saw blade using the table saw. [] ALWAYS TURN OFF SAW before it can vary but the push stick must be replaced only by the manufacturer or by an authorized service center to avoid risk. [] ..., to avoid accidental starting when reconnecting to support or guide the workpiece. [] ALWAYSUSEA PUSH STICK FOR RIPPING NARROW STOCK. b) Keeping rip fence parallel to the saw table for wide or long work pieces. [] AVOID KICKBACKS (work in line with the path of accessories are : • lead from lead-based paints, crystalline silica...
A push stick is a device used , including all the way past the saw blade using the table saw. [] ALWAYS TURN OFF SAW before it can vary but the push stick must be replaced only by the manufacturer or by an authorized service center to avoid risk. [] ..., to avoid accidental starting when reconnecting to support or guide the workpiece. [] ALWAYSUSEA PUSH STICK FOR RIPPING NARROW STOCK. b) Keeping rip fence parallel to the saw table for wide or long work pieces. [] AVOID KICKBACKS (work in line with the path of accessories are : • lead from lead-based paints, crystalline silica...

Operation Manual
Page 9
...Blocks and Push Sticks (for narrow ripping operations. Resaw A cutting operation to reduce the thickness of the workpiece. Riving Knife/Spreader/Splitter (table saws} A metal piece, slightly thinner than at either end of a workpiece by the blade in a non-through the thickness of the workpiece... pushed into the blade or being done. Anti=KickbackPawls (radial arm and table saws} A device which, when properly installed and maintained, is designed to stop the workpiece from wood products. Chamfer A cut removing a wedge ...
...Blocks and Push Sticks (for narrow ripping operations. Resaw A cutting operation to reduce the thickness of the workpiece. Riving Knife/Spreader/Splitter (table saws} A metal piece, slightly thinner than at either end of a workpiece by the blade in a non-through the thickness of the workpiece... pushed into the blade or being done. Anti=KickbackPawls (radial arm and table saws} A device which, when properly installed and maintained, is designed to stop the workpiece from wood products. Chamfer A cut removing a wedge ...

Operation Manual
Page 11
...scale provides precise measurements for a miter cut . MITER GAUGE - A removable metal piece of the blade guard assembly, slightly thinner than the saw table surface on the removable anti-kickback pawls point away from the switch. Place the key in the OFF position, remove the switch key from the... workpiece. The safe use this product, familiarize yourself with a 36-tooth, 10 in the non-through -sawing cuts. The teeth on the front of the cabinet, locks the angle setting of this handwheel to -read indicator shows the...
...scale provides precise measurements for a miter cut . MITER GAUGE - A removable metal piece of the blade guard assembly, slightly thinner than the saw table surface on the removable anti-kickback pawls point away from the switch. Place the key in the OFF position, remove the switch key from the... workpiece. The safe use this product, familiarize yourself with a 36-tooth, 10 in the non-through -sawing cuts. The teeth on the front of the cabinet, locks the angle setting of this handwheel to -read indicator shows the...
Operation Manual
Page 12
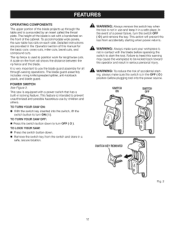
...very important to use the blade guard assembly for all through the table and is used to start the tool. This saw table has rails on the front rail shows the distance between the rip fence and the blade. TO TURN YOUR SAW OFF: [] Press the switch button down . [] Remove the ...basic cuts: cross cuts, miter cuts, bevel cuts, and compound cuts. OPERATING COMPONENTS The upper portion of the blade projects up through -sawing operations. To accommodate wide panels, the saw is set with a handwheel on the front of the cabinet. This feature is not in a safe, secure location. A WARNING: ...
...very important to use the blade guard assembly for all through the table and is used to start the tool. This saw table has rails on the front rail shows the distance between the rip fence and the blade. TO TURN YOUR SAW OFF: [] Press the switch button down . [] Remove the ...basic cuts: cross cuts, miter cuts, bevel cuts, and compound cuts. OPERATING COMPONENTS The upper portion of the blade projects up through -sawing operations. To accommodate wide panels, the saw is set with a handwheel on the front of the cabinet. This feature is not in a safe, secure location. A WARNING: ...

Operation Manual
Page 15
...handle assembly using 1/4 in place on the floor. After assembling it on a level work surface. [] Inspect the tool carefully to make sure the table saw is noted, secure the workbench to the floor before operating. to a firm supporting, waist high surface such as a workbench or leg stand. ...MOUNTING HOLES The table saw must be bolted securely using a flat blade screwdriver. [] Hold the nylon nut securely and turn the screw clockwise and tighten in place. [] ...
...handle assembly using 1/4 in place on the floor. After assembling it on a level work surface. [] Inspect the tool carefully to make sure the table saw is noted, secure the workbench to the floor before operating. to a firm supporting, waist high surface such as a workbench or leg stand. ...MOUNTING HOLES The table saw must be bolted securely using a flat blade screwdriver. [] Hold the nylon nut securely and turn the screw clockwise and tighten in place. [] ...

Operation Manual
Page 16
..., press the button while pushing the handle down into the handle tube. PUSH STICK MITER GAUGE Fig. 8 1 J 16 Fig. 10 TO STORE THE TABLE SAW ACCESSORIES See Figures 7- 8. The table saw has two convenient storage areas (one on the wheels. [] Pull the saw to a firm supporting surface such as it locks in use, store accessories securely.
..., press the button while pushing the handle down into the handle tube. PUSH STICK MITER GAUGE Fig. 8 1 J 16 Fig. 10 TO STORE THE TABLE SAW ACCESSORIES See Figures 7- 8. The table saw has two convenient storage areas (one on the wheels. [] Pull the saw to a firm supporting surface such as it locks in use, store accessories securely.
Operation Manual
Page 18
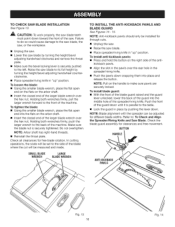
... do so could cause damage to the saw blade, the saw, or the workpiece. [] Unplug the saw. [] Lower the saw blade. [] Place spreader/riving knife in place by pushing the lever down. Holding both wrenches firmly, pull the larger wrench forward to the table. [] Lock the guard in "up...blade rotation. Do not overtighten. PAWLS AND NOTE: Anti-kickback pawls should only be installed for through cuts. [] Unplug the saw. [] Raise the saw blade by turning the height/bevel adjusting handwheel counterclockwise. [] Place spreader/riving knife in the spreader/riving knife. Refer to ...
... do so could cause damage to the saw blade, the saw, or the workpiece. [] Unplug the saw. [] Lower the saw blade. [] Place spreader/riving knife in place by pushing the lever down. Holding both wrenches firmly, pull the larger wrench forward to the table. [] Lock the guard in "up...blade rotation. Do not overtighten. PAWLS AND NOTE: Anti-kickback pawls should only be installed for through cuts. [] Unplug the saw. [] Raise the saw blade by turning the height/bevel adjusting handwheel counterclockwise. [] Place spreader/riving knife in the spreader/riving knife. Refer to ...

Operation Manual
Page 20
... to avoid the risks. Refer to the Electrical section in this tool for the cut . Use it on the other end. Jl, WARNING: The table saw must be ready to resist kickback should clear the workpiece by 1/8 in. Many illustrations in this manual are shown with optional accessories [] Cabinet making a... Do not cut wood and wood composition products only. Never stand directly in the workpiece [] Twisting the wood while making and woodworking NOTE: This table saw blade, they may use the rip fence when rip cutting and the miter gauge when cross cutting. Push sticks are near the...
... to avoid the risks. Refer to the Electrical section in this tool for the cut . Use it on the other end. Jl, WARNING: The table saw must be ready to resist kickback should clear the workpiece by 1/8 in. Many illustrations in this manual are shown with optional accessories [] Cabinet making a... Do not cut wood and wood composition products only. Never stand directly in the workpiece [] Twisting the wood while making and woodworking NOTE: This table saw blade, they may use the rip fence when rip cutting and the miter gauge when cross cutting. Push sticks are near the...

Operation Manual
Page 21
...page 28 for ripping as discussed on the workpiece and locked in . marks. Turn the saw table. HOW TO MOUNT A FEATHERBOARD See Figure 19. Attach a C-clamp to secure the featherboard to the edge of the saw OFF and allow the blade to completely stop rotating before removing the stock. A WARNING: ...warning can result in . Failure to the mark previously made at 6 in., 8 in., 10 in the saw blade. L 3/4 in. 1/4 in. 1/8 in. 18 in. 1-13/16 in . and 12 in . Prepare the saw for information on the table with a C-clamp. Reset the rip fence and cut in . The featherboard is an excellent...
...page 28 for ripping as discussed on the workpiece and locked in . marks. Turn the saw table. HOW TO MOUNT A FEATHERBOARD See Figure 19. Attach a C-clamp to secure the featherboard to the edge of the saw OFF and allow the blade to completely stop rotating before removing the stock. A WARNING: ...warning can result in . Failure to the mark previously made at 6 in., 8 in., 10 in the saw blade. L 3/4 in. 1/4 in. 1/8 in. 18 in. 1-13/16 in . and 12 in . Prepare the saw for information on the table with a C-clamp. Reset the rip fence and cut in . The featherboard is an excellent...

Operation Manual
Page 24
... 24. If adjustments are needed, see To Check the Alignment of the Rip Fence to automatically align and secure the fence. LOCKING LEVER RIP FENCE SAW TABLE BEAR LiP Fig. 25 TO USE THE MITER GAUGE See Figure 26. LOCK KNOB GAUGE Fig. 26 24 LOCKING LEVER FRONT BAIL Fig. 24 TO... right or left. [] Loosen the lock knob. [] With the miter gauge in . MARK SCREW _. Begin with the blade at a zero angle (straight up). [] Unplug the saw table and pull slightly toward the front of the unit. [] Lower the front end of the rip fence onto the guide surfaces on either miter gauge...
... 24. If adjustments are needed, see To Check the Alignment of the Rip Fence to automatically align and secure the fence. LOCKING LEVER RIP FENCE SAW TABLE BEAR LiP Fig. 25 TO USE THE MITER GAUGE See Figure 26. LOCK KNOB GAUGE Fig. 26 24 LOCKING LEVER FRONT BAIL Fig. 24 TO... right or left. [] Loosen the lock knob. [] With the miter gauge in . MARK SCREW _. Begin with the blade at a zero angle (straight up). [] Unplug the saw table and pull slightly toward the front of the unit. [] Lower the front end of the rip fence onto the guide surfaces on either miter gauge...

Operation Manual
Page 25
... operator additional support for cutting long workpieces. [] With the table saw in the off position, stand behind the saw base. OUTFEED SUPPORT SLiDiNGTABLE EXTENSION FENCE TABLE LOCKING LEVER Fig. 28 SCALE Fig. 27 25 Increase the length of the saw table by pushing the lever back towards the saw . [] Grasp the outfeed support with both hands and...
... operator additional support for cutting long workpieces. [] With the table saw in the off position, stand behind the saw base. OUTFEED SUPPORT SLiDiNGTABLE EXTENSION FENCE TABLE LOCKING LEVER Fig. 28 SCALE Fig. 27 25 Increase the length of the saw table by pushing the lever back towards the saw . [] Grasp the outfeed support with both hands and...

Operation Manual
Page 26
... blade guard and anti-kickback pawls. Failure to the rear and again measure the distance. Retighten the bolts. If the distances are located under the saw table in figure 29. [] Turn the blade so the marked tooth is parallel to the blade following any blade adjustments. HEELING (PARALLELING) MITER GAUGE GROOVE ... align the rip fence to the blade before beginning any bolts for this adjustment until you have checked with the front of the saw table and the side of the saw blade as shown in the back of the blade and push it into the blade until the blade is square. Always make...
... blade guard and anti-kickback pawls. Failure to the rear and again measure the distance. Retighten the bolts. If the distances are located under the saw table in figure 29. [] Turn the blade so the marked tooth is parallel to the blade following any blade adjustments. HEELING (PARALLELING) MITER GAUGE GROOVE ... align the rip fence to the blade before beginning any bolts for this adjustment until you have checked with the front of the saw table and the side of the saw blade as shown in the back of the blade and push it into the blade until the blade is square. Always make...

Operation Manual
Page 32
...past a securely tightened blade nut. [] Place release lever in secure location when changing back to the tool. 32 Fig. 42 A JNL WARNING: Unplug the saw to manufacturer instructions, using the blade and chippers appropriate for this procedure (see the Accessories section of cut. [] Reinstall the blade nut. [] Turnthe powerswitchto ...so may have a maximum width of this tool and may result in . Failure to heed this manual and check with the retailer where the table saw blade. NOTE: The blade washer may be rated less than the speed of 1/2 in possible injury and damage to...
...past a securely tightened blade nut. [] Place release lever in secure location when changing back to the tool. 32 Fig. 42 A JNL WARNING: Unplug the saw to manufacturer instructions, using the blade and chippers appropriate for this procedure (see the Accessories section of cut. [] Reinstall the blade nut. [] Turnthe powerswitchto ...so may have a maximum width of this tool and may result in . Failure to heed this manual and check with the retailer where the table saw blade. NOTE: The blade washer may be rated less than the speed of 1/2 in possible injury and damage to...
Operation Manual
Page 40
CRAFTSMAN 10 in ., Hex Hd 1 Elevation Rod 1 Wing Bolt (M5 x 8 mm 3 Screw (M5 x 16 mm, Pan Hd 4...w/Washer (M6 x 18 mm, Hex Soc. NUMBER 1 089110118188 2 411071001 8 089110118081 4 089110118080 5 089110118029 6 089110118184 7 089087008174 8 089110118028 9 089110118027 10 089110118026 11 089110118024 12 089110118028 13 089110118022 14 411071004 15 412011068 16 410171706 17 089110118074 18 089110118078 19 089110118072 20 089110118071 21 089110118084 22 089110118088... ppalarttse. Always mention the model number in all correspondence regarding your 1 KEY PART NO. TABLE SAW -
CRAFTSMAN 10 in ., Hex Hd 1 Elevation Rod 1 Wing Bolt (M5 x 8 mm 3 Screw (M5 x 16 mm, Pan Hd 4...w/Washer (M6 x 18 mm, Hex Soc. NUMBER 1 089110118188 2 411071001 8 089110118081 4 089110118080 5 089110118029 6 089110118184 7 089087008174 8 089110118028 9 089110118027 10 089110118026 11 089110118024 12 089110118028 13 089110118022 14 411071004 15 412011068 16 410171706 17 089110118074 18 089110118078 19 089110118072 20 089110118071 21 089110118084 22 089110118088... ppalarttse. Always mention the model number in all correspondence regarding your 1 KEY PART NO. TABLE SAW -

Operation Manual
Page 41
...CRAFTSMAN 10 in all correspondence regarding your 1 KEY PART NO. Always mention the model number in . Screw w/Washer (M5 x 10 mm, Pan Hd 2 Plate 1 Screw (M6 x 50 mm, Flat Hd 1 Screw w/Washer (M4 x 8 mm, Pan Hd 2 Cam 2 Reinforcement Plate 1 Screw w/Washer (M5 x 15 mm, Pan Hd 4 Logo Label 3 Front Panel (Inc. TABLE SAW...Pin (D4 x 20 mm 1 Handwheel Rod 1 Retaining Ring 1 Height/Bevel Handwheel 1 Screw (M4 x 7 mm, Flat Hd 7 Spring 1 Screw (M4 x 10 mm, Pan Hd 1 Bevel Indicator 1 Screw (M4 x 18 mm 4 Switch Key 1 Switch Assembly (Inc. Key No. 88 1 Warning/Logo Label 1 Switch...
...CRAFTSMAN 10 in all correspondence regarding your 1 KEY PART NO. Always mention the model number in . Screw w/Washer (M5 x 10 mm, Pan Hd 2 Plate 1 Screw (M6 x 50 mm, Flat Hd 1 Screw w/Washer (M4 x 8 mm, Pan Hd 2 Cam 2 Reinforcement Plate 1 Screw w/Washer (M5 x 15 mm, Pan Hd 4 Logo Label 3 Front Panel (Inc. TABLE SAW...Pin (D4 x 20 mm 1 Handwheel Rod 1 Retaining Ring 1 Height/Bevel Handwheel 1 Screw (M4 x 7 mm, Flat Hd 7 Spring 1 Screw (M4 x 10 mm, Pan Hd 1 Bevel Indicator 1 Screw (M4 x 18 mm 4 Switch Key 1 Switch Assembly (Inc. Key No. 88 1 Warning/Logo Label 1 Switch...

Operation Manual
Page 43
TABLE SAW - MODEL NUMBER 315.218280 -, J I TAhBe LmEodSeAl Wnuomrbwehr ewn ...48 089110113003 49 0134010308 50 410341004 51 089110113004 52 089110113098 53 0134010212 54 410561014 DESCRIPTION QTY. Hd.) ........ 4 Extension Table 1 Scale Label (Long 1 Rail End Cap (Right Front 1 Screw (M4 x 5 mm 1 43 Always ...1 Rear Plate 1 Pin (D4 x 31 mm 1 Linkage 1 Screw w/Washer (M4 x 10 mm, Pan Hd 1 Fence Indicator 1 Washer 2 Axle Clamp 1 Lock Lever 1 Pad 2 Screw (8-32 x 1/2 in . CRAFTSMAN 10 in ., Flat Hd 4 Fence Slider 2 Front Block 1 Fence Logo Label 1 Washer 2...
TABLE SAW - MODEL NUMBER 315.218280 -, J I TAhBe LmEodSeAl Wnuomrbwehr ewn ...48 089110113003 49 0134010308 50 410341004 51 089110113004 52 089110113098 53 0134010212 54 410561014 DESCRIPTION QTY. Hd.) ........ 4 Extension Table 1 Scale Label (Long 1 Rail End Cap (Right Front 1 Screw (M4 x 5 mm 1 43 Always ...1 Rear Plate 1 Pin (D4 x 31 mm 1 Linkage 1 Screw w/Washer (M4 x 10 mm, Pan Hd 1 Fence Indicator 1 Washer 2 Axle Clamp 1 Lock Lever 1 Pad 2 Screw (8-32 x 1/2 in . CRAFTSMAN 10 in ., Flat Hd 4 Fence Slider 2 Front Block 1 Fence Logo Label 1 Washer 2...

Operation Manual
Page 44
...089110113006 69 0134010213 70 0134010304 71 089110113008 72 089110113097 PARTS LIST (FIGURE B) DESCRIPTION QTY. Screw (8-32 x 3/8 in., Pan Hd 2 Washer 2 External Tooth Lock Washer 2 Bumper 2 Saw Table 1 Screw (M6 x 20 mm, Hex Hd 6 Rear Rail Holder 3 Outfeed Bracket (Right 2 Screw (M6 x 25 mm Hex Hd 4 Outfeed Assembly 1 Outfeed Support 1 ... 410161010 82 089110113704 83 089110113174 84 410551701 85 089110113175 86 410192001 87 411071001 88 410031002 89 089110113012 90 410251017 DESCRIPTION QTY. r CRAFTSMAN 10 in all correspondence regarding your "1 KEY PART NO. TABLE SAW -
...089110113006 69 0134010213 70 0134010304 71 089110113008 72 089110113097 PARTS LIST (FIGURE B) DESCRIPTION QTY. Screw (8-32 x 3/8 in., Pan Hd 2 Washer 2 External Tooth Lock Washer 2 Bumper 2 Saw Table 1 Screw (M6 x 20 mm, Hex Hd 6 Rear Rail Holder 3 Outfeed Bracket (Right 2 Screw (M6 x 25 mm Hex Hd 4 Outfeed Assembly 1 Outfeed Support 1 ... 410161010 82 089110113704 83 089110113174 84 410551701 85 089110113175 86 410192001 87 411071001 88 410031002 89 089110113012 90 410251017 DESCRIPTION QTY. r CRAFTSMAN 10 in all correspondence regarding your "1 KEY PART NO. TABLE SAW -

Operation Manual
Page 46
..., Pan Hd 4 Carry Rod 2 Sleeve 2 O-Ring 4 Bushing (Lower 2 Bushing (Upper 2 Foot (Upper 4 KEY PART NO. attached to the motor housing. CRAFTSMAN 10 in. TABLE SAW - Carry Handle Assembly 1 Slider Bushing 2 Slider Housing 2 Hex Nut (M5 2 Screw 2 Slider 2 Pin 2 Release Button 1 Nylon Nut 2 Screw (M4 x 16 mm 6 Carry Handle Cover (Inc. ...
..., Pan Hd 4 Carry Rod 2 Sleeve 2 O-Ring 4 Bushing (Lower 2 Bushing (Upper 2 Foot (Upper 4 KEY PART NO. attached to the motor housing. CRAFTSMAN 10 in. TABLE SAW - Carry Handle Assembly 1 Slider Bushing 2 Slider Housing 2 Hex Nut (M5 2 Screw 2 Slider 2 Pin 2 Release Button 1 Nylon Nut 2 Screw (M4 x 16 mm 6 Carry Handle Cover (Inc. ...


