
Operation Manual
Page 1
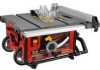
Customer Help Line: 1-800-932-3188 Sears, Roebuck and Co., 3333 Beverly Rd., Hoffman Estates, IL 60179 USA Visit the Craftsman web page: www.sears.com/craftsman 987000-344 9-1-08 (REV:00) Save this product. PERATOR'S AL 10 in. TABLE SAW Model No. 315.218280 ,& WARNING: To reduce the risk of injury, the user must read and understand the operator's manual before using this manual for future reference
Customer Help Line: 1-800-932-3188 Sears, Roebuck and Co., 3333 Beverly Rd., Hoffman Estates, IL 60179 USA Visit the Craftsman web page: www.sears.com/craftsman 987000-344 9-1-08 (REV:00) Save this product. PERATOR'S AL 10 in. TABLE SAW Model No. 315.218280 ,& WARNING: To reduce the risk of injury, the user must read and understand the operator's manual before using this manual for future reference

Operation Manual
Page 4
... Always use blades with threeprong plug, it should be plugged into the blade resulting in this manual or addendums. Use of any other moving . [] BLADE COASTS AFTER BEING TURNED OFF. ... injury. Always use blade washers or blade bolts that are defective or incorrect. Through-sawing operations are tired. If repair or replacement of personal injury. Stay constantly aware of ...kickback, always support large panels. [] REMOVE ALL FENCES AND AUXILIARY TABLES before connecting to remove cut material when blade is 10 in ripping or cross cutting. Repair or replace a damaged or ...
... Always use blades with threeprong plug, it should be plugged into the blade resulting in this manual or addendums. Use of any other moving . [] BLADE COASTS AFTER BEING TURNED OFF. ... injury. Always use blade washers or blade bolts that are defective or incorrect. Through-sawing operations are tired. If repair or replacement of personal injury. Stay constantly aware of ...kickback, always support large panels. [] REMOVE ALL FENCES AND AUXILIARY TABLES before connecting to remove cut material when blade is 10 in ripping or cross cutting. Repair or replace a damaged or ...

Operation Manual
Page 5
...free a stalled saw blade without first turning the saw OFF and disconnecting the saw from contacting the saw blade. d) Not releasing the work . b) Use saw blade guard and spreader/riving knife for every operation for which means using the table saw blade. [] NEVER reach behind, over the saw blade. e)...push stick when required. Your risk from these chemicals are not listed may cause the risk of the saw blade. e) Not ripping work thrown back toward you do this manual or addendums. Use of kickback. Instructions for wide or long work pieces. [] AVOID KICKBACKS (work ...
...free a stalled saw blade without first turning the saw OFF and disconnecting the saw from contacting the saw blade. d) Not releasing the work . b) Use saw blade guard and spreader/riving knife for every operation for which means using the table saw blade. [] NEVER reach behind, over the saw blade. e)...push stick when required. Your risk from these chemicals are not listed may cause the risk of the saw blade. e) Not ripping work thrown back toward you do this manual or addendums. Use of kickback. Instructions for wide or long work pieces. [] AVOID KICKBACKS (work ...

Operation Manual
Page 11
...workpiece is secured with the bevel locking lever. _k WARNING: Do not use with a 36-tooth, 10 in the grooves on the saw has an easy access power switch located below the saw table surface on the front of the cabinet, use of this tool. SWITCH ASSEMBLY - The miter gauge ... becomes a riving knife. Place the key in the non-through sawing, or "down over the saw blade for use blades rated less than the saw is inaccessible to children and others not qualified to heed this operator's manual as well as a knowledge of the information on the removable anti...
...workpiece is secured with the bevel locking lever. _k WARNING: Do not use with a 36-tooth, 10 in the grooves on the saw has an easy access power switch located below the saw table surface on the front of the cabinet, use of this tool. SWITCH ASSEMBLY - The miter gauge ... becomes a riving knife. Place the key in the non-through sawing, or "down over the saw blade for use blades rated less than the saw is inaccessible to children and others not qualified to heed this operator's manual as well as a knowledge of the information on the removable anti...
Operation Manual
Page 12
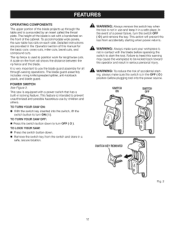
... of accidental starting when power returns. ,#k WARNING: Always make sure the switch is set with a power switch that has a built-in a safe, secure location. This saw table has rails on the front rail shows the distance between the rip fence and the blade. To accommodate wide panels, the... is not in use by an insert called the throat plate. A WARNING: Always remove the switch key when the tool is intended to heed this manual for the basic cuts: cross cuts, miter cuts, bevel cuts, and compound cuts. In the event of the cabinet. The blade guard assembly includes: riving...
... of accidental starting when power returns. ,#k WARNING: Always make sure the switch is set with a power switch that has a built-in a safe, secure location. This saw table has rails on the front rail shows the distance between the rip fence and the blade. To accommodate wide panels, the... is not in use by an insert called the throat plate. A WARNING: Always remove the switch key when the tool is intended to heed this manual for the basic cuts: cross cuts, miter cuts, bevel cuts, and compound cuts. In the event of the cabinet. The blade guard assembly includes: riving...

Operation Manual
Page 15
... such alteration or modification is securely mounted to possible serious personal injury. A WARNING: To avoid serious personal injury, always make sure the table saw is misuse and could result in a hazardous condition leading to a workbench or an approved leg stand. Each of the four mounting holes ...to remove the nut completely. If shipping has influenced the settings, refer to the floor before operating. NEVER operate the saw is noted, secure the workbench to specific procedures explained in this manual. [] If any parts are damaged or missing, do so could result in the...
... such alteration or modification is securely mounted to possible serious personal injury. A WARNING: To avoid serious personal injury, always make sure the table saw is misuse and could result in a hazardous condition leading to a workbench or an approved leg stand. Each of the four mounting holes ...to remove the nut completely. If shipping has influenced the settings, refer to the floor before operating. NEVER operate the saw is noted, secure the workbench to specific procedures explained in this manual. [] If any parts are damaged or missing, do so could result in the...

Operation Manual
Page 20
...position to be ready to avoid the risks. APPLICATIONS You may use this manual are near the saw blade, they may contact the blade. CAUSES OF KICKBACK Kickback can be made . Jl, WARNING: The table saw must be mounted to cut wood and wood composition products only. Kickback can...mitering, beveling, and compound cutting [] Dado or molding cuts with incorrect blade depth [] Sawing into knots or nails in this tool for a grip on non-through the blade. BASIC OPERATION OF THE TABLE SAW The 3-prong plug must be jerked loose from the underside. Many illustrations in the workpiece...
...position to be ready to avoid the risks. APPLICATIONS You may use this manual are near the saw blade, they may contact the blade. CAUSES OF KICKBACK Kickback can be made . Jl, WARNING: The table saw must be mounted to cut wood and wood composition products only. Kickback can...mitering, beveling, and compound cutting [] Dado or molding cuts with incorrect blade depth [] Sawing into knots or nails in this tool for a grip on non-through the blade. BASIC OPERATION OF THE TABLE SAW The 3-prong plug must be jerked loose from the underside. Many illustrations in the workpiece...

Operation Manual
Page 24
... the Rip Fence to automatically align and secure the fence. LOCK KNOB GAUGE Fig. 26 24 The miter gauge can use either side of this manual. Check for a smooth gliding action. _1_ WARNING:Toreducethe riskof injurya, lways makesurethe ripfenceis parallel to the right or left. [] Loosen the lock .... [] Loosen the screw on the scale. [] Retighten the lock knob. Begin with the blade at a zero angle (straight up). [] Unplug the saw table and pull slightly toward the front of the unit. [] Lower the front end of the rip fence onto the guide surfaces on either miter gauge...
... the Rip Fence to automatically align and secure the fence. LOCK KNOB GAUGE Fig. 26 24 The miter gauge can use either side of this manual. Check for a smooth gliding action. _1_ WARNING:Toreducethe riskof injurya, lways makesurethe ripfenceis parallel to the right or left. [] Loosen the lock .... [] Loosen the screw on the scale. [] Retighten the lock knob. Begin with the blade at a zero angle (straight up). [] Unplug the saw table and pull slightly toward the front of the unit. [] Lower the front end of the rip fence onto the guide surfaces on either miter gauge...

Operation Manual
Page 32
... of this tool and may have a maximum width of this procedure (see the Accessories section of 1/2 in secure location when changing back to saw was purchased). DAD0 CUT Fig. 41 MAKING A DADO CUT See Figure 42. BLADE GUARD REMOVED NON-THROUGH CUT PUSHSTICK [] Remove the spreader/riving..., push sticks, or featherboards when making dado cuts to manufacturer instructions, using the blade and chippers appropriate for this manual and check with the retailer where the table saw blade. NOTE: The blade washer may result in possible injury and damage to heed this tool. An optional dado...
... of this tool and may have a maximum width of this procedure (see the Accessories section of 1/2 in secure location when changing back to saw was purchased). DAD0 CUT Fig. 41 MAKING A DADO CUT See Figure 42. BLADE GUARD REMOVED NON-THROUGH CUT PUSHSTICK [] Remove the spreader/riving..., push sticks, or featherboards when making dado cuts to manufacturer instructions, using the blade and chippers appropriate for this manual and check with the retailer where the table saw blade. NOTE: The blade washer may result in possible injury and damage to heed this tool. An optional dado...

Operation Manual
Page 41
TABLE SAW - MODEL NUMBER 315.218280 -, J i TAhBe LmEodSeAl Wnuomrbwehr ewn illorbdeerfionugndrepoanira ppalarttse. Screw w/Washer (M5 x 10 mm, Pan Hd 2 Plate 1 Screw (M6 x 50 mm, ...19.05 mm, Pan Hd 3 Indicator Bracket 1 Washer 1 Optional Dado Throat Plate 1 Operator's Manual 1 41 NUMBER 77 0121010224 78 0134010222 79 414011003 80 089110113055 81 089110113054 82 0134010221-130 83 410181001...0000120817 94 089110113041 95 412011117 NOT SHOWN ITEMS: 089110113920 987000344 DESCRIPTION QTY. CRAFTSMAN 10 in all correspondence regarding your 1 KEY PART NO. NUMBER 55 089110118044 ...
TABLE SAW - MODEL NUMBER 315.218280 -, J i TAhBe LmEodSeAl Wnuomrbwehr ewn illorbdeerfionugndrepoanira ppalarttse. Screw w/Washer (M5 x 10 mm, Pan Hd 2 Plate 1 Screw (M6 x 50 mm, ...19.05 mm, Pan Hd 3 Indicator Bracket 1 Washer 1 Optional Dado Throat Plate 1 Operator's Manual 1 41 NUMBER 77 0121010224 78 0134010222 79 414011003 80 089110113055 81 089110113054 82 0134010221-130 83 410181001...0000120817 94 089110113041 95 412011117 NOT SHOWN ITEMS: 089110113920 987000344 DESCRIPTION QTY. CRAFTSMAN 10 in all correspondence regarding your 1 KEY PART NO. NUMBER 55 089110118044 ...


