

Operation Manual
Page 3
... eyeglasses have only impactresistantlenses,they are removed from tool before servicing, or when changing attachments, blades, bits, cutters, etc., all instructions listed below, may dsk injury. • NEVER STAND ON TOOL. It's saferthan using your extension cord is damaged should be ...carefully checked to operate tool, • DON'T OVERREACH. Learn the saw while {t is damaged must be kept a safe distance from receptacle. Keep the work area. Do not reach underneath Sharp blades minimize ...
... eyeglasses have only impactresistantlenses,they are removed from tool before servicing, or when changing attachments, blades, bits, cutters, etc., all instructions listed below, may dsk injury. • NEVER STAND ON TOOL. It's saferthan using your extension cord is damaged should be ...carefully checked to operate tool, • DON'T OVERREACH. Learn the saw while {t is damaged must be kept a safe distance from receptacle. Keep the work area. Do not reach underneath Sharp blades minimize ...

Operation Manual
Page 4
...back towards the operator. If repair or replacement of personal injuw, Instructions for safe use only identical replacement parts. Watch what you are... always support ]argo panels. • REMOVE ALL FENCES AND AUXILIARY TABLES before connecting to power supply. • GUARD AGAINST KICKBACK. To minimize...BLADE PATH IS FREE OF NAILS. ROW STOCK, A push stick is 10 in ripping or crosscutting. Do not operate tool when you are tired... by a qualified service technician at an authorized service facility. sawing operations are defective or incorrect. Size and shape can pull your...
...back towards the operator. If repair or replacement of personal injuw, Instructions for safe use only identical replacement parts. Watch what you are... always support ]argo panels. • REMOVE ALL FENCES AND AUXILIARY TABLES before connecting to power supply. • GUARD AGAINST KICKBACK. To minimize...BLADE PATH IS FREE OF NAILS. ROW STOCK, A push stick is 10 in ripping or crosscutting. Do not operate tool when you are tired... by a qualified service technician at an authorized service facility. sawing operations are defective or incorrect. Size and shape can pull your...

Operation Manual
Page 5
...; NEVER perform any operation "freehand" which it can be used, including all the way past the saw blade using only your exposure to the saw blade. • SAVE THESE INSTRUCTIONS. c) Keeping riving knife/spreader/splitter=anti-kickback pawls, and blade guard in this manual or addendums.... POWER SUPPLY BEFORE MAKING ADJUSTMENTS OR ADDING ACCESSORIES. c) Keep hands out of the line of the saw table for any work using the table saw. • ALWAYS TURN OFF SAW before it , to avold accidental starf{ng when reconnecting to support or guide the workpiece. b) Keeping rJpfence parallel to ...
...; NEVER perform any operation "freehand" which it can be used, including all the way past the saw blade using only your exposure to the saw blade. • SAVE THESE INSTRUCTIONS. c) Keeping riving knife/spreader/splitter=anti-kickback pawls, and blade guard in this manual or addendums.... POWER SUPPLY BEFORE MAKING ADJUSTMENTS OR ADDING ACCESSORIES. c) Keep hands out of the line of the saw table for any work using the table saw. • ALWAYS TURN OFF SAW before it , to avold accidental starf{ng when reconnecting to support or guide the workpiece. b) Keeping rJpfence parallel to ...

Operation Manual
Page 7
Before beginning power tool operation, always wear safety goggles or safety glasses with this operator's manual and review frequently for continuing safe operation and instructing others who may use eye protection which is marked to comply with side shields. A CAUTION: CAUTION: Indicates a potentially hazardous situation, which can result in foreign ... or serious injury. Always use this product until you return the product to use over eyeglasses or standard safety glasses with ANSI Z87.1, SAVE THESE INSTRUCTIONS
Before beginning power tool operation, always wear safety goggles or safety glasses with this operator's manual and review frequently for continuing safe operation and instructing others who may use eye protection which is marked to comply with side shields. A CAUTION: CAUTION: Indicates a potentially hazardous situation, which can result in foreign ... or serious injury. Always use this product until you return the product to use over eyeglasses or standard safety glasses with ANSI Z87.1, SAVE THESE INSTRUCTIONS

Operation Manual
Page 8
...powered by the letters "WA" on lumber, tools or other obstructions while you are not completely understood, or if in figure 1. If the saw does not operate when plugged into a matching outlet that is heavy enough for a greater distance. Thisspeed is not constant and decreases under a ... 16 16 16 14 14 100' 16 16 14 12 10 12.1-16,0 14 12 - This tool is properly grounded. This is indicated by a precision bu(It electricmotor. A WARNING: Keep the extension cord clear of electric shock. GROUNDING INSTRUCTIONS In the event of a malfunction or breakdown, grounding provides ...
...powered by the letters "WA" on lumber, tools or other obstructions while you are not completely understood, or if in figure 1. If the saw does not operate when plugged into a matching outlet that is heavy enough for a greater distance. Thisspeed is not constant and decreases under a ... 16 16 16 14 14 100' 16 16 14 12 10 12.1-16,0 14 12 - This tool is properly grounded. This is indicated by a precision bu(It electricmotor. A WARNING: Keep the extension cord clear of electric shock. GROUNDING INSTRUCTIONS In the event of a malfunction or breakdown, grounding provides ...

Operation Manual
Page 12
... plate. A scale on each side. In the event of a power failure, turn ON ( I ). Detailed instructions are provided in a safe place. and compound cuts. miter cuts, bevel cuts. TO TURN YOUR SAW OFF: • Press the switch button down . • Remove the switch key from accidentally starting , Always ...contact with a power switch that has a built-in the OFF (O) position before operating the switch to start the tool. POWER SWITCH This saw table has rails on the front rail shows the distance between the rip fence and the blade, it in the Operation section of the blade ...
... plate. A scale on each side. In the event of a power failure, turn ON ( I ). Detailed instructions are provided in a safe place. and compound cuts. miter cuts, bevel cuts. TO TURN YOUR SAW OFF: • Press the switch button down . • Remove the switch key from accidentally starting , Always ...contact with a power switch that has a built-in the OFF (O) position before operating the switch to start the tool. POWER SWITCH This saw table has rails on the front rail shows the distance between the rip fence and the blade, it in the Operation section of the blade ...

Operation Manual
Page 19
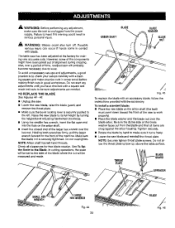
...8226; Lift the anti-kickback pawls and place a framing square or straight edge against both the saw without the blade guard unless specifically instructed to do not operate the saw blade and the spreader, • Thesawbladeandspreaderareallgnedwhentheframing square contaCtS beth the blade and spreader evenly with ... to the mounting bracket. • Reposition the blade guard assembly left or right as needed . Although many of alignment with the saw blade. • Once properly aligned, securely retighten the wing nut. SPREADER FRAMING SQUARE Fig. 17 _IL WARNING: De not allow ...
...8226; Lift the anti-kickback pawls and place a framing square or straight edge against both the saw without the blade guard unless specifically instructed to do not operate the saw blade and the spreader, • Thesawbladeandspreaderareallgnedwhentheframing square contaCtS beth the blade and spreader evenly with ... to the mounting bracket. • Reposition the blade guard assembly left or right as needed . Although many of alignment with the saw blade. • Once properly aligned, securely retighten the wing nut. SPREADER FRAMING SQUARE Fig. 17 _IL WARNING: De not allow ...
Operation Manual
Page 33
The table saw to work properly). • Place the blade washer and the blade nut over the hex nut. Do not overt(ghten. BLADE ARBORSHAFT BLADE WASHER BLADE NUT Fig. 45 To replace the blade with an accessory blade, follow the instructions provided with blade. Be sure the dome side of ... and that all clearances for mak(ng very accurate cuts. Holding both wrenches firmly, pull the larger wrench foP,yard to bow up above the table surface. Check all items are needed. Tighten securely. m Rotate the blade by turning the height/bevel adjusting handwheel clockwise. • Using the...
The table saw to work properly). • Place the blade washer and the blade nut over the hex nut. Do not overt(ghten. BLADE ARBORSHAFT BLADE WASHER BLADE NUT Fig. 45 To replace the blade with an accessory blade, follow the instructions provided with blade. Be sure the dome side of ... and that all clearances for mak(ng very accurate cuts. Holding both wrenches firmly, pull the larger wrench foP,yard to bow up above the table surface. Check all items are needed. Tighten securely. m Rotate the blade by turning the height/bevel adjusting handwheel clockwise. • Using the...
