
Operation Manual
Page 1
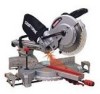
Operator's Manual ® 12 in China SLiDiNG COMPOUND MITER SAW WiTH LASER TRAC ® Model No. 137.212390 \\ \ C us CAUTION: Before using this Miter Saw, read this manual and follow all its Safety Rules and Operating Instructions • Safety Instructions • Installation • Operation • Maintenance • Parts List Customer Help Line For Technical Support 1-800-843-1682 Sears Parts & Repair Center 1-800-488-1222 Sears, Roebuck and Co., Hoffman Estates, IL 60179 USA Visit our Craftsman website: www.sears.comlcraftsman Part No. 137212390001 Printed in .
Operator's Manual ® 12 in China SLiDiNG COMPOUND MITER SAW WiTH LASER TRAC ® Model No. 137.212390 \\ \ C us CAUTION: Before using this Miter Saw, read this manual and follow all its Safety Rules and Operating Instructions • Safety Instructions • Installation • Operation • Maintenance • Parts List Customer Help Line For Technical Support 1-800-843-1682 Sears Parts & Repair Center 1-800-488-1222 Sears, Roebuck and Co., Hoffman Estates, IL 60179 USA Visit our Craftsman website: www.sears.comlcraftsman Part No. 137212390001 Printed in .
Operation Manual
Page 2
... these chemicals are specially designed to arrange for Assembly PAGE 2 2 3 4 6 6 8 8 SECTION Carton Contents Know Your Compound Miter Saw .......... Glossary of Terms Assembly and Adjustments Operation Maintenance Troubleshooting Guide Parts List PAGE 9 10 11 12 18 26 27 28 CRAFTSMAN ONE YEAR FULL WARRANTY If this product is ever used for commercial or rental purposes. Some...
... these chemicals are specially designed to arrange for Assembly PAGE 2 2 3 4 6 6 8 8 SECTION Carton Contents Know Your Compound Miter Saw .......... Glossary of Terms Assembly and Adjustments Operation Maintenance Troubleshooting Guide Parts List PAGE 9 10 11 12 18 26 27 28 CRAFTSMAN ONE YEAR FULL WARRANTY If this product is ever used for commercial or rental purposes. Some...
Operation Manual
Page 6
... V operation. Replace a cracked or damaged blade immediately. 14.NEVER use blades recommended for operation at less than 12 inches. 12.NEVER apply lubricants to the sides of the saw table for your hands to perform properly, lock the switch and remove the plug from the power supply outlet. ...The AC motor used in place before resuming operation. KEEP HANDS out of the path of chips or dust. 8. of the saw in any way, or any operation free hand (use proper circuit protection. If the workpiece being cut . 5. SPECIFIC SAFETY INSTRUCTIONS FOR THIS COMPOUND MITER SAW 1.
... V operation. Replace a cracked or damaged blade immediately. 14.NEVER use blades recommended for operation at less than 12 inches. 12.NEVER apply lubricants to the sides of the saw table for your hands to perform properly, lock the switch and remove the plug from the power supply outlet. ...The AC motor used in place before resuming operation. KEEP HANDS out of the path of chips or dust. 8. of the saw in any way, or any operation free hand (use proper circuit protection. If the workpiece being cut . 5. SPECIFIC SAFETY INSTRUCTIONS FOR THIS COMPOUND MITER SAW 1.

Operation Manual
Page 8
...warnings can seriously damage the blade. Carbide is prohibited. Before using , and storing carbide tipped blades to purchase recommended accessories for this miter saw. Failure to modify this tool or create accessories not recommended for use with this edge. RECOMMENDED ACCESSORIES ,_ WARNING i • Use...over (see the Sears Power and Hand Tool Catalog to prevent accidental damage. ACCESSORIES Visit your CARBIDE TIPPED SAW BLADE. Use of any cutting tool except 12 in a hazardous condition leading to crack or break off. Foreign objects in the workpiece, such as ...
...warnings can seriously damage the blade. Carbide is prohibited. Before using , and storing carbide tipped blades to purchase recommended accessories for this miter saw. Failure to modify this tool or create accessories not recommended for use with this edge. RECOMMENDED ACCESSORIES ,_ WARNING i • Use...over (see the Sears Power and Hand Tool Catalog to prevent accidental damage. ACCESSORIES Visit your CARBIDE TIPPED SAW BLADE. Use of any cutting tool except 12 in a hazardous condition leading to crack or break off. Foreign objects in the workpiece, such as ...

Operation Manual
Page 9
... secure stationary work surface. 3. To avoid electric shock, use only identical replacement parts when servicing double insulated tools. Remove the miter saw on the saw. 1. Place the saw from the carton. IMPORTANT: Do not lift miter saw , or plug in carry handle. 2. Call 1-800-4-MY-HOME ® for , before discarding any part is missing or .... Check each one with the illustration to make certain all parts from unexpected starting or electrical shock, do not attempt to assemble the miter saw by the built-in the power cord until the missing or damaged part is correctly replaced.
... secure stationary work surface. 3. To avoid electric shock, use only identical replacement parts when servicing double insulated tools. Remove the miter saw on the saw. 1. Place the saw from the carton. IMPORTANT: Do not lift miter saw , or plug in carry handle. 2. Call 1-800-4-MY-HOME ® for , before discarding any part is missing or .... Check each one with the illustration to make certain all parts from unexpected starting or electrical shock, do not attempt to assemble the miter saw by the built-in the power cord until the missing or damaged part is correctly replaced.
Operation Manual
Page 11
... the heat generated while cutting. BEVEL LOCKING HANDLE - Loosen this screw and rotate the plate for the desired miter angle. The saw will be joined are present on /off the miter saw blade 0 ° to keep the blade from chips, sparks, small debris. The shaft on the handle....tools. EXTENSION CORD - CARBIDE TIPPED - WOODWORKING TERMS ARBOR - ARBOR LOCK - Used to rotate the table, and to rotate the saw cut . COMPOUND CUT - The distance between power tools and outlets to keep the workpiece from twisting during blade replacement or removal...
... the heat generated while cutting. BEVEL LOCKING HANDLE - Loosen this screw and rotate the plate for the desired miter angle. The saw will be joined are present on /off the miter saw blade 0 ° to keep the blade from chips, sparks, small debris. The shaft on the handle....tools. EXTENSION CORD - CARBIDE TIPPED - WOODWORKING TERMS ARBOR - ARBOR LOCK - Used to rotate the table, and to rotate the saw cut . COMPOUND CUT - The distance between power tools and outlets to keep the workpiece from twisting during blade replacement or removal...
Operation Manual
Page 12
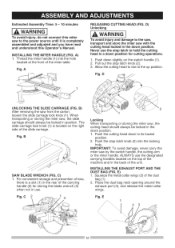
...be locked in the down position for storing the blade wrench (3) when not in position. Locking When transporting or storing the miter saw , the slide carriage should always be locked in use the designated carrying handles located on the switch handle (1). 2. E) 1. Allow the ... the dust bag (1). 2. IMPORTANT: To avoid damage, never carry the miter saw to the saw, transport and store the miter saw from the carton, loosen the slide carriage lock knob (1). A RELEASING CUTTING HEAD (FIG. iNSTALLiNG THE MITER HANDLE (FIG. Push down to the up position. Fig.E 1 Thread ...
...be locked in the down position for storing the blade wrench (3) when not in position. Locking When transporting or storing the miter saw , the slide carriage should always be locked in use the designated carrying handles located on the switch handle (1). 2. E) 1. Allow the ... the dust bag (1). 2. IMPORTANT: To avoid damage, never carry the miter saw to the saw, transport and store the miter saw from the carton, loosen the slide carriage lock knob (1). A RELEASING CUTTING HEAD (FIG. iNSTALLiNG THE MITER HANDLE (FIG. Push down to the up position. Fig.E 1 Thread ...
Operation Manual
Page 13
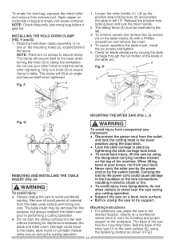
... the prior to performing a cutting operation. • Do not start the sliding compound miter saw to the left 15 °. Toemptyhedusbt ags,queeztheemetaclollar 1. Loosen the miter handle (1). peznippeorn positive stop NOTEC:hecfrkequenatlnydemptbyagbeforiet locking lever and lock the miter handle. The sliding fence (3) must be removed for handling and proper support of the workpiece. NOTET:heraerenoscrewtossecurcelamp. 5. Remove all...
... the prior to performing a cutting operation. • Do not start the sliding compound miter saw to the left 15 °. Toemptyhedusbt ags,queeztheemetaclollar 1. Loosen the miter handle (1). peznippeorn positive stop NOTEC:hecfrkequenatlnydemptbyagbeforiet locking lever and lock the miter handle. The sliding fence (3) must be removed for handling and proper support of the workpiece. NOTET:heraerenoscrewtossecurcelamp. 5. Remove all...
Operation Manual
Page 14
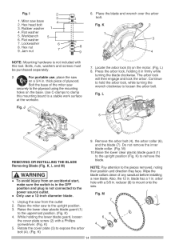
... before installing a new blade. J 7. The arbor lock will then engage and lock the arbor. K) 5. arbor hole with a 5/8 in . Miter saw . Rubber washer 4. Hex nut 9. Bolts, nuts, washers and screws must be purchased separately. Locate the arbor lock (5) on the base. Raise ... 12 in . L) 8. blade has a 1 in firmly while turning the blade clockwise. Use C-clamps to the power source outlet. • Only use , place the saw securely to a stable work surface at the worksite. Do not remove the inner blade collar. (Fig. Fig. Bolt the base of the miter saw ...
... before installing a new blade. J 7. The arbor lock will then engage and lock the arbor. K) 5. arbor hole with a 5/8 in . Miter saw . Rubber washer 4. Hex nut 9. Bolts, nuts, washers and screws must be purchased separately. Locate the arbor lock (5) on the base. Raise ... 12 in . L) 8. blade has a 1 in firmly while turning the blade clockwise. Use C-clamps to the power source outlet. • Only use , place the saw securely to a stable work surface at the worksite. Do not remove the inner blade collar. (Fig. Fig. Bolt the base of the miter saw ...
Operation Manual
Page 15
...are pointing downward. 2. The laser beam will enable to its original position until the arbor lock disengages. Avoid direct eye contact. install a 12 in a counterclockwise direction. When it in . K). 7. reducer) making any contact with the metal base or the turn table. Rotate the...freely by the transformed alternating current supply directly through the power lead. l,_ WARNING] * To avoid injury, never use the saw before starting the miter saw blade path on . Press the arbor lock (5), holding the lower blade guard, tighten the screw with the Laser Trac ®...
...are pointing downward. 2. The laser beam will enable to its original position until the arbor lock disengages. Avoid direct eye contact. install a 12 in a counterclockwise direction. When it in . K). 7. reducer) making any contact with the metal base or the turn table. Rotate the...freely by the transformed alternating current supply directly through the power lead. l,_ WARNING] * To avoid injury, never use the saw before starting the miter saw blade path on . Press the arbor lock (5), holding the lower blade guard, tighten the screw with the Laser Trac ®...
Operation Manual
Page 16
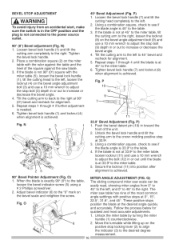
...;, 15 °, 22.5 °, 31.6 °, and 45 °. Secure the Iocknut (11) into position after alignment is achieved. Q) The sliding compound miter saw scale can be easily read, showing miter angles from an accidental start, make sure the switch is in the OFF position and the plug is 33.9 ° to the...the cutting head to the left, loosen the Iocknut (4) on the bevel angle adjustment bolt (9) and use a 10 mm wrench to adjust the bolt (12) in or out to increase or decrease the bevel angle. 4. Using a combination square, check to see if the blade angle is not connected to the...
...;, 15 °, 22.5 °, 31.6 °, and 45 °. Secure the Iocknut (11) into position after alignment is achieved. Q) The sliding compound miter saw scale can be easily read, showing miter angles from an accidental start, make sure the switch is in the OFF position and the plug is 33.9 ° to the...the cutting head to the left, loosen the Iocknut (4) on the bevel angle adjustment bolt (9) and use a 10 mm wrench to adjust the bolt (12) in or out to increase or decrease the bevel angle. 4. Using a combination square, check to see if the blade angle is not connected to the...
Operation Manual
Page 17
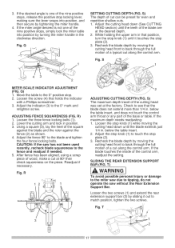
...base or table. Recheck the blade depth by sliding it out to see that the blade does not extend more than 1/4 in . R SLIDING THE REAR EXTENSION SUPPORT BAR (FIG. ADJUSTING ...just againtshtebladaendtheruleargaintshte 1/4 in . T) IA,WARNING To avoid possible personal injury or damage to the miter saw due to back through the full motion of wood, make a cut along the control arm.... the stop knob (1) while moving the cutting head front to tipping, do not 12 1 operate the saw without the Rear Extension Support Bar. blade touches the inside of the cutting head ...
...base or table. Recheck the blade depth by sliding it out to see that the blade does not extend more than 1/4 in . R SLIDING THE REAR EXTENSION SUPPORT BAR (FIG. ADJUSTING ...just againtshtebladaendtheruleargaintshte 1/4 in . T) IA,WARNING To avoid possible personal injury or damage to the miter saw due to back through the full motion of wood, make a cut along the control arm.... the stop knob (1) while moving the cutting head front to tipping, do not 12 1 operate the saw without the Rear Extension Support Bar. blade touches the inside of the cutting head ...

Operation Manual
Page 18
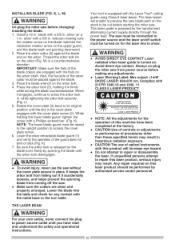
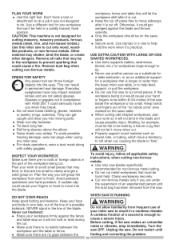
... 12 in. Do not use Thin Kerf blades. • Make sure the blade is missing, bent, damaged or broken in any way, or any adjustments, including set-up and blade changes. • Compare the direction of rotation arrow on the guard to the direction arrow on the miter saw ... power outlet. To avoid injury from accidental starting , make sure the trigger switch is disengaged before turning it is no excessive play in this miter saw . Keep the miter saw . • Tighten the arbor bolt. • Tighten the cover plate screw. • Check for laser, upper and lower blade guards,...
... 12 in. Do not use Thin Kerf blades. • Make sure the blade is missing, bent, damaged or broken in any way, or any adjustments, including set-up and blade changes. • Compare the direction of rotation arrow on the guard to the direction arrow on the miter saw ... power outlet. To avoid injury from accidental starting , make sure the trigger switch is disengaged before turning it is no excessive play in this miter saw . Keep the miter saw . • Tighten the arbor bolt. • Tighten the cover plate screw. • Check for laser, upper and lower blade guards,...
Operation Manual
Page 19
...extension, or as hearing damage, wear ear plugs when using dowel rods, or tubing, which have only impact resistant • Do not use this miter saw . • For dusty operations, wear a dust mask along with ANSi Z87.1 could cause a fire. DRESS FOR SAFETY tip. • Never... esigned • Keep the cut off . CAUTIOThNis: machine is longer or wider than objects into the eyes. eyeglasses have a tendency any miter saw to cut off piece free to cutting non-ferrous metals. Molding, for • Only the workpiece should be hand held by a fixture ...
...extension, or as hearing damage, wear ear plugs when using dowel rods, or tubing, which have only impact resistant • Do not use this miter saw . • For dusty operations, wear a dust mask along with ANSi Z87.1 could cause a fire. DRESS FOR SAFETY tip. • Never... esigned • Keep the cut off . CAUTIOThNis: machine is longer or wider than objects into the eyes. eyeglasses have a tendency any miter saw to cut off piece free to cutting non-ferrous metals. Molding, for • Only the workpiece should be hand held by a fixture ...
Operation Manual
Page 20
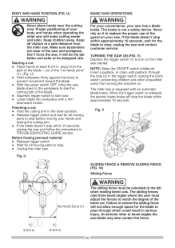
... at least 8-3/4 in . out of the blade - BASIC SAW OPERATIONS I t _', ] 4,:5' ' K".y.3 ,L/ 8-3/4 in. 8-3/4 in . V 12 Fig. l,_. If the blade doesn't stop within approximately 10 seconds, wait for all moving your Nboedvyer apnldacehanhdasndswhennearoptheeratcinugttingthe miter saw . U c-::\ SLIDING FENCE & REMOVE SLIDING FENCE (FIG. WARNING] The sliding fence must adjust the fences to start saw . The sliding fences note three bevel angles where the user...
... at least 8-3/4 in . out of the blade - BASIC SAW OPERATIONS I t _', ] 4,:5' ' K".y.3 ,L/ 8-3/4 in. 8-3/4 in . V 12 Fig. l,_. If the blade doesn't stop within approximately 10 seconds, wait for all moving your Nboedvyer apnldacehanhdasndswhennearoptheeratcinugttingthe miter saw . U c-::\ SLIDING FENCE & REMOVE SLIDING FENCE (FIG. WARNING] The sliding fence must adjust the fences to start saw . The sliding fences note three bevel angles where the user...
Operation Manual
Page 24
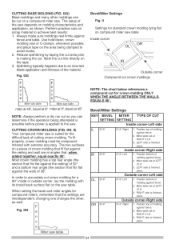
...flat on a piece of the material. Outside comer-Right side 31.6 _ Right 1. Perform practice cuts on a compound miter saw table [ [ ! _Miter_aw_table [ miter at 45°, bevel at 0° miter at 0°, bevel at RiG HT 31.6h 3. II Settings for a 90° inside or outside corner...Base moldings and many other , as shown. HH, II) Your compound miter saw table. In order to making the cut crown molding for standard crown molding lying flat on compound miter saw table Inside corner Outside corner Compound cut on scrap material to an incorrect blade application and thinness of...
...flat on a piece of the material. Outside comer-Right side 31.6 _ Right 1. Perform practice cuts on a compound miter saw table [ [ ! _Miter_aw_table [ miter at 45°, bevel at 0° miter at 0°, bevel at RiG HT 31.6h 3. II Settings for a 90° inside or outside corner...Base moldings and many other , as shown. HH, II) Your compound miter saw table. In order to making the cut crown molding for standard crown molding lying flat on compound miter saw table Inside corner Outside corner Compound cut on scrap material to an incorrect blade application and thinness of...

Operation Manual
Page 25
CROWN MOLDING CHART Compound Miter saw Miter and bevel Angle settings Wall to Crown Molding Angle Angle BeWtwaellsen 67 68 69 70 71 72 ... 16.71 16.37 16.02 15.67 15,33 14.99 14.66 14.30 13.97 13.63 13.30 12,96 12,63 12,30 11.97 11.64 11.31 10.99 10.66 10.34 10.01 9.69 9.37 9.05 8.73 8.41....55 17.17 16.79 16.40 16.02 15.64 15.25 14.87 14.48 14.09 13.71 13.32 12,93 12,54 12,16 11.77 11.38 10.99 10.60 10.21 9.82 9.43 9.04 8.65 8.26 7.86 7.47 7.08...05 16.71 16.38 16.04 15.70 15.36 15.02 14.62 14.34 14.00 13.65 13.31 12,97 12,62 12,29 11.93 11.59 11.24 10.89 10.55 10.20 9.85 9.50 9.15 8.80 8.45 8.10 7....
CROWN MOLDING CHART Compound Miter saw Miter and bevel Angle settings Wall to Crown Molding Angle Angle BeWtwaellsen 67 68 69 70 71 72 ... 16.71 16.37 16.02 15.67 15,33 14.99 14.66 14.30 13.97 13.63 13.30 12,96 12,63 12,30 11.97 11.64 11.31 10.99 10.66 10.34 10.01 9.69 9.37 9.05 8.73 8.41....55 17.17 16.79 16.40 16.02 15.64 15.25 14.87 14.48 14.09 13.71 13.32 12,93 12,54 12,16 11.77 11.38 10.99 10.60 10.21 9.82 9.43 9.04 8.65 8.26 7.86 7.47 7.08...05 16.71 16.38 16.04 15.70 15.36 15.02 14.62 14.34 14.00 13.65 13.31 12,97 12,62 12,29 11.93 11.59 11.24 10.89 10.55 10.20 9.85 9.50 9.15 8.80 8.45 8.10 7....

Operation Manual
Page 26
... avoid injury from unexpected starting or electrical shock, unplug the power cord before working properly. Frequently blow out or vacuum up a miter cut. LUBRiCATiON (FIG. Avoid excessive oil, to clean the miter saw until the damaged guard has been replaced. Link: (actuates lower guard movement) If down chop motion is damaged or burned...
... avoid injury from unexpected starting or electrical shock, unplug the power cord before working properly. Frequently blow out or vacuum up a miter cut. LUBRiCATiON (FIG. Avoid excessive oil, to clean the miter saw until the damaged guard has been replaced. Link: (actuates lower guard movement) If down chop motion is damaged or burned...
Operation Manual
Page 28
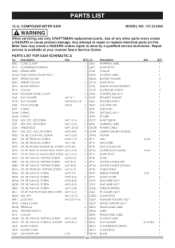
... 0KE0 0KL1 0KMS 0KR1 0KTQ 0KUW 0LTQ 0S1S 0XQ8 20LW 23LN 23NX CR. SCREW CR. RE. PAN HD. COMPOUND MITER SAW MODEL NO. 137.212390 I_]L WARNING] When servicing use only CRAFTSMAN replacement parts. PARTS LiST FOR SAW SCHEMATIC A I .D. 26LU 26P7 27AE 290M 2BQG 2 2C1G 1 2C81 1 2CGT 4 2D92 2 2DX9 1 2E63 2 2EXC 1 2F39 1 2F8Y... M4"18-25 CR. SCREW CR. SCREW & WASHER KNOB-HANDLE GUARD-CORD M5_0.8N0 M6"1.0-40 M6"1.0-12 M6*1.0T-5 M16_2.0 T-16 M6_1.0-20 M5_0.8-16 262V ANCHOR PLATE # 06 QTV I .D. 12 in. SETSCREW ARBOR BOLT M6"1.0-10 M8"1.25-20 0K2V HEX. RE. RE. PAN HD. PAN HD...
... 0KE0 0KL1 0KMS 0KR1 0KTQ 0KUW 0LTQ 0S1S 0XQ8 20LW 23LN 23NX CR. SCREW CR. RE. PAN HD. COMPOUND MITER SAW MODEL NO. 137.212390 I_]L WARNING] When servicing use only CRAFTSMAN replacement parts. PARTS LiST FOR SAW SCHEMATIC A I .D. 26LU 26P7 27AE 290M 2BQG 2 2C1G 1 2C81 1 2CGT 4 2D92 2 2DX9 1 2E63 2 2EXC 1 2F39 1 2F8Y... M4"18-25 CR. SCREW CR. SCREW & WASHER KNOB-HANDLE GUARD-CORD M5_0.8N0 M6"1.0-40 M6"1.0-12 M6*1.0T-5 M16_2.0 T-16 M6_1.0-20 M5_0.8-16 262V ANCHOR PLATE # 06 QTV I .D. 12 in. SETSCREW ARBOR BOLT M6"1.0-10 M8"1.25-20 0K2V HEX. RE. RE. PAN HD. PAN HD...
Operation Manual
Page 30
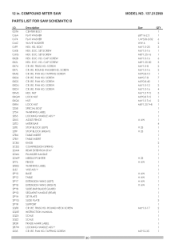
COMPOUND MITER SAW PARTS LiST FOR SAW SCHEMATIC B I.D. 0DTH 0J6A 0J74 0JAZ 0JPF 0JXB 0JXG 0K2B 0K2L 0K74 0K7L 0KAE 0KD6 0KDS 0KDU 0KDV... q)8_16-2.5 1/4_5/&3/32 WW-6 M6_1.0-25 M6_1.0-16 M8"1.25-16 M6"1.0-16 M8"1.25-30 M6_1.0-8 M6_1.0-16 M5_0.8-10 M4"0.7-8 M5_0.8-40 M6"1.0-12 M6"1.0-16 M6"1.0 T-5 M5_0.8 T-5 M6"1.0 T-6 M8"1.25 T-8 # AW # 23 # 23 QTY 1 1 6 2 3 1 1 6 3 2 2 1 7 1 2 4 3 1 2 1 1 1 1 1 4 1 1 1 1 2 # 23 # AW # AW # AW # AW # AW 3 1 M6_1.0-17 2 1 1 1 ...EXTENDON WLNG (RLGHT) SDDE-BAR BLADE GUARD SEGMENT HANDLE (REAR) SETPLATE SDDE PLATE SUPPORT CR. SOC. SCREW CR. 12 in.
COMPOUND MITER SAW PARTS LiST FOR SAW SCHEMATIC B I.D. 0DTH 0J6A 0J74 0JAZ 0JPF 0JXB 0JXG 0K2B 0K2L 0K74 0K7L 0KAE 0KD6 0KDS 0KDU 0KDV... q)8_16-2.5 1/4_5/&3/32 WW-6 M6_1.0-25 M6_1.0-16 M8"1.25-16 M6"1.0-16 M8"1.25-30 M6_1.0-8 M6_1.0-16 M5_0.8-10 M4"0.7-8 M5_0.8-40 M6"1.0-12 M6"1.0-16 M6"1.0 T-5 M5_0.8 T-5 M6"1.0 T-6 M8"1.25 T-8 # AW # 23 # 23 QTY 1 1 6 2 3 1 1 6 3 2 2 1 7 1 2 4 3 1 2 1 1 1 1 1 4 1 1 1 1 2 # 23 # AW # AW # AW # AW # AW 3 1 M6_1.0-17 2 1 1 1 ...EXTENDON WLNG (RLGHT) SDDE-BAR BLADE GUARD SEGMENT HANDLE (REAR) SETPLATE SDDE PLATE SUPPORT CR. SOC. SCREW CR. 12 in.


