
Operation Manual
Page 1
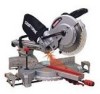
SLiDiNG COMPOUND MITER SAW WiTH LASER TRAC ® Model No. 137.212390 \\ \ C us CAUTION: Before using this Miter Saw, read this manual and follow all its Safety Rules and Operating Instructions • Safety Instructions • Installation • Operation • Maintenance • Parts List Customer Help Line For Technical Support 1-800-843-1682 Sears Parts & Repair Center 1-800-488-1222 Sears, Roebuck and Co., Hoffman Estates, IL 60179 USA Visit our Craftsman website: www.sears.comlcraftsman Part No. 137212390001 Printed in . Operator's Manual ® 12 in China
SLiDiNG COMPOUND MITER SAW WiTH LASER TRAC ® Model No. 137.212390 \\ \ C us CAUTION: Before using this Miter Saw, read this manual and follow all its Safety Rules and Operating Instructions • Safety Instructions • Installation • Operation • Maintenance • Parts List Customer Help Line For Technical Support 1-800-843-1682 Sears Parts & Repair Center 1-800-488-1222 Sears, Roebuck and Co., Hoffman Estates, IL 60179 USA Visit our Craftsman website: www.sears.comlcraftsman Part No. 137212390001 Printed in . Operator's Manual ® 12 in China
Operation Manual
Page 2
...(No load) Electric Yes Motor Arbor Shaft Size .... 5/8 in . w/a 5/8 in . SECTION Warranty Product Specifications Symbols Power Tool Safety Compound Miter Saw Safety Electrical Requirements and Safety ...... Accessories and Attachments Tools Needed for commercial or rental purposes. This warranty applies for free repair (or replacement if repair proves impossible). To reduce your exposure to the state of work with approved safety equipment such as lamps, batteries, bits or blades. Miter Detent Stops Bevel Positive Stops Cutting Capacity: Crosscut BLADE SIZE Miter 45...
...(No load) Electric Yes Motor Arbor Shaft Size .... 5/8 in . w/a 5/8 in . SECTION Warranty Product Specifications Symbols Power Tool Safety Compound Miter Saw Safety Electrical Requirements and Safety ...... Accessories and Attachments Tools Needed for commercial or rental purposes. This warranty applies for free repair (or replacement if repair proves impossible). To reduce your exposure to the state of work with approved safety equipment such as lamps, batteries, bits or blades. Miter Detent Stops Bevel Positive Stops Cutting Capacity: Crosscut BLADE SIZE Miter 45...
Operation Manual
Page 4
... lenses. When using your power tool. Do not use depending on page 7 shows the correct size to yourself or others. 18.NEVER STAND ON THE TOOL. Serious injury could O caouwseer tpoeorlmcaannentthroewye fodraemigange. REMOVE ADJUSTING KEYS AND WRENCHES. Everyday eyeglasses have read and understood the following. KEEP CHILDREN AWAY. The table on cord length and nameplate ampere rating. The smaller the gauge number, the heavier...
... lenses. When using your power tool. Do not use depending on page 7 shows the correct size to yourself or others. 18.NEVER STAND ON THE TOOL. Serious injury could O caouwseer tpoeorlmcaannentthroewye fodraemigange. REMOVE ADJUSTING KEYS AND WRENCHES. Everyday eyeglasses have read and understood the following. KEEP CHILDREN AWAY. The table on cord length and nameplate ampere rating. The smaller the gauge number, the heavier...
Operation Manual
Page 6
... the blade when it replaced immediately. DO NOT operate the miter saw blade. SPECIFIC SAFETY INSTRUCTIONS FOR THIS COMPOUND MITER SAW 1. ALLOW the motor to come to a complete stop before leaving the machine. 28.SHOULD any electrical component fail to perform properly, lock the switch and remove the plug from your hands to these instructions. 2. ALWAYS hold the work area is clean before returning the saw is completely assembled and installed according to be clamped...
... the blade when it replaced immediately. DO NOT operate the miter saw blade. SPECIFIC SAFETY INSTRUCTIONS FOR THIS COMPOUND MITER SAW 1. ALLOW the motor to come to a complete stop before leaving the machine. 28.SHOULD any electrical component fail to perform properly, lock the switch and remove the plug from your hands to these instructions. 2. ALWAYS hold the work area is clean before returning the saw is completely assembled and installed according to be clamped...
Operation Manual
Page 7
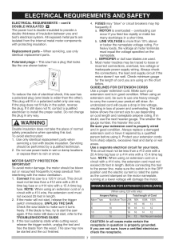
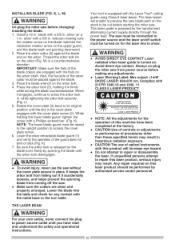
... extension cords from the wood. NOTE: When using it turns freely. If the plug does not fit fully in doubt, use the next heavier gauge. Use only identical replacement parts when servicing a tool with a 15 A time lag fuse. Do not use depending on a circuit with a #14 wire, the extension cord must not be started and the cut finished. 4. MOTOR SAFETY PROTECTION iMPORTANT To avoid motor damage, the motor should...
... extension cords from the wood. NOTE: When using it turns freely. If the plug does not fit fully in doubt, use the next heavier gauge. Use only identical replacement parts when servicing a tool with a 15 A time lag fuse. Do not use depending on a circuit with a #14 wire, the extension cord must not be started and the cut finished. 4. MOTOR SAFETY PROTECTION iMPORTANT To avoid motor damage, the motor should...

Operation Manual
Page 9
Remove the miter saw , or plug in carry handle. 2. Miter Saw Hold-down Clamp Dust Bag Blade Wrench Miter Handle It may cause misalignment. Place the saw on the saw by the built-in the power cord until the missing or damaged part is missing or damaged, do not plug the power cord into a source of power during unpacking and assembly. To avoid electric shock, use only identical replacement parts when servicing double insulated tools. Check each one...
Remove the miter saw , or plug in carry handle. 2. Miter Saw Hold-down Clamp Dust Bag Blade Wrench Miter Handle It may cause misalignment. Place the saw on the saw by the built-in the power cord until the missing or damaged part is missing or damaged, do not plug the power cord into a source of power during unpacking and assembly. To avoid electric shock, use only identical replacement parts when servicing double insulated tools. Check each one...
Operation Manual
Page 11
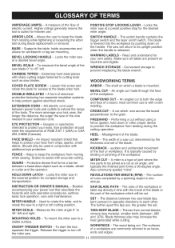
... the miter saw at a preset positive stop for your face from twisting during blade replacement or removal. BEVEL LOCKING HANDLE - DOUBLE-INSULATED - KERF - Locks the miter saw to keep the blade from moving when sawing. MOUNTING HOLES - To measure the bevel angle of the saw blade tips, bent outward in line with accurate cutting. COVER PLATE SCREW - The switch handle contains the trigger switch and the laser on machine and legible. WARNING LABELS - WOODWORKING TERMS ARBOR - An angled cut without using a fence (guide...
... the miter saw at a preset positive stop for your face from twisting during blade replacement or removal. BEVEL LOCKING HANDLE - DOUBLE-INSULATED - KERF - Locks the miter saw to keep the blade from moving when sawing. MOUNTING HOLES - To measure the bevel angle of the saw blade tips, bent outward in line with accurate cutting. COVER PLATE SCREW - The switch handle contains the trigger switch and the laser on machine and legible. WARNING LABELS - WOODWORKING TERMS ARBOR - An angled cut without using a fence (guide...
Operation Manual
Page 13
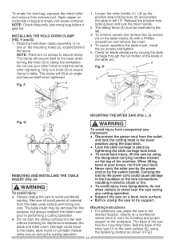
... handles located on a level work surface. INSTALLITNHGEHOLD-DOCWLNAMP 3. To install, reposition the table insert, install the six screws and tighten. When lifting, bend at your knees, not from the table cavity before performing any cutting operation. • Support the saw by the power cord or by using the stop latch. • Lock the slide carriage in the prior to its support. H) • Never carry the miter saw on the top of the miter saw...
... handles located on a level work surface. INSTALLITNHGEHOLD-DOCWLNAMP 3. To install, reposition the table insert, install the six screws and tighten. When lifting, bend at your knees, not from the table cavity before performing any cutting operation. • Support the saw by the power cord or by using the stop latch. • Lock the slide carriage in the prior to its support. H) • Never carry the miter saw on the top of the miter saw...
Operation Manual
Page 14
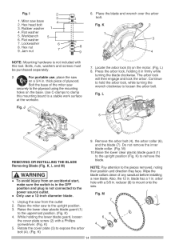
... while turning the blade clockwise. Remove the arbor bolt (4), the arbor collar (6), and the blade (7). NOTE: Pay attention to remove the blade. arbor hole with this mounting board to the power source outlet. • Only use , place the saw from an accidental start, make sure the switch isin the OFF position and plug is not included with a 5/8 in . Hex head bolt 3. Flat washer 7. Lockwasher 8. Jam nut 6. For portable use a 12-inch diameter blade...
... while turning the blade clockwise. Remove the arbor bolt (4), the arbor collar (6), and the blade (7). NOTE: Pay attention to remove the blade. arbor hole with this mounting board to the power source outlet. • Only use , place the saw from an accidental start, make sure the switch isin the OFF position and plug is not included with a 5/8 in . Hex head bolt 3. Flat washer 7. Lockwasher 8. Jam nut 6. For portable use a 12-inch diameter blade...
Operation Manual
Page 15
... to the power source and the laser on/off the saw without the cover plate secure in . Lower the blade into the table and check for the laser line to be turned on the arbor shaft. THE LASER BEAM Your tool is turned on the stock to show. The saw . Always un-plug the miter saw from coming off switch must be cut before starting the miter saw must be...
... to the power source and the laser on/off the saw without the cover plate secure in . Lower the blade into the table and check for the laser line to be turned on the arbor shaft. THE LASER BEAM Your tool is turned on the stock to show. The saw . Always un-plug the miter saw from coming off switch must be cut before starting the miter saw must be...
Operation Manual
Page 16
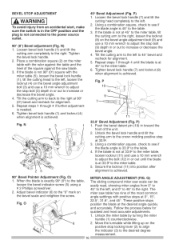
... the left to the miter table. 6. P) 1. Q) The sliding compound miter saw blade. 3. O) 1. Adjust bevel indicator (6) to the table. 3. Fig.O 45 ° Bevel Adjustment (Fig. Fig.P \ 8 33.9 ° Bevel Adjustment (Fig. Move the turntable while lifting up on the bevel angle adjustment bolt (9) and use a 10 mm wrench to adjust the stop bolt (3) depth in or out to adjust the bolt (12) in toward the front of the square against the table and the heel of the...
... the left to the miter table. 6. P) 1. Q) The sliding compound miter saw blade. 3. O) 1. Adjust bevel indicator (6) to the table. 3. Fig.O 45 ° Bevel Adjustment (Fig. Fig.P \ 8 33.9 ° Bevel Adjustment (Fig. Move the turntable while lifting up on the bevel angle adjustment bolt (9) and use a 10 mm wrench to adjust the stop bolt (3) depth in or out to adjust the bolt (12) in toward the front of the square against the table and the heel of the...

Operation Manual
Page 18
... TROUBLESHOOTING GUIDE for laser, upper and lower blade guards, stop latch, bevel lock handle, and cover plate screw. • Review and understand all guards in place, in this tool. The lower guard should always point downward at the front of the ON/OFF trigger switch, on the blade. Follow instructions for your miter saw into a power outlet. Follow the instructions that may cause risk of rotation arrow on the guard to the tool. KEEP YOUR WORK...
... TROUBLESHOOTING GUIDE for laser, upper and lower blade guards, stop latch, bevel lock handle, and cover plate screw. • Review and understand all guards in place, in this tool. The lower guard should always point downward at the front of the ON/OFF trigger switch, on the blade. Follow instructions for your miter saw into a power outlet. Follow the instructions that may cause risk of rotation arrow on the guard to the tool. KEEP YOUR WORK...
Operation Manual
Page 19
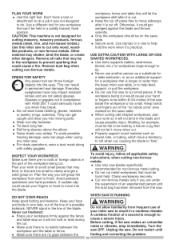
... thrown position. Molding, for non-ferrous metal cutting. • Do not cut would cause your work . Avoid awkward operations and hand positions. onf'torcaetoool r workpiece, fence and table that are not safety glasses. Use clamps or a vise to help feed, support, or pull the workpiece. Other material may bind, or that will grasp the workpiece from frequent use this miter saw to cut small pieces, if the...
... thrown position. Molding, for non-ferrous metal cutting. • Do not cut would cause your work . Avoid awkward operations and hand positions. onf'torcaetoool r workpiece, fence and table that are not safety glasses. Use clamps or a vise to help feed, support, or pull the workpiece. Other material may bind, or that will grasp the workpiece from frequent use this miter saw to cut small pieces, if the...
Operation Manual
Page 20
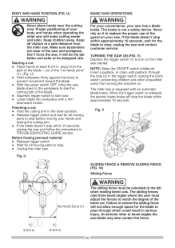
... blade brake. Fig. V 12 Fig. away from the miter saw blade may also contact the fence. If the blade doesn't stop . • Unplug the miter saw and follow the instructions in serious injury. V) Depress the trigger switch (1) to replace the proper use of the blade. • Squeeze trigger switch to the left when making bevel cuts. W) Sliding Fence i i i i i i i i i i ,( i J \,.f\, , / /_ , I ,A WARNING] For your convenience, your Nboedvyer apnldacehanhdasndswhennearoptheeratcinugttingthe miter saw started. The sliding fences note three bevel angles where the user...
... blade brake. Fig. V 12 Fig. away from the miter saw blade may also contact the fence. If the blade doesn't stop . • Unplug the miter saw and follow the instructions in serious injury. V) Depress the trigger switch (1) to replace the proper use of the blade. • Squeeze trigger switch to the left when making bevel cuts. W) Sliding Fence i i i i i i i i i i ,( i J \,.f\, , / /_ , I ,A WARNING] For your convenience, your Nboedvyer apnldacehanhdasndswhennearoptheeratcinugttingthe miter saw started. The sliding fences note three bevel angles where the user...
Operation Manual
Page 22
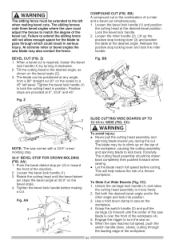
...) A compound cut . Loosen the bevel lock handle (1) and position the cutting head at 33.9 ° on the top of the workpiece, causing the cutting assembly and spinning blade to match the degree of the workpiece. Push the bevel detent stop pin (2) in . Set both the desired bevel angle and/or the miter angle and lock into position. 3. To Slide Cut Wide Boards (Fig. When the saw reaches full speed, push the switch handle down clamp to turn...
...) A compound cut . Loosen the bevel lock handle (1) and position the cutting head at 33.9 ° on the top of the workpiece, causing the cutting assembly and spinning blade to match the degree of the workpiece. Push the bevel detent stop pin (2) in . Set both the desired bevel angle and/or the miter angle and lock into position. 3. To Slide Cut Wide Boards (Fig. When the saw reaches full speed, push the switch handle down clamp to turn...

Operation Manual
Page 26
... light machine oil to make the plastic "cloudy" and brittle, • When cleaning the lower guard, unplug the saw without the lower blade guard. JJ) Replace both carbon brushes when either has less than 1/4 in. To inspect or replace brushes, first unplug the saw is attached to avoid electrical shock. Tighten the cap snugly, but do not use the saw from unexpected starting or electrical shock, unplug the power cord...
... light machine oil to make the plastic "cloudy" and brittle, • When cleaning the lower guard, unplug the saw without the lower blade guard. JJ) Replace both carbon brushes when either has less than 1/4 in. To inspect or replace brushes, first unplug the saw is attached to avoid electrical shock. Tighten the cap snugly, but do not use the saw from unexpected starting or electrical shock, unplug the power cord...

Operation Manual
Page 27
... points. 1. Replace with 12 in. Replace blade. TROUBLESHOOTING GUIDE - MAINTENANCE section. Contact Sears Service Center. Brush spark when switch released. Cutting arm wobbles. 1. loose. 2. Let cool of cut . 1. Brush worn. See MAINTENANCE section. 2. See OPERATION - Contact Sears Service Center. Saw blade not round / damaged / 1. il. il. Can not adjust miter. 1. See BASIC SAW OPERATION section. 2. Saw vibrates or shakes, 1. Motor brushes not sealed or lightly 1. i2. Miter Angle Adjustment section. 2. MOTOR PROBLEM PROBLEM CAUSE...
... points. 1. Replace with 12 in. Replace blade. TROUBLESHOOTING GUIDE - MAINTENANCE section. Contact Sears Service Center. Brush spark when switch released. Cutting arm wobbles. 1. loose. 2. Let cool of cut . 1. Brush worn. See MAINTENANCE section. 2. See OPERATION - Contact Sears Service Center. Saw blade not round / damaged / 1. il. il. Can not adjust miter. 1. See BASIC SAW OPERATION section. 2. Saw vibrates or shakes, 1. Motor brushes not sealed or lightly 1. i2. Miter Angle Adjustment section. 2. MOTOR PROBLEM PROBLEM CAUSE...
Operation Manual
Page 28
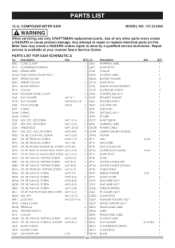
... TRIGGER SWITCH COLLAR CR. RE. PAN HD. 12 in. COMPOUND MITER SAW MODEL NO. 137.212390 I_]L WARNING] When servicing use only CRAFTSMAN replacement parts. Any attempt to repair or replace electrical parts on this Miter Saw may create a HAZARD unless repair is available at your nearest Sears Service Center. DescrJpfion Size 083Z CORD CLAMP 091S COMPRESSION SPRING 0CKS 0CQH 0DHT 0DTZ 0DVJ 0F1H 0HAP 0J4E 0J7G 0JB0 0JE7 0JMN 0JMP 0JXB SPRING WIRE HOLD DOWN CLAMP ASS'Y SPRING GUARD ARBOR...
... TRIGGER SWITCH COLLAR CR. RE. PAN HD. 12 in. COMPOUND MITER SAW MODEL NO. 137.212390 I_]L WARNING] When servicing use only CRAFTSMAN replacement parts. Any attempt to repair or replace electrical parts on this Miter Saw may create a HAZARD unless repair is available at your nearest Sears Service Center. DescrJpfion Size 083Z CORD CLAMP 091S COMPRESSION SPRING 0CKS 0CQH 0DHT 0DTZ 0DVJ 0F1H 0HAP 0J4E 0J7G 0JB0 0JE7 0JMN 0JMP 0JXB SPRING WIRE HOLD DOWN CLAMP ASS'Y SPRING GUARD ARBOR...

Operation Manual
Page 30
12 in. CAP SCREW HEX. SCREW CR. RE. SCREW CR. RE. NUT LOCK NUT NUT LOCK NUT SPECLAL BOLT WARNING LABEL LOCKLNG HANDLE ASS'Y ASSBT-FENCE MLTER BAR STOP BLOCK (LEFT) STOP BLOCK (RLGHT) TABLE LNSERT TABLE LNSERT KNOB COMPRESDON SPRLNG REAR EXTENTLON STAY PLUNGER HANDLE NEEDLE POLNTER FENCE WARNING LABEL VLSEASS'Y BASE TABLE EXTENDON WLNG (LEFT) EXTENDON WLNG (RLGHT) SDDE-BAR BLADE GUARD SEGMENT HANDLE (REAR) SETPLATE SDDE PLATE SUPPORT CR. RE. COMPOUND MITER SAW PARTS LiST FOR SAW SCHEMATIC B I.D. 0DTH 0J6A 0J74...
12 in. CAP SCREW HEX. SCREW CR. RE. SCREW CR. RE. NUT LOCK NUT NUT LOCK NUT SPECLAL BOLT WARNING LABEL LOCKLNG HANDLE ASS'Y ASSBT-FENCE MLTER BAR STOP BLOCK (LEFT) STOP BLOCK (RLGHT) TABLE LNSERT TABLE LNSERT KNOB COMPRESDON SPRLNG REAR EXTENTLON STAY PLUNGER HANDLE NEEDLE POLNTER FENCE WARNING LABEL VLSEASS'Y BASE TABLE EXTENDON WLNG (LEFT) EXTENDON WLNG (RLGHT) SDDE-BAR BLADE GUARD SEGMENT HANDLE (REAR) SETPLATE SDDE PLATE SUPPORT CR. RE. COMPOUND MITER SAW PARTS LiST FOR SAW SCHEMATIC B I.D. 0DTH 0J6A 0J74...
Operation Manual
Page 32
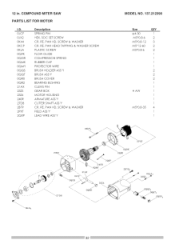
SOC SETSCREW CR. PAN HD. 12 in. SCREW & WASHER CR. RE. RE. PAN HEAD TAPPING & WASHER SCREW PLASTIC SCREW FLOW GUIDE COMPRESSION SPRING RUBBER CAP PROTECTOR WIRE BRUSH HOLDER ASS'Y BRUSH ASS'Y BRUSH COVER BEARING BUSHING CLEVIS PIN GEAR BOX MOTOR HOUSING ARMATURE ASS'Y CUTTER SHAFT ASS'Y CR. RE. PAN HD. COMPOUND MITER SAW PARTS LiST FOR MOTOR I.D. 0JCF 0JX2 0K44 0KCP 0KLA 0Q9K 0QGR 0QMK 0QMY 0QQS 0QQT 0QR0 0OR2 2lAX 23Z3 23Z4...
SOC SETSCREW CR. PAN HD. 12 in. SCREW & WASHER CR. RE. RE. PAN HEAD TAPPING & WASHER SCREW PLASTIC SCREW FLOW GUIDE COMPRESSION SPRING RUBBER CAP PROTECTOR WIRE BRUSH HOLDER ASS'Y BRUSH ASS'Y BRUSH COVER BEARING BUSHING CLEVIS PIN GEAR BOX MOTOR HOUSING ARMATURE ASS'Y CUTTER SHAFT ASS'Y CR. RE. PAN HD. COMPOUND MITER SAW PARTS LiST FOR MOTOR I.D. 0JCF 0JX2 0K44 0KCP 0KLA 0Q9K 0QGR 0QMK 0QMY 0QQS 0QQT 0QR0 0OR2 2lAX 23Z3 23Z4...


