
Routine Care
Page 6
... unused and disconnected from HP. To avoid potential safety issues, use only the battery pack provided with the computer, a replacement battery pack provided by HP, or a compatible battery pack purchased as an accessory from external power for battery disposal information. 2 Chapter 1 Hardware maintenance ENWW Do not expose a battery pack to temperatures above 60˚C (140˚F).
... unused and disconnected from HP. To avoid potential safety issues, use only the battery pack provided with the computer, a replacement battery pack provided by HP, or a compatible battery pack purchased as an accessory from external power for battery disposal information. 2 Chapter 1 Hardware maintenance ENWW Do not expose a battery pack to temperatures above 60˚C (140˚F).
Routine Care - Windows Vista
Page 6
..., and Environmental Notices for extended periods of a battery pack in a cool, dry place. or dispose of time. Calibrate a battery pack before using it if it separately. Battery pack WARNING! To reduce potential safety issues, use only the battery provided with the computer, a replacement battery provided by HP, or a compatible battery purchased from external power for one month...
..., and Environmental Notices for extended periods of a battery pack in a cool, dry place. or dispose of time. Calibrate a battery pack before using it if it separately. Battery pack WARNING! To reduce potential safety issues, use only the battery provided with the computer, a replacement battery provided by HP, or a compatible battery purchased from external power for one month...
Computer Setup - Windows XP and Windows Vista
Page 10
... keyboard controller version. Your changes go into effect when the computer restarts. 4 Chapter 3 Computer Setup menus ENWW Replace the configuration settings in the system. ● View specification information for the computer and the batteries in Computer Setup with the original factory settings. (Password settings and security settings are not changed when you...
... keyboard controller version. Your changes go into effect when the computer restarts. 4 Chapter 3 Computer Setup menus ENWW Replace the configuration settings in the system. ● View specification information for the computer and the batteries in Computer Setup with the original factory settings. (Password settings and security settings are not changed when you...
Computer Setup
Page 9
Then exit and restart the computer. Then exit and restart the computer. Your changes go into effect when the computer restarts. Replace the configuration settings in Computer Setup with factory settings. (Password and security settings are not changed when you restore the factory settings...Restore defaults Ignore changes and exit Save changes and exit To Do This ● View identification information for the computer and the batteries in the system. ● View specification information for the processor, cache and memory size, system ROM, video revision, and keyboard controller version....
Then exit and restart the computer. Then exit and restart the computer. Your changes go into effect when the computer restarts. Replace the configuration settings in Computer Setup with factory settings. (Password and security settings are not changed when you restore the factory settings...Restore defaults Ignore changes and exit Save changes and exit To Do This ● View identification information for the computer and the batteries in the system. ● View specification information for the processor, cache and memory size, system ROM, video revision, and keyboard controller version....
Drives
Page 11
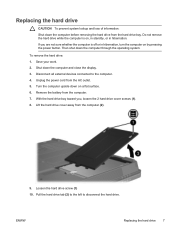
To remove the hard drive: 1. Replacing the hard drive CAUTION To prevent system lockup and loss of information: Shut down the computer and close the display. 3. If you , loosen the 2 hard drive cover screws (1). 8. Remove the battery from the AC outlet. 5. Loosen the hard drive screw (1) 10. ... Disconnect all external devices connected to disconnect the hard drive. Pull the hard drive tab (2) to the left to the computer. 4. ENWW Replacing the hard drive 7 Unplug the power cord from the computer. 7. Lift the hard drive cover away from the hard drive bay. Shut ...
To remove the hard drive: 1. Replacing the hard drive CAUTION To prevent system lockup and loss of information: Shut down the computer and close the display. 3. If you , loosen the 2 hard drive cover screws (1). 8. Remove the battery from the AC outlet. 5. Loosen the hard drive screw (1) 10. ... Disconnect all external devices connected to disconnect the hard drive. Pull the hard drive tab (2) to the left to the computer. 4. ENWW Replacing the hard drive 7 Unplug the power cord from the computer. 7. Lift the hard drive cover away from the hard drive bay. Shut ...

Drives - Windows Vista
Page 3
... light 3 Hard drives HP Mobile Data Protection 3D with digital accelerometer 4 HP Mobile Data Protection 3D status 4 HP Mobile Data Protection 3D software 4 Replacing the hard drive ...6 4 MultiBay II Drive MultiBay II Security Screw ...10 MultiBay II Hard Drive ...11 Inserting a Hard Drive Module 11 Removing a...Optical Drive 13 Removing an Optical Drive 13 5 Optical drives Inserting an optical disc ...16 Removing an optical disc when running on battery or external power 17 Removing an optical disc when no computer power is available 18 Avoiding the Sleep state or Hibernation 19 6 ...
... light 3 Hard drives HP Mobile Data Protection 3D with digital accelerometer 4 HP Mobile Data Protection 3D status 4 HP Mobile Data Protection 3D software 4 Replacing the hard drive ...6 4 MultiBay II Drive MultiBay II Security Screw ...10 MultiBay II Hard Drive ...11 Inserting a Hard Drive Module 11 Removing a...Optical Drive 13 Removing an Optical Drive 13 5 Optical drives Inserting an optical disc ...16 Removing an optical disc when running on battery or external power 17 Removing an optical disc when no computer power is available 18 Avoiding the Sleep state or Hibernation 19 6 ...

Drives - Windows Vista
Page 10
... outlet. 5. Pull the hard drive tab (2) to the left to the computer. 4. Unplug the power cord from the computer (2). 9. Remove the battery from the hard drive bay. Then shut down the computer and close the display. 3. Do not remove the hard drive while the computer is off... the hard drive. 6 Chapter 3 Hard drives ENWW Loosen the hard drive screw (1) 10. If you , loosen the 2 hard drive cover screws (1). 8. Replacing the hard drive CAUTION To prevent system lockup and loss of information: Shut down the computer before removing the hard drive from the computer. 7.
... outlet. 5. Pull the hard drive tab (2) to the left to the computer. 4. Unplug the power cord from the computer (2). 9. Remove the battery from the hard drive bay. Then shut down the computer and close the display. 3. Do not remove the hard drive while the computer is off... the hard drive. 6 Chapter 3 Hard drives ENWW Loosen the hard drive screw (1) 10. If you , loosen the 2 hard drive cover screws (1). 8. Replacing the hard drive CAUTION To prevent system lockup and loss of information: Shut down the computer before removing the hard drive from the computer. 7.
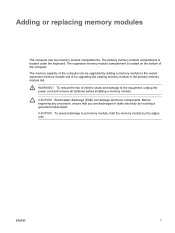
Memory Modules
Page 5
... the vacant expansion memory module slot or by touching a grounded metal object. ENWW 1 The expansion memory module compartment is located under the keyboard. 1 Adding or replacing memory modules The computer has two memory module compartments. WARNING! CAUTION To prevent damage to the equipment, unplug the power cord and remove all...
... the vacant expansion memory module slot or by touching a grounded metal object. ENWW 1 The expansion memory module compartment is located under the keyboard. 1 Adding or replacing memory modules The computer has two memory module compartments. WARNING! CAUTION To prevent damage to the equipment, unplug the power cord and remove all...
Memory Modules
Page 6
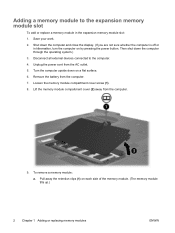
... upside down the computer through the operating system.) 3. Remove the battery from the computer. 9. To remove a memory module: a. Disconnect all external devices connected to the expansion memory module slot To add or replace a memory module in hibernation, turn the computer on by pressing ...away from the computer. 7. Then shut down on each side of the memory module. (The memory module tilts up.) 2 Chapter 1 Adding or replacing memory modules ENWW Loosen the memory module compartment cover screw (1). 8. Pull away the retention clips (1) on a flat surface. 6. Adding a memory ...
... upside down the computer through the operating system.) 3. Remove the battery from the computer. 9. To remove a memory module: a. Disconnect all external devices connected to the expansion memory module slot To add or replace a memory module in hibernation, turn the computer on by pressing ...away from the computer. 7. Then shut down on each side of the memory module. (The memory module tilts up.) 2 Chapter 1 Adding or replacing memory modules ENWW Loosen the memory module compartment cover screw (1). 8. Pull away the retention clips (1) on a flat surface. 6. Adding a memory ...

Memory Modules
Page 8
Tighten the memory module compartment cover screw (3). 14. Close the cover (2). 13. Align the tabs (1) on the memory module compartment cover with the notches on the computer. 12. Replace the battery. 4 Chapter 1 Adding or replacing memory modules ENWW Press the memory module (3) down, applying pressure to both the left and right edges of the memory module, until the retention clips snap into place. 11. c.
Tighten the memory module compartment cover screw (3). 14. Close the cover (2). 13. Align the tabs (1) on the memory module compartment cover with the notches on the computer. 12. Replace the battery. 4 Chapter 1 Adding or replacing memory modules ENWW Press the memory module (3) down, applying pressure to both the left and right edges of the memory module, until the retention clips snap into place. 11. c.
Memory Modules
Page 10
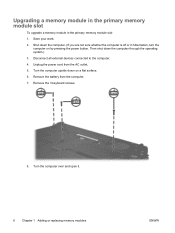
... by pressing the power button. Shut down the computer through the operating system.) 3. Remove the battery from the AC outlet. 5. Unplug the power cord from the computer. 7. Turn the computer over and open it. 6 Chapter 1 Adding or replacing memory modules ENWW Disconnect all external devices connected to the computer. 4. Remove the 3 keyboard...
... by pressing the power button. Shut down the computer through the operating system.) 3. Remove the battery from the AC outlet. 5. Unplug the power cord from the computer. 7. Turn the computer over and open it. 6 Chapter 1 Adding or replacing memory modules ENWW Disconnect all external devices connected to the computer. 4. Remove the 3 keyboard...

Memory Modules
Page 14
Replace the keyboard screws. 17. Slide the 4 keyboard release latches to lock the keyboard. 15. 14. Turn the computer upside down on the computer. 10 Chapter 1 Adding or replacing memory modules ENWW Reconnect external power and external devices. 19. Turn on a flat surface. 16. Replace the battery. 18.
Replace the keyboard screws. 17. Slide the 4 keyboard release latches to lock the keyboard. 15. 14. Turn the computer upside down on the computer. 10 Chapter 1 Adding or replacing memory modules ENWW Reconnect external power and external devices. 19. Turn on a flat surface. 16. Replace the battery. 18.
Memory Modules - Windows Vista
Page 5
...of the computer. WARNING! The memory capacity of electric shock and damage to the equipment, unplug the power cord and remove all batteries before installing a memory module. CAUTION To prevent damage to the vacant expansion memory module slot or by upgrading the existing memory ...can be upgraded by adding a memory module to a memory module, hold the memory module by touching a grounded metal object. Adding or replacing memory modules The computer has two memory module compartments. To reduce the risk of the computer can damage electronic components. The primary memory module ...
...of the computer. WARNING! The memory capacity of electric shock and damage to the equipment, unplug the power cord and remove all batteries before installing a memory module. CAUTION To prevent damage to the vacant expansion memory module slot or by upgrading the existing memory ...can be upgraded by adding a memory module to a memory module, hold the memory module by touching a grounded metal object. Adding or replacing memory modules The computer has two memory module compartments. To reduce the risk of the computer can damage electronic components. The primary memory module ...

Memory Modules - Windows Vista
Page 6
... module compartment cover screw (1). 9. Save your work and close all external devices connected to the expansion memory module slot To add or replace a memory module in Hibernation, you must first exit Sleep or Hibernation before shutdown is possible. 2. Unplug the power cord from the ...computer. 8. Turn the computer upside down on each side of the memory module. (The memory module tilts up.) 2 Adding or replacing memory modules ENWW Remove the battery from the AC outlet. 6. Lift the memory module compartment cover (2) away from the computer. 10. To remove a memory module:...
... module compartment cover screw (1). 9. Save your work and close all external devices connected to the expansion memory module slot To add or replace a memory module in Hibernation, you must first exit Sleep or Hibernation before shutdown is possible. 2. Unplug the power cord from the ...computer. 8. Turn the computer upside down on each side of the memory module. (The memory module tilts up.) 2 Adding or replacing memory modules ENWW Remove the battery from the AC outlet. 6. Lift the memory module compartment cover (2) away from the computer. 10. To remove a memory module:...

Memory Modules - Windows Vista
Page 8
Align the tabs (1) on the memory module compartment cover with the notches on the computer. 13. c. Tighten the memory module compartment cover screw (3). 15. Press the memory module (3) down, applying pressure to both the left and right edges of the memory module, until the retention clips snap into place. 12. Close the cover (2). 14. Replace the battery. 4 Adding or replacing memory modules ENWW
Align the tabs (1) on the memory module compartment cover with the notches on the computer. 13. c. Tighten the memory module compartment cover screw (3). 15. Press the memory module (3) down, applying pressure to both the left and right edges of the memory module, until the retention clips snap into place. 12. Close the cover (2). 14. Replace the battery. 4 Adding or replacing memory modules ENWW
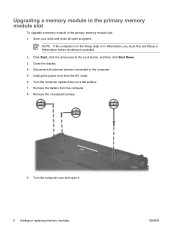
Memory Modules - Windows Vista
Page 10
... primary memory module slot: 1. Close the display. 4. Unplug the power cord from the computer. 8. Disconnect all open it. 6 Adding or replacing memory modules ENWW Remove the 3 keyboard screws. 9. Remove the battery from the AC outlet. 6. Save your work and close all external devices connected to the Lock button, and then click Shut...
... primary memory module slot: 1. Close the display. 4. Unplug the power cord from the computer. 8. Disconnect all open it. 6 Adding or replacing memory modules ENWW Remove the 3 keyboard screws. 9. Remove the battery from the AC outlet. 6. Save your work and close all external devices connected to the Lock button, and then click Shut...

Memory Modules - Windows Vista
Page 14
15. Turn on a flat surface. 17. Replace the battery. 19. Reconnect external power and external devices. 20. Slide the 4 keyboard release latches to lock the keyboard. 16. Turn the computer upside down on the computer. 10 Adding or replacing memory modules ENWW Replace the keyboard screws. 18.
15. Turn on a flat surface. 17. Replace the battery. 19. Reconnect external power and external devices. 20. Slide the 4 keyboard release latches to lock the keyboard. 16. Turn the computer upside down on the computer. 10 Adding or replacing memory modules ENWW Replace the keyboard screws. 18.

Notebook Tour
Page 17
...To prevent an unresponsive system and the display of a warning message, replace the devices with only a Mini Card authorized for the internal fan to cycle on a hard, flat surface. Holds the battery. Connects an optional accessory battery. Do not allow another hard surface, such as an adjoining optional ... operation. It is normal for use in the computer by the governmental agency that regulates wireless devices in your country, If you replace the device and then receive a warning message, remove the device to block airflow. ENWW Bottom components 13 CAUTION To prevent overheating,...
...To prevent an unresponsive system and the display of a warning message, replace the devices with only a Mini Card authorized for the internal fan to cycle on a hard, flat surface. Holds the battery. Connects an optional accessory battery. Do not allow another hard surface, such as an adjoining optional ... operation. It is normal for use in the computer by the governmental agency that regulates wireless devices in your country, If you replace the device and then receive a warning message, remove the device to block airflow. ENWW Bottom components 13 CAUTION To prevent overheating,...

Notebook Tour - Windows Vista
Page 17
... latches (5) Battery bay ENWW Description Contains a Bluetooth device (select models only). Enable airflow to cool internal components and prevent overheating. CAUTION To prevent overheating, do not obstruct vents. Bottom components 13 Contains a wireless LAN device (select models only). CAUTION To prevent an unresponsive system and the display of a warning message, replace the...
... latches (5) Battery bay ENWW Description Contains a Bluetooth device (select models only). Enable airflow to cool internal components and prevent overheating. CAUTION To prevent overheating, do not obstruct vents. Bottom components 13 Contains a wireless LAN device (select models only). CAUTION To prevent an unresponsive system and the display of a warning message, replace the...

Power
Page 24
... reduce potential safety issues, only the AC adapter or battery provided with the computer, a replacement AC adapter or battery provided by HP, or a compatible AC adapter or battery purchased as an accessory from HP should be used with the computer. ● The optional accessory battery that can be unused and disconnected from external power for...
... reduce potential safety issues, only the AC adapter or battery provided with the computer, a replacement AC adapter or battery provided by HP, or a compatible AC adapter or battery purchased as an accessory from HP should be used with the computer. ● The optional accessory battery that can be unused and disconnected from external power for...


