HP Client Manager 6.1
Page 13
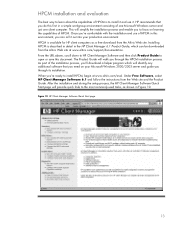
...Product Guide will simplify the installation process and enable you to open or save this document. When you through the HPCM installation process. Figure 10. After the installation and during the setup process, the HP Client Manager Software Quick Start page will provide quick links to install HPCM, ...documentation. HP Client Manager Software Quick Start page 13 HPCM is described in detail in a simple workgroup environment consisting of one Microsoft Windows server and just one client computer. Once you're comfortable with the installation and use it out into your Microsoft...
...Product Guide will simplify the installation process and enable you to open or save this document. When you through the HPCM installation process. Figure 10. After the installation and during the setup process, the HP Client Manager Software Quick Start page will provide quick links to install HPCM, ...documentation. HP Client Manager Software Quick Start page 13 HPCM is described in detail in a simple workgroup environment consisting of one Microsoft Windows server and just one client computer. Once you're comfortable with the installation and use it out into your Microsoft...
Using LightScribe (Select Models Only)
Page 9
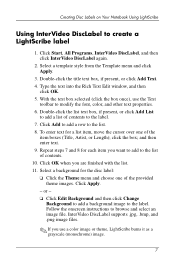
...menu and click Apply. 3. and then enter text. 9. Click Apply. - Creating Disc Labels on Your Notebook Using LightScribe Using InterVideo DiscLabel to the label. Type the text into the Rich Text Edit window, and then click OK. 5. Select a background for each item you want to add to browse and ...DiscLabel, and then click InterVideo DiscLabel again. 2. Double-click the list text box, if present, or click Add List to add a list of contents. 10. Double-click the title text box, if present, or click Add Text. 4. With the text box selected (click the box once), use a color image...
...menu and click Apply. 3. and then enter text. 9. Click Apply. - Creating Disc Labels on Your Notebook Using LightScribe Using InterVideo DiscLabel to the label. Type the text into the Rich Text Edit window, and then click OK. 5. Select a background for each item you want to add to browse and ...DiscLabel, and then click InterVideo DiscLabel again. 2. Double-click the list text box, if present, or click Add List to add a list of contents. 10. Double-click the title text box, if present, or click Add Text. 4. With the text box selected (click the box once), use a color image...
Using LightScribe (Select Models Only)
Page 12
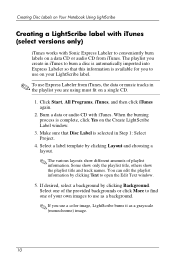
...data or music tracks in the playlist you use as a grayscale (monochrome) image. 10 When the burning process is selected in iTunes to burn a disc is automatically imported ... playlist information. Select one of the provided backgrounds or click More to open the Edit Text window. 5. The playlist you create in Step 1: Select Project. 4. If desired, select a background...9998; If you are using must fit on a single CD. 1. Creating Disc Labels on Your Notebook Using LightScribe Creating a LightScribe label with iTunes (select versions only) iTunes works with iTunes. Click Start, ...
...data or music tracks in the playlist you use as a grayscale (monochrome) image. 10 When the burning process is selected in iTunes to burn a disc is automatically imported ... playlist information. Select one of the provided backgrounds or click More to open the Edit Text window. 5. The playlist you create in Step 1: Select Project. 4. If desired, select a background...9998; If you are using must fit on a single CD. 1. Creating Disc Labels on Your Notebook Using LightScribe Creating a LightScribe label with iTunes (select versions only) iTunes works with iTunes. Click Start, ...

HP Compaq notebook single image white paper
Page 1
... ROM version using HP Diagnostics for Windows 7 Determining the ROM Version Using Windows System Information 8 Determining the ROM version using QuickLaunch Buttons for Windows 8 Creating a ROMPaq diskette ...8 Upgrading the ROM...8 Appendix B: SoftPaqs...9 Unpacking a SoftPaq file...9 Appendix C: Known anomalies ...10 Appendix D: Questions and answers 11 For more information...12 HP Compaq notebook single image white paper Introduction...
... ROM version using HP Diagnostics for Windows 7 Determining the ROM Version Using Windows System Information 8 Determining the ROM version using QuickLaunch Buttons for Windows 8 Creating a ROMPaq diskette ...8 Upgrading the ROM...8 Appendix B: SoftPaqs...9 Unpacking a SoftPaq file...9 Appendix C: Known anomalies ...10 Appendix D: Questions and answers 11 For more information...12 HP Compaq notebook single image white paper Introduction...
HP Compaq notebook single image white paper
Page 4
...to complete the ROM upgrade. Removal procedures are available in the Maintenance and Service Guide: "HP Compaq Business Notebook nc6100 Series." 8. Failure to the documentation included with supported single image systems. Installing the operating system... and system software Preparing for users who perform a clean installation of the new devices. 10. Installing drivers and enhancements IMPORTANT Upgrade the system ROM before beginning the Windows...
...to complete the ROM upgrade. Removal procedures are available in the Maintenance and Service Guide: "HP Compaq Business Notebook nc6100 Series." 8. Failure to the documentation included with supported single image systems. Installing the operating system... and system software Preparing for users who perform a clean installation of the new devices. 10. Installing drivers and enhancements IMPORTANT Upgrade the system ROM before beginning the Windows...
HP Compaq notebook single image white paper
Page 5
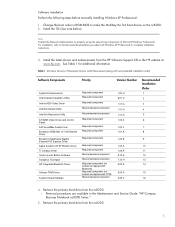
Software installation Perform the following steps before manually installing Windows XP Professional: 1. Remove the primary hard drive from the nc6200. 5 Change the boot order in the Maintenance and Service Guide: "HP Compaq Business Notebook nc8200 Series." 5. Note Contact the Network Administrators to properly set ... Set Default Utility Intel Set Resolution Utility ATI 8200 Video Driver and Control Panel ADI SoundMax Audio Driver Broadcom BCM440x 10-100 Ethernet Driver Broadcom NetXtreme Gigabit Ethernet PCI Express Driver Agere Systems AC'97 Modem Driver TI Cardbus Driver Quick...
Software installation Perform the following steps before manually installing Windows XP Professional: 1. Remove the primary hard drive from the nc6200. 5 Change the boot order in the Maintenance and Service Guide: "HP Compaq Business Notebook nc8200 Series." 5. Note Contact the Network Administrators to properly set ... Set Default Utility Intel Set Resolution Utility ATI 8200 Video Driver and Control Panel ADI SoundMax Audio Driver Broadcom BCM440x 10-100 Ethernet Driver Broadcom NetXtreme Gigabit Ethernet PCI Express Driver Agere Systems AC'97 Modem Driver TI Cardbus Driver Quick...
HP Compaq notebook single image white paper
Page 10
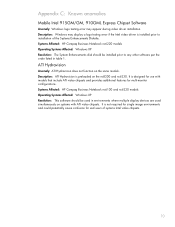
Systems Affected: HP Compaq Business Notebook nc6220 models Operating Systems Affected: Windows XP Resolution: The System Enhancements disk should be installed prior to installation of systems Intel video chipsets. 10 ATI Hydravision Anomaly: ATI Hydravision does not function on the nc8200 and nc6230. It is preloaded ... Diskette. Description: ATI Hydravision is designed for use with ATI video chipsets. Systems Affected: HP Compaq Business Notebook nc6100 and nc6220 models Operating Systems Affected: Windows XP Resolution: This software should be used in table 1.
Systems Affected: HP Compaq Business Notebook nc6220 models Operating Systems Affected: Windows XP Resolution: The System Enhancements disk should be installed prior to installation of systems Intel video chipsets. 10 ATI Hydravision Anomaly: ATI Hydravision does not function on the nc8200 and nc6230. It is preloaded ... Diskette. Description: ATI Hydravision is designed for use with ATI video chipsets. Systems Affected: HP Compaq Business Notebook nc6100 and nc6220 models Operating Systems Affected: Windows XP Resolution: This software should be used in table 1.

Hardware-Software Guide
Page 7
... Your Wireless Notebook to a Corporate WLAN 11-4 Connecting Your Wireless Notebook to a Public WLAN 11-4 Setting Up a WLAN in Your Home 11-5 Using a WLAN Connection 11-6 Using Wireless Security Features 11-7 Installing Wireless Software (Optional 11-8 Troubleshooting Devices 11-10 Bluetooth (Select... Setup 12-4 Passwords 12-4 HP and Windows Passwords 12-5 HP and Windows Password Guidelines 12-6 HP Administrator Passwords 12-8 Setting HP Administrator Passwords 12-9 Entering HP Administrator Passwords 12-10 Power-On Passwords 12-10 Setting Power-On Passwords 12-11 Entering Power...
... Your Wireless Notebook to a Corporate WLAN 11-4 Connecting Your Wireless Notebook to a Public WLAN 11-4 Setting Up a WLAN in Your Home 11-5 Using a WLAN Connection 11-6 Using Wireless Security Features 11-7 Installing Wireless Software (Optional 11-8 Troubleshooting Devices 11-10 Bluetooth (Select... Setup 12-4 Passwords 12-4 HP and Windows Passwords 12-5 HP and Windows Password Guidelines 12-6 HP Administrator Passwords 12-8 Setting HP Administrator Passwords 12-9 Entering HP Administrator Passwords 12-10 Power-On Passwords 12-10 Setting Power-On Passwords 12-11 Entering Power...

Hardware-Software Guide
Page 37
... settings and timeouts can be changed in the Power Options window. Hardware and Software Guide 2-10 Allow the system to external power, the system does not initiate hibernation. Press and release the power button. ✎ If the system initiated hibernation because of notebook inactivity or when the battery pack(s) reach a critical low-battery...
... settings and timeouts can be changed in the Power Options window. Hardware and Software Guide 2-10 Allow the system to external power, the system does not initiate hibernation. Press and release the power button. ✎ If the system initiated hibernation because of notebook inactivity or when the battery pack(s) reach a critical low-battery...

Hardware-Software Guide
Page 38
...or system-initiated standby. Power settings and timeouts can be changed in the Power Options window. ■ Press and release the power button. ■ If the display was closed while the notebook was in standby, open the display. Hardware and Software Guide 2-11 Result ■...; The screen clears. ■ The power/standby lights are turned on battery power, the system initiates standby after 10 minutes of notebook inactivity. (Default setting) ■ If the notebook is running on . ■ Your work returns to the screen. Resume from Standby Task Initiate standby. Procedure &#...
...or system-initiated standby. Power settings and timeouts can be changed in the Power Options window. ■ Press and release the power button. ■ If the display was closed while the notebook was in standby, open the display. Hardware and Software Guide 2-11 Result ■...; The screen clears. ■ The power/standby lights are turned on battery power, the system initiates standby after 10 minutes of notebook inactivity. (Default setting) ■ If the notebook is running on . ■ Your work returns to the screen. Resume from Standby Task Initiate standby. Procedure &#...

Hardware-Software Guide
Page 92
... door is enabled on or off , refer to enable AutoPlay if the feature has been turned off . When the installation wizard is an option in Windows that turns the autorun feature on the notebook. Restart the notebook if prompted. ✎ Repeat the installation procedure for proper installation. Hardware and Software Guide...
... door is enabled on or off , refer to enable AutoPlay if the feature has been turned off . When the installation wizard is an option in Windows that turns the autorun feature on the notebook. Restart the notebook if prompted. ✎ Repeat the installation procedure for proper installation. Hardware and Software Guide...

Hardware-Software Guide
Page 135
...in the Location list, and then select OK. ✎ You can use the preceding procedure to save your new location setting. (The Dialing Rules window is displayed.) Then: ❏ To set your new location setting as the current location setting, select OK. ❏ To select another location ...setting as the current location setting, select your preference from the Country/region drop-down list. Hardware and Software Guide 10-5 Type a name for the new location setting in other countries. If you could add a setting named "Work" that is not supported by ...
...in the Location list, and then select OK. ✎ You can use the preceding procedure to save your new location setting. (The Dialing Rules window is displayed.) Then: ❏ To set your new location setting as the current location setting, select OK. ❏ To select another location ...setting as the current location setting, select your preference from the Country/region drop-down list. Hardware and Software Guide 10-5 Type a name for the new location setting in other countries. If you could add a setting named "Work" that is not supported by ...

Hardware-Software Guide
Page 136
... location settings include dialing mode options. On the upper menu in which you purchased the notebook, the following suggestions might be the dialing mode supported by a telephone line, dial ... Select the Dialing Rules tab. 4. Select your current modem location setting: 1. Hardware and Software Guide 10-6 Select either Tone or Pulse. 7. Select OK > OK. A line described as a data line...a digital line. An analog telephone line supports 1 of the Network and Internet Connections window, select Phone and Modem Options. 3. Modem and Networking Solving Travel Connection Problems If you...
... location settings include dialing mode options. On the upper menu in which you purchased the notebook, the following suggestions might be the dialing mode supported by a telephone line, dial ... Select the Dialing Rules tab. 4. Select your current modem location setting: 1. Hardware and Software Guide 10-6 Select either Tone or Pulse. 7. Select OK > OK. A line described as a data line...a digital line. An analog telephone line supports 1 of the Network and Internet Connections window, select Phone and Modem Options. 3. Modem and Networking Solving Travel Connection Problems If you...

Hardware-Software Guide
Page 137
... > Network and Internet Connections. 2. On the upper menu in the left panel of the Network and Internet Connections window, select Phone and Modem Options. 3. Select Start > Control Panel > Network and Internet Connections. 2. Select Dialing Rules. 4. Hardware and Software Guide... 10-7 To set the modem to ignore dial tones. Select Properties. 6. Select Edit. On the upper menu in the left panel of the Network and Internet Connections window, select Phone and Modem Options. 3.
... > Network and Internet Connections. 2. On the upper menu in the left panel of the Network and Internet Connections window, select Phone and Modem Options. 3. Select Start > Control Panel > Network and Internet Connections. 2. Select Dialing Rules. 4. Hardware and Software Guide... 10-7 To set the modem to ignore dial tones. Select Properties. 6. Select Edit. On the upper menu in the left panel of the Network and Internet Connections window, select Phone and Modem Options. 3.

Hardware-Software Guide
Page 138
... and data transfer: 1. Select your current location from the Country/region drop-down list. In the Phone and Modem Options window, select Modems. 9. Preinstalled Communication Software To use preinstalled modem software for USA or UK is displayed by default. 7. Hardware and Software Guide... 10-8 Select the appropriate fax or terminal emulation program or Internet connection wizard. Select Apply > OK. 8. Clear the check box for ...
... and data transfer: 1. Select your current location from the Country/region drop-down list. In the Phone and Modem Options window, select Modems. 9. Preinstalled Communication Software To use preinstalled modem software for USA or UK is displayed by default. 7. Hardware and Software Guide... 10-8 Select the appropriate fax or terminal emulation program or Internet connection wizard. Select Apply > OK. 8. Clear the check box for ...

Hardware-Software Guide
Page 208
...directions. Select Start > Help and Support. 2. Hardware and Software Guide 14-10 To restore the notebook to a previous configuration restore point if you encounter problems. To set system restore points when the notebook is opened.) 4. Select Start > Help and Support > System Recovery. ...2. You should periodically set a system restore point: 1. Select System Restore. (A System Restore window is functioning at optimal performance and before installing ...
...directions. Select Start > Help and Support. 2. Hardware and Software Guide 14-10 To restore the notebook to a previous configuration restore point if you encounter problems. To set system restore points when the notebook is opened.) 4. Select Start > Help and Support > System Recovery. ...2. You should periodically set a system restore point: 1. Select System Restore. (A System Restore window is functioning at optimal performance and before installing ...

Hardware-Software Guide
Page 212
... software you must reinstall drivers. Follow the installation instructions provided with the notebook: 1. Follow the on-screen instructions for the Product Key, refer to the Microsoft ...the bottom of the notebook. To reinstall drivers, use the Driver Recovery disc included with the software. Select Format the partition using this partition. 11. While running Windows, insert the Driver ... Guide 14-14 If you do not have autorun enabled, select Start > Run. The notebook restarts in Windows when the process is complete, you added to continue setup using the NTFS file system (Quick...
... software you must reinstall drivers. Follow the installation instructions provided with the notebook: 1. Follow the on-screen instructions for the Product Key, refer to the Microsoft ...the bottom of the notebook. To reinstall drivers, use the Driver Recovery disc included with the software. Select Format the partition using this partition. 11. While running Windows, insert the Driver ... Guide 14-14 If you do not have autorun enabled, select Start > Run. The notebook restarts in Windows when the process is complete, you added to continue setup using the NTFS file system (Quick...

Hardware-Software Guide
Page 239
See PC Card, SD Card DIMM. Index Credential Manager for ProtectTools 12-28 critical low-battery conditions 2-25 Critical Security Updates for ProtectTools 12-27 emergency shutdown ... primary hard drive description 5-3 installing 5-6 removing 5-4 USB 5-1 See also hard drive DVD drives 5-10, 5-11 See also hard drive DVD region settings 4-10 DVDs See recovery discs E edge motion 3-4 embedded security chip 13-6 Embedded Security for Windows XP 12-24 D default boot sequence B-1 deployment C-2 device disabling 12-18 device options in Computer Setup...
See PC Card, SD Card DIMM. Index Credential Manager for ProtectTools 12-28 critical low-battery conditions 2-25 Critical Security Updates for ProtectTools 12-27 emergency shutdown ... primary hard drive description 5-3 installing 5-6 removing 5-4 USB 5-1 See also hard drive DVD drives 5-10, 5-11 See also hard drive DVD region settings 4-10 DVDs See recovery discs E edge motion 3-4 embedded security chip 13-6 Embedded Security for Windows XP 12-24 D default boot sequence B-1 deployment C-2 device disabling 12-18 device options in Computer Setup...

Hardware-Software Guide
Page 240
... Connection Firewall 12-22 Internet service provider 11-5 InterVideo WinDVD 4-8 InterVideo WinDVD Creator Plus 4-8 J jacks headphone 1-10, 4-2 microphone 1-10, 4-1 RJ-11 1-11 RJ-45 1-11 S-Video-out 1-9, 4-6 K keyboard cleaning 15-3 external 3-10 keypad keys 1-6 keypad, embedded numeric 3-18 keypad, external numeric 3-21 keys fn 1-6 function 1-6, 2-3 keypad 1-6 Windows application 1-6 Windows logo 1-6 Hardware and Software Guide Index-4
... Connection Firewall 12-22 Internet service provider 11-5 InterVideo WinDVD 4-8 InterVideo WinDVD Creator Plus 4-8 J jacks headphone 1-10, 4-2 microphone 1-10, 4-1 RJ-11 1-11 RJ-45 1-11 S-Video-out 1-9, 4-6 K keyboard cleaning 15-3 external 3-10 keypad keys 1-6 keypad, embedded numeric 3-18 keypad, external numeric 3-21 keys fn 1-6 function 1-6, 2-3 keypad 1-6 Windows application 1-6 Windows logo 1-6 Hardware and Software Guide Index-4

Hardware-Software Guide
Page 242
...10 removing 5-11 MultiBay II, location 1-10 MultiBoot B-1 multimedia software 4-8 mute button 4-1 N network cable 10-6 network jack 1-11 network, noise suppression circuitry 10-6 noise suppression circuitry modem cable 10-1 network cable 10-6 Norton AntiVirus 12-21 notebook care 15-2 notebook information 14-2 num lock light 1-2 numeric keypad 3-19 O opening the notebook...-5 HP guidelines 12-6 power-on 12-10, 13-5 security 2-14 using 12-4 Windows 12-5 Windows guidelines 12-6 PC Card description 6-1 inserting 6-2 removing 6-3 PC Card eject button 1-11 PC Card slot, location 1-11 pointing devices ...
...10 removing 5-11 MultiBay II, location 1-10 MultiBoot B-1 multimedia software 4-8 mute button 4-1 N network cable 10-6 network jack 1-11 network, noise suppression circuitry 10-6 noise suppression circuitry modem cable 10-1 network cable 10-6 Norton AntiVirus 12-21 notebook care 15-2 notebook information 14-2 num lock light 1-2 numeric keypad 3-19 O opening the notebook...-5 HP guidelines 12-6 power-on 12-10, 13-5 security 2-14 using 12-4 Windows 12-5 Windows guidelines 12-6 PC Card description 6-1 inserting 6-2 removing 6-3 PC Card eject button 1-11 PC Card slot, location 1-11 pointing devices ...


