
HP USB Digital Drive
Page 9
Gently unplug the Digital Drive from the USB port. ✎ If the USB connector cable is flashing. 1. Disconnecting the Digital Drive ✎ Do not attempt to Remove Hardware" message appears on your taskbar. Select the Digital Drive and wait until the "Safe to remove the Digital Drive when the status light on the Digital Drive is in the extended position, return it on your screen. 3. Select the "Safely Remove Hardware" icon on its track for safe storage. 8 User Guide A dialog box displays a list of connected devices. 2.
Gently unplug the Digital Drive from the USB port. ✎ If the USB connector cable is flashing. 1. Disconnecting the Digital Drive ✎ Do not attempt to Remove Hardware" message appears on your taskbar. Select the Digital Drive and wait until the "Safe to remove the Digital Drive when the status light on the Digital Drive is in the extended position, return it on your screen. 3. Select the "Safely Remove Hardware" icon on its track for safe storage. 8 User Guide A dialog box displays a list of connected devices. 2.
HP Client Manager 6.1
Page 7
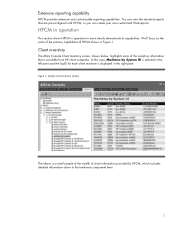
... reporting capabilities. We'll focus on the some of HPCM shown in operation to the hardware component level. 7 Client inventory The Altiris Console Client Inventory screen, shown below, highlights some of the primary capabilities of the inventory information that are pre-configured with HPCM, or you can create your own customized...
... reporting capabilities. We'll focus on the some of HPCM shown in operation to the hardware component level. 7 Client inventory The Altiris Console Client Inventory screen, shown below, highlights some of the primary capabilities of the inventory information that are pre-configured with HPCM, or you can create your own customized...
HP Client Manager 6.1
Page 8
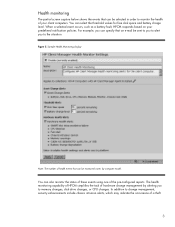
... changes, or CPU changes. For example, you can specify that can be monitored varies by alerting you to the situation. Figure 5. Health monitoring The partial screen capture below shows the events that can be selected in order to monitor the health of your predefined notification policies. The health monitoring capability of...
... changes, or CPU changes. For example, you can specify that can be monitored varies by alerting you to the situation. Figure 5. Health monitoring The partial screen capture below shows the events that can be selected in order to monitor the health of your predefined notification policies. The health monitoring capability of...
HP Client Manager 6.1
Page 9
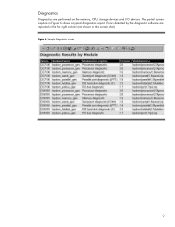
Errors detected by the diagnostic software are performed on the memory, CPU, storage devices and I/O devices. Diagnostics Diagnostics are reported in the far right column (not shown in Figure 6 shows a typical diagnostics report. Sample Diagnostics screen 9 Figure 6. The partial screen capture in this screen shot).
Errors detected by the diagnostic software are performed on the memory, CPU, storage devices and I/O devices. Diagnostics Diagnostics are reported in the far right column (not shown in Figure 6 shows a typical diagnostics report. Sample Diagnostics screen 9 Figure 6. The partial screen capture in this screen shot).
HP Client Manager 6.1
Page 10
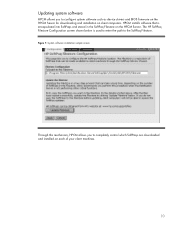
...system software such as device drivers and BIOS firmware on the HPCM Server for downloading and installation on the HPCM Server. System software installation sample screen Through this mechanism, HPCM allows you to completely control which SoftPaqs are downloaded and installed on each of your client machines. 10 Figure 7. ...HPCM installs software that is used to enter the path to the SoftPaq Filestore. The HP SoftPaq Filestore Configuration screen shown below is encapsulated into SoftPaqs and stored in the SoftPaq Filestore on client computers.
...system software such as device drivers and BIOS firmware on the HPCM Server for downloading and installation on the HPCM Server. System software installation sample screen Through this mechanism, HPCM allows you to completely control which SoftPaqs are downloaded and installed on each of your client machines. 10 Figure 7. ...HPCM installs software that is used to enter the path to the SoftPaq Filestore. The HP SoftPaq Filestore Configuration screen shown below is encapsulated into SoftPaqs and stored in the SoftPaq Filestore on client computers.

Using LightScribe (Select Models Only)
Page 3
... paper to curl, and no sticky adhesive to cause problems. LightScribe discs are identified by the LightScribe logo on the retail packaging and on Your Notebook Using LightScribe LightScribe is burn, flip the disc, and then burn again. Creating Disc Labels on the inner area of the disc itself. 1 All you... enhanced disc-labeling software, and specially coated CD or DVD discs (sold separately). A LightScribe-enabled optical drive uses an optical laser to create precise silk-screen-quality labels for discs.
... paper to curl, and no sticky adhesive to cause problems. LightScribe discs are identified by the LightScribe logo on the retail packaging and on Your Notebook Using LightScribe LightScribe is burn, flip the disc, and then burn again. Creating Disc Labels on the inner area of the disc itself. 1 All you... enhanced disc-labeling software, and specially coated CD or DVD discs (sold separately). A LightScribe-enabled optical drive uses an optical laser to create precise silk-screen-quality labels for discs.
Using LightScribe (Select Models Only)
Page 7
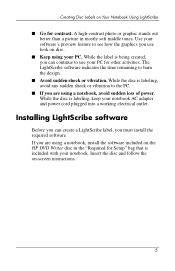
...; If you must install the required software. If you are using your PC. Use your PC for other activities. Installing LightScribe software Before you use your software's preview feature to see how the graphics you can continue to use look on ... sudden loss of power. While the disc is included with your notebook AC adapter and power cord plugged into a working electrical outlet. Creating Disc Labels on -screen instructions. 5 Insert the disc and follow the on Your Notebook Using LightScribe ■ Go for Setup" bag that is labeling, avoid any sudden shock or vibration...
...; If you must install the required software. If you are using your PC. Use your PC for other activities. Installing LightScribe software Before you use your software's preview feature to see how the graphics you can continue to use look on ... sudden loss of power. While the disc is included with your notebook AC adapter and power cord plugged into a working electrical outlet. Creating Disc Labels on -screen instructions. 5 Insert the disc and follow the on Your Notebook Using LightScribe ■ Go for Setup" bag that is labeling, avoid any sudden shock or vibration...
Using LightScribe (Select Models Only)
Page 10
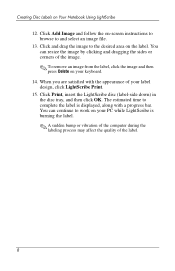
... the sides or corners of your label design, click LightScribe Print. 15. Click and drag the image to the desired area on -screen instructions to browse to work on your PC while LightScribe is displayed, along with the appearance of the image. ✎ To remove an image from the label, click the... image and then press Delete on Your Notebook Using LightScribe 12. Click Print, insert the LightScribe disc (label-side down) in the disc ...
... the sides or corners of your label design, click LightScribe Print. 15. Click and drag the image to the desired area on -screen instructions to browse to work on your PC while LightScribe is displayed, along with the appearance of the image. ✎ To remove an image from the label, click the... image and then press Delete on Your Notebook Using LightScribe 12. Click Print, insert the LightScribe disc (label-side down) in the disc ...
Using LightScribe (Select Models Only)
Page 13
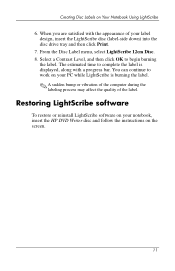
...-side down) into the disc drive tray and then click Print. 7. Restoring LightScribe software To restore or reinstall LightScribe software on your PC while LightScribe is displayed, along with the appearance of the label. The estimated time to begin burning the label. From the Disc Label... menu, select LightScribe 12cm Disc. 8. You can continue to work on your notebook, insert the HP DVD Writer disc and follow the instructions on Your Notebook Using LightScribe 6. Creating Disc Labels on the screen. 11 When you are satisfied with a progress bar.
...-side down) into the disc drive tray and then click Print. 7. Restoring LightScribe software To restore or reinstall LightScribe software on your PC while LightScribe is displayed, along with the appearance of the label. The estimated time to begin burning the label. From the Disc Label... menu, select LightScribe 12cm Disc. 8. You can continue to work on your notebook, insert the HP DVD Writer disc and follow the instructions on Your Notebook Using LightScribe 6. Creating Disc Labels on the screen. 11 When you are satisfied with a progress bar.
HP Compaq notebook single image white paper
Page 7
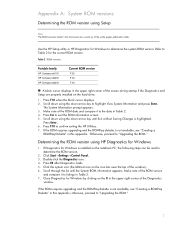
...to "Upgrading the ROM." 7 If the ROM requires upgrading and the ROMPaq diskette is highlighted. Refer to exit the ROM information screen. 5. Press F10 when the block cursor displays. 2. Make note of the ROM date and compare it to the date in ...notebook PC, the following steps can be used to confirm exiting the HP Utilities. 7. Press F10 to determine the ROM version. 2. Table 2 ROM versions Portable family HP Compaq nc6100 HP Compaq nc6200 HP Compaq nc8200 Current ROM version F.02 F.03 F.04 „ A block cursor displays in the upper right corner of the screen...
...to "Upgrading the ROM." 7 If the ROM requires upgrading and the ROMPaq diskette is highlighted. Refer to exit the ROM information screen. 5. Press F10 when the block cursor displays. 2. Make note of the ROM date and compare it to the date in ...notebook PC, the following steps can be used to confirm exiting the HP Utilities. 7. Press F10 to determine the ROM version. 2. Table 2 ROM versions Portable family HP Compaq nc6100 HP Compaq nc6200 HP Compaq nc8200 Current ROM version F.02 F.03 F.04 „ A block cursor displays in the upper right corner of the screen...
HP Compaq notebook single image white paper
Page 8
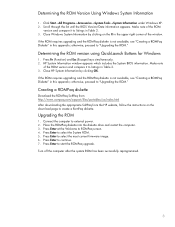
... is not available, see "Creating a ROMPaq Diskette" in Table 2. 3. Creating a ROMPaq diskette Download the ROMPaq SoftPaq from http://www.compaq.com/support/files/portables/us/index.html After downloading the appropriate SoftPaq from the HP website, follow the instructions on the X in the... not available, see "Creating a ROMPaq Diskette" in Table 2. 3. Determining the ROM version using QuickLaunch Buttons for Windows 1. Press Enter to ROMPaq screen. 4. Make note of the ROM version and compare it to listings in this appendix; Press Fn (Function) and Esc (Escape) keys simultaneously. ...
... is not available, see "Creating a ROMPaq Diskette" in Table 2. 3. Creating a ROMPaq diskette Download the ROMPaq SoftPaq from http://www.compaq.com/support/files/portables/us/index.html After downloading the appropriate SoftPaq from the HP website, follow the instructions on the X in the... not available, see "Creating a ROMPaq Diskette" in Table 2. 3. Determining the ROM version using QuickLaunch Buttons for Windows 1. Press Enter to ROMPaq screen. 4. Make note of the ROM version and compare it to listings in this appendix; Press Fn (Function) and Esc (Escape) keys simultaneously. ...
HP Compaq notebook single image white paper
Page 9
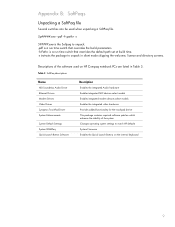
... that overrides the default path set at build time. -s instructs the package to match HP defaults System Firmware Enables the Quick Launch Buttons on HP Compaq notebook PCs are listed in silent mode skipping the welcome, license and directory screens.
... that overrides the default path set at build time. -s instructs the package to match HP defaults System Firmware Enables the Quick Launch Buttons on HP Compaq notebook PCs are listed in silent mode skipping the welcome, license and directory screens.

Hardware-Software Guide
Page 13
... Right pointing stick button Functions like the right button on an external mouse. 7 Left pointing stick button Functions like the left button on the screen. Hardware and Software Guide 1-3 Can be set to "Using the TouchPad" in Chapter 3, "Pointing Devices and Keyboard." Pointing Devices Component ID ...Component Description 1 Pointing stick Moves the pointer and selects or activates items on the screen. 2 TouchPad* Moves the pointer and selects or activates items on an external mouse. *This table describes default settings.
... Right pointing stick button Functions like the right button on an external mouse. 7 Left pointing stick button Functions like the left button on the screen. Hardware and Software Guide 1-3 Can be set to "Using the TouchPad" in Chapter 3, "Pointing Devices and Keyboard." Pointing Devices Component ID ...Component Description 1 Pointing stick Moves the pointer and selects or activates items on the screen. 2 TouchPad* Moves the pointer and selects or activates items on an external mouse. *This table describes default settings.

Hardware-Software Guide
Page 27
...need this information when traveling internationally. The Service Tag label is included with the notebook. ■ Service Tag-Provides the product name, product number (P/N), and serial number (S/N) of your screen, select Start > Help and Support. ■ Microsoft Certificate of Authenticity-Contains the... Microsoft Windows Product Key. If your notebook. You might need the Product Key to the inside of the notebook. Hardware and Software Guide 1-17 ...
...need this information when traveling internationally. The Service Tag label is included with the notebook. ■ Service Tag-Provides the product name, product number (P/N), and serial number (S/N) of your screen, select Start > Help and Support. ■ Microsoft Certificate of Authenticity-Contains the... Microsoft Windows Product Key. If your notebook. You might need the Product Key to the inside of the notebook. Hardware and Software Guide 1-17 ...

Hardware-Software Guide
Page 32
... Standby and hibernation are energy-saving features that are not in use each setting. Hardware and Software Guide 2-5 Connect the notebook to the screen where you left off. ■ Saving your notebook in standby for details about when to system components that conserve power and reduce startup time. They can be initiated by...
... Standby and hibernation are energy-saving features that are not in use each setting. Hardware and Software Guide 2-5 Connect the notebook to the screen where you left off. ■ Saving your notebook in standby for details about when to system components that conserve power and reduce startup time. They can be initiated by...
Hardware-Software Guide
Page 33
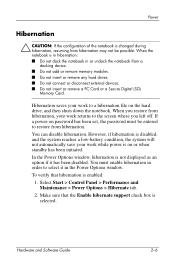
...Options window, hibernation is not displayed as an option if it in the Power Options window. When the notebook is in hibernation: ■ Do not dock the notebook in order to the screen where you restore from hibernation, your work while power is on password has been set, the password ...must enable hibernation in or undock the notebook from a docking device. ■ Do not add or remove memory modules. ■ Do not insert or remove any hard drives. ■ Do not connect or disconnect external devices. ■ Do not insert or remove a PC Card or a Secure Digital (SD) Memory...
...Options window, hibernation is not displayed as an option if it in the Power Options window. When the notebook is in hibernation: ■ Do not dock the notebook in order to the screen where you restore from hibernation, your work while power is on password has been set, the password ...must enable hibernation in or undock the notebook from a docking device. ■ Do not add or remove memory modules. ■ Do not insert or remove any hard drives. ■ Do not connect or disconnect external devices. ■ Do not insert or remove a PC Card or a Secure Digital (SD) Memory...

Hardware-Software Guide
Page 34
...the battery pack fails, hibernation saves your work to a hibernation file and shuts down your work returns instantly to the screen when you pause your notebook. Your work when the power supply is recommended to extend the life of the following sections explain when to initiate standby... or hibernation and when to shut down the notebook. When You Leave Your Work Initiating standby clears the screen and uses less power than standby. Power Initiating Standby, Hibernation or Shutdown The following : ■ Initiate ...
...the battery pack fails, hibernation saves your work to a hibernation file and shuts down your work returns instantly to the screen when you pause your notebook. Your work when the power supply is recommended to extend the life of the following sections explain when to initiate standby... or hibernation and when to shut down the notebook. When You Leave Your Work Initiating standby clears the screen and uses less power than standby. Power Initiating Standby, Hibernation or Shutdown The following : ■ Initiate ...

Hardware-Software Guide
Page 36
... Display On or Off Task Procedure Result Turn on the notebook. Then ■ Press and release the power button and follow the on-screen directions (if displayed) for shutting down the notebook. ■ Shut down . ■ The notebook is turned off. *If the system is unresponsive and you...Using Emergency Shutdown Procedures" in this chapter. Press and release the power button. ■ The power/standby lights are unable to shut down the notebook.* Save your preference. Select Start > Turn Off Computer > Turn Off. ■ The power/standby lights are turned off. ■ The ...
... Display On or Off Task Procedure Result Turn on the notebook. Then ■ Press and release the power button and follow the on-screen directions (if displayed) for shutting down the notebook. ■ Shut down . ■ The notebook is turned off. *If the system is unresponsive and you...Using Emergency Shutdown Procedures" in this chapter. Press and release the power button. ■ The power/standby lights are unable to shut down the notebook.* Save your preference. Select Start > Turn Off Computer > Turn Off. ■ The power/standby lights are turned off. ■ The ...

Hardware-Software Guide
Page 37
No action required. ■ If the notebook is running on . ■ Your work returns to the screen. Result ■ The power/standby lights are turned off. ■ The screen clears. ■ The power/standby lights are turned off. ■ The screen clears. ■ The power/standby lights are...enabled). Press and release the power button. ✎ If the system initiated hibernation because of notebook inactivity or when the battery pack(s) reach a critical low-battery condition. ■ If the notebook is not displayed, press and hold the shift key.) ■ If hibernation has been ...
No action required. ■ If the notebook is running on . ■ Your work returns to the screen. Result ■ The power/standby lights are turned off. ■ The screen clears. ■ The power/standby lights are turned off. ■ The screen clears. ■ The power/standby lights are...enabled). Press and release the power button. ✎ If the system initiated hibernation because of notebook inactivity or when the battery pack(s) reach a critical low-battery condition. ■ If the notebook is not displayed, press and hold the shift key.) ■ If hibernation has been ...

Hardware-Software Guide
Page 38
... option is not displayed, press the shift key.) No action required. ■ If the notebook is attached to the screen. Result ■ The power/standby lights blink. ■ The screen clears. ■ The power/standby lights blink. ■ The screen clears. ■ The power/standby lights are turned on battery power, the system initiates...
... option is not displayed, press the shift key.) No action required. ■ If the notebook is attached to the screen. Result ■ The power/standby lights blink. ■ The screen clears. ■ The power/standby lights blink. ■ The screen clears. ■ The power/standby lights are turned on battery power, the system initiates...


