HP Compaq notebook single image white paper
Page 5
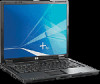
... installation Perform the following steps before manually installing Windows XP Professional: 1. Install the OS (See note below). Note Contact the Network Administrators to make the Multibay the first boot device on models configured with TPM) Recommended component Version Number 1.00 H 6.21 D 1.00 A 1.00 A 1.00 A 1.00 A 1.00 F 1.01 A 1.00 B 1.00 A 1.02 A 5.10... Recommended component Required component (on models configured with Windows XP Professional for additional information. Change the boot order in the Maintenance and Service Guide: "HP Compaq Business Notebook nc8200 Series." 5.
... installation Perform the following steps before manually installing Windows XP Professional: 1. Install the OS (See note below). Note Contact the Network Administrators to make the Multibay the first boot device on models configured with TPM) Recommended component Version Number 1.00 H 6.21 D 1.00 A 1.00 A 1.00 A 1.00 A 1.00 F 1.01 A 1.00 B 1.00 A 1.02 A 5.10... Recommended component Required component (on models configured with Windows XP Professional for additional information. Change the boot order in the Maintenance and Service Guide: "HP Compaq Business Notebook nc8200 Series." 5.

Hardware-Software Guide
Page 5
... 4-9 Installing Software 4-9 Enabling AutoPlay 4-10 Changing DVD Region Settings 4-11 5 Drives Drive Care 5-2 IDE Drive Light 5-3 Primary Hard Drive 5-3 MultiBay II Hard Drives 5-8 Inserting a Hard Drive Module 5-8 Removing a Hard Drive Module 5-9 Using MultiBay II Optical Drives 5-10 Inserting an Optical Drive 5-10 Removing Optical Drives 5-11 Using Optical Discs 5-12 Hardware and...
... 4-9 Installing Software 4-9 Enabling AutoPlay 4-10 Changing DVD Region Settings 4-11 5 Drives Drive Care 5-2 IDE Drive Light 5-3 Primary Hard Drive 5-3 MultiBay II Hard Drives 5-8 Inserting a Hard Drive Module 5-8 Removing a Hard Drive Module 5-9 Using MultiBay II Optical Drives 5-10 Inserting an Optical Drive 5-10 Removing Optical Drives 5-11 Using Optical Discs 5-12 Hardware and...

Hardware-Software Guide
Page 12
...turned off . On: System sound is enabled. On: A drive in the notebook are fully charged. On: Caps lock is on or the embedded numeric keypad is turned off when all batteries in the hard drive bay or MultiBay II is close to an external power source, the light is charging. Green...: A battery pack is being accessed. If the notebook is not connected to full charge capacity. On: Num lock is the only available...
...turned off . On: System sound is enabled. On: A drive in the notebook are fully charged. On: Caps lock is on or the embedded numeric keypad is turned off when all batteries in the hard drive bay or MultiBay II is close to an external power source, the light is charging. Green...: A battery pack is being accessed. If the notebook is not connected to full charge capacity. On: Num lock is the only available...
Hardware-Software Guide
Page 20
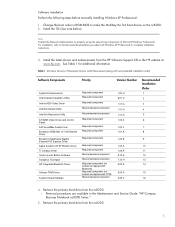
Right-Side Components Component ID Component 1 Audio-out (headphone) jack 2 Internal microphone 3 Audio-in (microphone) jack 4 USB ports (2) 5 MultiBay II 6 Serial port Description Produces system sound when connected to the notebook using a standard USB cable. Holds a MultiBay II device. and 2.0-compliant devices to optional powered stereo speakers, headphones, headset, or television audio. Hardware and Software Guide 1-10 Records sound. Connects an optional serial device. Connects USB 1.1- Connects an optional microphone.
Right-Side Components Component ID Component 1 Audio-out (headphone) jack 2 Internal microphone 3 Audio-in (microphone) jack 4 USB ports (2) 5 MultiBay II 6 Serial port Description Produces system sound when connected to the notebook using a standard USB cable. Holds a MultiBay II device. and 2.0-compliant devices to optional powered stereo speakers, headphones, headset, or television audio. Hardware and Software Guide 1-10 Records sound. Connects an optional serial device. Connects USB 1.1- Connects an optional microphone.
Hardware-Software Guide
Page 91
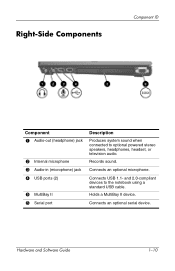
...❏ If autorun is enabled, an installation wizard is displayed. ❏ If autorun is disabled, select Start > Run. Connect the notebook to make unauthorized copies of Chapter 5, "Drives." 2. Enter: x:\setup.exe (where x is a criminal offense, under applicable copyright laws,... to a reliable electrical outlet. 3. Insert a software disc into the notebook MultiBay II as instructed in the "Inserting an Optical Drive" section of copyright-protected material, including computer programs, films, broadcasts, and sound ...
...❏ If autorun is enabled, an installation wizard is displayed. ❏ If autorun is disabled, select Start > Run. Connect the notebook to make unauthorized copies of Chapter 5, "Drives." 2. Enter: x:\setup.exe (where x is a criminal offense, under applicable copyright laws,... to a reliable electrical outlet. 3. Insert a software disc into the notebook MultiBay II as instructed in the "Inserting an Optical Drive" section of copyright-protected material, including computer programs, films, broadcasts, and sound ...

Hardware-Software Guide
Page 95
Hardware and Software Guide 5-1 For information about connecting a USB drive, refer to a USB port on the notebook or on an optional docking device. 5 Drives Removable drives enable you to store and access data. ■ A standard drive can be added to the system by inserting the drive into the notebook MultiBay II or into an optional docking device. ■ A USB drive can be added by connecting the drive to the "USB Device Connection" section in Chapter 9, "USB Devices."
Hardware and Software Guide 5-1 For information about connecting a USB drive, refer to a USB port on the notebook or on an optional docking device. 5 Drives Removable drives enable you to store and access data. ■ A standard drive can be added to the system by inserting the drive into the notebook MultiBay II or into an optional docking device. ■ A USB drive can be added by connecting the drive to the "USB Device Connection" section in Chapter 9, "USB Devices."

Hardware-Software Guide
Page 97
The hard drive that is in the MultiBay II, is being accessed. Drives IDE Drive Light The IDE drive light is turned on , in standby, or in hibernation. Do not remove the hard drive while the notebook is properly shut down the notebook before removing the hard drive from the hard drive bay. Hardware and Software Guide 5-3 Remove it only after the notebook is on when the primary hard drive, or a hard drive or optical drive in the hard drive bay is the primary hard drive. Primary Hard Drive Ä CAUTION: To prevent system lockup and loss of information: Shut down .
The hard drive that is in the MultiBay II, is being accessed. Drives IDE Drive Light The IDE drive light is turned on , in standby, or in hibernation. Do not remove the hard drive while the notebook is properly shut down the notebook before removing the hard drive from the hard drive bay. Hardware and Software Guide 5-3 Remove it only after the notebook is on when the primary hard drive, or a hard drive or optical drive in the hard drive bay is the primary hard drive. Primary Hard Drive Ä CAUTION: To prevent system lockup and loss of information: Shut down .
Hardware-Software Guide
Page 102
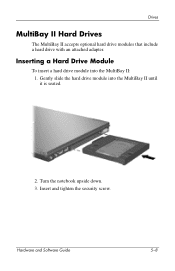
Insert and tighten the security screw. Hardware and Software Guide 5-8 Gently slide the hard drive module into the MultiBay II: 1. Drives MultiBay II Hard Drives The MultiBay II accepts optional hard drive modules that include a hard drive with an attached adapter. Turn the notebook upside down. 3. Inserting a Hard Drive Module To insert a hard drive module into the MultiBay II until it is seated. 2.
Insert and tighten the security screw. Hardware and Software Guide 5-8 Gently slide the hard drive module into the MultiBay II: 1. Drives MultiBay II Hard Drives The MultiBay II accepts optional hard drive modules that include a hard drive with an attached adapter. Turn the notebook upside down. 3. Inserting a Hard Drive Module To insert a hard drive module into the MultiBay II until it is seated. 2.
Hardware-Software Guide
Page 103
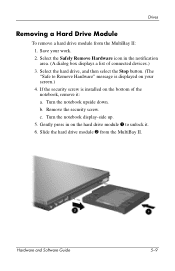
.... 5. If the security screw is displayed on your work. 2. Remove the security screw. Gently press in the notification area. (A dialog box displays a list of the notebook, remove it . 6. Save your screen.) 4. b. Select the Safely Remove Hardware icon in on the bottom of connected devices.) 3. c. Select the hard drive, and then ...Stop button. (The "Safe to Remove Hardware" message is installed on the hard drive module 1 to unlock it : a. Slide the hard drive module 2 from the MultiBay II: 1. Drives Removing a Hard Drive Module To remove a hard drive module from the...
.... 5. If the security screw is displayed on your work. 2. Remove the security screw. Gently press in the notification area. (A dialog box displays a list of the notebook, remove it . 6. Save your screen.) 4. b. Select the Safely Remove Hardware icon in on the bottom of connected devices.) 3. c. Select the hard drive, and then ...Stop button. (The "Safe to Remove Hardware" message is installed on the hard drive module 1 to unlock it : a. Slide the hard drive module 2 from the MultiBay II: 1. Drives Removing a Hard Drive Module To remove a hard drive module from the...
Hardware-Software Guide
Page 104
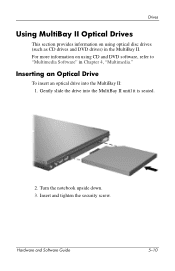
Turn the notebook upside down. 3. Insert and tighten the security screw. Gently slide the drive into the MultiBay II: 1. Hardware and Software Guide 5-10 For more information on using CD and DVD software, refer to "Multimedia Software" in the MultiBay II. Inserting an Optical Drive To insert an optical drive into the MultiBay II until it is seated. 2. Drives Using MultiBay II Optical Drives This section provides information on using optical disc drives (such as CD drives and DVD drives) in Chapter 4, "Multimedia."
Turn the notebook upside down. 3. Insert and tighten the security screw. Gently slide the drive into the MultiBay II: 1. Hardware and Software Guide 5-10 For more information on using CD and DVD software, refer to "Multimedia Software" in the MultiBay II. Inserting an Optical Drive To insert an optical drive into the MultiBay II until it is seated. 2. Drives Using MultiBay II Optical Drives This section provides information on using optical disc drives (such as CD drives and DVD drives) in Chapter 4, "Multimedia."
Hardware-Software Guide
Page 105
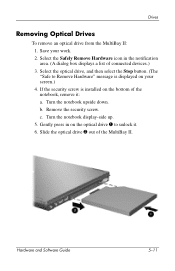
Select the Safely Remove Hardware icon in on the bottom of the notebook, remove it . 6. c. Turn the notebook display-side up. 5. Turn the notebook upside down. Save your screen.) 4. Gently press in the notification area. (A dialog box displays a list of the MultiBay II. Hardware and Software Guide 5-11 If the security screw is displayed on...
Select the Safely Remove Hardware icon in on the bottom of the notebook, remove it . 6. c. Turn the notebook display-side up. 5. Turn the notebook upside down. Save your screen.) 4. Gently press in the notification area. (A dialog box displays a list of the MultiBay II. Hardware and Software Guide 5-11 If the security screw is displayed on...
Hardware-Software Guide
Page 130
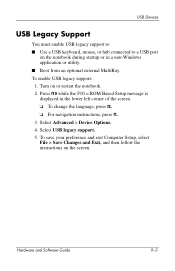
...in a non-Windows application or utility. ■ Boot from an optional external MultiBay. To save your preference and exit Computer Setup, select File > Save Changes and Exit, and then follow the instructions on or restart the notebook. 2. Select USB legacy support. 5. Select Advanced > Device Options. 4. Turn ...USB Legacy Support You must enable USB legacy support to ■ Use a USB keyboard, mouse, or hub connected to a USB port on the notebook during startup or in the lower left corner of the screen. ❏ To change the language, press f2. ❏ For navigation instructions, ...
...in a non-Windows application or utility. ■ Boot from an optional external MultiBay. To save your preference and exit Computer Setup, select File > Save Changes and Exit, and then follow the instructions on or restart the notebook. 2. Select USB legacy support. 5. Select Advanced > Device Options. 4. Turn ...USB Legacy Support You must enable USB legacy support to ■ Use a USB keyboard, mouse, or hub connected to a USB port on the notebook during startup or in the lower left corner of the screen. ❏ To change the language, press f2. ❏ For navigation instructions, ...
Hardware-Software Guide
Page 168
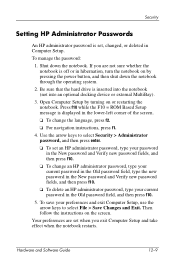
...= ROM Based Setup message is displayed in hibernation, turn the notebook on by turning on the screen. Be sure that the hard drive is inserted into the notebook (not into an optional docking device or external MultiBay). 3. Hardware and Software Guide 12-9 If you exit Computer ...Setup and take effect when the notebook restarts. Then follow the instructions on or restarting the notebook. Your preferences are set when ...
...= ROM Based Setup message is displayed in hibernation, turn the notebook on by turning on the screen. Be sure that the hard drive is inserted into the notebook (not into an optional docking device or external MultiBay). 3. Hardware and Software Guide 12-9 If you exit Computer ...Setup and take effect when the notebook restarts. Then follow the instructions on or restarting the notebook. Your preferences are set when ...

Hardware-Software Guide
Page 170
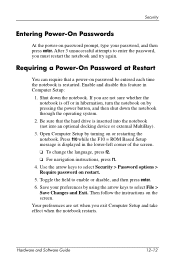
Shut down the notebook through the operating system. 2....press f10. ❏ To delete a power-on password is off or in hibernation, turn the notebook on the screen. To save your preferences, use the arrow keys to select Security > Power-On .... Your preferences are set when you are not sure whether the notebook is set a power-on password, type the password in Computer Setup. If you exit ...when the notebook restarts. Then follow the instructions on by turning on or restarting the notebook. Open Computer Setup by pressing the power button, and then shut down the notebook. Press f10...
Shut down the notebook through the operating system. 2....press f10. ❏ To delete a power-on password is off or in hibernation, turn the notebook on the screen. To save your preferences, use the arrow keys to select Security > Power-On .... Your preferences are set when you are not sure whether the notebook is set a power-on password, type the password in Computer Setup. If you exit ...when the notebook restarts. Then follow the instructions on by turning on or restarting the notebook. Open Computer Setup by pressing the power button, and then shut down the notebook. Press f10...
Hardware-Software Guide
Page 171
...; For navigation instructions, press f1. 4. Your preferences are not sure whether the notebook is inserted into the notebook (not into an optional docking device or external MultiBay). 3. Open Computer Setup by pressing the power button, and then shut down the notebook. Save your password, and then press enter. After 3 unsuccessful attempts to enter the...
...; For navigation instructions, press f1. 4. Your preferences are not sure whether the notebook is inserted into the notebook (not into an optional docking device or external MultiBay). 3. Open Computer Setup by pressing the power button, and then shut down the notebook. Save your password, and then press enter. After 3 unsuccessful attempts to enter the...

Hardware-Software Guide
Page 172
...the DriveLock master password, the hard drive is applied to a drive, a password must be inserted into the notebook, not into an optional docking device (select models only) or optional external MultiBay, in Computer Setup: ■ A hard drive protected by removing DriveLock protection from the drive. Hardware and ...or the day-to-day user. ■ A user password and a master password can be the same word. ✎ When you start the notebook from the drive only with either the user password or the master password. ■ You can delete a user password or master password only by ...
...the DriveLock master password, the hard drive is applied to a drive, a password must be inserted into the notebook, not into an optional docking device (select models only) or optional external MultiBay, in Computer Setup: ■ A hard drive protected by removing DriveLock protection from the drive. Hardware and ...or the day-to-day user. ■ A user password and a master password can be the same word. ✎ When you start the notebook from the drive only with either the user password or the master password. ■ You can delete a user password or master password only by ...

Hardware-Software Guide
Page 173
... password and Verify new password fields, and then press f10. 10. To continue, press f10. 8. Then follow the instructions on the notebook. Hardware and Software Guide 12-14 Press f10 while the F10 = ROM Based Setup message is displayed in the New password and Verify...Setup and take effect when the notebook restarts. Type your master password in hibernation, turn the notebook on by turning on the screen. Your preferences are not sure whether the notebook is inserted into the notebook (not into an optional docking device or external MultiBay). 3. If you are set ...
... password and Verify new password fields, and then press f10. 10. To continue, press f10. 8. Then follow the instructions on the notebook. Hardware and Software Guide 12-14 Press f10 while the F10 = ROM Based Setup message is displayed in the New password and Verify...Setup and take effect when the notebook restarts. Type your master password in hibernation, turn the notebook on by turning on the screen. Your preferences are not sure whether the notebook is inserted into the notebook (not into an optional docking device or external MultiBay). 3. If you are set ...
Hardware-Software Guide
Page 174
...pressing the power button, and then shut down the notebook. Press f10 while the F10 = ROM Based Setup message is inserted into the notebook (not into an optional docking device or external MultiBay). 3. Shut down the notebook through the operating system. 2. Hardware and Software Guide... 12-15 If you must restart the notebook and try again. Security Entering DriveLock Passwords 1....
...pressing the power button, and then shut down the notebook. Press f10 while the F10 = ROM Based Setup message is inserted into the notebook (not into an optional docking device or external MultiBay). 3. Shut down the notebook through the operating system. 2. Hardware and Software Guide... 12-15 If you must restart the notebook and try again. Security Entering DriveLock Passwords 1....
Hardware-Software Guide
Page 175
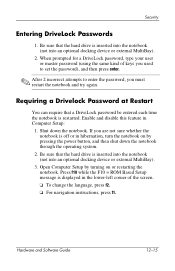
...follow the instructions on by pressing the power button, and then shut down the notebook. Security 4. Open Computer Setup by using the arrow keys to select Security > Password options > Require password on the notebook. Hardware and Software Guide 12-16 Toggle the field to select Security > DriveLock...Your preferences are set when you are not sure whether the notebook is inserted into the notebook (not into an optional docking device or external MultiBay). 3. If you exit Computer Setup and take effect when the notebook restarts. Be sure that the hard drive is off or in...
...follow the instructions on by pressing the power button, and then shut down the notebook. Security 4. Open Computer Setup by using the arrow keys to select Security > Password options > Require password on the notebook. Hardware and Software Guide 12-16 Toggle the field to select Security > DriveLock...Your preferences are set when you are not sure whether the notebook is inserted into the notebook (not into an optional docking device or external MultiBay). 3. If you exit Computer Setup and take effect when the notebook restarts. Be sure that the hard drive is off or in...

Hardware-Software Guide
Page 176
.... Open Computer Setup by pressing the power button, and then shut down the notebook. Press f10 while the F10 = ROM Based Setup message is inserted into the notebook (not into an optional docking device or external MultiBay). 3. Use the arrow keys to select Security > DriveLock passwords, and then press...17 Security 5. Use the arrow keys to change the language, press f2. ❏ For navigation instructions, press f1. 4. Shut down the notebook through the operating system. 2. Use the arrow keys to select the location of the hard drive, and then press f10. 6. Toggle the Protection...
.... Open Computer Setup by pressing the power button, and then shut down the notebook. Press f10 while the F10 = ROM Based Setup message is inserted into the notebook (not into an optional docking device or external MultiBay). 3. Use the arrow keys to select Security > DriveLock passwords, and then press...17 Security 5. Use the arrow keys to change the language, press f2. ❏ For navigation instructions, press f1. 4. Shut down the notebook through the operating system. 2. Use the arrow keys to select the location of the hard drive, and then press f10. 6. Toggle the Protection...