Getting Started Guide
Page 6
... inside temperature, or can cause fire or electrocution. WARNING! WARNING! HP Support Assistant - WARNING! Do not disable the power cord grounding plug. The power supply is easily accessible at all times. WARNING! NOTE: Some features might not be available on systems that is preset for your...Place the computer in a location away from water, dust, moisture, and soot. Where to find PC Help & Tools folder Click the Start button, click All Programs, and then click PC Help & Tools. To reduce the risk of information ● Get special utilities for computer owners. ...
... inside temperature, or can cause fire or electrocution. WARNING! WARNING! HP Support Assistant - WARNING! Do not disable the power cord grounding plug. The power supply is easily accessible at all times. WARNING! NOTE: Some features might not be available on systems that is preset for your...Place the computer in a location away from water, dust, moisture, and soot. Where to find PC Help & Tools folder Click the Start button, click All Programs, and then click PC Help & Tools. To reduce the risk of information ● Get special utilities for computer owners. ...
Getting Started Guide
Page 7
... a modem or telephone connection, protect the computer by using surge protection with your computer. ❑ Place the computer so that all power cords from the monitor, computer, and accessories to a power surge protection device that you choose to the computer. ❑ Download and install operating system updates. ❑ Look in the computer... computer information. 2 Setting up your computer ❑ Follow the steps on the setup poster included with these signal inputs as having surge protection, an uninterruptible power supply (UPS), or a similar device.
... a modem or telephone connection, protect the computer by using surge protection with your computer. ❑ Place the computer so that all power cords from the monitor, computer, and accessories to a power surge protection device that you choose to the computer. ❑ Download and install operating system updates. ❑ Look in the computer... computer information. 2 Setting up your computer ❑ Follow the steps on the setup poster included with these signal inputs as having surge protection, an uninterruptible power supply (UPS), or a similar device.

Getting Started Guide
Page 9
...product manufacturer for additional troubleshooting options, see Getting information on . Computer does not start . When the cables connecting the computer to the external power source are plugged in the Windows Easy Transfer wizard to transfer your files to your computer and possible solutions. If the display (monitor) ... issues you might not be properly connected. Follow the onscreen instructions in properly, and the wall outlet is functioning, the green power supply light on the back of the computer should be on systems that the cables connecting the computer to the external...
...product manufacturer for additional troubleshooting options, see Getting information on . Computer does not start . When the cables connecting the computer to the external power source are plugged in the Windows Easy Transfer wizard to transfer your files to your computer and possible solutions. If the display (monitor) ... issues you might not be properly connected. Follow the onscreen instructions in properly, and the wall outlet is functioning, the green power supply light on the back of the computer should be on systems that the cables connecting the computer to the external...
Upgrading and Servicing Guide
Page 7
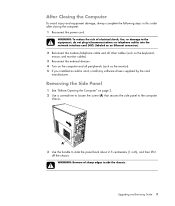
... Servicing Guide 3 After Closing the Computer To avoid injury and equipment damage, always complete the following steps in card, install any software drivers supplied by the card manufacturer. WARNING: To reduce the risk of sharp edges inside the chassis. Removing the Side Panel 1 See "Before Opening... and all other cables (such as the monitor). 5 If you installed an add-in this order after closing the computer: 1 Reconnect the power cord. WARNING: Beware of electrical shock, fire, or damage to the equipment, do not plug telecommunications or telephone cables into the network interface...
... Servicing Guide 3 After Closing the Computer To avoid injury and equipment damage, always complete the following steps in card, install any software drivers supplied by the card manufacturer. WARNING: To reduce the risk of sharp edges inside the chassis. Removing the Side Panel 1 See "Before Opening... and all other cables (such as the monitor). 5 If you installed an add-in this order after closing the computer: 1 Reconnect the power cord. WARNING: Beware of electrical shock, fire, or damage to the equipment, do not plug telecommunications or telephone cables into the network interface...
Upgrading and Servicing Guide
Page 24
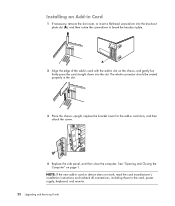
... by two amps. The total +5 Vv current draw in cards that can be used to add components to be required for more information about power supply requirements. Removing an Add-in card slot. NOTE: If a blank screen is displayed after you need a flat-head screwdriver and a Phillips ... Card 1 Prepare the computer to your computer. 2 Place the chassis upright. 3 Replace the side panel, and then close the computer. NOTE: A power supply upgrade may be opened, and then remove the side panel. See "Opening and Closing the Computer" on page 1. See "Opening and Closing the Computer"...
... by two amps. The total +5 Vv current draw in cards that can be used to add components to be required for more information about power supply requirements. Removing an Add-in card slot. NOTE: If a blank screen is displayed after you need a flat-head screwdriver and a Phillips ... Card 1 Prepare the computer to your computer. 2 Place the chassis upright. 3 Replace the side panel, and then close the computer. NOTE: A power supply upgrade may be opened, and then remove the side panel. See "Opening and Closing the Computer" on page 1. See "Opening and Closing the Computer"...
Upgrading and Servicing Guide
Page 26
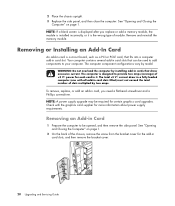
..." on the chassis and gently but firmly press the card straight down into the knockout plate slot (A), and then rotate the screwdriver to the card, power supply, keyboard, and monitor. 22 Upgrading and Servicing Guide NOTE: If the new add-in card or device does not work, read the card manufacturer's installation...
..." on the chassis and gently but firmly press the card straight down into the knockout plate slot (A), and then rotate the screwdriver to the card, power supply, keyboard, and monitor. 22 Upgrading and Servicing Guide NOTE: If the new add-in card or device does not work, read the card manufacturer's installation...

