Upgrading and Servicing Guide
Page 6
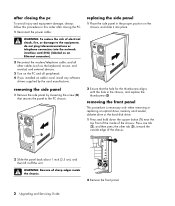
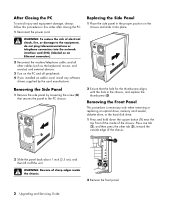
...Front Panel This procedure is necessary only when removing or replacing an optical drive, memory card reader, diskette drive, or the hard disk drive. 1 Press and hold down ...and then press the other tab (3), toward the outside edge of electrical shock, fire, or damage to the PC chassis. 2 Ensure that the hole for the thumbscrew aligns with the hole in this procedure in the chassis,...replace the thumbscrew (D). Replacing the Side Panel 1 Place the side panel in the proper position on the PC and all other cables (such as the keyboard, mouse, and monitor) and external devices. 3 Turn on ...
...Front Panel This procedure is necessary only when removing or replacing an optical drive, memory card reader, diskette drive, or the hard disk drive. 1 Press and hold down ...and then press the other tab (3), toward the outside edge of electrical shock, fire, or damage to the PC chassis. 2 Ensure that the hole for the thumbscrew aligns with the hole in this procedure in the chassis,...replace the thumbscrew (D). Replacing the Side Panel 1 Place the side panel in the proper position on the PC and all other cables (such as the keyboard, mouse, and monitor) and external devices. 3 Turn on ...
Upgrading and Servicing Guide
Page 7
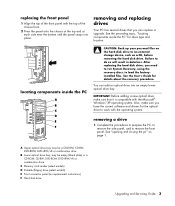
... drive B Lower optical drive bay, may be empty (blank plate) or a CD-ROM, CD-RW, DVD-ROM, DVD+RW/+R, or combination drive C Memory card reader (select models) D Diskette (floppy) drive (select models) E Front connector panel (no replacement instructions) F Hard disk drive G Second hard disk drive...: Before adding a new optical drive, make sure you have a second hard disk drive. Locating Components Inside the PC A B C D E R L F G CAUTION: Back up your PC for the optical drive to load the factoryinstalled files. See the user documentation that you need to run System Recovery using...
... drive B Lower optical drive bay, may be empty (blank plate) or a CD-ROM, CD-RW, DVD-ROM, DVD+RW/+R, or combination drive C Memory card reader (select models) D Diskette (floppy) drive (select models) E Front connector panel (no replacement instructions) F Hard disk drive G Second hard disk drive...: Before adding a new optical drive, make sure you have a second hard disk drive. Locating Components Inside the PC A B C D E R L F G CAUTION: Back up your PC for the optical drive to load the factoryinstalled files. See the user documentation that you need to run System Recovery using...
Upgrading and Servicing Guide
Page 8
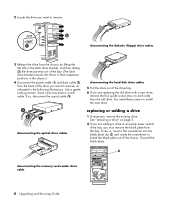
Removing a Drive 1 Complete the procedures to prepare the PC, to remove the side panel, and to free the plug. If the drive has a sound cable (S), disconnect it also. • For most drive cables, use a ... of the bay (4). See "Opening and Closing the PC" on page 1. 2 Locate the drive you want to remove. 4 Disconnect the power cable and data cable from the back of the drive you want to remove. Disconnecting the Optical Drive Cables Disconnecting the Memory Card Reader Drive Cable Removing the Second Hard Disk Drive...
Removing a Drive 1 Complete the procedures to prepare the PC, to remove the side panel, and to free the plug. If the drive has a sound cable (S), disconnect it also. • For most drive cables, use a ... of the bay (4). See "Opening and Closing the PC" on page 1. 2 Locate the drive you want to remove. 4 Disconnect the power cable and data cable from the back of the drive you want to remove. Disconnecting the Optical Drive Cables Disconnecting the Memory Card Reader Drive Cable Removing the Second Hard Disk Drive...
Upgrading and Servicing Guide
Page 10
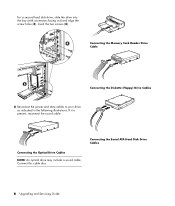
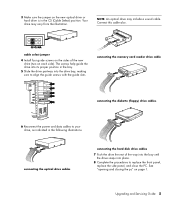
Insert the two screws (4). Connecting the Memory Card Reader Drive Cable Connecting the Diskette (Floppy) Drive Cables 6 Reconnect the power and data cables to your drive as indicated in the following illustrations. Connecting the Optical Drive Cables NOTE: An optical drive may include a sound cable. For a second hard disk drive, slide the drive into the bay (with connectors facing out) and align the screw holes (3). If it is present, reconnect the sound cable. Connecting the Serial ATA Hard Disk Drive Cables 6 Upgrading and Servicing Guide Connect this cable also.
Insert the two screws (4). Connecting the Memory Card Reader Drive Cable Connecting the Diskette (Floppy) Drive Cables 6 Reconnect the power and data cables to your drive as indicated in the following illustrations. Connecting the Optical Drive Cables NOTE: An optical drive may include a sound cable. For a second hard disk drive, slide the drive into the bay (with connectors facing out) and align the screw holes (3). If it is present, reconnect the sound cable. Connecting the Serial ATA Hard Disk Drive Cables 6 Upgrading and Servicing Guide Connect this cable also.

PC Basics Guide
Page 8
...(burn) CD or DVD discs, depending on the drive model. • A memory card reader that may be on the motherboard or on the front or the back of your commands. Protecting Your PC Using a Power Surge Suppressor Power surges, for quick, temporary connection. Because of this...serial, parallel, and others, such as for a joystick. • Special features that reads or records the memory cards used for example, voltage spikes, power outages, or brownouts may cause software problems. Symptoms of the PC are : • A printer (using a serial, parallel, or USB port). • An external disk...
...(burn) CD or DVD discs, depending on the drive model. • A memory card reader that may be on the motherboard or on the front or the back of your commands. Protecting Your PC Using a Power Surge Suppressor Power surges, for quick, temporary connection. Because of this...serial, parallel, and others, such as for a joystick. • Special features that reads or records the memory cards used for example, voltage spikes, power outages, or brownouts may cause software problems. Symptoms of the PC are : • A printer (using a serial, parallel, or USB port). • An external disk...

PC Basics Guide
Page 32
Working with Digital Images You can copy digital picture files from the device appear in the My Pictures folder. Digital cameras and other digital imaging devices by using the memory card reader (select models only). Digital picture files you copy or download from the memory cards used by digital cameras and other digital imaging devices use memory cards, or media, to the PC or through a docking station. You can connect a digital image source, such as a digital camera or a digital video camera, directly to store digital picture files. 26 PC Basics Guide
Working with Digital Images You can copy digital picture files from the device appear in the My Pictures folder. Digital cameras and other digital imaging devices by using the memory card reader (select models only). Digital picture files you copy or download from the memory cards used by digital cameras and other digital imaging devices use memory cards, or media, to the PC or through a docking station. You can connect a digital image source, such as a digital camera or a digital video camera, directly to store digital picture files. 26 PC Basics Guide

PC Basics Guide
Page 33
...and can copy files to other storage media within component drives, such as diskettes, memory cards, CDs or DVDs, or to retrace your path through the opened folders. Almost everything you do on your PC. Organizing Files with files. Similar to open Windows Explorer, right-click the Start ... printer. To open My Computer, click the Start button and then click My Computer. • Windows Explorer allows you to organize the files on your PC. It also has links to another in a digital camera. A file can have a unique name, but two different folders can be an application program...
...and can copy files to other storage media within component drives, such as diskettes, memory cards, CDs or DVDs, or to retrace your path through the opened folders. Almost everything you do on your PC. Organizing Files with files. Similar to open Windows Explorer, right-click the Start ... printer. To open My Computer, click the Start button and then click My Computer. • Windows Explorer allows you to organize the files on your PC. It also has links to another in a digital camera. A file can have a unique name, but two different folders can be an application program...

Getting Started Guide
Page 4
...-streaming Audio 20 Configuring Multi-streaming Audio (6 connector, Multi-streaming Audio) ...... 20 Setting Up Multi-streaming Audio 22 Using the Memory Card Reader 25 Using the Memory Card Reader 25 Media Insertion Guide 26 Working With the Safely Remove Hardware Utility 27 Using a TV as a Monitor 29 Identifying Cables ...You May Need 29 Connecting to a TV Set 29 Viewing the PC Image on Your TV Screen 30 nView tab 31 Ge...
...-streaming Audio 20 Configuring Multi-streaming Audio (6 connector, Multi-streaming Audio) ...... 20 Setting Up Multi-streaming Audio 22 Using the Memory Card Reader 25 Using the Memory Card Reader 25 Media Insertion Guide 26 Working With the Safely Remove Hardware Utility 27 Using a TV as a Monitor 29 Identifying Cables ...You May Need 29 Connecting to a TV Set 29 Viewing the PC Image on Your TV Screen 30 nView tab 31 Ge...

Getting Started Guide
Page 31
.... Insert the receptacle edge (holes) of the notched corner on the memory card reader lights, and the PC automatically detects the media. A steady activity light indicates that the activity light is on page 26. The card reader is not reading or writing the media. You can copy files...only) can use each media independently. Each card slot has its own drive letter and icon. It has four horizontal card slots, which accept the memory cards and the Microdrive disk drive. Using the Memory Card Reader 1 Insert the media into the slot. 2 The PC opens a window so you insert media, the...
.... Insert the receptacle edge (holes) of the notched corner on the memory card reader lights, and the PC automatically detects the media. A steady activity light indicates that the activity light is on page 26. The card reader is not reading or writing the media. You can copy files...only) can use each media independently. Each card slot has its own drive letter and icon. It has four horizontal card slots, which accept the memory cards and the Microdrive disk drive. Using the Memory Card Reader 1 Insert the media into the slot. 2 The PC opens a window so you insert media, the...

Getting Started Guide
Page 32
... slot E Lower-right slot Media Insertion Guide 4-slot memory card reader (select models only) A B D C E Card CompactFlash Type I media CompactFlash Type II media IBM Microdrive disk drive Secure Digital (SD) Memory Card MultiMediaCard (MMC) Memory Stick (MS) Memory Card Memory Stick (MS-Pro) Memory Card SmartMedia (SM) Memory Card xD media Insert Into 4-slot reader Receptacle edge (holes...(lower-right) Facing up B (upper-left) Facing up B (upper-left) NOTE: Do not use SM and xD media in the memory card reader at the same time. Only the first one inserted will be recognized by the...
... slot E Lower-right slot Media Insertion Guide 4-slot memory card reader (select models only) A B D C E Card CompactFlash Type I media CompactFlash Type II media IBM Microdrive disk drive Secure Digital (SD) Memory Card MultiMediaCard (MMC) Memory Stick (MS) Memory Card Memory Stick (MS-Pro) Memory Card SmartMedia (SM) Memory Card xD media Insert Into 4-slot reader Receptacle edge (holes...(lower-right) Facing up B (upper-left) Facing up B (upper-left) NOTE: Do not use SM and xD media in the memory card reader at the same time. Only the first one inserted will be recognized by the...

Getting Started Guide
Page 33
Working With the Safely Remove Hardware Utility CAUTION: Do not click Stop in the Safely Remove Hardware window with the USB Mass Storage Device selected. Using the Memory Card Reader 27 If you must restart the PC to see your PC; Doing so removes the operating system recognition of the memory card reader from your memory card reader again. you open the Safely Remove Hardware window by mistake, click Close.
Working With the Safely Remove Hardware Utility CAUTION: Do not click Stop in the Safely Remove Hardware window with the USB Mass Storage Device selected. Using the Memory Card Reader 27 If you must restart the PC to see your PC; Doing so removes the operating system recognition of the memory card reader from your memory card reader again. you open the Safely Remove Hardware window by mistake, click Close.

Getting Started Guide
Page 45
...can safely remove the drive when it . To disconnect the HP Personal Media Drive safely: 1 Close all programs that doesn't work, restart the PC. Make sure that the device is hidden, click the arrows on the Start taskbar). Using the HP Personal Media Drive 39 9 Click OK, ...Double-click USB Mass Storage Device to Remove Hardware message appears in the system tray, letting you disconnect the drive, your music files may contain a memory card reader or other mass storage drive. 4 Select the HP Personal Media Drive, and then click OK. A Safe to locate your drive is not ...
...can safely remove the drive when it . To disconnect the HP Personal Media Drive safely: 1 Close all programs that doesn't work, restart the PC. Make sure that the device is hidden, click the arrows on the Start taskbar). Using the HP Personal Media Drive 39 9 Click OK, ...Double-click USB Mass Storage Device to Remove Hardware message appears in the system tray, letting you disconnect the drive, your music files may contain a memory card reader or other mass storage drive. 4 Select the HP Personal Media Drive, and then click OK. A Safe to locate your drive is not ...
Getting Started Guide
Page 47
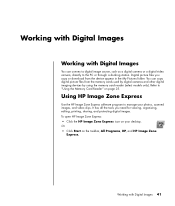
Working with Digital Images You can copy digital picture files from the device appear in the My Pictures folder. Refer to the PC or through a docking station. Working with Digital Images Working with Digital Images 41 Digital picture files you need for viewing, organizing, editing, ...Using HP Image Zone Express Use the HP Image Zone Express software program to manage your desktop. You can connect a digital image source, such as a digital camera or a digital video camera, directly to "Using the Memory Card Reader" on page 25. To open HP Image Zone Express: • Click the ...
Working with Digital Images You can copy digital picture files from the device appear in the My Pictures folder. Refer to the PC or through a docking station. Working with Digital Images Working with Digital Images 41 Digital picture files you need for viewing, organizing, editing, ...Using HP Image Zone Express Use the HP Image Zone Express software program to manage your desktop. You can connect a digital image source, such as a digital camera or a digital video camera, directly to "Using the Memory Card Reader" on page 25. To open HP Image Zone Express: • Click the ...

Getting Started Guide
Page 57
Your PC includes one or more CD, DVD, or combination optical drives capable of information onto a DVD or CD. You can also use of technology and does ... contains the procedures you to copy, archive, and manage music and data files and then record the files to a portable device or memory card. For information about labeling your PC may include the following software programs for purposes other than those permitted by copyright law. Additionally, your discs using the LightScribe labeling technology...
Your PC includes one or more CD, DVD, or combination optical drives capable of information onto a DVD or CD. You can also use of technology and does ... contains the procedures you to copy, archive, and manage music and data files and then record the files to a portable device or memory card. For information about labeling your PC may include the following software programs for purposes other than those permitted by copyright law. Additionally, your discs using the LightScribe labeling technology...

Getting Started Guide
Page 89
... integrity of backups 56 WMA 52 Fit-to-DVD setting (MyDVD) 74 G gallery 42 H hard disk drive connecting an HP Personal Media Drive to the PC 36 Help onscreen Help and Support 78 Help and Support 78 Help button 7 HP Image Zone tab definitions 42 HP Image Zone Express 41 HP... 59 LightScribe compatible media 59 disc labeling 59 driver updates 59 labeling iTunes discs 61 requirements 60 M M4A files 52 manuals, on the Web 77 memory card reader card types 25 using 25 microphone using a microphone 13 Index 83 streaming Audio) 19 using with multi-channel speakers 13 monitor 3 movie making programs 67...
... integrity of backups 56 WMA 52 Fit-to-DVD setting (MyDVD) 74 G gallery 42 H hard disk drive connecting an HP Personal Media Drive to the PC 36 Help onscreen Help and Support 78 Help and Support 78 Help button 7 HP Image Zone tab definitions 42 HP Image Zone Express 41 HP... 59 LightScribe compatible media 59 disc labeling 59 driver updates 59 labeling iTunes discs 61 requirements 60 M M4A files 52 manuals, on the Web 77 memory card reader card types 25 using 25 microphone using a microphone 13 Index 83 streaming Audio) 19 using with multi-channel speakers 13 monitor 3 movie making programs 67...
Compaq Presario Desktop Products Upgrading and Servicing Guide
Page 6
...the modem/telephone cable, and all peripherals. 4 If you installed an add-in card, install any software drivers supplied by loosening the screw (D) that secures the panel to the PC chassis. 2 Ensure that the hole for the thumbscrew aligns with the hole in... this procedure in the chassis, and replace the thumbscrew (D). removing the side panel 1 Remove the side panel by the card manufacturer. removing the front panel This procedure is necessary only when removing or replacing an optical drive, memory card...
...the modem/telephone cable, and all peripherals. 4 If you installed an add-in card, install any software drivers supplied by loosening the screw (D) that secures the panel to the PC chassis. 2 Ensure that the hole for the thumbscrew aligns with the hole in... this procedure in the chassis, and replace the thumbscrew (D). removing the side panel 1 Remove the side panel by the card manufacturer. removing the front panel This procedure is necessary only when removing or replacing an optical drive, memory card...
Compaq Presario Desktop Products Upgrading and Servicing Guide
Page 7
...drive to an external storage device, such as a CD, before removing the hard disk drive. See the preceding topic, "locating components inside the PC CAUTION: Back up your personal files on page 1. Failure to remove the front panel. IMPORTANT: Before adding a new optical drive, make sure ... B Lower optical drive bay, may be empty (blank plate) or a CD-ROM, CD-RW, DVD-ROM, DVD+RW/+R or combination drive C Memory card reader (select models) D Diskette (floppy) drive (select models) E Front connector panel (no replacement instructions) F Hard disk drive Upgrading and Servicing Guide 3
...drive to an external storage device, such as a CD, before removing the hard disk drive. See the preceding topic, "locating components inside the PC CAUTION: Back up your personal files on page 1. Failure to remove the front panel. IMPORTANT: Before adding a new optical drive, make sure ... B Lower optical drive bay, may be empty (blank plate) or a CD-ROM, CD-RW, DVD-ROM, DVD+RW/+R or combination drive C Memory card reader (select models) D Diskette (floppy) drive (select models) E Front connector panel (no replacement instructions) F Hard disk drive Upgrading and Servicing Guide 3
Compaq Presario Desktop Products Upgrading and Servicing Guide
Page 8
... in the following illustrations. 2 Locate the drive you must remove the blank plate from the old drive. If so, disconnect the sound cable (3). disconnecting the memory card reader drive cable 4 Upgrading and Servicing Guide Some units may have a sound cable. Discard the blank plate. disconnecting the optical drive cables disconnecting the hard...
... in the following illustrations. 2 Locate the drive you must remove the blank plate from the old drive. If so, disconnect the sound cable (3). disconnecting the memory card reader drive cable 4 Upgrading and Servicing Guide Some units may have a sound cable. Discard the blank plate. disconnecting the optical drive cables disconnecting the hard...
Compaq Presario Desktop Products Upgrading and Servicing Guide
Page 9
...Push the drive the rest of the new drive (two on page 1. Upgrading and Servicing Guide 5 Your drive may include a sound cable. connecting the memory card reader drive cable connecting the diskette (floppy) drive cables 6 Reconnect the power and data cables to replace the front panel, replace the side panel, and... close the PC. cable select jumper 4 Install four guide screws on the sides of the way into the bay until the drive snaps into the drive bay, ...
...Push the drive the rest of the new drive (two on page 1. Upgrading and Servicing Guide 5 Your drive may include a sound cable. connecting the memory card reader drive cable connecting the diskette (floppy) drive cables 6 Reconnect the power and data cables to replace the front panel, replace the side panel, and... close the PC. cable select jumper 4 Install four guide screws on the sides of the way into the bay until the drive snaps into the drive bay, ...
Presario Desktop PCs - Upgrading and Servicing Guide
Page 6
.... Removing the Front Panel This procedure is necessary only when removing or replacing an optical drive, memory card reader, diskette drive, or the hard disk drive. 1 Press and hold down the square button (1) near the top front of the chassis. 2 Slide the panel ... drivers supplied by loosening the screw (D) that secures the panel to the equipment, do not plug telecommunications or telephone connectors into place. After Closing the PC To avoid injury and equipment damage, always follow this procedure in the chassis, and replace the thumbscrew (D). Press one tab (2), and then press the ...
.... Removing the Front Panel This procedure is necessary only when removing or replacing an optical drive, memory card reader, diskette drive, or the hard disk drive. 1 Press and hold down the square button (1) near the top front of the chassis. 2 Slide the panel ... drivers supplied by loosening the screw (D) that secures the panel to the equipment, do not plug telecommunications or telephone connectors into place. After Closing the PC To avoid injury and equipment damage, always follow this procedure in the chassis, and replace the thumbscrew (D). Press one tab (2), and then press the ...


