Using LightScribe (Select Models Only)
Page 7
...instructions. 5 While the label is being created, you use your PC. Installing LightScribe software Before you can continue to see how the graphics you can create a LightScribe label, you are using a notebook, install the software included on the HP DVD Writer disc in ...the "Required for contrast. The LightScribe software indicates the time remaining to the PC. ■ If you are using a notebook, avoid sudden loss of power. While the disc is included with your notebook AC adapter and power cord plugged into a working electrical outlet. If you must install the required ...
...instructions. 5 While the label is being created, you use your PC. Installing LightScribe software Before you can continue to see how the graphics you can create a LightScribe label, you are using a notebook, install the software included on the HP DVD Writer disc in ...the "Required for contrast. The LightScribe software indicates the time remaining to the PC. ■ If you are using a notebook, avoid sudden loss of power. While the disc is included with your notebook AC adapter and power cord plugged into a working electrical outlet. If you must install the required ...

Hardware-Software Guide
Page 17
... these vents is visible on the right side of the notebook. †The notebook has 4 USB ports. Connects the modem cable. *The notebook has 5 vents. All vents are on the bottom of the notebook. Component ID Rear Components Component Description 1 Power connector Connects the AC adapter cable. 2 Exhaust vents (2)* Provides airflow to block airflow. Do not...) jack Ä To prevent overheating, do not obstruct vents. The other USB ports are visible on the right side and the left side of the notebook. 1-8 Hardware and Software Guide
... these vents is visible on the right side of the notebook. †The notebook has 4 USB ports. Connects the modem cable. *The notebook has 5 vents. All vents are on the bottom of the notebook. Component ID Rear Components Component Description 1 Power connector Connects the AC adapter cable. 2 Exhaust vents (2)* Provides airflow to block airflow. Do not...) jack Ä To prevent overheating, do not obstruct vents. The other USB ports are visible on the right side and the left side of the notebook. 1-8 Hardware and Software Guide

Hardware-Software Guide
Page 25
... Hardware Component 1 AC adapter* Description Converts AC power to DC power. 2 Power cord* Connects an AC adapter to an AC outlet. 3 Battery pack* Powers the notebook when the notebook is not connected to external power. 4 Modem cable* Connects the modem to an RJ-11 telephone jack or to a country-specific modem adapter. 5 Country-specific modem Adapts the modem cable to a non...
... Hardware Component 1 AC adapter* Description Converts AC power to DC power. 2 Power cord* Connects an AC adapter to an AC outlet. 3 Battery pack* Powers the notebook when the notebook is not connected to external power. 4 Modem cable* Connects the modem to an RJ-11 telephone jack or to a country-specific modem adapter. 5 Country-specific modem Adapts the modem cable to a non...

Hardware-Software Guide
Page 30
... in most software applications. The grounding pin is easily accessible at all times. ■ Disconnect power from the notebook by unplugging the power cord from the AC outlet (not by attaching a 2-pin adapter. Power Power Sources Selecting a Power Source The notebook can use power from any of electric shock or damage to an optical disc. Do not disable the...
... in most software applications. The grounding pin is easily accessible at all times. ■ Disconnect power from the notebook by unplugging the power cord from the AC outlet (not by attaching a 2-pin adapter. Power Power Sources Selecting a Power Source The notebook can use power from any of electric shock or damage to an optical disc. Do not disable the...
Hardware-Software Guide
Page 46
...try to turn on the notebook while the only power source is much warmer or cooler than room temperature. Power Charging Battery Packs A battery pack inserted in the notebook charges whenever the notebook is off. A battery pack inserted in the notebook charges whether the notebook is off or in use,...notebook is connected to start the notebook. To prolong battery life and optimize the accuracy of battery charge displays, follow the instructions in "Charging a New Battery Pack" and "Charging an In-Use Battery Pack," next in the battery pack is too low to external power through the AC adapter...
...try to turn on the notebook while the only power source is much warmer or cooler than room temperature. Power Charging Battery Packs A battery pack inserted in the notebook charges whenever the notebook is off. A battery pack inserted in the notebook charges whether the notebook is off or in use,...notebook is connected to start the notebook. To prolong battery life and optimize the accuracy of battery charge displays, follow the instructions in "Charging a New Battery Pack" and "Charging an In-Use Battery Pack," next in the battery pack is too low to external power through the AC adapter...

Hardware-Software Guide
Page 47
Power Charging a New Battery Pack To charge a new battery pack: ■ Charge the battery pack while the notebook is displayed by your notebook: ■ Allow a battery pack to discharge to about battery calibration, refer to about 10 percent of simply charging it. For information about 10 .... ■ If a battery pack has been unused for one month or more, calibrate the battery pack instead of a full charge through the AC adapter. ■ When you charge the battery pack, charge it fully. The charge in a Battery Pack Obtaining Accurate Charge Information To increase the accuracy of...
Power Charging a New Battery Pack To charge a new battery pack: ■ Charge the battery pack while the notebook is displayed by your notebook: ■ Allow a battery pack to discharge to about battery calibration, refer to about 10 percent of simply charging it. For information about 10 .... ■ If a battery pack has been unused for one month or more, calibrate the battery pack instead of a full charge through the AC adapter. ■ When you charge the battery pack, charge it fully. The charge in a Battery Pack Obtaining Accurate Charge Information To increase the accuracy of...

Hardware-Software Guide
Page 50
..., shut down the notebook. When the Notebook Cannot Restore from hibernation: If the notebook has reached a critical low-battery condition and has begun to initiate hibernation, do not restore power until hibernation is complete. Hardware and Software Guide 2-23 The external power source could be either of the following items: ■ AC adapter ■ Optional docking...
..., shut down the notebook. When the Notebook Cannot Restore from hibernation: If the notebook has reached a critical low-battery condition and has begun to initiate hibernation, do not restore power until hibernation is complete. Hardware and Software Guide 2-23 The external power source could be either of the following items: ■ AC adapter ■ Optional docking...

Hardware-Software Guide
Page 52
Power How to external power through the AC adapter. (The notebook battery light is on throughout the discharge process. The battery pack can discharge whether or not you are using the notebook, but the battery pack will discharge faster if the notebook is shut down. ■ The system will not ...you must remain on as the battery pack charges.) 3. Leave the notebook connected to external power until the battery pack is fully charged. (The notebook battery light is on. To charge the battery pack: 1. The notebook must fully charge, fully discharge, and then fully recharge the battery...
Power How to external power through the AC adapter. (The notebook battery light is on throughout the discharge process. The battery pack can discharge whether or not you are using the notebook, but the battery pack will discharge faster if the notebook is shut down. ■ The system will not ...you must remain on as the battery pack charges.) 3. Leave the notebook connected to external power until the battery pack is fully charged. (The notebook battery light is on. To charge the battery pack: 1. The notebook must fully charge, fully discharge, and then fully recharge the battery...

Hardware-Software Guide
Page 140
...Power States," later in this chapter. ■ For your home WLAN, verify that the 802.11 wireless device is turned on . Hardware and Software Guide 11-5 If the wireless light is turned on . When the 802.11 wireless device is turned on, the wireless light is off, turn on your notebook...wireless device is correctly configured. ✎ If you are using an integrated 802.11 wireless device, all required drivers are installed and the adapter is preconfigured and ready for subsequent WLAN connections may vary, depending on the 802.11 wireless device. For more information about using an ...
...Power States," later in this chapter. ■ For your home WLAN, verify that the 802.11 wireless device is turned on . Hardware and Software Guide 11-5 If the wireless light is turned on . When the 802.11 wireless device is turned on, the wireless light is off, turn on your notebook...wireless device is correctly configured. ✎ If you are using an integrated 802.11 wireless device, all required drivers are installed and the adapter is preconfigured and ready for subsequent WLAN connections may vary, depending on the 802.11 wireless device. For more information about using an ...
Hardware-Software Guide
Page 182
...Compaq Web site is packaged in compressed files called ROMPaqs. Most download packages contain a file named Readme.txt. A Readme.txt file contains detailed descriptive, installation, and troubleshooting information about connecting to the Internet using the AC adapter. (Do not download or install a ROM update while the notebook... is connected to the Internet" section in an optional docking device or running on battery power.) During the download and installation: ■ Do not unplug the notebook from the AC...
...Compaq Web site is packaged in compressed files called ROMPaqs. Most download packages contain a file named Readme.txt. A Readme.txt file contains detailed descriptive, installation, and troubleshooting information about connecting to the Internet using the AC adapter. (Do not download or install a ROM update while the notebook... is connected to the Internet" section in an optional docking device or running on battery power.) During the download and installation: ■ Do not unplug the notebook from the AC...

Hardware-Software Guide
Page 186
In the folder containing your download, select the name or number of notebook functionality, perform the procedures described in this section only while the notebook is connected to reliable external power through the AC adapter. To complete the installation, follow the instructions on the screen. ✎ After a message on the screen reports a successful installation, you...
In the folder containing your download, select the name or number of notebook functionality, perform the procedures described in this section only while the notebook is connected to reliable external power through the AC adapter. To complete the installation, follow the instructions on the screen. ✎ After a message on the screen reports a successful installation, you...
Hardware-Software Guide
Page 188
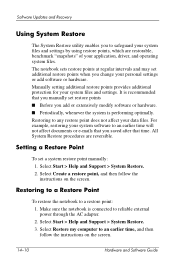
..., which are reversible. Select Create a restore point, and then follow the instructions on the screen. Make sure the notebook is performing optimally. Manually setting additional restore points provides additional protection for your data files. All System Restore procedures are restorable... ■ Periodically, whenever the system is connected to reliable external power through the AC adapter. 2. Select Start > Help and Support > System Restore. 3. Restoring to a Restore Point To restore the notebook to any restore point does not affect your system files and settings...
..., which are reversible. Select Create a restore point, and then follow the instructions on the screen. Make sure the notebook is performing optimally. Manually setting additional restore points provides additional protection for your data files. All System Restore procedures are restorable... ■ Periodically, whenever the system is connected to reliable external power through the AC adapter. 2. Select Start > Help and Support > System Restore. 3. Restoring to a Restore Point To restore the notebook to any restore point does not affect your system files and settings...

Hardware-Software Guide
Page 192
...ctrl+alt+del, and then select Shut Down > Turn Off. ❏ In Windows XP Professional, press ctrl+alt+del. Turn on the notebook by briefly pressing the power button. 5. When prompted, press any key to boot from the drop-down list, and then select OK. ✎ If you have completed ...(The "Licensing Agreement" page is connected to repair the selected Windows installation. (The repair process begins). Press R to a AC outlet through the AC adapter. 2. Be sure the notebook is displayed). 7. Select Shut down the notebook using the standard shutdown procedure for 4 seconds. 4.
...ctrl+alt+del, and then select Shut Down > Turn Off. ❏ In Windows XP Professional, press ctrl+alt+del. Turn on the notebook by briefly pressing the power button. 5. When prompted, press any key to boot from the drop-down list, and then select OK. ✎ If you have completed ...(The "Licensing Agreement" page is connected to repair the selected Windows installation. (The repair process begins). Press R to a AC outlet through the AC adapter. 2. Be sure the notebook is displayed). 7. Select Shut down the notebook using the standard shutdown procedure for 4 seconds. 4.

Hardware-Software Guide
Page 195
... connected to continue. (A "Licensing Agreement" page is provided on the notebook by briefly pressing the power button. 5. Hardware and Software Guide 14-17 Your Product Key is displayed). Insert the Operating System disc into the optical drive. 3. Select Shut..., press any key to Setup" page is normal for some notebook models to pause occasionally for several minutes and to shut down the notebook using the Operating System disc included with the notebook: 1. Press enter to a AC outlet through the AC adapter. 2. These normal pauses are unable to restart several times. ...
... connected to continue. (A "Licensing Agreement" page is provided on the notebook by briefly pressing the power button. 5. Hardware and Software Guide 14-17 Your Product Key is displayed). Insert the Operating System disc into the optical drive. 3. Select Shut..., press any key to Setup" page is normal for some notebook models to pause occasionally for several minutes and to shut down the notebook using the Operating System disc included with the notebook: 1. Press enter to a AC outlet through the AC adapter. 2. These normal pauses are unable to restart several times. ...

Hardware-Software Guide
Page 205
... package as "fragile." Shipping To prepare the notebook for more than 2 weeks, remove the battery pack. Shut down the notebook. 5. If you are traveling internationally: ❏ Consult with Customer Care about power cord and adapter requirements for each country on your itinerary. ❏...-2 Hardware and Software Guide Back up your shipping or travel plans may expose the notebook to run the notebook with the notebook. Turn off, then disconnect, all media, including CDs, DVDs, PC Cards, ExpressCards, digital memory cards, etc. 3. For backup information, refer to ...
... package as "fragile." Shipping To prepare the notebook for more than 2 weeks, remove the battery pack. Shut down the notebook. 5. If you are traveling internationally: ❏ Consult with Customer Care about power cord and adapter requirements for each country on your itinerary. ❏...-2 Hardware and Software Guide Back up your shipping or travel plans may expose the notebook to run the notebook with the notebook. Turn off, then disconnect, all media, including CDs, DVDs, PC Cards, ExpressCards, digital memory cards, etc. 3. For backup information, refer to ...
Hardware-Software Guide
Page 207
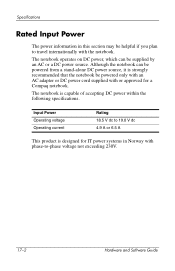
... AC or a DC power source. The notebook operates on DC power, which can be powered from a stand-alone DC power source, it is capable of accepting DC power within the following specifications. Input Power Operating voltage Operating current Rating 18.5 V dc to travel internationally with the notebook. Specifications Rated Input Power The power information in Norway with or approved for a Compaq notebook.
... AC or a DC power source. The notebook operates on DC power, which can be powered from a stand-alone DC power source, it is capable of accepting DC power within the following specifications. Input Power Operating voltage Operating current Rating 18.5 V dc to travel internationally with the notebook. Specifications Rated Input Power The power information in Norway with or approved for a Compaq notebook.
Hardware-Software Guide
Page 209
..., docking. See docking device battery bay identifying 1-13 inserting, removing battery pack 2-17 labels inside 1-18 Hardware and Software Guide Index-1 Index 1394 port 1-9, 9-3 A AC adapter 1-16 AC power vs. battery power 2-4 adapters 2-pin (for power cord) 2-3 AC 1-16 country-specific modem 10-1 airport security devices 5-1, 16-1 altitude specifications 17-1 analog vs.
..., docking. See docking device battery bay identifying 1-13 inserting, removing battery pack 2-17 labels inside 1-18 Hardware and Software Guide Index-1 Index 1394 port 1-9, 9-3 A AC adapter 1-16 AC power vs. battery power 2-4 adapters 2-pin (for power cord) 2-3 AC 1-16 country-specific modem 10-1 airport security devices 5-1, 16-1 altitude specifications 17-1 analog vs.

Hardware-Software Guide
Page 211
... Windows 2-7 color television format 4-8 Compaq administrator password. Index caps lock light 1-1 card and socket services ExpressCard 6-6 PC Card 6-1 cards. ports conservation, power 2-28 cord, power connecting 2-3 identifying 1-16 See also cables country-specific modem adapter 1-16, 10-1, 10-4 critical low...18 inserting 7-3 Memory Reader 7-1 removing 7-4 setting AutoPlay preferences 4-18 types supported 7-1 digital vs. See digital memory cards; PC Cards; analog line 10-1, 10-7 Hardware and Software Guide Index-3 memory modules; See passwords compartment, expansion memory module 1-14,...
... Windows 2-7 color television format 4-8 Compaq administrator password. Index caps lock light 1-1 card and socket services ExpressCard 6-6 PC Card 6-1 cards. ports conservation, power 2-28 cord, power connecting 2-3 identifying 1-16 See also cables country-specific modem adapter 1-16, 10-1, 10-4 critical low...18 inserting 7-3 Memory Reader 7-1 removing 7-4 setting AutoPlay preferences 4-18 types supported 7-1 digital vs. See digital memory cards; PC Cards; analog line 10-1, 10-7 Hardware and Software Guide Index-3 memory modules; See passwords compartment, expansion memory module 1-14,...
HP Pavilion zv6000 Notebook PC and Compaq Presario R4000 Notebook PC - Maintenance and Service Guide
Page 6
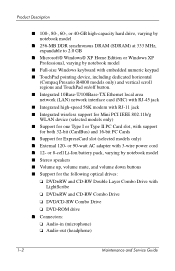
or 90-watt AC adapter with 3-wire power cord ■ 12- or 8-cell Li-Ion battery pack, varying by notebook model ■ Full-size Windows keyboard with embedded numeric keypad ■ TouchPad pointing device, including dedicated horizontal (Compaq Presario R4000 models only) and vertical scroll regions and TouchPad on/off button. ■...IEEE 802.11b/g WLAN device (selected models only) ■ Support for one Type I or Type II PC Card slot, with support for both 32-bit (CardBus) and 16-bit PC Cards ■ Support for the following optical drives: ❏ DVD±RW and CD-RW Double ...
or 90-watt AC adapter with 3-wire power cord ■ 12- or 8-cell Li-Ion battery pack, varying by notebook model ■ Full-size Windows keyboard with embedded numeric keypad ■ TouchPad pointing device, including dedicated horizontal (Compaq Presario R4000 models only) and vertical scroll regions and TouchPad on/off button. ■...IEEE 802.11b/g WLAN device (selected models only) ■ Support for one Type I or Type II PC Card slot, with support for both 32-bit (CardBus) and 16-bit PC Cards ■ Support for the following optical drives: ❏ DVD±RW and CD-RW Double ...

HP Pavilion zv6000 Notebook PC and Compaq Presario R4000 Notebook PC - Maintenance and Service Guide
Page 13
..., component locations may vary. Exhaust vents (2) Provide airflow to block airflow. Depending on the rear panel of the notebook are shown below and described in Table 1-3. Do not allow a hard surface, such as a printer, or a soft surface, such as pillows or thick rugs or ... overheating, do not obstruct vents. External monitor port Connects an optional VGA monitor or projector. Rear Panel Components Item 1 2 3 4 5 Table 1-3 Rear Panel Components Component Function Power connector Connects the AC adapter cable.
..., component locations may vary. Exhaust vents (2) Provide airflow to block airflow. Depending on the rear panel of the notebook are shown below and described in Table 1-3. Do not allow a hard surface, such as a printer, or a soft surface, such as pillows or thick rugs or ... overheating, do not obstruct vents. External monitor port Connects an optional VGA monitor or projector. Rear Panel Components Item 1 2 3 4 5 Table 1-3 Rear Panel Components Component Function Power connector Connects the AC adapter cable.


