
Wireless Setup Guide
Page 4
...instructions on page 2.) 2 Retype the pass phrase in the Available wireless networks list. 3 Complete the following steps that correspond with wireless notebooks and wired desktop PROGRESS CHECK If you successfully complete step 6, all computers on your network can access a Web site. 4 6 Run...wireless router security level (encryption): PROGRESS CHECK If you successfully complete step 3, a Wireless Network Connection status icon and message are displayed on the computer to enable the wireless function. 2 Connect to have problems accessing a Web site, contact your router manufacturer or ...
...instructions on page 2.) 2 Retype the pass phrase in the Available wireless networks list. 3 Complete the following steps that correspond with wireless notebooks and wired desktop PROGRESS CHECK If you successfully complete step 6, all computers on your network can access a Web site. 4 6 Run...wireless router security level (encryption): PROGRESS CHECK If you successfully complete step 3, a Wireless Network Connection status icon and message are displayed on the computer to enable the wireless function. 2 Connect to have problems accessing a Web site, contact your router manufacturer or ...

Wireless Setup Guide
Page 5
... will limit your Web browser. DSL (Digital Subscriber Line) modem-A device that provides a wireless link between a wireless-enabled device and a wired network. A unique key is displayed.) c Select the Wireless Networks tab. If you . DID YOU KNOW... DID YOU KNOW... • Windows XP and some types of data at night with you...
... will limit your Web browser. DSL (Digital Subscriber Line) modem-A device that provides a wireless link between a wireless-enabled device and a wired network. A unique key is displayed.) c Select the Wireless Networks tab. If you . DID YOU KNOW... DID YOU KNOW... • Windows XP and some types of data at night with you...
Wireless Setup Guide
Page 6
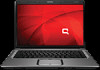
... policy that protect the resources of hotspots near explosives, and in addition to identify a computer or device on . What Is? If you give your computer displays available networks.
... policy that protect the resources of hotspots near explosives, and in addition to identify a computer or device on . What Is? If you give your computer displays available networks.

HP USB Digital Drive
Page 8
User Guide 7 Accessing the Digital Drive You are now ready to use the Digital Drive as a storage device. » Select the Digital Drive icon in "My Computer" to display the contents of the Digital Drive. ✎ The status light on the Digital Drive flashes when you copy and move files to and from the Digital Drive.
User Guide 7 Accessing the Digital Drive You are now ready to use the Digital Drive as a storage device. » Select the Digital Drive icon in "My Computer" to display the contents of the Digital Drive. ✎ The status light on the Digital Drive flashes when you copy and move files to and from the Digital Drive.

HP USB Digital Drive
Page 9
Gently unplug the Digital Drive from the USB port. ✎ If the USB connector cable is flashing. 1. Select the "Safely Remove Hardware" icon on your screen. 3. Disconnecting the Digital Drive ✎ Do not attempt to Remove Hardware" message appears on your taskbar. Select the Digital Drive and wait until the "Safe to remove the Digital Drive when the status light on the Digital Drive is in the extended position, return it on its track for safe storage. 8 User Guide A dialog box displays a list of connected devices. 2.
Gently unplug the Digital Drive from the USB port. ✎ If the USB connector cable is flashing. 1. Select the "Safely Remove Hardware" icon on your screen. 3. Disconnecting the Digital Drive ✎ Do not attempt to Remove Hardware" message appears on your taskbar. Select the Digital Drive and wait until the "Safe to remove the Digital Drive when the status light on the Digital Drive is in the extended position, return it on its track for safe storage. 8 User Guide A dialog box displays a list of connected devices. 2.
Modem and Local Area Network - Windows Vista and Windows XP
Page 10
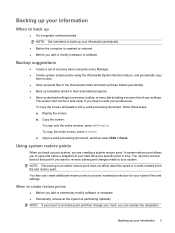
Click Regional and Language Options. 4. Click Clock, Language, and Region. 3. Select Start > Control Panel. 2. Your location is displayed under Location. 4 Chapter 1 Using the modem (select models only) Selecting a location setting Viewing the current location selection To view the current location setting for the modem, follow these steps: 1.
Click Regional and Language Options. 4. Click Clock, Language, and Region. 3. Select Start > Control Panel. 2. Your location is displayed under Location. 4 Chapter 1 Using the modem (select models only) Selecting a location setting Viewing the current location selection To view the current location setting for the modem, follow these steps: 1.

Modem and Local Area Network - Windows Vista and Windows XP
Page 11
... "home" or "work") for the country in which you are visiting, select the country in which the computer is displayed.) 9. To add a location setting for USA or UK is displayed by the modem, the Country/region selection for the modem, follow these steps: 1. Select Start > Control Panel > ...number to add location settings for accessing an outside line (if necessary). 7. The modem may not function properly if the correct country selection is displayed.) 4. To enable modem use the modem. Do one of the country you will use in which you purchased the computer. NOTE: You ...
... "home" or "work") for the country in which you are visiting, select the country in which the computer is displayed.) 9. To add a location setting for USA or UK is displayed by the modem, the Country/region selection for the modem, follow these steps: 1. Select Start > Control Panel > ...number to add location settings for accessing an outside line (if necessary). 7. The modem may not function properly if the correct country selection is displayed.) 4. To enable modem use the modem. Do one of the country you will use in which you purchased the computer. NOTE: You ...

Modem and Local Area Network - Windows Vista and Windows XP
Page 12
... Modem Options. 2. Select your location. Click either Tone or Pulse. 6. Click OK twice. ● Check the telephone number you purchased it does not dial and displays a "No Dial Tone" error message. If the modem receives a dial tone it does not recognize, it , try the following suggestions. ● Check the telephone line...
... Modem Options. 2. Select your location. Click either Tone or Pulse. 6. Click OK twice. ● Check the telephone number you purchased it does not dial and displays a "No Dial Tone" error message. If the modem receives a dial tone it does not recognize, it , try the following suggestions. ● Check the telephone line...
Backup and Recovery - Windows Vista
Page 9
... them to disc. ● Store personal files in the Documents folder and back up these steps: a. b. Open a word-processing document, and then select Edit > Paste. Display the screen. c. To copy the entire screen, press fn+prt sc. Backing up your information When to back up ● On a regularly scheduled basis NOTE...
... them to disc. ● Store personal files in the Documents folder and back up these steps: a. b. Open a word-processing document, and then select Edit > Paste. Display the screen. c. To copy the entire screen, press fn+prt sc. Backing up your information When to back up ● On a regularly scheduled basis NOTE...
Backup and Recovery - Windows Vista
Page 11
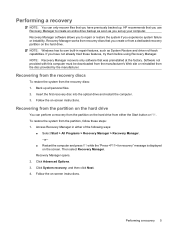
... ways: ● Select Start > All Programs > Recovery Manager > Recovery Manager. -or- ● Restart the computer and press f11 while the "Press for recovery" message is displayed on -screen instructions. HP recommends that was preinstalled at the factory. NOTE: Recovery Manager recovers only software that you use Recovery Manager to repair or...
... ways: ● Select Start > All Programs > Recovery Manager > Recovery Manager. -or- ● Restart the computer and press f11 while the "Press for recovery" message is displayed on -screen instructions. HP recommends that was preinstalled at the factory. NOTE: Recovery Manager recovers only software that you use Recovery Manager to repair or...
Drives - Windows Vista
Page 9
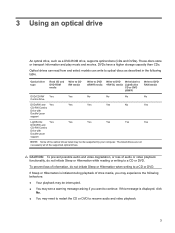
... or transport information and play music and movies. If this message is initiated during playback of the supported optical drives. If Sleep or Hibernation is displayed, click No. ● You may not be interrupted. ● You may see a warning message asking if you want to a CD or DVD. 3 Using an optical...
... or transport information and play music and movies. If this message is initiated during playback of the supported optical drives. If Sleep or Hibernation is displayed, click No. ● You may not be interrupted. ● You may see a warning message asking if you want to a CD or DVD. 3 Using an optical...

Drives - Windows Vista
Page 14
... hard drive Turn the computer upside down the computer through the operating system. To remove the hard drive: 1. Shut down the computer and close the display. 3. Disconnect all external devices connected to the computer. 4. With the hard drive bay toward you are not sure whether the computer is on, in the...
... hard drive Turn the computer upside down the computer through the operating system. To remove the hard drive: 1. Shut down the computer and close the display. 3. Disconnect all external devices connected to the computer. 4. With the hard drive bay toward you are not sure whether the computer is on, in the...
External Devices - Windows Vista
Page 8
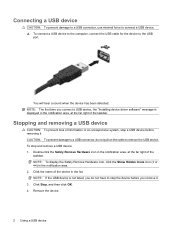
...and remove a USB device: 1. Double-click the Safely Remove Hardware icon in the notification area, at the far right of the taskbar. NOTE: To display the Safely Remove Hardware icon, click the Show Hidden Icons icon (< or CAUTION: To prevent damage to a USB connector, do not pull on the cable... to the USB port. NOTE: The first time you connect a USB device, the "Installing device driver software" message is displayed in the notification area, at the far right of the taskbar. Connecting a USB device CAUTION: To prevent damage to a USB connector, use minimal force...
...and remove a USB device: 1. Double-click the Safely Remove Hardware icon in the notification area, at the far right of the taskbar. NOTE: To display the Safely Remove Hardware icon, click the Show Hidden Icons icon (< or CAUTION: To prevent damage to a USB connector, do not pull on the cable... to the USB port. NOTE: The first time you connect a USB device, the "Installing device driver software" message is displayed in the notification area, at the far right of the taskbar. Connecting a USB device CAUTION: To prevent damage to a USB connector, use minimal force...
External Media Cards - Windows Vista
Page 8
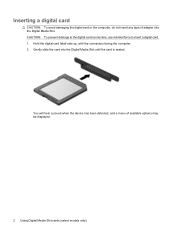
Gently slide the card into the Digital Media Slot. Hold the digital card label-side up, with the connectors facing the computer. 2. CAUTION: To prevent damage to the digital card connectors, use minimal force to insert a digital card. 1. You will hear a sound when the device has been detected, and a menu of adapter into the Digital Media Slot until the card is seated. Inserting a digital card CAUTION: To avoid damaging the digital card or the computer, do not insert any type of available options may be displayed. 2 Using Digital Media Slot cards (select models only)
Gently slide the card into the Digital Media Slot. Hold the digital card label-side up, with the connectors facing the computer. 2. CAUTION: To prevent damage to the digital card connectors, use minimal force to insert a digital card. 1. You will hear a sound when the device has been detected, and a menu of adapter into the Digital Media Slot until the card is seated. Inserting a digital card CAUTION: To avoid damaging the digital card or the computer, do not insert any type of available options may be displayed. 2 Using Digital Media Slot cards (select models only)
External Media Cards - Windows Vista
Page 9
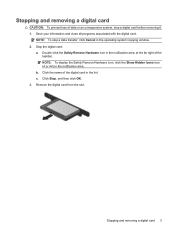
Double-click the Safely Remove Hardware icon in the notification area, at the far right of data or an unresponsive system, stop a data transfer, click Cancel in the operating system Copying window. 2. Stopping and removing a digital card CAUTION: To prevent loss of the taskbar. Stop the digital card: a. NOTE: To stop a digital card before removing it. 1. NOTE: To display the Safely Remove Hardware icon, click the Show Hidden Icons icon (< or Save your information and close all programs associated with the digital card.
Double-click the Safely Remove Hardware icon in the notification area, at the far right of data or an unresponsive system, stop a data transfer, click Cancel in the operating system Copying window. 2. Stopping and removing a digital card CAUTION: To prevent loss of the taskbar. Stop the digital card: a. NOTE: To stop a digital card before removing it. 1. NOTE: To display the Safely Remove Hardware icon, click the Show Hidden Icons icon (< or Save your information and close all programs associated with the digital card.
Memory Modules - Windows Vista
Page 7
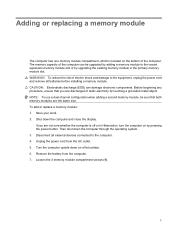
... a dual-channel configuration when adding a second memory module, be upgraded by adding a memory module to the computer. 4. Then shut down the computer and close the display. Remove the battery from the AC outlet. 5. Before beginning any procedure, ensure that both memory modules are not sure whether the computer is located on...
... a dual-channel configuration when adding a second memory module, be upgraded by adding a memory module to the computer. 4. Then shut down the computer and close the display. Remove the battery from the AC outlet. 5. Before beginning any procedure, ensure that both memory modules are not sure whether the computer is located on...
Notebook Tour - Windows Vista
Page 5
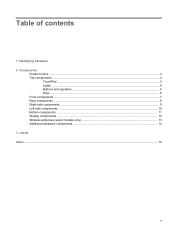
Table of contents 1 Identifying hardware 2 Components Product notice ...3 Top components ...3 TouchPad ...3 Lights ...4 Buttons and speakers ...5 Keys ...6 Front components ...7 Rear components ...8 Right-side components ...9 Left-side components ...10 Bottom components ...11 Display components ...12 Wireless antennae (select models only 13 Additional hardware components ...14 3 Labels Index ...16 v
Table of contents 1 Identifying hardware 2 Components Product notice ...3 Top components ...3 TouchPad ...3 Lights ...4 Buttons and speakers ...5 Keys ...6 Front components ...7 Rear components ...8 Right-side components ...9 Left-side components ...10 Bottom components ...11 Display components ...12 Wireless antennae (select models only 13 Additional hardware components ...14 3 Labels Index ...16 v
Notebook Tour - Windows Vista
Page 10
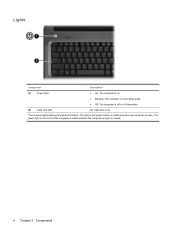
The power light on the power button is visible only when the computer is open or closed. 4 Chapter 2 Components The light on the front of the computer is visible whether the computer is on. *The 2 power lights display the same information. Lights Component Description (1) Power light* ● On: The computer is on. ● Blinking: The computer is in the Sleep state. ● Off: The computer is off or in Hibernation. (2) Caps lock light On: Caps lock is open .
The power light on the power button is visible only when the computer is open or closed. 4 Chapter 2 Components The light on the front of the computer is visible whether the computer is on. *The 2 power lights display the same information. Lights Component Description (1) Power light* ● On: The computer is on. ● Blinking: The computer is in the Sleep state. ● Off: The computer is off or in Hibernation. (2) Caps lock light On: Caps lock is open .
Notebook Tour - Windows Vista
Page 12
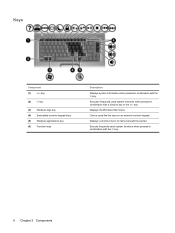
Can be used system functions when pressed in combination with the fn key. 6 Chapter 2 Components Displays the Windows Start menu. Execute frequently used system functions when pressed in combination with the fn key. Displays a shortcut menu for items beneath the pointer. Executes frequently used like the keys on an external numeric keypad. Keys...
Can be used system functions when pressed in combination with the fn key. 6 Chapter 2 Components Displays the Windows Start menu. Execute frequently used system functions when pressed in combination with the fn key. Displays a shortcut menu for items beneath the pointer. Executes frequently used like the keys on an external numeric keypad. Keys...
Notebook Tour - Windows Vista
Page 13
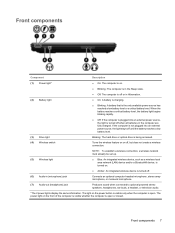
... monaural microphone. (7) Audio-out (headphone) jack Produces sound when connected to optional powered stereo speakers, headphones, ear buds, a headset, or television audio. *The 2 power lights display the same information. The light on the front of the computer is visible whether the computer is the only available power source has reached a low...
... monaural microphone. (7) Audio-out (headphone) jack Produces sound when connected to optional powered stereo speakers, headphones, ear buds, a headset, or television audio. *The 2 power lights display the same information. The light on the front of the computer is visible whether the computer is the only available power source has reached a low...


