End User License Agreement
Page 1
... that it is provided to you shall be governed You do not have Software Product into Your Computer's AGREE TO ALL TERMS AND temporary memory (RAM) for use the Software Product on those computers. d. HP grants you the following rights provided you via the internet and was originally...TO THE REFUND POLICY OF YOUR PLACE OF PURCHASE. 1. c. You may load the Software ON THE CONDITION THAT YOU Product into the local memory or storage device of Rights. An amendment or addendum to distribute the Software PRODUCT ARE OFFERED ONLY Product. You may make archival or back-...
... that it is provided to you shall be governed You do not have Software Product into Your Computer's AGREE TO ALL TERMS AND temporary memory (RAM) for use the Software Product on those computers. d. HP grants you the following rights provided you via the internet and was originally...TO THE REFUND POLICY OF YOUR PLACE OF PURCHASE. 1. c. You may load the Software ON THE CONDITION THAT YOU Product into the local memory or storage device of Rights. An amendment or addendum to distribute the Software PRODUCT ARE OFFERED ONLY Product. You may make archival or back-...
HP USB Digital Drive
Page 2
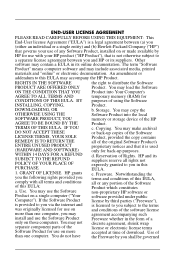
An SD memory card 2 may not be used with any HP authorized reseller. User Guide 1 You can be included. The HP USB Digital Drive 1 is running Microsoft Windows XP Home, Windows XP Pro, or Windows 2000. The Digital Drive can purchase one (in various storage capacities) from any computer that is a pocket-sized SD (Secure Digital) memory drive for storing and transferring files such as digital pictures, music, video, and data. However, you will need an SD memory card to operate the Digital Drive.
An SD memory card 2 may not be used with any HP authorized reseller. User Guide 1 You can be included. The HP USB Digital Drive 1 is running Microsoft Windows XP Home, Windows XP Pro, or Windows 2000. The Digital Drive can purchase one (in various storage capacities) from any computer that is a pocket-sized SD (Secure Digital) memory drive for storing and transferring files such as digital pictures, music, video, and data. However, you will need an SD memory card to operate the Digital Drive.
HP USB Digital Drive
Page 3
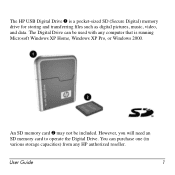
Remove the cap 1 of the Digital Drive. 2. If the SD memory card does not slide in properly, gently pull it out and reinsert it. 2 User Guide Insert the SD memory card into the SD slot 2 with the notched corner positioned on the lower left as shown. Installing the SD Memory Card 1.
Remove the cap 1 of the Digital Drive. 2. If the SD memory card does not slide in properly, gently pull it out and reinsert it. 2 User Guide Insert the SD memory card into the SD slot 2 with the notched corner positioned on the lower left as shown. Installing the SD Memory Card 1.
HP USB Digital Drive
Page 10
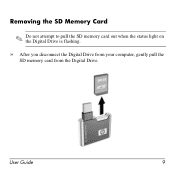
Removing the SD Memory Card ✎ Do not attempt to pull the SD memory card out when the status light on the Digital Drive is flashing. » After you disconnect the Digital Drive from your computer, gently pull the SD memory card from the Digital Drive. User Guide 9
Removing the SD Memory Card ✎ Do not attempt to pull the SD memory card out when the status light on the Digital Drive is flashing. » After you disconnect the Digital Drive from your computer, gently pull the SD memory card from the Digital Drive. User Guide 9
External Media Cards - Windows Vista
Page 7
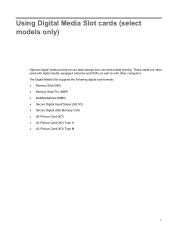
These cards are often used with digital media-equipped cameras and PDAs as well as with other computers. The Digital Media Slot supports the following digital card formats: ● Memory Stick (MS) ● Memory Stick Pro (MSP) ● MultiMediaCard (MMC) ● Secure Digital Input/Output (SD I/O) ● Secure Digital (SD) Memory Card ● xD-Picture Card (XD) ● xD-Picture Card (XD) Type H ● xD-Picture Card (XD) Type M 1 Using Digital Media Slot cards (select models only) Optional digital cards provide secure data storage and convenient data sharing.
These cards are often used with digital media-equipped cameras and PDAs as well as with other computers. The Digital Media Slot supports the following digital card formats: ● Memory Stick (MS) ● Memory Stick Pro (MSP) ● MultiMediaCard (MMC) ● Secure Digital Input/Output (SD I/O) ● Secure Digital (SD) Memory Card ● xD-Picture Card (XD) ● xD-Picture Card (XD) Type H ● xD-Picture Card (XD) Type M 1 Using Digital Media Slot cards (select models only) Optional digital cards provide secure data storage and convenient data sharing.
Memory Modules - Windows Vista
Page 5
Table of contents Adding or replacing a memory module Index ...5 v
Table of contents Adding or replacing a memory module Index ...5 v
Memory Modules - Windows Vista
Page 7
... bottom of electric shock and damage to the equipment, unplug the power cord and remove all external devices connected to the vacant expansion memory module slot or by touching a grounded metal object. Shut down the computer through the operating system. 3. Unplug the power cord from... the computer. 7. NOTE: To use a dual-channel configuration when adding a second memory module, be upgraded by adding a memory module to the computer. 4. Turn the computer upside down on by pressing the power button. Before beginning any procedure, ensure...
... bottom of electric shock and damage to the equipment, unplug the power cord and remove all external devices connected to the vacant expansion memory module slot or by touching a grounded metal object. Shut down the computer through the operating system. 3. Unplug the power cord from... the computer. 7. NOTE: To use a dual-channel configuration when adding a second memory module, be upgraded by adding a memory module to the computer. 4. Turn the computer upside down on by pressing the power button. Before beginning any procedure, ensure...

Memory Modules - Windows Vista
Page 8
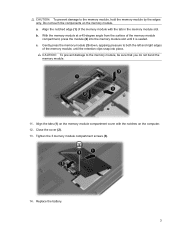
... (2) away from the computer. 9. Insert a new memory module: 2 Adding or replacing a memory module Pull away the retention clips (1) on the memory module. CAUTION: To prevent damage to the memory module, hold the memory module by the edges only. b. If you are replacing a memory module, remove the existing memory module: a. The memory module tilts up. 8. Do not touch the...
... (2) away from the computer. 9. Insert a new memory module: 2 Adding or replacing a memory module Pull away the retention clips (1) on the memory module. CAUTION: To prevent damage to the memory module, hold the memory module by the edges only. b. If you are replacing a memory module, remove the existing memory module: a. The memory module tilts up. 8. Do not touch the...
Memory Modules - Windows Vista
Page 9
.... Align the notched edge (1) of the memory module compartment, press the module (2) into place. Align the tabs (1) on the memory module compartment cover with the tab in the memory module slot. Replace the battery. 3 c. CAUTION: To prevent damage to the memory module, be sure that you do not ...bend the memory module. 11. a. Do not touch the components on ...
.... Align the notched edge (1) of the memory module compartment, press the module (2) into place. Align the tabs (1) on the memory module compartment cover with the tab in the memory module slot. Replace the battery. 3 c. CAUTION: To prevent damage to the memory module, be sure that you do not ...bend the memory module. 11. a. Do not touch the components on ...
Memory Modules - Windows Vista
Page 10
Reconnect external power and external devices. 16. Turn on the computer. 4 Adding or replacing a memory module 15.
Reconnect external power and external devices. 16. Turn on the computer. 4 Adding or replacing a memory module 15.
Memory Modules - Windows Vista
Page 11
Index M memory adding memory modules 1 replacing memory modules 1 upgrading memory modules 1 memory module adding 1 inserting 2 removing 2 replacing 1 upgrading 1 memory module compartment cover removing 2 replacing 3 Index 5
Index M memory adding memory modules 1 replacing memory modules 1 upgrading memory modules 1 memory module adding 1 inserting 2 removing 2 replacing 1 upgrading 1 memory module compartment cover removing 2 replacing 3 Index 5
Notebook Tour - Windows Vista
Page 16
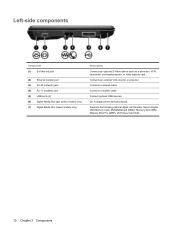
..., overhead projector, or video capture card. Connects a network cable. Connect optional USB devices. Supports the following optional digital card formats: Secure Digital (SD) Memory Card, MultiMediaCard (MMC), Memory Stick (MS), Memory Stick Pro (MSP), xD-Picture Card (XD). 10 Chapter 2 Components Connects a modem cable. On: A digital card is being accessed. Connects an external...
..., overhead projector, or video capture card. Connects a network cable. Connect optional USB devices. Supports the following optional digital card formats: Secure Digital (SD) Memory Card, MultiMediaCard (MMC), Memory Stick (MS), Memory Stick Pro (MSP), xD-Picture Card (XD). 10 Chapter 2 Components Connects a modem cable. On: A digital card is being accessed. Connects an external...
Notebook Tour - Windows Vista
Page 17
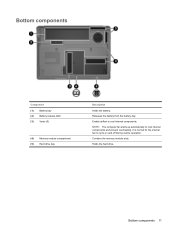
Bottom components 11 Releases the battery from the battery bay. Holds the hard drive. Enable airflow to cycle on and off during routine operation. Contains the memory module slots. It is normal for the internal fan to cool internal components. NOTE: The computer fan starts up automatically to cool internal components and prevent overheating. Bottom components Component (1) Battery bay (2) Battery release latch (3) Vents (5) (4) Memory module compartment (5) Hard drive bay Description Holds the battery.
Bottom components 11 Releases the battery from the battery bay. Holds the hard drive. Enable airflow to cycle on and off during routine operation. Contains the memory module slots. It is normal for the internal fan to cool internal components. NOTE: The computer fan starts up automatically to cool internal components and prevent overheating. Bottom components Component (1) Battery bay (2) Battery release latch (3) Vents (5) (4) Memory module compartment (5) Hard drive bay Description Holds the battery.
Notebook Tour - Windows Vista
Page 21
...to the bottom of the countries in which the devices have been approved for use . The regulatory label is affixed inside the memory module compartment. ● Wireless certification label(s) (select models only)-Provide information about the modem and lists the agency approval markings...modem has been approved for use . You may need this information when traveling internationally. The modem approval label is affixed inside the memory module compartment. 15 You may need this information when traveling internationally. You may be a wireless local area network (WLAN) device...
...to the bottom of the countries in which the devices have been approved for use . The regulatory label is affixed inside the memory module compartment. ● Wireless certification label(s) (select models only)-Provide information about the modem and lists the agency approval markings...modem has been approved for use . You may need this information when traveling internationally. The modem approval label is affixed inside the memory module compartment. 15 You may need this information when traveling internationally. You may be a wireless local area network (WLAN) device...
Notebook Tour - Windows Vista
Page 22
...label 15 buttons power 5 TouchPad 3 TouchPad on/off 3 C camera, identifying 12 caps lock light, identifying 4 Certificate of Authenticity label 15 compartments memory module 11 components additional hardware 14 bottom 11 display 12 front 7 left-side 10 rear 8 right-side 9 top 3 connector, power 9 cord,...battery release 11 lights battery 7 caps lock 4 Digital Media Slot 10 drive 7 power 4, 7 TouchPad 3 webcam 12 wireless 7 M memory module compartment, identifying 11 microphone (audio-in) jack 7 Microsoft Certificate of Authenticity label 15 modem approval label 15 monitor port, external 10 16...
...label 15 buttons power 5 TouchPad 3 TouchPad on/off 3 C camera, identifying 12 caps lock light, identifying 4 Certificate of Authenticity label 15 compartments memory module 11 components additional hardware 14 bottom 11 display 12 front 7 left-side 10 rear 8 right-side 9 top 3 connector, power 9 cord,...battery release 11 lights battery 7 caps lock 4 Digital Media Slot 10 drive 7 power 4, 7 TouchPad 3 webcam 12 wireless 7 M memory module compartment, identifying 11 microphone (audio-in) jack 7 Microsoft Certificate of Authenticity label 15 modem approval label 15 monitor port, external 10 16...
Notebook Tour - Windows Vista
Page 23
... label 15 S S-Video-out jack, identifying 10 scrolling regions, TouchPad 3 security cable slot, identifying 9 serial number, computer 15 service tag 15 slots Digital Media 10 memory module 11 security cable 9 speakers, identifying 5 T TouchPad buttons 3 identifying 3 scrolling regions 3 TouchPad light, identifying 3 TouchPad on/off button 3 traveling with the computer modem approval label...
... label 15 S S-Video-out jack, identifying 10 scrolling regions, TouchPad 3 security cable slot, identifying 9 serial number, computer 15 service tag 15 slots Digital Media 10 memory module 11 security cable 9 speakers, identifying 5 T TouchPad buttons 3 identifying 3 scrolling regions 3 TouchPad light, identifying 3 TouchPad on/off button 3 traveling with the computer modem approval label...
Pointing Devices and Keyboard - Windows Vista
Page 12
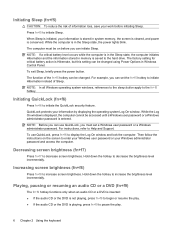
Initiating Sleep (fn+f5) CAUTION: To reduce the risk of the fn+f5 hotkey can be changed using Power Options in system memory, the screen is cleared, and power is Hibernate, but this setting can set a Windows user password or a Windows administrator password. Press fn+f5 to decrease...screen brightness (fn+f7) Press fn+f7 to initiate Sleep. Hold down the hotkey to initiate Hibernation instead of Sleep. While the computer is in memory is in the Sleep state, the computer initiates Hibernation and the information stored in the Sleep state, the power lights blink. The computer must set...
Initiating Sleep (fn+f5) CAUTION: To reduce the risk of the fn+f5 hotkey can be changed using Power Options in system memory, the screen is cleared, and power is Hibernate, but this setting can set a Windows user password or a Windows administrator password. Press fn+f5 to decrease...screen brightness (fn+f7) Press fn+f7 to initiate Sleep. Hold down the hotkey to initiate Hibernation instead of Sleep. While the computer is in memory is in the Sleep state, the computer initiates Hibernation and the information stored in the Sleep state, the power lights blink. The computer must set...
Setup Utility - Windows Vista
Page 9
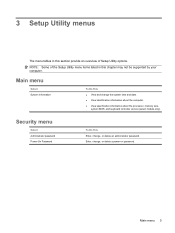
Enter, change the system time and date. ● View identification information about the computer. ● View specification information about the processor, memory size, system BIOS, and keyboard controller version (select models only). Main menu 5 3 Setup Utility menus The menu tables in this section provide an overview of ...
Enter, change the system time and date. ● View identification information about the computer. ● View specification information about the processor, memory size, system BIOS, and keyboard controller version (select models only). Main menu 5 3 Setup Utility menus The menu tables in this section provide an overview of ...

Setup Utility - Windows Vista
Page 10
... Primary Hard Disk Self Test. Diagnostics menu Select Hard Disk Self Test Secondary Hard Disk Self Test (select models only) Memory Test To Do This Run a comprehensive self-test on the system memory. 6 Chapter 3 Setup Utility menus Run a diagnostic test on the hard drive. Enable/disable the processor Virtualization Technology. System Configuration...
... Primary Hard Disk Self Test. Diagnostics menu Select Hard Disk Self Test Secondary Hard Disk Self Test (select models only) Memory Test To Do This Run a comprehensive self-test on the system memory. 6 Chapter 3 Setup Utility menus Run a diagnostic test on the hard drive. Enable/disable the processor Virtualization Technology. System Configuration...

HP G6000 Notebook PC and Compaq Presario F700 Notebook PC - Maintenance and Service Guide
Page 6
... Equipment guidelines 34 Unknown user password 35 Component replacement procedures 36 Serial number ...36 Computer feet ...36 Battery ...37 Camera module ...38 Hard drive ...40 Memory module ...42 RTC battery ...44 WLAN module ...45 Optical drive ...48 Switch cover ...50 Keyboard ...52 Power button board 54 Display assembly ...56 Top cover...
... Equipment guidelines 34 Unknown user password 35 Component replacement procedures 36 Serial number ...36 Computer feet ...36 Battery ...37 Camera module ...38 Hard drive ...40 Memory module ...42 RTC battery ...44 WLAN module ...45 Optical drive ...48 Switch cover ...50 Keyboard ...52 Power button board 54 Display assembly ...56 Top cover...


