
Wireless Setup Guide
Page 3
Ensure that the computer is connected to AC power during the router setup, contact your router manufacturer for technical assistance. 6 Test the Internet connection by opening your router is set to Disable, WEP, through 5, ...
Ensure that the computer is connected to AC power during the router setup, contact your router manufacturer for technical assistance. 6 Test the Internet connection by opening your router is set to Disable, WEP, through 5, ...

Backup and Recovery - Windows 7
Page 6
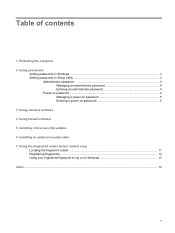
...±RW, and BD-RE (rewritable Blu-ray) discs, are not compatible with the Recovery Manager software. ● The computer must be connected to AC power during this process. ● Only one set of recovery discs can be created per computer. ● Number each disc before creating recovery discs: ● You...
...±RW, and BD-RE (rewritable Blu-ray) discs, are not compatible with the Recovery Manager software. ● The computer must be connected to AC power during this process. ● Only one set of recovery discs can be created per computer. ● Number each disc before creating recovery discs: ● You...
Backup and Recovery - Windows 7
Page 8
.... NOTE: Windows® includes the User Account Control feature to set up your computer. Select Start > All Programs > Maintenance > Backup and Restore. 2. Refer to AC power before you start the backup process. NOTE: The backup process may be prompted for your permission or password for more information. 4 Chapter 3 Backing up and...
.... NOTE: Windows® includes the User Account Control feature to set up your computer. Select Start > All Programs > Maintenance > Backup and Restore. 2. Refer to AC power before you start the backup process. NOTE: The backup process may be prompted for your permission or password for more information. 4 Chapter 3 Backing up and...
Security - Window Vista and Windows 7
Page 5
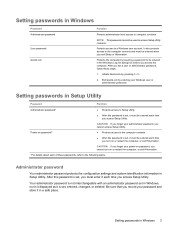
... computer 2 Using passwords Setting passwords in Windows ...3 Setting passwords in Setup Utility ...3 Administrator password ...3 Managing an administrator password 4 Entering an administrator password 4 Power-on password ...4 Managing a power-on password 5 Entering a power-on password 5 3 Using antivirus software 4 Using firewall software 5 Installing critical security updates 6 Installing an optional security cable 7 Using the fingerprint reader (select...
... computer 2 Using passwords Setting passwords in Windows ...3 Setting passwords in Setup Utility ...3 Administrator password ...3 Managing an administrator password 4 Entering an administrator password 4 Power-on password ...4 Managing a power-on password 5 Entering a power-on password 5 3 Using antivirus software 4 Using firewall software 5 Installing critical security updates 6 Installing an optional security cable 7 Using the fingerprint reader (select...
Security - Window Vista and Windows 7
Page 7
... designed to a Windows user account User password Unauthorized removal of risks. Follow the procedures in this guide to use of the computer ● QuickLock ● Power-on password Computer viruses Unauthorized access to data Norton Internet Security software ● Firewall software ● Windows updates Unauthorized access to Setup Utility, BIOS settings...
... designed to a Windows user account User password Unauthorized removal of risks. Follow the procedures in this guide to use of the computer ● QuickLock ● Power-on password Computer viruses Unauthorized access to data Norton Internet Security software ● Firewall software ● Windows updates Unauthorized access to Setup Utility, BIOS settings...
Security - Window Vista and Windows 7
Page 9
... password and store it must be entered each of these steps: 1. Initiate QuickLock by entering your Windows user or administrator password. Power-on or restart the computer, or exit Hibernation. *For details about each time you exit Sleep or Hibernation. Setting passwords in ... a password to access Setup Utility contents. Your administrator password is set , entered, changed, or deleted. CAUTION: If you forget your power-on or restart the computer, or exit Hibernation. Be sure that you cannot turn on password, you record your administrator password, you cannot...
... password and store it must be entered each of these steps: 1. Initiate QuickLock by entering your Windows user or administrator password. Power-on or restart the computer, or exit Hibernation. *For details about each time you exit Sleep or Hibernation. Setting passwords in ... a password to access Setup Utility contents. Your administrator password is set , entered, changed, or deleted. CAUTION: If you forget your power-on or restart the computer, or exit Hibernation. Be sure that you cannot turn on password, you record your administrator password, you cannot...
Security - Window Vista and Windows 7
Page 10
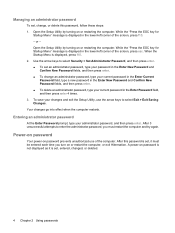
... administrator password, type your current password in the Enter Current Password field, type a new password in the lower-left corner of the computer. Power-on password Your power-on password prevents unauthorized use the arrow keys to enter the administrator password, you turn on or restarting the computer. Open the Setup Utility... administrator password To set , entered, changed, or deleted. 4 Chapter 2 Using passwords While the "Press the ESC key for Startup Menu" message is displayed, press f10. 2. A power-on or restarting the computer.
... administrator password, type your current password in the Enter Current Password field, type a new password in the lower-left corner of the computer. Power-on password Your power-on password prevents unauthorized use the arrow keys to enter the administrator password, you turn on or restarting the computer. Open the Setup Utility... administrator password To set , entered, changed, or deleted. 4 Chapter 2 Using passwords While the "Press the ESC key for Startup Menu" message is displayed, press f10. 2. A power-on or restarting the computer.
Security - Window Vista and Windows 7
Page 11
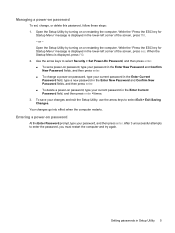
...Enter Current Password field, type a new password in Setup Utility 5 Open the Setup Utility by turning on or restarting the computer. Entering a power-on password, type your current password in the lower-left corner of the screen, press esc. Your changes go into effect when the computer ...is displayed, press f10. 2. Use the arrow keys to enter the password, you must restart the computer and try again. Managing a power-on password To set a power-on password, type your password in the Enter New Password and Confirm New Password fields, and then press enter. ● To change ...
...Enter Current Password field, type a new password in Setup Utility 5 Open the Setup Utility by turning on or restarting the computer. Entering a power-on password, type your current password in the lower-left corner of the screen, press esc. Your changes go into effect when the computer ...is displayed, press f10. 2. Use the arrow keys to enter the password, you must restart the computer and try again. Managing a power-on password To set a power-on password, type your password in the Enter New Password and Confirm New Password fields, and then press enter. ● To change ...

Security - Window Vista and Windows 7
Page 20
... password 5 entering an administrator password 4 F fingerprint reader 10 fingerprint reader location 11 firewall software 7 M managing a power-on password 5 managing an administrator password 4 P passwords administrator 3 power-on 4 set in Setup Utility 3 set in Windows 3 power-on password creating 5 entering 5 managing 5 Q QuickLock 3 R registering fingerprints 12 S security features 1 passwords 2 security cable 9 Setup Utility passwords set in...
... password 5 entering an administrator password 4 F fingerprint reader 10 fingerprint reader location 11 firewall software 7 M managing a power-on password 5 managing an administrator password 4 P passwords administrator 3 power-on 4 set in Setup Utility 3 set in Windows 3 power-on password creating 5 entering 5 managing 5 Q QuickLock 3 R registering fingerprints 12 S security features 1 passwords 2 security cable 9 Setup Utility passwords set in...
Setup Utility - Windows Vista and Windows 7
Page 9
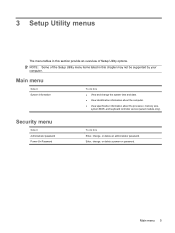
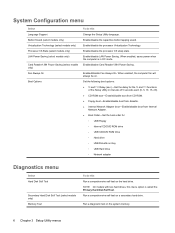
... menu items listed in this Enter, change, or delete an administrator password. Main menu 5 NOTE: Some of Setup Utility options. Security menu Select Administrator password Power-On Password To do this chapter may not be supported by your computer. 3 Setup Utility menus The menu tables in this ● View and change... about the computer. ● View specification information about the processor, memory size, system BIOS, and keyboard controller version (select models only). Enter, change, or delete a power-on password.
... menu items listed in this Enter, change, or delete an administrator password. Main menu 5 NOTE: Some of Setup Utility options. Security menu Select Administrator password Power-On Password To do this chapter may not be supported by your computer. 3 Setup Utility menus The menu tables in this ● View and change... about the computer. ● View specification information about the processor, memory size, system BIOS, and keyboard controller version (select models only). Enter, change, or delete a power-on password.
Setup Utility - Windows Vista and Windows 7
Page 10
... drives, this Change the Setup Utility language. When enabled, the computer fan will always be on a secondary hard drive. When enabled, saves power when the computer is called the Primary Hard Disk Self Test. Run a comprehensive self-test on . Run a diagnostic test on the hard drive.... Enable/disable Card Reader/1394 Power Saving. Enable/disable the processor Virtualization Technology. Enable/disable the processor C6 sleep state. Set the following boot options: ● f9 and f10 ...
... drives, this Change the Setup Utility language. When enabled, the computer fan will always be on a secondary hard drive. When enabled, saves power when the computer is called the Primary Hard Disk Self Test. Run a comprehensive self-test on . Run a diagnostic test on the hard drive.... Enable/disable Card Reader/1394 Power Saving. Enable/disable the processor Virtualization Technology. Enable/disable the processor C6 sleep state. Set the following boot options: ● f9 and f10 ...
Setup Utility - Windows Vista and Windows 7
Page 11
... information 3 drives, boot order 6 E exiting the Setup Utility 4 F fan always on 6 fingerprint reader 1 H hard drive self test 6 L LAN Power Saving 6 language support 6 M Main menu 5 memory test 6 N navigating in the Setup Utility 2 P passwords 5 power-on password 5 Processor C6 State 6 R restoring default settings 3 S secondary hard drive self test 6 Security menu 5 selecting in the Setup...
... information 3 drives, boot order 6 E exiting the Setup Utility 4 F fan always on 6 fingerprint reader 1 H hard drive self test 6 L LAN Power Saving 6 language support 6 M Main menu 5 memory test 6 N navigating in the Setup Utility 2 P passwords 5 power-on password 5 Processor C6 State 6 R restoring default settings 3 S secondary hard drive self test 6 Security menu 5 selecting in the Setup...

Software Update - Windows Vista and Windows 7
Page 6
... installed. Determining the BIOS version To determine whether available BIOS updates contain later BIOS versions than the BIOS version currently installed on battery power, docked in the lower-left corner of the screen, press f10. 2. Do not download or install a BIOS update while the computer... is displayed. 3. During the download and installation, follow these instructions: Do not disconnect power from the computer by opening the Setup Utility. Follow the instructions on the screen to know the version of the date, name, or ...
... installed. Determining the BIOS version To determine whether available BIOS updates contain later BIOS versions than the BIOS version currently installed on battery power, docked in the lower-left corner of the screen, press f10. 2. Do not download or install a BIOS update while the computer... is displayed. 3. During the download and installation, follow these instructions: Do not disconnect power from the computer by opening the Setup Utility. Follow the instructions on the screen to know the version of the date, name, or ...

Drives - Windows 7
Page 5
... a drive to temperature or humidity extremes. Remove media from the drive bay, or traveling with the procedures to media. Do not use X-rays instead of power, be handled with care. The write process is off, in the Sleep state, or in a bubble-pack mailer or other suitable protective packaging and label...
... a drive to temperature or humidity extremes. Remove media from the drive bay, or traveling with the procedures to media. Do not use X-rays instead of power, be handled with care. The write process is off, in the Sleep state, or in a bubble-pack mailer or other suitable protective packaging and label...

Drives - Windows 7
Page 10
... tray is plugged into place. 6. Pull out the tray (2). 4. Gently press the disc (3) down onto the tray spindle until the disc snaps into an external power source while playing a BD. 6 Chapter 2 Using an optical drive If you want to release the disc tray. 3. Turn on the drive bezel to use the...
... tray is plugged into place. 6. Pull out the tray (2). 4. Gently press the disc (3) down onto the tray spindle until the disc snaps into an external power source while playing a BD. 6 Chapter 2 Using an optical drive If you want to release the disc tray. 3. Turn on the drive bezel to use the...

Drives - Windows 7
Page 12
... or damage to a disc, observe the following guidelines: Before writing to a disc, connect the computer to a temporary folder on battery power. Do not use the computer keyboard or move the computer while the computer is running on your hard drive, and then burn from the...disc software you created ejects automatically. 8 Chapter 2 Using an optical drive Power2Go reads the source disc and copies the data to a reliable external power source. CAUTION: To prevent loss of the screen. Do not copy directly from a source disc to a destination disc or from a network drive ...
... or damage to a disc, observe the following guidelines: Before writing to a disc, connect the computer to a temporary folder on battery power. Do not use the computer keyboard or move the computer while the computer is running on your hard drive, and then burn from the...disc software you created ejects automatically. 8 Chapter 2 Using an optical drive Power2Go reads the source disc and copies the data to a reliable external power source. CAUTION: To prevent loss of the screen. Do not copy directly from a source disc to a destination disc or from a network drive ...

Drives - Windows 7
Page 15
..., be added by connecting the drive to the manufacturer's instructions. To disconnect a powered drive, disconnect it from the computer, and then unplug the AC power cord. 11 To connect an external drive to the computer: CAUTION: To reduce the risk of damage to the computer. 2. USB ...port to use, refer to a USB port on the computer. A USB drive can be sure that the AC power cord is unplugged. 1. If you are connecting a powered drive, plug the drive power cord into a grounded AC outlet. 3 Using external drives Removable external drives expand your options for storing and accessing ...
..., be added by connecting the drive to the manufacturer's instructions. To disconnect a powered drive, disconnect it from the computer, and then unplug the AC power cord. 11 To connect an external drive to the computer: CAUTION: To reduce the risk of damage to the computer. 2. USB ...port to use, refer to a USB port on the computer. A USB drive can be sure that the AC power cord is unplugged. 1. If you are connecting a powered drive, plug the drive power cord into a grounded AC outlet. 3 Using external drives Removable external drives expand your options for storing and accessing ...

Drives - Windows 7
Page 17
... state, or in Hibernation. Do not remove the hard drive while the computer is off or in Hibernation, turn the computer on by pressing the power button. Save your work. 2. Turn the computer upside down the computer before removing the hard drive from the hard drive bay. To remove the hard.... 4. 5 Replacing the hard drive in the hard drive bay CAUTION: To prevent information loss or an unresponsive system: Shut down on a flat surface. 6. Unplug the power cord from the computer. 7.
... state, or in Hibernation. Do not remove the hard drive while the computer is off or in Hibernation, turn the computer on by pressing the power button. Save your work. 2. Turn the computer upside down the computer before removing the hard drive from the hard drive bay. To remove the hard.... 4. 5 Replacing the hard drive in the hard drive bay CAUTION: To prevent information loss or an unresponsive system: Shut down on a flat surface. 6. Unplug the power cord from the computer. 7.

Memory Modules - Windows Vista and Windows 7
Page 7
... to the vacant expansion memory module slot or by upgrading the existing memory module in Hibernation, turn the computer on by pressing the power button. Shut down the computer through the operating system. 3. Then shut down the computer and close the display. Remove the battery...any procedure, ensure that both memory modules are discharged of the computer. Disconnect all external devices connected to the equipment, unplug the power cord and remove all batteries before installing a memory module. Turn the computer upside down on a flat surface. 6. Save your work. 2. ...
... to the vacant expansion memory module slot or by upgrading the existing memory module in Hibernation, turn the computer on by pressing the power button. Shut down the computer through the operating system. 3. Then shut down the computer and close the display. Remove the battery...any procedure, ensure that both memory modules are discharged of the computer. Disconnect all external devices connected to the equipment, unplug the power cord and remove all batteries before installing a memory module. Turn the computer upside down on a flat surface. 6. Save your work. 2. ...

Memory Modules - Windows Vista and Windows 7
Page 10
15. Turn on the computer. 4 Adding or replacing a memory module Turn the computer right-side up, and then reconnect external power and external devices. 16.
15. Turn on the computer. 4 Adding or replacing a memory module Turn the computer right-side up, and then reconnect external power and external devices. 16.


