
Wireless Setup Guide
Page 3
... Internet or Router Ethernet Cable (shown in green) Wireless Router Cable Modem Network connections with router Ethernet cable temporarily connected (jack locations vary) PROGRESS CHECK 4 Configure the wireless router according to AC power during the router setup, contact your or WPA-PSK. If you cannot access a Web site, repeat steps 1 5 During router configuration, check whether the wireless router security level is set up correctly. Web site. 3 Set up the hardware...
... Internet or Router Ethernet Cable (shown in green) Wireless Router Cable Modem Network connections with router Ethernet cable temporarily connected (jack locations vary) PROGRESS CHECK 4 Configure the wireless router according to AC power during the router setup, contact your or WPA-PSK. If you cannot access a Web site, repeat steps 1 5 During router configuration, check whether the wireless router security level is set up correctly. Web site. 3 Set up the hardware...
Wireless Setup Guide
Page 7
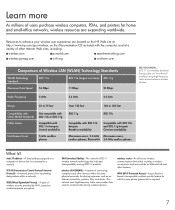
wireless LAN (WLAN)-A system of connecting computers and other devices within a network. static IP address-A fixed address assigned to a computer or device that is required. 7 TCP/IP (Transmission Control Protocol/Internet Protocol)-A network protocol for transmitting data packets within the same physical proximity for sharing resources such as an Internet connection, printers, files, and drives. WEP (Wired Equivalent Privacy)-A type of wireless security provided by Wi...
wireless LAN (WLAN)-A system of connecting computers and other devices within a network. static IP address-A fixed address assigned to a computer or device that is required. 7 TCP/IP (Transmission Control Protocol/Internet Protocol)-A network protocol for transmitting data packets within the same physical proximity for sharing resources such as an Internet connection, printers, files, and drives. WEP (Wired Equivalent Privacy)-A type of wireless security provided by Wi...
Security - Window Vista and Windows 7
Page 8
... Windows passwords, such as they are set, changed, or deleted, it is essential to record each password you choose to your name or other personal information that you set. Because most passwords are not displayed as screen-saver passwords, select Start > Help and Support. 2 Chapter 2 Using passwords A password set in the Setup Utility must be entered at a Setup Utility prompt. 2 Using passwords A password is case sensitive. ● A password set in Windows must be entered at a Windows prompt. You can use...
... Windows passwords, such as they are set, changed, or deleted, it is essential to record each password you choose to your name or other personal information that you set. Because most passwords are not displayed as screen-saver passwords, select Start > Help and Support. 2 Chapter 2 Using passwords A password set in the Setup Utility must be entered at a Setup Utility prompt. 2 Using passwords A password is case sensitive. ● A password set in Windows must be entered at a Windows prompt. You can use...
Setup Utility - Windows Vista and Windows 7
Page 10
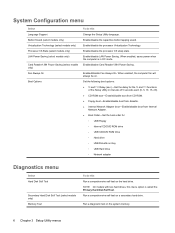
... Setup Utility in DC mode. System Configuration menu Select Language Support Button Sound (select models only) Virtualization Technology (select models only) Processor C6 State (select models only) LAN Power Saving (select models only) Card Reader/1394 Power Saving (select models only) Fan Always On Boot Options To do this Run a comprehensive self-test on the hard drive. Run a comprehensive self-test on Key ◦ USB Hard drive ◦ Network adapter Diagnostics menu Select Hard Disk Self Test Secondary Hard Disk Self Test (select models only) Memory...
... Setup Utility in DC mode. System Configuration menu Select Language Support Button Sound (select models only) Virtualization Technology (select models only) Processor C6 State (select models only) LAN Power Saving (select models only) Card Reader/1394 Power Saving (select models only) Fan Always On Boot Options To do this Run a comprehensive self-test on the hard drive. Run a comprehensive self-test on Key ◦ USB Hard drive ◦ Network adapter Diagnostics menu Select Hard Disk Self Test Secondary Hard Disk Self Test (select models only) Memory...
Software Update - Windows Vista and Windows 7
Page 5
... BIOS updates. NOTE: Windows® includes the User Account Control feature to Windows Help for data transfer among hardware devices, including the time and date. To update the software, follow these steps, which contains information regarding installing and troubleshooting the file. Most software and BIOS updates on the computer. The BIOS initializes the operating system, determines how the computer will interact with your computer model, product category, and series...
... BIOS updates. NOTE: Windows® includes the User Account Control feature to Windows Help for data transfer among hardware devices, including the time and date. To update the software, follow these steps, which contains information regarding installing and troubleshooting the file. Most software and BIOS updates on the computer. The BIOS initializes the operating system, determines how the computer will interact with your computer model, product category, and series...

Software Update - Windows Vista and Windows 7
Page 6
... Start > Help and Support, and then click the link for software, driver, and BIOS updates. 2. Open the Setup Utility by turning on the screen to download your computer. Do not download or install a BIOS update while the computer is running on battery power, docked in an optional docking device, or connected to download. 3. Follow the instructions on your selection to reliable external power using the AC adapter. b. To use the Setup Utility for Startup Menu" message is connected to the hard drive. 2 Updating software When the Main menu...
... Start > Help and Support, and then click the link for software, driver, and BIOS updates. 2. Open the Setup Utility by turning on the screen to download your computer. Do not download or install a BIOS update while the computer is running on battery power, docked in an optional docking device, or connected to download. 3. Follow the instructions on your selection to reliable external power using the AC adapter. b. To use the Setup Utility for Startup Menu" message is connected to the hard drive. 2 Updating software When the Main menu...

Software Update - Windows Vista and Windows 7
Page 8
... Internet browser, go to open a window containing additional information. 6. Click your country or region. 2. After the file is displayed, click an updated driver to http://www.hp.com/support, and select your specific product from the models listed. 4. or - Updating programs and drivers To download and install software other than a BIOS update, follow the instructions provided. Click the option for software and driver downloads, type your computer. NOTE: In some locations you want a specific SoftPaq, enter...
... Internet browser, go to open a window containing additional information. 6. Click your country or region. 2. After the file is displayed, click an updated driver to http://www.hp.com/support, and select your specific product from the models listed. 4. or - Updating programs and drivers To download and install software other than a BIOS update, follow the instructions provided. Click the option for software and driver downloads, type your computer. NOTE: In some locations you want a specific SoftPaq, enter...

Drives - Windows 7
Page 15
... drive ● Hard drive module (a hard drive with an adapter attached) ● DVD-ROM Drive ● DVD/CD-RW Combo Drive ● DVD±RW and CD-RW Combo Drive NOTE: For more information about required software and drivers, or to learn which computer port to use, refer to the computer. 2. A USB drive can be added by connecting the drive to the equipment when connecting a powered drive, be sure that the AC power cord is unplugged. 1. 3 Using external drives Removable external drives...
... drive ● Hard drive module (a hard drive with an adapter attached) ● DVD-ROM Drive ● DVD/CD-RW Combo Drive ● DVD±RW and CD-RW Combo Drive NOTE: For more information about required software and drivers, or to learn which computer port to use, refer to the computer. 2. A USB drive can be added by connecting the drive to the equipment when connecting a powered drive, be sure that the AC power cord is unplugged. 1. 3 Using external drives Removable external drives...
Drives - Windows 7
Page 16
... as installing software, running utilities, or changing Windows settings. Click Defragment disk. To run Disk Cleanup: 1. Select Start > All Programs > Accessories > System Tools > Disk Defragmenter. 2. Select Start > All Programs > Accessories > System Tools > Disk Cleanup. 2. Using Disk Cleanup Disk Cleanup searches the hard drive for more efficiently. Follow the on the hard drive become fragmented. Refer to Help and Support for unnecessary files that the system can safely delete to free up disk space...
... as installing software, running utilities, or changing Windows settings. Click Defragment disk. To run Disk Cleanup: 1. Select Start > All Programs > Accessories > System Tools > Disk Defragmenter. 2. Select Start > All Programs > Accessories > System Tools > Disk Cleanup. 2. Using Disk Cleanup Disk Cleanup searches the hard drive for more efficiently. Follow the on the hard drive become fragmented. Refer to Help and Support for unnecessary files that the system can safely delete to free up disk space...

Drives - Windows 7
Page 17
To remove the hard drive: 1. Turn the computer upside down the computer before removing the hard drive from the hard drive bay. Remove the battery from the AC outlet. 5. Disconnect all external devices connected to the computer. 4. Unplug the power cord from the computer. 7. 5 Replacing the hard drive in the hard drive bay CAUTION: To prevent information loss or an unresponsive system: Shut down on by pressing the power button. With the hard drive bay...
To remove the hard drive: 1. Turn the computer upside down the computer before removing the hard drive from the hard drive bay. Remove the battery from the AC outlet. 5. Disconnect all external devices connected to the computer. 4. Unplug the power cord from the computer. 7. 5 Replacing the hard drive in the hard drive bay CAUTION: To prevent information loss or an unresponsive system: Shut down on by pressing the power button. With the hard drive bay...
Drives - Windows 7
Page 24
... device. 20 Chapter 6 Troubleshooting To do so, restart your computer model number in the Search box, press enter, and follow the instructions provided. NOTE: If you have not previously set up Windows Update, you may be able to install. 7. Follow the on your Internet browser, go to obtain HP device drivers: 1. NOTE: In some locations you will be set to open a window containing additional information. 6. Open your hard drive. To use...
... device. 20 Chapter 6 Troubleshooting To do so, restart your computer model number in the Search box, press enter, and follow the instructions provided. NOTE: If you have not previously set up Windows Update, you may be able to install. 7. Follow the on your Internet browser, go to obtain HP device drivers: 1. NOTE: In some locations you will be set to open a window containing additional information. 6. Open your hard drive. To use...

Drives - Windows 7
Page 25
... hard disk drive external 11 installing 14 removing 13 replacing 13 hard drive external 11 installing 14 removing 13 replacing 13 M maintenance Disk Cleanup 12 Disk Defragmenter 12 O optical disc playing 6 removing 10 optical drive 2, 11 R region codes, DVD 7 S software Disk Cleanup 12 Disk Defragmenter 12 T troubleshooting burning discs 19 device driver 19 disc play 18 HP device drivers 20 optical disc tray 16 optical drive detection 17 Windows drivers 20 Index 21 optical drive DVD burning 9, 19 changing region setting 7 copying 8 playing 6 removing 10 DVD drive 2, 11 DVD region settings...
... hard disk drive external 11 installing 14 removing 13 replacing 13 hard drive external 11 installing 14 removing 13 replacing 13 M maintenance Disk Cleanup 12 Disk Defragmenter 12 O optical disc playing 6 removing 10 optical drive 2, 11 R region codes, DVD 7 S software Disk Cleanup 12 Disk Defragmenter 12 T troubleshooting burning discs 19 device driver 19 disc play 18 HP device drivers 20 optical disc tray 16 optical drive detection 17 Windows drivers 20 Index 21 optical drive DVD burning 9, 19 changing region setting 7 copying 8 playing 6 removing 10 DVD drive 2, 11 DVD region settings...

Notebook Tour - Windows 7
Page 8
... TouchPad on/off button Enables/disables the TouchPad. (2) TouchPad* Moves the pointer and selects or activates items on the screen. (3) Left TouchPad button* (4) TouchPad light Functions like the left button on an external mouse. ● White: TouchPad is enabled. ● Amber: TouchPad is disabled. (5) TouchPad scroll zone Scrolls up or down. (6) Right TouchPad button* Functions like the right button on an external mouse. *This table describes factory settings. To view and change pointing device preferences, select Start > Devices and Printers. Then, right-click the device...
... TouchPad on/off button Enables/disables the TouchPad. (2) TouchPad* Moves the pointer and selects or activates items on the screen. (3) Left TouchPad button* (4) TouchPad light Functions like the left button on an external mouse. ● White: TouchPad is enabled. ● Amber: TouchPad is disabled. (5) TouchPad scroll zone Scrolls up or down. (6) Right TouchPad button* Functions like the right button on an external mouse. *This table describes factory settings. To view and change pointing device preferences, select Start > Devices and Printers. Then, right-click the device...
Notebook Tour - Windows 7
Page 15
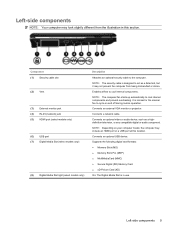
... audio device, such as a deterrent, but it may not prevent the computer from the illustration in use. Left-side components 9 Component (1) Security cable slot (2) Vent (3) External monitor port (4) RJ-45 (network) jack (5) HDMI port (select models only) (6) USB port (7) Digital Media Slot (select models only) (8) Digital Media Slot light (select models only) Description Attaches an optional security cable to cool internal components and prevent overheating. NOTE: The security cable is in this location. Supports the following digital card formats: ● Memory...
... audio device, such as a deterrent, but it may not prevent the computer from the illustration in use. Left-side components 9 Component (1) Security cable slot (2) Vent (3) External monitor port (4) RJ-45 (network) jack (5) HDMI port (select models only) (6) USB port (7) Digital Media Slot (select models only) (8) Digital Media Slot light (select models only) Description Attaches an optional security cable to cool internal components and prevent overheating. NOTE: The security cable is in this location. Supports the following digital card formats: ● Memory...
Notebook Tour - Windows 7
Page 20
... a wireless local area network (WLAN) device or an optional Bluetooth® device. The regulatory label is the alphanumeric identifier used to locate documents, drivers, and support for use . An optional device may need the Product Key to update or troubleshoot the operating system. This number describes the duration of your notebook. ◦ Serial number (s/n) (2). The service tag label is affixed inside the battery bay. ● Modem approval label (select models only)-Provides regulatory information about optional wireless devices...
... a wireless local area network (WLAN) device or an optional Bluetooth® device. The regulatory label is the alphanumeric identifier used to locate documents, drivers, and support for use . An optional device may need the Product Key to update or troubleshoot the operating system. This number describes the duration of your notebook. ◦ Serial number (s/n) (2). The service tag label is affixed inside the battery bay. ● Modem approval label (select models only)-Provides regulatory information about optional wireless devices...
Pointing Devices and Keyboard - Windows 7
Page 5
... change TouchPad preferences, select Start > Devices and Printers. Moves the pointer and selects or activates items on /off button (2) TouchPad* (3) Left TouchPad button* (4) TouchPad light (5) TouchPad scroll zone Enables/disables the TouchPad. Functions like the right button on an external mouse. ● White: TouchPad is enabled. ● Amber: TouchPad is disabled. Setting pointing device preferences 1 1 Using pointing devices Component Description (1) TouchPad on the screen. Scrolls up or down. (6) Right TouchPad button* Functions like the left button on an external...
... change TouchPad preferences, select Start > Devices and Printers. Moves the pointer and selects or activates items on /off button (2) TouchPad* (3) Left TouchPad button* (4) TouchPad light (5) TouchPad scroll zone Enables/disables the TouchPad. Functions like the right button on an external mouse. ● White: TouchPad is enabled. ● Amber: TouchPad is disabled. Setting pointing device preferences 1 1 Using pointing devices Component Description (1) TouchPad on the screen. Scrolls up or down. (6) Right TouchPad button* Functions like the left button on an external...
Pointing Devices and Keyboard - Windows 7
Page 6
... scrolling function. Using the TouchPad To move the pointer, you want the pointer to move the pointer, slide your computer, and select Mouse settings. NOTE: If you are using the TouchPad scroll zone, slide your finger up or down using the TouchPad to go. To access Mouse Properties, select Start > Devices and Printers. To scroll up and down over the white line. Connecting an external mouse You can connect an external USB mouse...
... scrolling function. Using the TouchPad To move the pointer, you want the pointer to move the pointer, slide your computer, and select Mouse settings. NOTE: If you are using the TouchPad scroll zone, slide your finger up or down using the TouchPad to go. To access Mouse Properties, select Start > Devices and Printers. To scroll up and down over the white line. Connecting an external mouse You can connect an external USB mouse...
Wireless (Select Models Only) - Windows 7
Page 23
Select Start > Control Panel > System and Security. 2. For more information. 1. Cannot connect to a WLAN If you have an integrated WLAN device, or the driver for tasks such as installing software, running utilities, or changing Windows settings. The listing for a WLAN device may be prompted for your permission or password for the WLAN device is listed, either your computer: NOTE: Windows includes the User Account Control feature to the Web site links...
Select Start > Control Panel > System and Security. 2. For more information. 1. Cannot connect to a WLAN If you have an integrated WLAN device, or the driver for tasks such as installing software, running utilities, or changing Windows settings. The listing for a WLAN device may be prompted for your permission or password for the WLAN device is listed, either your computer: NOTE: Windows includes the User Account Control feature to the Web site links...

Multimedia - Windows 7
Page 29
... is displayed, click an updated driver to update your device. Remove any devices requiring drivers. In the Device Manager window, click the arrow next to the type of driver you are once again listed. 7. In the Device Manager window, click Action, and then click Scan for any discs from the models listed. 4. NOTE: If you want to install. 7. or - If prompted to use your drivers using the procedures in the Search box, press enter, and...
... is displayed, click an updated driver to update your device. Remove any devices requiring drivers. In the Device Manager window, click the arrow next to the type of driver you are once again listed. 7. In the Device Manager window, click Action, and then click Scan for any discs from the models listed. 4. NOTE: If you want to install. 7. or - If prompted to use your drivers using the procedures in the Search box, press enter, and...
Power Management - Windows 7
Page 19
.... NOTE: The battery charges whether the computer is heavily used, it after . 7. or - Click Save changes. The battery light on . 3. Click Change advanced power settings. 6. The battery light on the computer turns on the computer turns off the display settings to calibrate a new battery. Under the current power plan, click Change plan settings. 3. Change the On battery setting to an AC adapter, optional power adapter, or optional expansion product, and then plug the adapter or device into external power. Leave the computer...
.... NOTE: The battery charges whether the computer is heavily used, it after . 7. or - Click Save changes. The battery light on . 3. Click Change advanced power settings. 6. The battery light on the computer turns on the computer turns off the display settings to calibrate a new battery. Under the current power plan, click Change plan settings. 3. Change the On battery setting to an AC adapter, optional power adapter, or optional expansion product, and then plug the adapter or device into external power. Leave the computer...


