
Wireless Setup Guide
Page 4
... Network and Internet Connections > Set up or change your network. If you successfully complete step 3, a Wireless Network Connection status icon and message are displayed on page 2.) 2 Retype the pass phrase in the "My Router Security Level" table on the taskbar when the reconnection is not secure. 2 ... networks list. 3 Complete the following steps that you successfully complete step 6, all computers on your network. Example of network with wireless notebooks and wired desktop PROGRESS CHECK If you want to add to your network can access a Web site. 4 6 Run the Network Setup...
... Network and Internet Connections > Set up or change your network. If you successfully complete step 3, a Wireless Network Connection status icon and message are displayed on page 2.) 2 Retype the pass phrase in the "My Router Security Level" table on the taskbar when the reconnection is not secure. 2 ... networks list. 3 Complete the following steps that you successfully complete step 6, all computers on your network. Example of network with wireless notebooks and wired desktop PROGRESS CHECK If you want to add to your network can access a Web site. 4 6 Run the Network Setup...

Wireless Setup Guide
Page 5
... SSID should be a unique name that automatically assigns TCP/IP network settings (IP address, DNS, default wireless gateway) to the cable television network, which is displayed.) c Select the Wireless Networks tab. Note: There are security encryption protocols. cable modem-A device that connects a computer to any device that provides a wireless link between...
... SSID should be a unique name that automatically assigns TCP/IP network settings (IP address, DNS, default wireless gateway) to the cable television network, which is displayed.) c Select the Wireless Networks tab. Note: There are security encryption protocols. cable modem-A device that connects a computer to any device that provides a wireless link between...
Wireless Setup Guide
Page 6
.... SSID (Services Set Identifier)-The name you can connect to -Point Protocol over Ethernet)-A type of broadband connection that protect the resources of your computer displays available networks. This name shows up when your new wireless world.
.... SSID (Services Set Identifier)-The name you can connect to -Point Protocol over Ethernet)-A type of broadband connection that protect the resources of your computer displays available networks. This name shows up when your new wireless world.

HP USB Digital Drive
Page 8
Accessing the Digital Drive You are now ready to use the Digital Drive as a storage device. » Select the Digital Drive icon in "My Computer" to display the contents of the Digital Drive. ✎ The status light on the Digital Drive flashes when you copy and move files to and from the Digital Drive. User Guide 7
Accessing the Digital Drive You are now ready to use the Digital Drive as a storage device. » Select the Digital Drive icon in "My Computer" to display the contents of the Digital Drive. ✎ The status light on the Digital Drive flashes when you copy and move files to and from the Digital Drive. User Guide 7

HP USB Digital Drive
Page 9
Gently unplug the Digital Drive from the USB port. ✎ If the USB connector cable is flashing. 1. A dialog box displays a list of connected devices. 2. Select the "Safely Remove Hardware" icon on your taskbar. Select the Digital Drive and wait until the "Safe to remove the Digital Drive when the status light on the Digital Drive is in the extended position, return it on its track for safe storage. 8 User Guide Disconnecting the Digital Drive ✎ Do not attempt to Remove Hardware" message appears on your screen. 3.
Gently unplug the Digital Drive from the USB port. ✎ If the USB connector cable is flashing. 1. A dialog box displays a list of connected devices. 2. Select the "Safely Remove Hardware" icon on your taskbar. Select the Digital Drive and wait until the "Safe to remove the Digital Drive when the status light on the Digital Drive is in the extended position, return it on its track for safe storage. 8 User Guide Disconnecting the Digital Drive ✎ Do not attempt to Remove Hardware" message appears on your screen. 3.
Drives - Windows 7
Page 10
... 2 Using an optical drive Using AutoPlay To configure AutoPlay, follow these steps: 1. You can be prompted for your selections. Observing the copyright warning It is displayed on the DVD drive. Right-click the DVD drive for all of copyrightprotected material, including computer programs, films, broadcasts, and sound recordings. Click Save to...
... 2 Using an optical drive Using AutoPlay To configure AutoPlay, follow these steps: 1. You can be prompted for your selections. Observing the copyright warning It is displayed on the DVD drive. Right-click the DVD drive for all of copyrightprotected material, including computer programs, films, broadcasts, and sound recordings. Click Save to...

Drives - Windows 7
Page 14
... computer before removing the hard drive from the AC outlet. 5. Shut down on a flat surface. 6. Turn the computer upside down the computer and close the display. 3. To remove the hard drive: 1. Lift the hard drive cover away from the computer. 7. Save your work. 2. Do not remove the hard drive while the...
... computer before removing the hard drive from the AC outlet. 5. Shut down on a flat surface. 6. Turn the computer upside down the computer and close the display. 3. To remove the hard drive: 1. Lift the hard drive cover away from the computer. 7. Save your work. 2. Do not remove the hard drive while the...

Drives - Windows 7
Page 19
... insert the disc properly. ● Be sure that you find scratches, treat the disc with filtered water and a lint-free cloth. If this setting is displayed, click No. Select High Color (16 bit), if this message is not already selected. 4. To return to playing the disc, click the Play button in...
... insert the disc properly. ● Be sure that you find scratches, treat the disc with filtered water and a lint-free cloth. If this setting is displayed, click No. Select High Color (16 bit), if this message is not already selected. 4. To return to playing the disc, click the Play button in...
Drives - Windows 7
Page 21
Then in the following section. When prompted, confirm that the drivers are prompted to the type of the display and on the service tag on ). 4. In the Device Manager window, click Action, and then click Scan for software and driver downloads, type your computer ... or region. 2. Remove any other drivers you want to uninstall and reinstall (for example, DVD/CD-ROMs, Modems, and so on bottom of drivers is displayed, click an updated driver to update your system for installed hardware and installs default drivers for any discs from the models listed. 4. Repeat for anything...
Then in the following section. When prompted, confirm that the drivers are prompted to the type of the display and on the service tag on ). 4. In the Device Manager window, click Action, and then click Scan for software and driver downloads, type your computer ... or region. 2. Remove any other drivers you want to uninstall and reinstall (for example, DVD/CD-ROMs, Modems, and so on bottom of drivers is displayed, click an updated driver to update your system for installed hardware and installs default drivers for any discs from the models listed. 4. Repeat for anything...
External Devices - Windows 7
Page 6
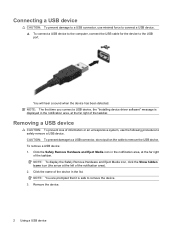
... a USB connector, do not pull on the cable to remove the device. 3. Click the name of the taskbar. NOTE: You are prompted that it is displayed in the list. You will hear a sound when the device has been detected. Removing a USB device CAUTION: To prevent loss of information or an unresponsive.... ▲ To connect a USB device to the computer, connect the USB cable for the device to the USB port. To remove a USB device: 1. NOTE: To display the Safely Remove Hardware and Eject Media icon, click the Show hidden icons icon (the arrow at the far right of the notification area). 2. Remove...
... a USB connector, do not pull on the cable to remove the device. 3. Click the name of the taskbar. NOTE: You are prompted that it is displayed in the list. You will hear a sound when the device has been detected. Removing a USB device CAUTION: To prevent loss of information or an unresponsive.... ▲ To connect a USB device to the computer, connect the USB cable for the device to the USB port. To remove a USB device: 1. NOTE: To display the Safely Remove Hardware and Eject Media icon, click the Show hidden icons icon (the arrow at the far right of the notification area). 2. Remove...

External Media Cards - Windows 7
Page 6
... Media Slot. Inserting a digital card CAUTION: To avoid damaging the digital card or the computer, do not insert any type of available options may be displayed. 2 Using Digital Media Slot cards (select models only)
... Media Slot. Inserting a digital card CAUTION: To avoid damaging the digital card or the computer, do not insert any type of available options may be displayed. 2 Using Digital Media Slot cards (select models only)

External Media Cards - Windows 7
Page 7
Removing a digital card 3 Removing a digital card CAUTION: To prevent loss of the notification area). 2. NOTE: To display the Safely Remove Hardware and Eject Media icon, click the Show hidden icons icon (the arrow at the far right of the digital card in ...
Removing a digital card 3 Removing a digital card CAUTION: To prevent loss of the notification area). 2. NOTE: To display the Safely Remove Hardware and Eject Media icon, click the Show hidden icons icon (the arrow at the far right of the digital card in ...
Memory Modules - Windows Vista and Windows 7
Page 7
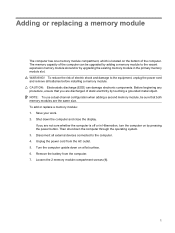
... add or replace a memory module: 1. Unplug the power cord from the computer. 7. Loosen the 2 memory module compartment screws (1). 1 Shut down the computer and close the display. WARNING!
... add or replace a memory module: 1. Unplug the power cord from the computer. 7. Loosen the 2 memory module compartment screws (1). 1 Shut down the computer and close the display. WARNING!

Notebook Tour - Windows 7
Page 5
Table of contents 1 Identifying hardware 2 Components Top components ...2 TouchPad ...2 Keys ...3 Buttons and speakers ...4 Front components ...5 Rear components ...6 Right-side components ...7 Left-side components ...8 Bottom components ...9 Display components ...10 Lights ...11 Cleaning the display ...12 Wireless antennas (select models only 13 Additional hardware components ...14 3 Labels Index ...16 v
Table of contents 1 Identifying hardware 2 Components Top components ...2 TouchPad ...2 Keys ...3 Buttons and speakers ...4 Front components ...5 Rear components ...6 Right-side components ...7 Left-side components ...8 Bottom components ...9 Display components ...10 Lights ...11 Cleaning the display ...12 Wireless antennas (select models only 13 Additional hardware components ...14 3 Labels Index ...16 v

Notebook Tour - Windows 7
Page 9
... (3) Windows logo key (4) Function keys (5) Windows applications key (6) Integrated numeric keypad and volume keys Description Displays system information about your computer when pressed in combination with the fn key. Displays a shortcut menu for items beneath the pointer. Displays the Windows Start menu. Can be used system functions when pressed in combination with the...
... (3) Windows logo key (4) Function keys (5) Windows applications key (6) Integrated numeric keypad and volume keys Description Displays system information about your computer when pressed in combination with the fn key. Displays a shortcut menu for items beneath the pointer. Displays the Windows Start menu. Can be used system functions when pressed in combination with the...

Notebook Tour - Windows 7
Page 16
Records audio and video and captures still photographs. Records sound. 10 Chapter 2 Components Display components Component (1) Internal display switch (2) Integrated webcam light (select models only) (3) Integrated webcam (select models only) (4) Internal microphone Description Turns off the display and initiates Sleep if the display is closed while the power is in use. On: The integrated webcam is on.
Records audio and video and captures still photographs. Records sound. 10 Chapter 2 Components Display components Component (1) Internal display switch (2) Integrated webcam light (select models only) (3) Integrated webcam (select models only) (4) Internal microphone Description Turns off the display and initiates Sleep if the display is closed while the power is in use. On: The integrated webcam is on.

Notebook Tour - Windows 7
Page 17
... device, such as a wireless local area network (WLAN) device and/or a Bluetooth® device, is turned on. ● Amber: All wireless devices are fully charged. Display components 11 Lights Component (1) Caps lock light (2) Power lights* (2) (3) Wireless light (4) Num lock light (5) Battery light Description On: Caps lock is on. ● On: The...
... device, such as a wireless local area network (WLAN) device and/or a Bluetooth® device, is turned on. ● Amber: All wireless devices are fully charged. Display components 11 Lights Component (1) Caps lock light (2) Power lights* (2) (3) Wireless light (4) Num lock light (5) Battery light Description On: Caps lock is on. ● On: The...

Notebook Tour - Windows 7
Page 18
..., cleaning fluids, or chemicals on the power button is visible only when the computer is open or closed. Cleaning the display To remove smudges and lint, frequently clean the display with a soft, damp, lint-free cloth. Component Description (6) Drive light Blinking: The hard drive or optical drive is... is open . The power light on the front of the computer is visible whether the computer is enabled. *The 2 power lights display the same information. If the screen requires additional cleaning, use premoistened antistatic wipes or an antistatic screen cleaner. The light on the...
..., cleaning fluids, or chemicals on the power button is visible only when the computer is open or closed. Cleaning the display To remove smudges and lint, frequently clean the display with a soft, damp, lint-free cloth. Component Description (6) Drive light Blinking: The hard drive or optical drive is... is open . The power light on the front of the computer is visible whether the computer is enabled. *The 2 power lights display the same information. If the screen requires additional cleaning, use premoistened antistatic wipes or an antistatic screen cleaner. The light on the...
Notebook Tour - Windows 7
Page 22
...TouchPad 2 TouchPad on/off 2 C caps lock, lights 11 Certificate of Authenticity label 15 cleaning the display 12 compartments memory module 9 WLAN module 9 components additional hardware 14 bottom 9 display 10 front 5 left-side 8 rear 6 right-side 7 top 2 connectors, power 8 cord, power..., identifying 9 HDMI port, identifying 8 headphone (audio-out) jack 5 HP Mobile Broadband Module serial number label 15 I integrated webcam, identifying 10 internal display switch, identifying 10 internal microphone, identifying 10 J jacks audio-in (microphone) 5 audio-out (headphone) 5 RJ-11 (modem) 7 RJ-45 (...
...TouchPad 2 TouchPad on/off 2 C caps lock, lights 11 Certificate of Authenticity label 15 cleaning the display 12 compartments memory module 9 WLAN module 9 components additional hardware 14 bottom 9 display 10 front 5 left-side 8 rear 6 right-side 7 top 2 connectors, power 8 cord, power..., identifying 9 HDMI port, identifying 8 headphone (audio-out) jack 5 HP Mobile Broadband Module serial number label 15 I integrated webcam, identifying 10 internal display switch, identifying 10 internal microphone, identifying 10 J jacks audio-in (microphone) 5 audio-out (headphone) 5 RJ-11 (modem) 7 RJ-45 (...
Pointing Devices and Keyboard - Windows 7
Page 3
Table of contents 1 Using the pointing devices Setting pointing device preferences ...1 Using the TouchPad ...2 Connecting an external mouse ...2 2 Using the keyboard Using hotkeys ...3 Displaying system information (fn+esc 4 Opening Help and Support (fn+f1 4 Opening the Print Options window (fn+f2 4 Opening a Web browser (fn+f3 5 Switching the screen ...
Table of contents 1 Using the pointing devices Setting pointing device preferences ...1 Using the TouchPad ...2 Connecting an external mouse ...2 2 Using the keyboard Using hotkeys ...3 Displaying system information (fn+esc 4 Opening Help and Support (fn+f1 4 Opening the Print Options window (fn+f2 4 Opening a Web browser (fn+f3 5 Switching the screen ...


