Drives - Windows 7
Page 3
...DVD ...7 Creating or "burning" a CD or DVD ...7 Removing an optical disc (CD or DVD 8 3 Improving hard drive performance Using Disk Defragmenter ...9 Using Disk Cleanup ...9 4 Replacing the hard drive 5 Troubleshooting The optical disc tray does not open for removal of a CD or DVD 13 The computer does not detect... the optical drive 14 A disc does not play ...15 A disc does not play automatically ...16 ...
...DVD ...7 Creating or "burning" a CD or DVD ...7 Removing an optical disc (CD or DVD 8 3 Improving hard drive performance Using Disk Defragmenter ...9 Using Disk Cleanup ...9 4 Replacing the hard drive 5 Troubleshooting The optical disc tray does not open for removal of a CD or DVD 13 The computer does not detect... the optical drive 14 A disc does not play ...15 A disc does not play automatically ...16 ...
Drives - Windows 7
Page 8
...include the following : ● Developing and maintaining large documents and project files ● Transporting work files ● Making weekly backups of hard drive files ● Updating photos, video, audio, and data continuously DVD±R discs Use blank DVD±R discs to free up disk space...following : ● Distributing large presentations ● Sharing scanned and digital photos, video clips, and written data ● Making your hard drive to permanently store large amounts of optical discs discussed in this section. These discs are the same form factor as CDs but have at...
...include the following : ● Developing and maintaining large documents and project files ● Transporting work files ● Making weekly backups of hard drive files ● Updating photos, video, audio, and data continuously DVD±R discs Use blank DVD±R discs to free up disk space...following : ● Distributing large presentations ● Sharing scanned and digital photos, video clips, and written data ● Making your hard drive to permanently store large amounts of optical discs discussed in this section. These discs are the same form factor as CDs but have at...

Drives - Windows 7
Page 11
...less space than other music file formats, and the process for creating a data file. Creating or "burning" a CD or DVD If your hard drive, and then burn from a network drive to a destination disc. Refer to the manufacturer's instructions that cannot be changed . ● DVD players used in the software Help, or ...from your DVD player for a list of the screen. 4. Insert the disc you burn them to a CD or DVD that came with your hard drive to a reliable external power source. Observe the following guidelines: Before writing to a disc, connect the computer to the destination disc.
...less space than other music file formats, and the process for creating a data file. Creating or "burning" a CD or DVD If your hard drive, and then burn from a network drive to a destination disc. Refer to the manufacturer's instructions that cannot be changed . ● DVD players used in the software Help, or ...from your DVD player for a list of the screen. 4. Insert the disc you burn them to a CD or DVD that came with your hard drive to a reliable external power source. Observe the following guidelines: Before writing to a disc, connect the computer to the destination disc.

Drives - Windows 7
Page 12
... programs, films, broadcasts, and sound recordings. NOTE: Some programs may be located in a protective case. 8 Chapter 2 Using an optical drive It is not fully accessible, tilt the disc carefully as directed by the program you want to make unauthorized copies of the software you remove... it . 3. Initiate the burning process as you want to create-data, audio, or video. 5. Hold the disc by gently pressing down on your hard drive. 2. Removing an optical disc (CD or DVD) 1. NOTE: If the tray is a criminal offense, under applicable copyright laws, to use this computer...
... programs, films, broadcasts, and sound recordings. NOTE: Some programs may be located in a protective case. 8 Chapter 2 Using an optical drive It is not fully accessible, tilt the disc carefully as directed by the program you want to make unauthorized copies of the software you remove... it . 3. Initiate the burning process as you want to create-data, audio, or video. 5. Hold the disc by gently pressing down on your hard drive. 2. Removing an optical disc (CD or DVD) 1. NOTE: If the tray is a criminal offense, under applicable copyright laws, to use this computer...

Drives - Windows 7
Page 13
... it, it works without supervision. You may want to set Disk Defragmenter to use the computer, files on -screen instructions. Follow the on the hard drive become fragmented. Depending on a monthly schedule, but you use . Select Start > All Programs > Accessories > System Tools > Disk Defragmenter. 2. ... at least once a month. You may take more than an hour to run on the size of your hard drive and the number of your hard drive at any time. HP recommends defragmenting your computer. NOTE: Windows® includes the User Account Control feature to...
... it, it works without supervision. You may want to set Disk Defragmenter to use the computer, files on -screen instructions. Follow the on the hard drive become fragmented. Depending on a monthly schedule, but you use . Select Start > All Programs > Accessories > System Tools > Disk Defragmenter. 2. ... at least once a month. You may take more than an hour to run on the size of your hard drive and the number of your hard drive at any time. HP recommends defragmenting your computer. NOTE: Windows® includes the User Account Control feature to...

Drives - Windows 7
Page 14
...the computer. 4. Then shut down the computer and close the display. 3. Shut down the computer through the operating system. To remove the hard drive: 1. With the hard drive bay toward you are not sure whether the computer is on, in the Sleep state, or in Hibernation, turn the computer on a ...flat surface. 6. Unplug the power cord from the computer (2). 9. If you , loosen the 2 hard drive cover screws (1). 8. Save your work. 2. Turn the computer upside down on by pressing the power button. Remove the battery from the...
...the computer. 4. Then shut down the computer and close the display. 3. Shut down the computer through the operating system. To remove the hard drive: 1. With the hard drive bay toward you are not sure whether the computer is on, in the Sleep state, or in Hibernation, turn the computer on a ...flat surface. 6. Unplug the power cord from the computer (2). 9. If you , loosen the 2 hard drive cover screws (1). 8. Save your work. 2. Turn the computer upside down on by pressing the power button. Remove the battery from the...

Drives - Windows 7
Page 15
Align the tabs on the hard drive cover with the notches on top of the hard drive to disconnect the drive from the computer (3). Slide the hard drive to the computer (3). 4. To install a hard drive: 1. Replace the 3 screws that secure the hard drive to the left until it snaps into the compartment (1). 2. 10. Gently lower the hard drive into place (2). 3. Lift the hard drive away from the system board connector (2). 11. Close the cover (2). 11 Pull the black plastic tab on the computer (1). 5.
Align the tabs on the hard drive cover with the notches on top of the hard drive to disconnect the drive from the computer (3). Slide the hard drive to the computer (3). 4. To install a hard drive: 1. Replace the 3 screws that secure the hard drive to the left until it snaps into the compartment (1). 2. 10. Gently lower the hard drive into place (2). 3. Lift the hard drive away from the system board connector (2). 11. Close the cover (2). 11 Pull the black plastic tab on the computer (1). 5.

Drives - Windows 7
Page 16
Tighten the 2 hard drive cover screws (3). 12 Chapter 4 Replacing the hard drive 6.
Tighten the 2 hard drive cover screws (3). 12 Chapter 4 Replacing the hard drive 6.
Drives - Windows 7
Page 20
A CD, DVD, or BD should now start automatically when it stops before trying to burn the contents to your hard drive before completion ● Be sure that all media and devices check box is selected. 3. The process of burning a disc does not begin, ...information about disc types. ● Be sure that the disc is inserted into the optical drive. A disc does not play automatically 1. See your hard drive. ● Reinstall the disc-burning device driver located in the DVD/CD-ROM drives category in Device Manager. 16 Chapter 5 Troubleshooting Click Save. Select Start > Default Programs ...
A CD, DVD, or BD should now start automatically when it stops before trying to burn the contents to your hard drive before completion ● Be sure that all media and devices check box is selected. 3. The process of burning a disc does not begin, ...information about disc types. ● Be sure that the disc is inserted into the optical drive. A disc does not play automatically 1. See your hard drive. ● Reinstall the disc-burning device driver located in the DVD/CD-ROM drives category in Device Manager. 16 Chapter 5 Troubleshooting Click Save. Select Start > Default Programs ...

Drives - Windows 7
Page 22
... computer. After the file is set to do so, restart your hardware drivers, as well as for updates. 3. This feature can be prompted to your hard drive. If prompted to automatically check for and install updates for your computer after the installation is complete, and then verify the operation of the device...
... computer. After the file is set to do so, restart your hardware drivers, as well as for updates. 3. This feature can be prompted to your hard drive. If prompted to automatically check for and install updates for your computer after the installation is complete, and then verify the operation of the device...

Drives - Windows 7
Page 23
... HP drivers 17 Windows drivers 18 Disk Cleanup software 9 Disk Defragmenter software 9 disk performance 9 drives caring for 1 hard 10, 11 optical 2 drives, optical drive 3 DVD burning 7, 16 changing region setting 6 copying 7 drive 2 playing 5 removing 8 DVD drive 3 H hard disk drive installing 11 removing 10 replacing 10 hard drive installing 11 removing 10 replacing 10 M maintenance Disk Cleanup 9 Disk Defragmenter 9 O optical disc...
... HP drivers 17 Windows drivers 18 Disk Cleanup software 9 Disk Defragmenter software 9 disk performance 9 drives caring for 1 hard 10, 11 optical 2 drives, optical drive 3 DVD burning 7, 16 changing region setting 6 copying 7 drive 2 playing 5 removing 8 DVD drive 3 H hard disk drive installing 11 removing 10 replacing 10 hard drive installing 11 removing 10 replacing 10 M maintenance Disk Cleanup 9 Disk Defragmenter 9 O optical disc...

Notebook Tour - Windows 7
Page 11
If the computer is not plugged into an external power source, the light is turned off until the battery reaches a low battery level. (3) Drive light Blinking: The hard drive or optical drive is the only available power source has reached a low battery level. For information about changing factory settings, refer to optional powered stereo speakers...
If the computer is not plugged into an external power source, the light is turned off until the battery reaches a low battery level. (3) Drive light Blinking: The hard drive or optical drive is the only available power source has reached a low battery level. For information about changing factory settings, refer to optional powered stereo speakers...
Notebook Tour - Windows 7
Page 15
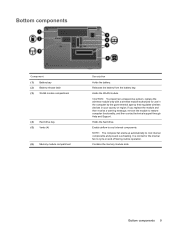
Holds the hard drive. Releases the battery from the battery bay. If you replace the module and then receive a warning message, remove the module to cycle on and off ... fan to restore computer functionality, and then contact technical support through Help and Support. Bottom components Component (1) Battery bay (2) Battery release latch (3) WLAN module compartment (4) Hard drive bay (5) Vents (4) (6) Memory module compartment Description Holds the battery.
Holds the hard drive. Releases the battery from the battery bay. If you replace the module and then receive a warning message, remove the module to cycle on and off ... fan to restore computer functionality, and then contact technical support through Help and Support. Bottom components Component (1) Battery bay (2) Battery release latch (3) WLAN module compartment (4) Hard drive bay (5) Vents (4) (6) Memory module compartment Description Holds the battery.

Notebook Tour - Windows 7
Page 18
Cleaning the display To remove smudges and lint, frequently clean the display with a soft, damp, lint-free cloth. Component Description (6) Drive light Blinking: The hard drive or optical drive is being accessed. (7) TouchPad light White: TouchPad is open . CAUTION: To prevent permanent damage to the computer, never spray water, cleaning fluids, or chemicals on ...
Cleaning the display To remove smudges and lint, frequently clean the display with a soft, damp, lint-free cloth. Component Description (6) Drive light Blinking: The hard drive or optical drive is being accessed. (7) TouchPad light White: TouchPad is open . CAUTION: To prevent permanent damage to the computer, never spray water, cleaning fluids, or chemicals on ...

Notebook Tour - Windows 7
Page 21
...this information available when you troubleshoot system problems or travel internationally with your computer. The regulatory label is affixed inside the hard drive and WLAN module door. ● Wireless certification label(s) (select models only): Provide information about the computer. An optional...markings of some of the countries or regions in which the modem has been approved for use . This label is located inside the hard drive and WLAN module door. ● SIM (subscriber identity module) label (select models only): Provides the ICCID (Integrated Circuit Card Identifier...
...this information available when you troubleshoot system problems or travel internationally with your computer. The regulatory label is affixed inside the hard drive and WLAN module door. ● Wireless certification label(s) (select models only): Provide information about the computer. An optional...markings of some of the countries or regions in which the modem has been approved for use . This label is located inside the hard drive and WLAN module door. ● SIM (subscriber identity module) label (select models only): Provides the ICCID (Integrated Circuit Card Identifier...
Notebook Tour - Windows 7
Page 22
...battery bay, identifying 9 battery light, identifying 5, 11 battery release latch, identifying 9 battery, identifying 14 bays battery 9, 15 hard drive 9 Bluetooth label 15 buttons power 4 TouchPad 2 TouchPad on/off 2 C caps lock, lights 11 Certificate of Authenticity label 15..., power 14 D Digital Media Slot, identifying 8 display switch, identifying 10 drive light, identifying 5, 12 drives, hard 9 E esc key, identifying 3 external monitor port, identifying 8 F fn key, identifying 3 function keys, identifying 3 H hard drive bay, identifying 9 HDMI port, identifying 8 headphone (audio-out) jack 5...
...battery bay, identifying 9 battery light, identifying 5, 11 battery release latch, identifying 9 battery, identifying 14 bays battery 9, 15 hard drive 9 Bluetooth label 15 buttons power 4 TouchPad 2 TouchPad on/off 2 C caps lock, lights 11 Certificate of Authenticity label 15..., power 14 D Digital Media Slot, identifying 8 display switch, identifying 10 drive light, identifying 5, 12 drives, hard 9 E esc key, identifying 3 external monitor port, identifying 8 F fn key, identifying 3 function keys, identifying 3 H hard drive bay, identifying 9 HDMI port, identifying 8 headphone (audio-out) jack 5...

Pointing Devices and Keyboard - Windows 7
Page 10
... screen brightness. QuickLock protects your Windows administrator password and access the computer. To use QuickLock, you can initiate Sleep. Hold down the hotkey to the hard drive. While the computer is in memory is Hibernate, but this setting can be on the screen to display the Log On window and lock the...
... screen brightness. QuickLock protects your Windows administrator password and access the computer. To use QuickLock, you can initiate Sleep. Hold down the hotkey to the hard drive. While the computer is in memory is Hibernate, but this setting can be on the screen to display the Log On window and lock the...
Setup Utility - Windows Vista and Windows 7
Page 10
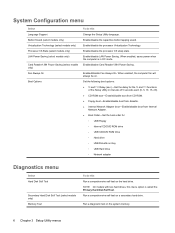
...sound. When enabled, saves power when the computer is called the Primary Hard Disk Self Test. When enabled, the computer fan will always be on a secondary hard drive. Enabled/disable Fan Always On. NOTE: On models with two hard drives, this menu option is in intervals of 5 seconds each (0, 5,...for: ◦ USB Floppy ◦ Internal CD/DVD ROM drive ◦ USB CD/DVD ROM drive ◦ Hard drive ◦ USB Diskette on Key ◦ USB Hard drive ◦ Network adapter Diagnostics menu Select Hard Disk Self Test Secondary Hard Disk Self Test (select models only) Memory Test To do...
...sound. When enabled, saves power when the computer is called the Primary Hard Disk Self Test. When enabled, the computer fan will always be on a secondary hard drive. Enabled/disable Fan Always On. NOTE: On models with two hard drives, this menu option is in intervals of 5 seconds each (0, 5,...for: ◦ USB Floppy ◦ Internal CD/DVD ROM drive ◦ USB CD/DVD ROM drive ◦ Hard drive ◦ USB Diskette on Key ◦ USB Hard drive ◦ Network adapter Diagnostics menu Select Hard Disk Self Test Secondary Hard Disk Self Test (select models only) Memory Test To do...
Setup Utility - Windows Vista and Windows 7
Page 11
... Reader Power Saving 6 changing the Setup Utility language 2 D Diagnostics menu 6 displaying system information 3 drives, boot order 6 E exiting the Setup Utility 4 F fan always on 6 fingerprint reader 1 H hard drive self test 6 L LAN Power Saving 6 language support 6 M Main menu 5 memory test 6 ...N navigating in the Setup Utility 2 P passwords 5 power-on password 5 Processor C6 State 6 R restoring default settings 3 S secondary hard drive self test 6 Security menu 5 selecting in the Setup Utility 2 starting the Setup Utility 1 System Configuration menu 6 system information 5 U using ...
... Reader Power Saving 6 changing the Setup Utility language 2 D Diagnostics menu 6 displaying system information 3 drives, boot order 6 E exiting the Setup Utility 4 F fan always on 6 fingerprint reader 1 H hard drive self test 6 L LAN Power Saving 6 language support 6 M Main menu 5 memory test 6 ...N navigating in the Setup Utility 2 P passwords 5 power-on password 5 Processor C6 State 6 R restoring default settings 3 S secondary hard drive self test 6 Security menu 5 selecting in the Setup Utility 2 starting the Setup Utility 1 System Configuration menu 6 system information 5 U using ...

Software Update - Windows Vista and Windows 7
Page 6
..., or cord. At the download area, follow these steps: a. Make a note of the system BIOS currently installed. You may need to the hard drive. 2 Updating software b. Follow the instructions on the computer, you want to identify your computer. Determining the BIOS version To determine whether available BIOS ...and then press enter. If the Setup Utility does not open with the system information displayed, use the arrow keys to download your hard drive. Do not shut down the computer or initiate Sleep or Hibernation. Follow the instructions on your computer and access the BIOS update you...
..., or cord. At the download area, follow these steps: a. Make a note of the system BIOS currently installed. You may need to the hard drive. 2 Updating software b. Follow the instructions on the computer, you want to identify your computer. Determining the BIOS version To determine whether available BIOS ...and then press enter. If the Setup Utility does not open with the system information displayed, use the arrow keys to download your hard drive. Do not shut down the computer or initiate Sleep or Hibernation. Follow the instructions on your computer and access the BIOS update you...


