Resolving Start Up and No Boot Problems Checklist
Page 1
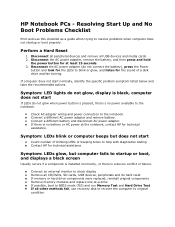
...media cards. 2. Check AC adapter wiring and power connection to resolve problems when computer does not startup or boot properly. HP Notebook PCs - Connect a different battery and disconnect AC power adapter. Symptom: LED lights do not glow, display is black, computer does not start If LEDs do hard... testing Contact HP for the sound of blinking LEDs or beeping tones to the notebook. Connect a different AC power adapter and remove battery. Resolving Start Up and No Boot Problems Checklist Print and use recovery disk to recover the computer to blink or glow, and listen...
...media cards. 2. Check AC adapter wiring and power connection to resolve problems when computer does not startup or boot properly. HP Notebook PCs - Connect a different battery and disconnect AC power adapter. Symptom: LED lights do not glow, display is black, computer does not start If LEDs do hard... testing Contact HP for the sound of blinking LEDs or beeping tones to the notebook. Connect a different AC power adapter and remove battery. Resolving Start Up and No Boot Problems Checklist Print and use recovery disk to recover the computer to blink or glow, and listen...
Getting Started - Windows 7
Page 6
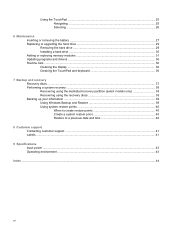
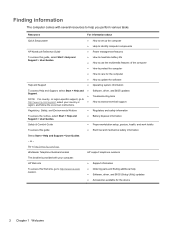
Using the TouchPad ...25 Navigating ...25 Selecting ...26 6 Maintenance Inserting or removing the battery ...27 Replacing or upgrading the hard drive 29 Removing the hard drive ...29 Installing a hard drive ...30 Adding or replacing memory modules 31 Updating programs ...
Using the TouchPad ...25 Navigating ...25 Selecting ...26 6 Maintenance Inserting or removing the battery ...27 Replacing or upgrading the hard drive 29 Removing the hard drive ...29 Installing a hard drive ...30 Adding or replacing memory modules 31 Updating programs ...
Getting Started - Windows 7
Page 8
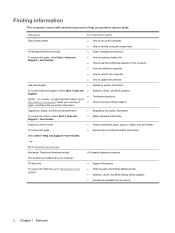
...Safety, and Environmental Notices ● Regulatory and safety information To access the notices, select Start > Help and Support > User Guides. ● Battery disposal information Safety & Comfort Guide ● Proper workstation setup, posture, health, and work habits To access this Web site, go to http://... Guide ● Power management features To access this guide, select Start > Help and Support > User Guides. ● How to maximize battery life ● How to use the multimedia features of the computer ● How to protect the computer ● How to http://www....
...Safety, and Environmental Notices ● Regulatory and safety information To access the notices, select Start > Help and Support > User Guides. ● Battery disposal information Safety & Comfort Guide ● Proper workstation setup, posture, health, and work habits To access this Web site, go to http://... Guide ● Power management features To access this guide, select Start > Help and Support > User Guides. ● How to maximize battery life ● How to use the multimedia features of the computer ● How to protect the computer ● How to http://www....
Getting Started - Windows 7
Page 15
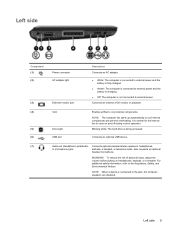
... monitor port Description Connects an AC adapter. ● White: The computer is connected to external power and the battery is fully charged. ● Amber: The computer is connected to external power and the battery is charging. ● Off: The computer is not connected to cool internal components. Vent Drive light USB port...
... monitor port Description Connects an AC adapter. ● White: The computer is connected to external power and the battery is fully charged. ● Amber: The computer is connected to external power and the battery is charging. ● Off: The computer is not connected to cool internal components. Vent Drive light USB port...

Getting Started - Windows 7
Page 17
Holds the battery. Bottom Component (1) Battery release latches (2) (2) Battery bay Description Release the battery from the battery bay. Bottom 11
Holds the battery. Bottom Component (1) Battery release latches (2) (2) Battery bay Description Release the battery from the battery bay. Bottom 11

Getting Started - Windows 7
Page 22
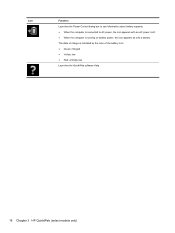
The state of charge is running on battery power, the icon appears as only a battery. Icon Function Launches the Power Control dialog box to see information about battery capacity: ● When the computer is connected to AC power, the icon appears with an AC power cord. ● When the computer is indicated by the color of the battery icon: ● Green: charged ● Yellow: low ● Red: critically low Launches the QuickWeb software Help. 16 Chapter 3 HP QuickWeb (select models only)
The state of charge is running on battery power, the icon appears as only a battery. Icon Function Launches the Power Control dialog box to see information about battery capacity: ● When the computer is connected to AC power, the icon appears with an AC power cord. ● When the computer is indicated by the color of the battery icon: ● Green: charged ● Yellow: low ● Red: critically low Launches the QuickWeb software Help. 16 Chapter 3 HP QuickWeb (select models only)
Getting Started - Windows 7
Page 33
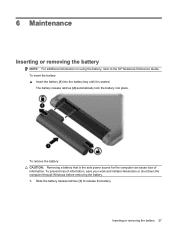
... information, save your work and initiate Hibernation or shut down the computer through Windows before removing the battery. 1. To prevent loss of information. Inserting or removing the battery 27 To remove the battery: CAUTION: Removing a battery that is seated. Slide the battery release latches (1) to the HP Notebook Reference Guide. 6 Maintenance Inserting or removing the...
... information, save your work and initiate Hibernation or shut down the computer through Windows before removing the battery. 1. To prevent loss of information. Inserting or removing the battery 27 To remove the battery: CAUTION: Removing a battery that is seated. Slide the battery release latches (1) to the HP Notebook Reference Guide. 6 Maintenance Inserting or removing the...

Getting Started - Windows 7
Page 34
Remove the battery from the computer (2). 28 Chapter 6 Maintenance 2.
Remove the battery from the computer (2). 28 Chapter 6 Maintenance 2.
Getting Started - Windows 7
Page 35
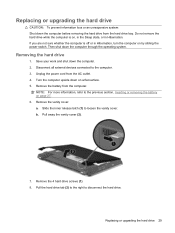
... 29 If you are not sure whether the computer is on page 27. 6. Disconnect all external devices connected to disconnect the hard drive. Remove the battery from the hard drive bay. Pull away the vanity cover (2). 7. Pull the hard drive tab (2) to the right to the computer. 3. Replacing ... computer. NOTE: For more information, refer to loosen the vanity cover. Slide the inner release latch (1) to the previous section, Inserting or removing the battery on , in the Sleep state, or in Hibernation, turn the computer on a flat surface. 5. Do not remove the hard drive while the computer ...
... 29 If you are not sure whether the computer is on page 27. 6. Disconnect all external devices connected to disconnect the hard drive. Remove the battery from the hard drive bay. Pull away the vanity cover (2). 7. Pull the hard drive tab (2) to the right to the computer. 3. Replacing ... computer. NOTE: For more information, refer to loosen the vanity cover. Slide the inner release latch (1) to the previous section, Inserting or removing the battery on , in the Sleep state, or in Hibernation, turn the computer on a flat surface. 5. Do not remove the hard drive while the computer ...
Getting Started - Windows 7
Page 36
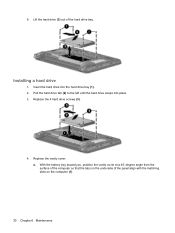
Lift the hard drive (3) out of the panel align with the matching slots on the computer (1). 30 Chapter 6 Maintenance Insert the hard drive into place. 3. With the battery bay toward you, position the vanity cover at a 45-degree angle from the surface of the computer so that the tabs on the underside of the hard drive bay. 9. Pull the hard drive tab (2) to the left until the hard drive snaps into the hard drive bay (1). 2. Replace the 4 hard drive screws (3). 4. Replace the vanity cover: a. Installing a hard drive 1.
Lift the hard drive (3) out of the panel align with the matching slots on the computer (1). 30 Chapter 6 Maintenance Insert the hard drive into place. 3. With the battery bay toward you, position the vanity cover at a 45-degree angle from the surface of the computer so that the tabs on the underside of the hard drive bay. 9. Pull the hard drive tab (2) to the left until the hard drive snaps into the hard drive bay (1). 2. Replace the 4 hard drive screws (3). 4. Replace the vanity cover: a. Installing a hard drive 1.

Getting Started - Windows 7
Page 37
...touching a grounded metal object. If you are not sure whether the computer is located on by sliding the power switch. Disconnect all batteries before adding or replacing memory modules. Before beginning any procedure, ensure that you are discharged of the computer, beneath the removable vanity... cover. Save your work and shut down the computer before installing a memory module. Remove the battery from the AC outlet. 4. Unplug the power cord from the computer. Turn on a flat surface. 5. The memory capacity of the panel...
...touching a grounded metal object. If you are not sure whether the computer is located on by sliding the power switch. Disconnect all batteries before adding or replacing memory modules. Before beginning any procedure, ensure that you are discharged of the computer, beneath the removable vanity... cover. Save your work and shut down the computer before installing a memory module. Remove the battery from the AC outlet. 4. Unplug the power cord from the computer. Turn on a flat surface. 5. The memory capacity of the panel...

Getting Started - Windows 7
Page 40
With the battery bay toward you, position the vanity cover at a 45-degree angle from the surface of the computer so that the tabs on the underside of the panel align with the matching slots on the computer (1). 34 Chapter 6 Maintenance 11. Replace the vanity cover: a. Replace the memory bracket (1). 12. Tighten the 2 memory bracket screws (2). 13.
With the battery bay toward you, position the vanity cover at a 45-degree angle from the surface of the computer so that the tabs on the underside of the panel align with the matching slots on the computer (1). 34 Chapter 6 Maintenance 11. Replace the vanity cover: a. Replace the memory bracket (1). 12. Tighten the 2 memory bracket screws (2). 13.
Getting Started - Windows 7
Page 41
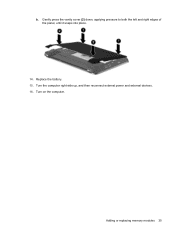
Adding or replacing memory modules 35 Gently press the vanity cover (2) down, applying pressure to both the left and right edges of the panel, until it snaps into place. 14. Replace the battery. 15. Turn on the computer. Turn the computer right-side up, and then reconnect external power and external devices. 16. b.
Adding or replacing memory modules 35 Gently press the vanity cover (2) down, applying pressure to both the left and right edges of the panel, until it snaps into place. 14. Replace the battery. 15. Turn on the computer. Turn the computer right-side up, and then reconnect external power and external devices. 16. b.
Getting Started - Windows 7
Page 48
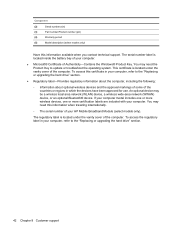
This certificate is located inside the battery bay of your computer. ● Microsoft® Certificate of the computer. If your computer model includes one or more wireless devices, one or more certification ...
This certificate is located inside the battery bay of your computer. ● Microsoft® Certificate of the computer. If your computer model includes one or more wireless devices, one or more certification ...
Getting Started - Windows 7
Page 50
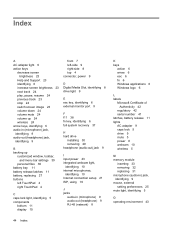
...audio-out (headphone) jack, identifying 9 B backing up customized window, toolbar, and menu bar settings 39 personal files 39 battery bay 11 battery release latches 11 battery, replacing 27 buttons left TouchPad 4 right TouchPad 4 C caps lock light, identifying 5 components bottom 11 display 10 front ... 6 arrow 6 esc 6 fn 6 Windows applications 6 Windows logo 6 L labels Microsoft Certificate of Authenticity 42 regulatory 42 serial number 41 latches, battery release 11 lights AC adapter 9 caps lock 5 drive 9 mute 5 power 8 webcam 10 wireless 5 M memory module inserting 33 removing 32 replacing...
...audio-out (headphone) jack, identifying 9 B backing up customized window, toolbar, and menu bar settings 39 personal files 39 battery bay 11 battery release latches 11 battery, replacing 27 buttons left TouchPad 4 right TouchPad 4 C caps lock light, identifying 5 components bottom 11 display 10 front ... 6 arrow 6 esc 6 fn 6 Windows applications 6 Windows logo 6 L labels Microsoft Certificate of Authenticity 42 regulatory 42 serial number 41 latches, battery release 11 lights AC adapter 9 caps lock 5 drive 9 mute 5 power 8 webcam 10 wireless 5 M memory module inserting 33 removing 32 replacing...
Getting Started Mini - Windows XP
Page 6
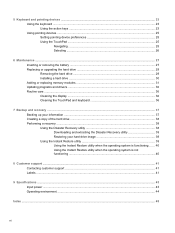
... keys ...23 Using pointing devices ...25 Setting pointing device preferences 25 Using the TouchPad ...25 Navigating ...25 Selecting ...26 6 Maintenance ...27 Inserting or removing the battery ...27 Replacing or upgrading the hard drive 29 Removing the hard drive ...29 Installing a hard drive ...30 Adding or replacing memory modules 31 Updating programs...
... keys ...23 Using pointing devices ...25 Setting pointing device preferences 25 Using the TouchPad ...25 Navigating ...25 Selecting ...26 6 Maintenance ...27 Inserting or removing the battery ...27 Replacing or upgrading the hard drive 29 Removing the hard drive ...29 Installing a hard drive ...30 Adding or replacing memory modules 31 Updating programs...
Getting Started Mini - Windows XP
Page 8
..., Safety, and Environmental Notices ● Regulatory and safety information To access the notices, select Start > Help and Support > User Guides. ● Battery disposal information Safety & Comfort Guide ● Proper workstation setup, posture, health, and work habits To access this guide, select Start > Help and ...Support > User Guides. ● How to maximize battery life ● How to use the multimedia features of the computer ● How to protect the computer ● How to care for the...
..., Safety, and Environmental Notices ● Regulatory and safety information To access the notices, select Start > Help and Support > User Guides. ● Battery disposal information Safety & Comfort Guide ● Proper workstation setup, posture, health, and work habits To access this guide, select Start > Help and ...Support > User Guides. ● How to maximize battery life ● How to use the multimedia features of the computer ● How to protect the computer ● How to care for the...

Getting Started Mini - Windows XP
Page 15
... monitor port Description Connects an AC adapter. ● White: The computer is connected to external power and the battery is fully charged. ● Amber: The computer is connected to external power and the battery is charging. ● Off: The computer is not connected to cycle on headphones, earbuds, or a headset. Also connects...
... monitor port Description Connects an AC adapter. ● White: The computer is connected to external power and the battery is fully charged. ● Amber: The computer is connected to external power and the battery is charging. ● Off: The computer is not connected to cycle on headphones, earbuds, or a headset. Also connects...

Getting Started Mini - Windows XP
Page 17
Bottom Component (1) Battery release latches (2) (2) Battery bay Description Release the battery from the battery bay. Holds the battery. Bottom 11
Bottom Component (1) Battery release latches (2) (2) Battery bay Description Release the battery from the battery bay. Holds the battery. Bottom 11
Getting Started Mini - Windows XP
Page 22
Icon Function Launches the Power Control dialog box to see information about battery capacity: ● When the computer is connected to AC power, the icon appears with an AC power cord. ● When the computer is indicated by the color of charge is running on battery power, the icon appears as only a battery. The state of the battery icon: ● Green: charged ● Yellow: low ● Red: critically low Launches the QuickWeb software Help. 16 Chapter 3 HP QuickWeb (select models only)
Icon Function Launches the Power Control dialog box to see information about battery capacity: ● When the computer is connected to AC power, the icon appears with an AC power cord. ● When the computer is indicated by the color of charge is running on battery power, the icon appears as only a battery. The state of the battery icon: ● Green: charged ● Yellow: low ● Red: critically low Launches the QuickWeb software Help. 16 Chapter 3 HP QuickWeb (select models only)


