HP Business Notebook PC - Getting Started - Windows Vista - Enhanced for Accessibility
Page 23
... Equipment (IEC 60950). Å WARNING: To reduce potential safety issues, use only the AC adapter or battery provided with the computer, a replacement AC adapter or battery provided by the International Standard for Safety of serious injury, read the Safety and Comfort Guide. To access ...■ Disconnect power from the computer by unplugging the power cord from HP. For more safety and regulatory information, and for battery disposal information, refer to contact the skin for extended periods. The Safety and Comfort Guide also provides important electrical and mechanical safety...
... Equipment (IEC 60950). Å WARNING: To reduce potential safety issues, use only the AC adapter or battery provided with the computer, a replacement AC adapter or battery provided by the International Standard for Safety of serious injury, read the Safety and Comfort Guide. To access ...■ Disconnect power from the computer by unplugging the power cord from HP. For more safety and regulatory information, and for battery disposal information, refer to contact the skin for extended periods. The Safety and Comfort Guide also provides important electrical and mechanical safety...
HP Business Notebook PC - Getting Started - Windows Vista - Enhanced for Accessibility
Page 30
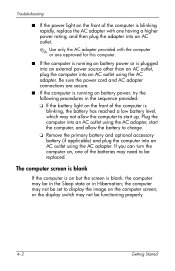
...image on the computer screen; If you can turn the computer on, one approved for this computer. ■ If the computer is running on battery power, try the following procedures in Hibernation; Plug the computer into an AC outlet using the AC adapter, start the computer, and allow the ...the computer is blinking rapidly, replace the AC adapter with one having a higher power rating, and then plug the adapter into an AC outlet. ✎ Use only the AC adapter provided with the computer or one of the computer is blinking, the battery has reached a low battery level, which may not allow...
...image on the computer screen; If you can turn the computer on, one approved for this computer. ■ If the computer is running on battery power, try the following procedures in Hibernation; Plug the computer into an AC outlet using the AC adapter, start the computer, and allow the ...the computer is blinking rapidly, replace the AC adapter with one having a higher power rating, and then plug the adapter into an AC outlet. ✎ Use only the AC adapter provided with the computer or one of the computer is blinking, the battery has reached a low battery level, which may not allow...
Computer Setup - Windows XP and Windows Vista
Page 10
...provide an overview of the Computer Setup menu items listed in this ● View identification information for the computer and the batteries in Computer Setup with the original factory settings. (Password settings and security settings are not changed when you restore the factory... settings.) Cancel any changes entered during the current session. Replace the configuration settings in the system. ● View specification information for the processor, cache and memory size, system ROM, video revision...
...provide an overview of the Computer Setup menu items listed in this ● View identification information for the computer and the batteries in Computer Setup with the original factory settings. (Password settings and security settings are not changed when you restore the factory... settings.) Cancel any changes entered during the current session. Replace the configuration settings in the system. ● View specification information for the processor, cache and memory size, system ROM, video revision...
Drives Windows XP
Page 5
... Improving hard drive performance Using Disk Defragmenter ...3 Using Disk Cleanup ...3 4 HP 3D DriveGuard HP 3D DriveGuard status ...5 HP 3D DriveGuard software ...6 5 Replacing a hard drive 6 MultiBay II drive MulitBay II security screw ...11 MultiBay II hard drive ...12 Inserting a hard drive module 12 Removing a hard ...Removing an optical drive 13 7 Using an optical drive Inserting an optical disc ...16 Removing an optical disc when running on battery or external power 17 Removing an optical disc when no computer power is available 18 8 Using external drives Optional external devices ......
... Improving hard drive performance Using Disk Defragmenter ...3 Using Disk Cleanup ...3 4 HP 3D DriveGuard HP 3D DriveGuard status ...5 HP 3D DriveGuard software ...6 5 Replacing a hard drive 6 MultiBay II drive MulitBay II security screw ...11 MultiBay II hard drive ...12 Inserting a hard drive module 12 Removing a hard ...Removing an optical drive 13 7 Using an optical drive Inserting an optical disc ...16 Removing an optical disc when running on battery or external power 17 Removing an optical disc when no computer power is available 18 8 Using external drives Optional external devices ......
Drives Windows XP
Page 13
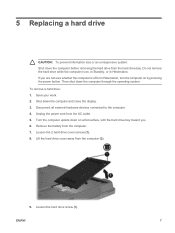
Then shut down the computer and close the display. 3. Unplug the power cord from the hard drive bay. 5 Replacing a hard drive CAUTION: To prevent information loss or an unresponsive system: Shut down the computer before removing the hard drive from the AC outlet. 5....4. Turn the computer upside down on by pressing the power button. Lift the hard drive cover away from the computer. 7. Save your work. 2. Remove the battery from the computer (2). 9. If you are not sure whether the computer is on, in Standby, or in Hibernation, turn the computer on a flat surface, with...
Then shut down the computer and close the display. 3. Unplug the power cord from the hard drive bay. 5 Replacing a hard drive CAUTION: To prevent information loss or an unresponsive system: Shut down the computer before removing the hard drive from the AC outlet. 5....4. Turn the computer upside down on by pressing the power button. Lift the hard drive cover away from the computer. 7. Save your work. 2. Remove the battery from the computer (2). 9. If you are not sure whether the computer is on, in Standby, or in Hibernation, turn the computer on a flat surface, with...

Drives - Windows Vista
Page 5
... Disk Cleanup ...5 4 Using HP 3D DriveGuard Identifying HP 3D DriveGuard status 8 Using HP 3D DriveGuard software ...9 5 Replacing a hard drive 6 Using an optical drive Inserting an optical disc ...17 Removing an optical disc when running on battery or external power 18 Removing an optical disc when no computer power is available 19 7 Using...
... Disk Cleanup ...5 4 Using HP 3D DriveGuard Identifying HP 3D DriveGuard status 8 Using HP 3D DriveGuard software ...9 5 Replacing a hard drive 6 Using an optical drive Inserting an optical disc ...17 Removing an optical disc when running on battery or external power 18 Removing an optical disc when no computer power is available 19 7 Using...

Drives - Windows Vista
Page 17
...power button. ENWW 11 Turn the computer upside down the computer and close the display. 3. Unplug the power cord from the computer. 7. Remove the battery from the AC outlet. 5. To remove a hard drive: 1. Disconnect all external hardware devices connected to the computer. 4. Save your work. 2. ... in the Sleep state, or in Hibernation, turn the computer on a flat surface, with the hard drive bay toward you. 6. 5 Replacing a hard drive CAUTION: To prevent information loss or an unresponsive system: Shut down the computer before removing the hard drive from the computer (2).
...power button. ENWW 11 Turn the computer upside down the computer and close the display. 3. Unplug the power cord from the computer. 7. Remove the battery from the AC outlet. 5. To remove a hard drive: 1. Disconnect all external hardware devices connected to the computer. 4. Save your work. 2. ... in the Sleep state, or in Hibernation, turn the computer on a flat surface, with the hard drive bay toward you. 6. 5 Replacing a hard drive CAUTION: To prevent information loss or an unresponsive system: Shut down the computer before removing the hard drive from the computer (2).

Drives - Windows XP
Page 5
... Disk Cleanup ...5 4 Using HP 3D DriveGuard Identifying HP 3D DriveGuard status 8 Using HP 3D DriveGuard software ...9 5 Replacing a hard drive 6 Using an optical drive Inserting an optical disc ...17 Removing an optical disc when running on battery or external power 18 Removing an optical disc when no computer power is available 19 7 Using...
... Disk Cleanup ...5 4 Using HP 3D DriveGuard Identifying HP 3D DriveGuard status 8 Using HP 3D DriveGuard software ...9 5 Replacing a hard drive 6 Using an optical drive Inserting an optical disc ...17 Removing an optical disc when running on battery or external power 18 Removing an optical disc when no computer power is available 19 7 Using...

Drives - Windows XP
Page 17
.... ENWW 11 Lift the hard drive cover away from the computer. 7. Loosen the 2 hard drive cover screws (1). 8. To remove a hard drive: 1. Remove the battery from the computer (2). 5 Replacing a hard drive CAUTION: To prevent information loss or an unresponsive system: Shut down the computer before removing the hard drive from the AC outlet...
.... ENWW 11 Lift the hard drive cover away from the computer. 7. Loosen the 2 hard drive cover screws (1). 8. To remove a hard drive: 1. Remove the battery from the computer (2). 5 Replacing a hard drive CAUTION: To prevent information loss or an unresponsive system: Shut down the computer before removing the hard drive from the AC outlet...
Memory Modules - Windows Vista
Page 8
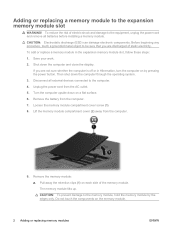
...in the expansion memory module slot, follow these steps: 1. CAUTION: Electrostatic discharge (ESD) can damage electronic components. To add or replace a memory module in Hibernation, turn the computer on each side of static electricity. Shut down the computer through the operating system. ...display. Turn the computer upside down on the memory module. 2 Adding or replacing memory modules ENWW Loosen the memory module compartment cover screw (1). 8. The memory module tilts up. Remove the battery from the AC outlet. 5. Disconnect all external devices connected to the equipment...
...in the expansion memory module slot, follow these steps: 1. CAUTION: Electrostatic discharge (ESD) can damage electronic components. To add or replace a memory module in Hibernation, turn the computer on each side of static electricity. Shut down the computer through the operating system. ...display. Turn the computer upside down on the memory module. 2 Adding or replacing memory modules ENWW Loosen the memory module compartment cover screw (1). 8. The memory module tilts up. Remove the battery from the AC outlet. 5. Disconnect all external devices connected to the equipment...
Memory Modules - Windows Vista
Page 10
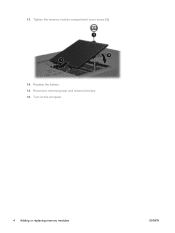
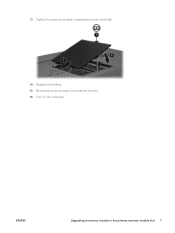
Tighten the memory module compartment cover screw (3). 14. Reconnect external power and external devices. 16. Replace the battery. 15. Turn on the computer. 4 Adding or replacing memory modules ENWW 13.
Tighten the memory module compartment cover screw (3). 14. Reconnect external power and external devices. 16. Replace the battery. 15. Turn on the computer. 4 Adding or replacing memory modules ENWW 13.

Memory Modules - Windows Vista
Page 13
Tighten the memory module compartment cover screw (3). 14. Reconnect external power and external devices. 16. Turn on the computer. Replace the battery. 15. 13. ENWW Upgrading a memory module in the primary memory module slot 7
Tighten the memory module compartment cover screw (3). 14. Reconnect external power and external devices. 16. Turn on the computer. Replace the battery. 15. 13. ENWW Upgrading a memory module in the primary memory module slot 7

Memory Modules - Windows XP
Page 8
... Shut down the computer through the operating system. 3. Remove the battery from the computer. 9. Remove the memory module: a. Pull away the retention clips (1) on the memory module. 2 Chapter 1 Adding or replacing memory modules ENWW Do not touch the components on each side of ...the memory module. To reduce the risk of static electricity. Disconnect all batteries before installing a memory module. CAUTION: Electrostatic discharge (ESD) can damage electronic components. To add or replace a memory module in hibernation, turn the computer on a flat surface. 6. Lift ...
... Shut down the computer through the operating system. 3. Remove the battery from the computer. 9. Remove the memory module: a. Pull away the retention clips (1) on the memory module. 2 Chapter 1 Adding or replacing memory modules ENWW Do not touch the components on each side of ...the memory module. To reduce the risk of static electricity. Disconnect all batteries before installing a memory module. CAUTION: Electrostatic discharge (ESD) can damage electronic components. To add or replace a memory module in hibernation, turn the computer on a flat surface. 6. Lift ...

Memory Modules - Windows XP
Page 10
13. Tighten the memory module compartment cover screw (3). 14. Turn on the computer. 4 Chapter 1 Adding or replacing memory modules ENWW Replace the battery. 15. Reconnect external power and external devices. 16.
13. Tighten the memory module compartment cover screw (3). 14. Turn on the computer. 4 Chapter 1 Adding or replacing memory modules ENWW Replace the battery. 15. Reconnect external power and external devices. 16.
Memory Modules - Windows XP
Page 13
Reconnect external power and external devices. 16. Replace the battery. 15. ENWW Upgrading a memory module in the primary memory module slot 7 13. Turn on the computer. Tighten the memory module compartment cover screw (3). 14.
Reconnect external power and external devices. 16. Replace the battery. 15. ENWW Upgrading a memory module in the primary memory module slot 7 13. Turn on the computer. Tighten the memory module compartment cover screw (3). 14.

Wireless (Select Models Only) - Windows Vista
Page 18
...surface, with a notch on one corner to prevent incorrect installation into the SIM slot. Remove the battery. 7. NOTE: HP Broadband Wireless will be snapped into the slot until it is not replaced. 9. Turn on by pressing the power button. Close the display. 3. Unplug the power cord ... the illustration, insert the SIM into the SIM slot, and gently push the SIM into place. 8. Then shut down the computer. Replace the battery. Disconnect all external devices connected to the connectors, use minimal force when inserting a SIM. Reconnect external power. 10. Shut down the...
...surface, with a notch on one corner to prevent incorrect installation into the SIM slot. Remove the battery. 7. NOTE: HP Broadband Wireless will be snapped into the slot until it is not replaced. 9. Turn on by pressing the power button. Close the display. 3. Unplug the power cord ... the illustration, insert the SIM into the SIM slot, and gently push the SIM into place. 8. Then shut down the computer. Replace the battery. Disconnect all external devices connected to the connectors, use minimal force when inserting a SIM. Reconnect external power. 10. Shut down the...

Wireless (Select Models Only) - Windows Vista
Page 19
... Unplug the power cord from the AC outlet. 5. Turn the computer upside down the computer. Shut down on a flat surface, with the battery bay toward you are not sure whether the computer is off or in on the SIM to the computer. 4. If you . 6. Turn ... down the computer through the operating system. 2. Pull the SIM out of the slot (2). 9. Replace the battery. 10. Push in Hibernation, turn the computer on the computer. Reconnect external power. 11. Remove the battery. 7. ENWW Removing a SIM 15 Disconnect all external devices connected to unlock it (1). 8. Close ...
... Unplug the power cord from the AC outlet. 5. Turn the computer upside down the computer. Shut down on a flat surface, with the battery bay toward you are not sure whether the computer is off or in on the SIM to the computer. 4. If you . 6. Turn ... down the computer through the operating system. 2. Pull the SIM out of the slot (2). 9. Replace the battery. 10. Push in Hibernation, turn the computer on the computer. Reconnect external power. 11. Remove the battery. 7. ENWW Removing a SIM 15 Disconnect all external devices connected to unlock it (1). 8. Close ...

Wireless (Select Models Only) - Windows XP
Page 18
... incorrect installation into the SIM slot. If the SIM is installed improperly, the battery cannot be disabled if the battery is firmly seated. Replace the battery. If you are not sure whether the computer is designed with the battery bay toward you. 6. Turn the computer upside down the computer. Turn on ... SIM into the SIM slot, and gently push the SIM into place. 8. Unplug the power cord from the AC outlet. 5. Remove the battery. 7. Then shut down the computer through the operating system. 2. NOTE: HP Broadband Wireless will be snapped into the slot until it is not...
... incorrect installation into the SIM slot. If the SIM is installed improperly, the battery cannot be disabled if the battery is firmly seated. Replace the battery. If you are not sure whether the computer is designed with the battery bay toward you. 6. Turn the computer upside down the computer. Turn on ... SIM into the SIM slot, and gently push the SIM into place. 8. Unplug the power cord from the AC outlet. 5. Remove the battery. 7. Then shut down the computer through the operating system. 2. NOTE: HP Broadband Wireless will be snapped into the slot until it is not...

Wireless (Select Models Only) - Windows XP
Page 19
... out of the slot (2). 9. Replace the battery. 10. ENWW Removing a SIM 15 Close the display. 3. Unplug the power cord from the AC outlet. 5. Remove the battery. 7. Turn on the SIM to the computer. 4. Then shut down the computer. Turn the computer upside down on a flat surface, with the battery bay toward you are not...
... out of the slot (2). 9. Replace the battery. 10. ENWW Removing a SIM 15 Close the display. 3. Unplug the power cord from the AC outlet. 5. Remove the battery. 7. Turn on the SIM to the computer. 4. Then shut down the computer. Turn the computer upside down on a flat surface, with the battery bay toward you are not...


