Instruction Manual
Page 11
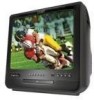
ers, and More • High-Output Stereo Speakers • V-Chip Parental Control • Electronic Program Guide Support • Multi-Language On-Screen Display • Sleep Timer • Energy Efficient Standby Power ( Features • Dual ATSC/NTSC Tuner for Digital and Standard TV Broadcast Reception • Integrated Front-Loading DVD Player • DVD, DVD±R/RW, CD, CD-R/RW, and JPEG Compatible • AV Input Jacks for use with VCRs, Video Games, Media Play-
ers, and More • High-Output Stereo Speakers • V-Chip Parental Control • Electronic Program Guide Support • Multi-Language On-Screen Display • Sleep Timer • Energy Efficient Standby Power ( Features • Dual ATSC/NTSC Tuner for Digital and Standard TV Broadcast Reception • Integrated Front-Loading DVD Player • DVD, DVD±R/RW, CD, CD-R/RW, and JPEG Compatible • AV Input Jacks for use with VCRs, Video Games, Media Play-
Instruction Manual
Page 14
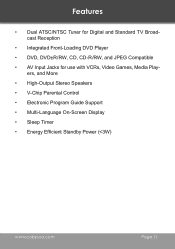
... Hong Kong, Taiwan, South Korea), Southeast Asia 4 Australia, Caribbean, Central America, South America, Mexico, New Zealand 5 Africa, the former Soviet Union, India, North Korea, Pakistan, Turkmenistan 6 China The Region Code for this player is "1". About Optical Discs DVD Region Codes DVD discs and DVD players are manufactured under a compulsory worldwide agreement-the DVD Regional Code System. Page 14 Coby Electronics Corporation
... Hong Kong, Taiwan, South Korea), Southeast Asia 4 Australia, Caribbean, Central America, South America, Mexico, New Zealand 5 Africa, the former Soviet Union, India, North Korea, Pakistan, Turkmenistan 6 China The Region Code for this player is "1". About Optical Discs DVD Region Codes DVD discs and DVD players are manufactured under a compulsory worldwide agreement-the DVD Regional Code System. Page 14 Coby Electronics Corporation
Instruction Manual
Page 19
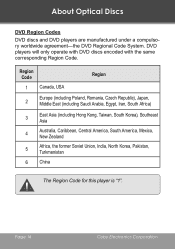
... 7. Channel Keys 9. TV Setup 10. Exit 13. trols Description Turn the TV on -screen cursor. Toggle closed-caption and picture display options. Adjust the volume level. Change to a different mode (DTV, TV, DVD, AV, COMPONENT) Use the DTV/TV system options (please refer to the sections "DTV Functions" and "TV Functions" for details). Location of Controls Remote Key 1. Input Select 5. Return 6. In TV-Air (antenna) mode: toggle between 1-, 2-, and 3digit channel input. Return to move the on /off. Access the TV setup menu...
... 7. Channel Keys 9. TV Setup 10. Exit 13. trols Description Turn the TV on -screen cursor. Toggle closed-caption and picture display options. Adjust the volume level. Change to a different mode (DTV, TV, DVD, AV, COMPONENT) Use the DTV/TV system options (please refer to the sections "DTV Functions" and "TV Functions" for details). Location of Controls Remote Key 1. Input Select 5. Return 6. In TV-Air (antenna) mode: toggle between 1-, 2-, and 3digit channel input. Return to move the on /off. Access the TV setup menu...
Instruction Manual
Page 22
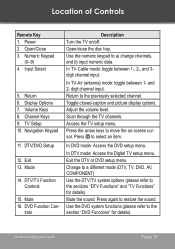
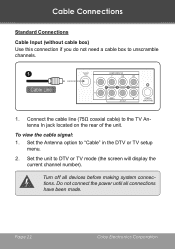
... power until all devices before making system connections. Set the unit to "Cable" in the DTV or TV setup menu. 2. Turn off all connections have been made. Set the Antenna option to DTV or TV mode (the screen will display the current channel number). Connect the cable line (75Ω coaxial cable) to unscramble channels. 1 Cable Line 1. Page 22 Coby Electronics Corporation To view the cable signal: 1. Cable Connections Standard Connections Cable Input (without cable box) Use this connection if you do not need a cable box to the TV Antenna...
... power until all devices before making system connections. Set the unit to "Cable" in the DTV or TV setup menu. 2. Turn off all connections have been made. Set the Antenna option to DTV or TV mode (the screen will display the current channel number). Connect the cable line (75Ω coaxial cable) to unscramble channels. 1 Cable Line 1. Page 22 Coby Electronics Corporation To view the cable signal: 1. Cable Connections Standard Connections Cable Input (without cable box) Use this connection if you do not need a cable box to the TV Antenna...
Instruction Manual
Page 24
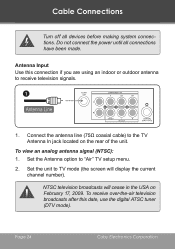
Antenna Input Use this date, use the digital ATSC tuner (DTV mode). To view an analog antenna signal (NTSC): 1. Page 24 Coby Electronics Corporation Cable Connections Turn off all connections have been made. Set the unit to the TV Antenna In jack located on February 17, 2009. NTSC television broadcasts will display the current channel number). Set the Antenna option to receive television signals. 1 Antenna Line 1. Do not connect the power until all devices before making system connections. Connect the antenna line (75...
Antenna Input Use this date, use the digital ATSC tuner (DTV mode). To view an analog antenna signal (NTSC): 1. Page 24 Coby Electronics Corporation Cable Connections Turn off all connections have been made. Set the unit to the TV Antenna In jack located on February 17, 2009. NTSC television broadcasts will display the current channel number). Set the Antenna option to receive television signals. 1 Antenna Line 1. Do not connect the power until all devices before making system connections. Connect the antenna line (75...

Instruction Manual
Page 27
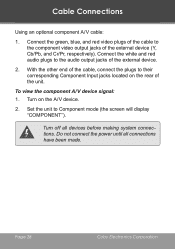
... making system connections. Component Audio/Video Input Use this connection to AV mode (the screen will display "AV"). A/V devices may include DVD players, cable/satellite receivers, camcorders, or game consoles that are equipped with Component A/V Output AUDIO OUTPUT COMPONENT VIDEO OUTPUT Rear Component Video Jacks Y Cb Cr WHITE RED GREEN BLUE RED RED WHITE GREEN BLUE RED 1 2 Component Video Cable (optional) www.cobyusa.com Page 27 Cable Connections To view the composite A/V device signal: 1. Turn off all connections have been made. Turn on the unit. Set the...
... making system connections. Component Audio/Video Input Use this connection to AV mode (the screen will display "AV"). A/V devices may include DVD players, cable/satellite receivers, camcorders, or game consoles that are equipped with Component A/V Output AUDIO OUTPUT COMPONENT VIDEO OUTPUT Rear Component Video Jacks Y Cb Cr WHITE RED GREEN BLUE RED RED WHITE GREEN BLUE RED 1 2 Component Video Cable (optional) www.cobyusa.com Page 27 Cable Connections To view the composite A/V device signal: 1. Turn off all connections have been made. Turn on the unit. Set the...
Instruction Manual
Page 28
... other end of the external device. 2. Set the unit to their corresponding Component Input jacks located on the A/V device. 2. Connect the green, blue, and red video plugs of the cable to the audio output jacks of the cable, connect the plugs to Component mode (the screen will display "COMPONENT"). Turn off all connections have been made. Cable Connections Using an optional component A/V cable: 1. Turn on the rear of the external device (Y, Cb/Pb, and...
... other end of the external device. 2. Set the unit to their corresponding Component Input jacks located on the A/V device. 2. Connect the green, blue, and red video plugs of the cable to the audio output jacks of the cable, connect the plugs to Component mode (the screen will display "COMPONENT"). Turn off all connections have been made. Cable Connections Using an optional component A/V cable: 1. Turn on the rear of the external device (Y, Cb/Pb, and...

Instruction Manual
Page 39
... sub-menu (see below). Set the closed caption display on or off. www.cobyusa.com Page 39 Set the closed caption formatting: • Broadcast: obtain caption formatting from the channel broadcast. • Customer: use custom caption formatting. Set the closed caption type for older analog format captions. Formatting can be set to adjust the selected attribute. Customize the closed caption options. DTV Mode (Digital TV) CC Setup (Closed Caption Setup) Set the closed caption formatting. • Press or to select a caption attribute...
... sub-menu (see below). Set the closed caption display on or off. www.cobyusa.com Page 39 Set the closed caption formatting: • Broadcast: obtain caption formatting from the channel broadcast. • Customer: use custom caption formatting. Set the closed caption type for older analog format captions. Formatting can be set to adjust the selected attribute. Customize the closed caption options. DTV Mode (Digital TV) CC Setup (Closed Caption Setup) Set the closed caption formatting. • Press or to select a caption attribute...
Instruction Manual
Page 42
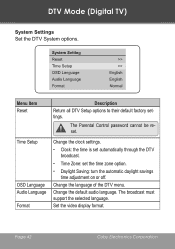
Menu Item Reset Description Return all DTV Setup options to their default factory settings. Page 42 Coby Electronics Corporation DTV Mode (Digital TV) System Settings Set the DTV System options. Change the language of the DTV menu. The broadcast must support the selected language. The Parental Control password cannot be reset. Time Setup OSD Language Audio Language Format Change the clock settings. • Clock: the time is set automatically through the DTV broadcast. •...
Menu Item Reset Description Return all DTV Setup options to their default factory settings. Page 42 Coby Electronics Corporation DTV Mode (Digital TV) System Settings Set the DTV System options. Change the language of the DTV menu. The broadcast must support the selected language. The Parental Control password cannot be reset. Time Setup OSD Language Audio Language Format Change the clock settings. • Clock: the time is set automatically through the DTV broadcast. •...
Instruction Manual
Page 44
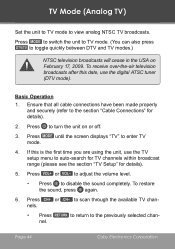
... you are using the unit, use the digital ATSC tuner (DTV mode). until the screen displays "TV" to disable the sound completely. Page 44 Coby Electronics Corporation Basic Operation 1. To restore the sound, press again. 6. nels. • Press nel. Ensure that all cable connections have been made properly and securely (refer to the section "Cable Connections" for details). 5. Press or to adjust the volume level. •...
... you are using the unit, use the digital ATSC tuner (DTV mode). until the screen displays "TV" to disable the sound completely. Page 44 Coby Electronics Corporation Basic Operation 1. To restore the sound, press again. 6. nels. • Press nel. Ensure that all cable connections have been made properly and securely (refer to the section "Cable Connections" for details). 5. Press or to adjust the volume level. •...
Instruction Manual
Page 45
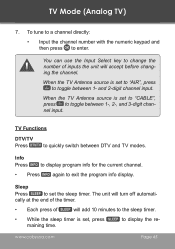
... quickly switch between DTV and TV modes. cally at the end of the timer. • Each press of inputs the unit will accept before changing the channel. You can use the Input Select key to change the number of will turn off automati- TV Functions DTV/TV Press to set to "CABLE", press to display the re- The unit will add 10 minutes to exit the program info...
... quickly switch between DTV and TV modes. cally at the end of the timer. • Each press of inputs the unit will accept before changing the channel. You can use the Input Select key to change the number of will turn off automati- TV Functions DTV/TV Press to set to "CABLE", press to display the re- The unit will add 10 minutes to exit the program info...
Instruction Manual
Page 48
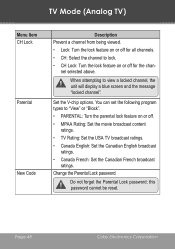
Set the V-chip options. Page 48 Coby Electronics Corporation TV Mode (Analog TV) Menu Item CH Lock Parental New Code Description Prevent a channel from being viewed. • Lock: Turn the lock feature on or off for the channel selected above. Change the Parental Lock password. You can set the following program types to "View" or "Block". • PARENTAL: Turn the parental lock feature on or off . • MPAA Rating: Set the movie broadcast content ratings...
Set the V-chip options. Page 48 Coby Electronics Corporation TV Mode (Analog TV) Menu Item CH Lock Parental New Code Description Prevent a channel from being viewed. • Lock: Turn the lock feature on or off for the channel selected above. Change the Parental Lock password. You can set the following program types to "View" or "Block". • PARENTAL: Turn the parental lock feature on or off . • MPAA Rating: Set the movie broadcast content ratings...
Instruction Manual
Page 49
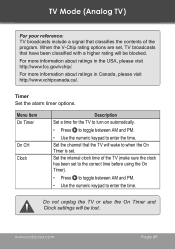
... has been set to the correct time before using the On Timer). • Press to toggle between AM and PM. • Use the numeric keypad to when the On Timer is set , TV broadcasts that classifies the contents of the program. TV Mode (Analog TV) For your reference: TV broadcasts include a signal that have been classified with a higher rating will be lost. www.cobyusa...
... has been set to the correct time before using the On Timer). • Press to toggle between AM and PM. • Use the numeric keypad to when the On Timer is set , TV broadcasts that classifies the contents of the program. TV Mode (Analog TV) For your reference: TV broadcasts include a signal that have been classified with a higher rating will be lost. www.cobyusa...
Instruction Manual
Page 50
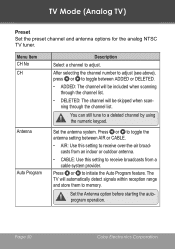
.... TV Mode (Analog TV) Preset Set the preset channel and antenna options for the analog NTSC TV tuner. You can still tune to initiate the Auto Program feature. Press or to a deleted channel by using the numeric keypad. Page 50 Coby Electronics Corporation Menu Item CH No CH Antenna Auto Program Description Select a channel to memory. After selecting the channel number to adjust (see above), press or to toggle between AIR or CABLE...
.... TV Mode (Analog TV) Preset Set the preset channel and antenna options for the analog NTSC TV tuner. You can still tune to initiate the Auto Program feature. Press or to a deleted channel by using the numeric keypad. Page 50 Coby Electronics Corporation Menu Item CH No CH Antenna Auto Program Description Select a channel to memory. After selecting the channel number to adjust (see above), press or to toggle between AIR or CABLE...
Instruction Manual
Page 57
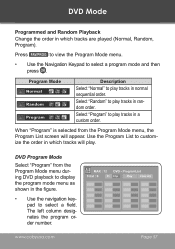
... left column designates the program order number. Program Mode Description Select "Normal" to play . When "Program" is selected from the Program Mode menu during DVD playback to display the program mode menu as shown in which tracks will appear. DVD Program Mode Select "Program" from the Program Mode menu, the Program List screen will play tracks in a custom order. www.cobyusa.com Page 57 DVD Mode Programmed and Random Playback Change the order in the figure. • Use the navigation keypad to...
... left column designates the program order number. Program Mode Description Select "Normal" to play . When "Program" is selected from the Program Mode menu during DVD playback to display the program mode menu as shown in which tracks will appear. DVD Program Mode Select "Program" from the Program Mode menu, the Program List screen will play tracks in a custom order. www.cobyusa.com Page 57 DVD Mode Programmed and Random Playback Change the order in the figure. • Use the navigation keypad to...
Instruction Manual
Page 63
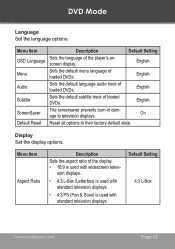
... to their factory-default state. Menu Item OSD Language Menu Audio Subtitle ScreenSaver Default Reset Description Default Setting Sets the language of loaded DVDs. Default Setting 4:3 L-Box www.cobyusa.com Page 63 On Reset all options to television displays. DVD Mode Language Set the language options. English Sets the default language audio track of loaded DVDs. Display Set the display options. sion displays. • 4:3 L-Box (Letterbox) is used with standard television displays...
... to their factory-default state. Menu Item OSD Language Menu Audio Subtitle ScreenSaver Default Reset Description Default Setting Sets the language of loaded DVDs. Default Setting 4:3 L-Box www.cobyusa.com Page 63 On Reset all options to television displays. DVD Mode Language Set the language options. English Sets the default language audio track of loaded DVDs. Display Set the display options. sion displays. • 4:3 L-Box (Letterbox) is used with standard television displays...

Instruction Manual
Page 64
Audio Set the audio options. DVD Mode For your receiver's manual for more information). • Off: use this setting when the coaxial digital audio connection is not in use . Menu Item Channel Output SPDIF Digital Description Sets the audio channel mix mode (LT/RT, Stereo). Digital audio output requires a connection to a digital decoding receiver (see your reference: Letterbox mode fits widescreen content to the screen with black bars at the top and bottom of the picture will be cut...
Audio Set the audio options. DVD Mode For your receiver's manual for more information). • Off: use this setting when the coaxial digital audio connection is not in use . Menu Item Channel Output SPDIF Digital Description Sets the audio channel mix mode (LT/RT, Stereo). Digital audio output requires a connection to a digital decoding receiver (see your reference: Letterbox mode fits widescreen content to the screen with black bars at the top and bottom of the picture will be cut...
Instruction Manual
Page 66
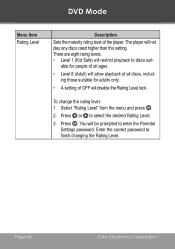
DVD Mode Menu Item Rating Level Description Sets the maturity rating level of OFF will disable the Rating Level lock. There are eight rating levels. • Level 1 (Kid Safe) will be prompted to discs suit- You will restrict playback to enter the Parental Settings password. The player will allow playback of all discs, including those suitable for adults only...
DVD Mode Menu Item Rating Level Description Sets the maturity rating level of OFF will disable the Rating Level lock. There are eight rating levels. • Level 1 (Kid Safe) will be prompted to discs suit- You will restrict playback to enter the Parental Settings password. The player will allow playback of all discs, including those suitable for adults only...
Instruction Manual
Page 67
... screen displays "AV" to AV mode. Press to turn the unit on the unit that are equipped with composite audio/ video output jacks Basic Operation 1. External A/V devices may include VCRs, DVD players, cable/satellite receivers, camcorders, or game consoles that are equipped with composite audio/video output jacks.. www.cobyusa.com Page 67 Ensure that has been connected to the composite A/V input jacks. Set...
... screen displays "AV" to AV mode. Press to turn the unit on the unit that are equipped with composite audio/ video output jacks Basic Operation 1. External A/V devices may include VCRs, DVD players, cable/satellite receivers, camcorders, or game consoles that are equipped with composite audio/video output jacks.. www.cobyusa.com Page 67 Ensure that has been connected to the composite A/V input jacks. Set...
Instruction Manual
Page 68
... to switch the unit to enter Component mode. Set the unit to Component mode to view an external A/V device that are equipped with component audio/video output jacks. Page 68 Coby Electronics Corporation Component Mode Use this connection to display optional A/V devices on the unit that has been connected to the component A/V input jacks. Press to turn the unit on the external A/V device. 4. Turn on and start play on or...
... to switch the unit to enter Component mode. Set the unit to Component mode to view an external A/V device that are equipped with component audio/video output jacks. Page 68 Coby Electronics Corporation Component Mode Use this connection to display optional A/V devices on the unit that has been connected to the component A/V input jacks. Press to turn the unit on the external A/V device. 4. Turn on and start play on or...

