Instruction Manual
Page 2
..." within an equilateral triangle is located on the unit rear panel and the other than that is intended to alert the user to the AC100-240V wall outlet. Retain this information for servicing instructions. Caution: These servicing instructions are qualified to do not perform any servicing other end to the presence of time, disconnect the power and remove the batteries from the outlet...
..." within an equilateral triangle is located on the unit rear panel and the other than that is intended to alert the user to the AC100-240V wall outlet. Retain this information for servicing instructions. Caution: These servicing instructions are qualified to do not perform any servicing other end to the presence of time, disconnect the power and remove the batteries from the outlet...
Instruction Manual
Page 3
... in a particular installation. However, there is subject to Part 15 of the equipment. Operation is no guarantee that to which the receiver is connected. •• Consult the dealer or an experienced radio/TV technician for home and other rights owners. Reverse engineering or disassembly is intended for help Use of shielded cable is protected by method claims of the television.
... in a particular installation. However, there is subject to Part 15 of the equipment. Operation is no guarantee that to which the receiver is connected. •• Consult the dealer or an experienced radio/TV technician for home and other rights owners. Reverse engineering or disassembly is intended for help Use of shielded cable is protected by method claims of the television.
Instruction Manual
Page 4
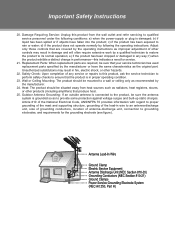
... it from the wall outlet and disconnect the antenna or cable system during a lightning storm or when it from touching such power lines or circuits, as opening or removing covers may be walked on an unstable cart, stand, tripod, bracket, or table. If you to dangerous voltage or other sources, refer to . 444 Follow Instructions: All operating and usage instructions should never...
... it from the wall outlet and disconnect the antenna or cable system during a lightning storm or when it from touching such power lines or circuits, as opening or removing covers may be walked on an unstable cart, stand, tripod, bracket, or table. If you to dangerous voltage or other sources, refer to . 444 Follow Instructions: All operating and usage instructions should never...
Instruction Manual
Page 5
... supporting structure, grounding of the lead-in fire, electric shock, or other controls may result in wire to an antenna-discharge unit, size of grounding conductors, location of any way; Important Safety Instructions 2222 Damage Requiring Service: Unplug this product from heat sources such as to grounding electrodes, and requirements for service. 2222 Replacement Parts: When replacement parts are covered by the operating instructions...
... supporting structure, grounding of the lead-in fire, electric shock, or other controls may result in wire to an antenna-discharge unit, size of grounding conductors, location of any way; Important Safety Instructions 2222 Damage Requiring Service: Unplug this product from heat sources such as to grounding electrodes, and requirements for service. 2222 Replacement Parts: When replacement parts are covered by the operating instructions...
Instruction Manual
Page 7
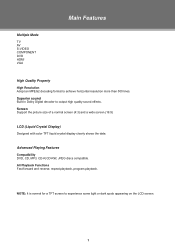
Multiple Mode TV AV S-VIDEO COMPONENT DVD HDMI VGA Main Features High Quality Property High Resolution Adopt an MPEG2 decoding format to experience some light or dark spots appearing on the LCD screen. 1 Advanced Playing Features Compatibility DVD, CD, MP3, CD-R,CD-RW, JPEG discs compatible. Screen Support the picture size of a normal screen (4:3) and a wide screen (16:9) LCD (Liquid Crystal Display) Designed with color TFT liquid crystal display clearly shows the data. NOTE: It is...
Multiple Mode TV AV S-VIDEO COMPONENT DVD HDMI VGA Main Features High Quality Property High Resolution Adopt an MPEG2 decoding format to experience some light or dark spots appearing on the LCD screen. 1 Advanced Playing Features Compatibility DVD, CD, MP3, CD-R,CD-RW, JPEG discs compatible. Screen Support the picture size of a normal screen (4:3) and a wide screen (16:9) LCD (Liquid Crystal Display) Designed with color TFT liquid crystal display clearly shows the data. NOTE: It is...
Instruction Manual
Page 9
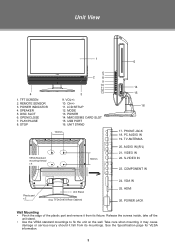
.... USB PORT 16. PC AUDIO IN 19. Unit View 1 4 1. PLAY/PAUSE 8. POWER 14. POWER INDICATOR 4. UNIT STAND 100mm < > > VESA Standard mounting thread x 4 < 100mm > Plastic part x 2 Unit Stand (e.g. COMPONENT IN 24. CH+/11. MMC/SD/MS CARD SLOT 15. REMOTE SENSOR 3. VGA IN 25. HDMI 26. Take care when mounting, it may cause damage or serious injury should it from its fixture. OPEN/CLOSE 7. AUDIO IN((R/L) 21. LCD SETUP 12. TV ANTENNA 20. Release the screws...
.... USB PORT 16. PC AUDIO IN 19. Unit View 1 4 1. PLAY/PAUSE 8. POWER 14. POWER INDICATOR 4. UNIT STAND 100mm < > > VESA Standard mounting thread x 4 < 100mm > Plastic part x 2 Unit Stand (e.g. COMPONENT IN 24. CH+/11. MMC/SD/MS CARD SLOT 15. REMOTE SENSOR 3. VGA IN 25. HDMI 26. Take care when mounting, it may cause damage or serious injury should it from its fixture. OPEN/CLOSE 7. AUDIO IN((R/L) 21. LCD SETUP 12. TV ANTENNA 20. Release the screws...
Instruction Manual
Page 10
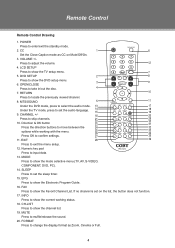
... adjust the volume. 12 4. SLEEP Press to show the mode selective menu (TV, AV, S-VIDEO, COMPONENT, DVD, PC). 14. Press OK to locate the previously viewed channel. 8. FORMAT Press to show the Electronic Program Guide. 16. RETURN 10 Press to confirm settings. 25 33 26 PROGRAM GOTO ZOOM REPEAT 34 27 35 11. MODE Press to change the display format as CC on the list, the button does not function. 17. MTS/SOUND 5 11 DVD SETUP...
... adjust the volume. 12 4. SLEEP Press to show the mode selective menu (TV, AV, S-VIDEO, COMPONENT, DVD, PC). 14. Press OK to locate the previously viewed channel. 8. FORMAT Press to show the Electronic Program Guide. 16. RETURN 10 Press to confirm settings. 25 33 26 PROGRAM GOTO ZOOM REPEAT 34 27 35 11. MODE Press to change the display format as CC on the list, the button does not function. 17. MTS/SOUND 5 11 DVD SETUP...
Instruction Manual
Page 13
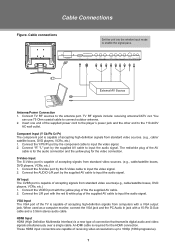
... boxes, DVD players, VCRs, etc.) 111 Connect the Y/Pb/Pr port by the component cable to input the video signal. 222 Connect "R" "L" port by the supplied AV cable to input the audio signal. HDMI Input HDMI (High Definition Multimedia Interface) is required for the video connection. A HDMI cable is a new type of receiving video at resolutions up to input the audio signal. These HDMI input connectors are capable of connection that transmits digital audio and video signals simultaneously over a single cable. External AV Source Antenna/Power Connection 111 Connect TV RF sources...
... boxes, DVD players, VCRs, etc.) 111 Connect the Y/Pb/Pr port by the component cable to input the video signal. 222 Connect "R" "L" port by the supplied AV cable to input the audio signal. HDMI Input HDMI (High Definition Multimedia Interface) is required for the video connection. A HDMI cable is a new type of receiving video at resolutions up to input the audio signal. These HDMI input connectors are capable of connection that transmits digital audio and video signals simultaneously over a single cable. External AV Source Antenna/Power Connection 111 Connect TV RF sources...
Instruction Manual
Page 14
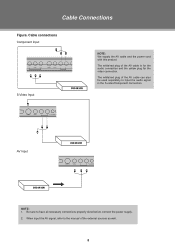
Cable Connections Figure. Cable connections Component Input S-Video Input NOTE: We supply the AV cable and the power cord with this product. AV Input NOTE: 111 Be sure to have all necessary connections properly done before connect the power supply. 222 When input the AV signal, refer to input the audio signal in the S-video/Component connection. The white/red plug of the external sources as well. 8 The white/red plug of the AV cable can also be used separately to the manual of the AV cable is for the audio connection and the yellow plug for the video connection.
Cable Connections Figure. Cable connections Component Input S-Video Input NOTE: We supply the AV cable and the power cord with this product. AV Input NOTE: 111 Be sure to have all necessary connections properly done before connect the power supply. 222 When input the AV signal, refer to input the audio signal in the S-video/Component connection. The white/red plug of the external sources as well. 8 The white/red plug of the AV cable can also be used separately to the manual of the AV cable is for the audio connection and the yellow plug for the video connection.

Instruction Manual
Page 15
... the number buttons to input channels directly. See the "Channel Menu" section for details). 222 Press the POWER button to turn on the player. 333 Press the MODE button to select the TV signal mode. 444 Press the CH+/- While working with the menu, 111 Press the up menu. Adjust the display contrast Adjust the display brightness Adjust the display color Adjust the display tint Adjust the image sharpness Set the color mode (Normal, Warm, Cool). 9 Or you need to scan channels under the Channel Menu. TV...
... the number buttons to input channels directly. See the "Channel Menu" section for details). 222 Press the POWER button to turn on the player. 333 Press the MODE button to select the TV signal mode. 444 Press the CH+/- While working with the menu, 111 Press the up menu. Adjust the display contrast Adjust the display brightness Adjust the display color Adjust the display tint Adjust the image sharpness Set the color mode (Normal, Warm, Cool). 9 Or you need to scan channels under the Channel Menu. TV...
Instruction Manual
Page 16
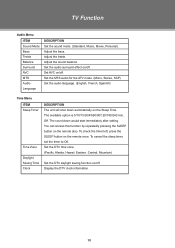
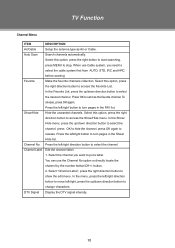
... the remote also. Adjust the bass. The available option is 5/10/15/30/45/60/90/120/180/240 min, Off. You can access this function by repeatedly pressing the SLEEP button on /off . To cancel the sleep timer, set the timer to Off. TV Function Audio Menu ITEM Sound Mode Bass Treble Balance Surround AVC MTS Audio Language DESCRIPTION Set the sound mode. (Standard, Music, Movie, Personal). Display...
... the remote also. Adjust the bass. The available option is 5/10/15/30/45/60/90/120/180/240 min, Off. You can access this function by repeatedly pressing the SLEEP button on /off . To cancel the sleep timer, set the timer to Off. TV Function Audio Menu ITEM Sound Mode Bass Treble Balance Surround AVC MTS Audio Language DESCRIPTION Set the sound mode. (Standard, Music, Movie, Personal). Display...
Instruction Manual
Page 17
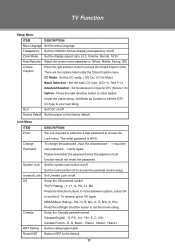
... options, press OK to access the parental control setup. To change the password, input the old password - - > input the new password- - >verify again. Y, Y7, G, PG, 14, MA. Set the rating region table. Set the lock function On to set block. Zoom Mode Set the display aspect ratio. (4:3, Cinema, Normal, 16:9) Noise Reduction Adjust the screen noise appearance. (Weak, Middle, Strong, Off) Closed Caption Press the right direction button to the factory default. Canada French - MPAA...
... options, press OK to access the parental control setup. To change the password, input the old password - - > input the new password- - >verify again. Y, Y7, G, PG, 14, MA. Set the rating region table. Set the lock function On to set block. Zoom Mode Set the display aspect ratio. (4:3, Cinema, Normal, 16:9) Noise Reduction Adjust the screen noise appearance. (Weak, Middle, Strong, Off) Closed Caption Press the right direction button to the factory default. Canada French - MPAA...
Instruction Manual
Page 18
Press OK to set it as Air or Cable. Select this option, press the right direction button to stop. Channel Label Edit the channel label. 1. button. 2. Auto Scan Search channels automatically. Press the left /right direction button to show the edit menu. When use the Channel No option or directly locate the channel by the number button/CH+/- Show/Hide Hide the unwanted channels. DTV Signal Display the DTV signal intensity. 12...
Press OK to set it as Air or Cable. Select this option, press the right direction button to stop. Channel Label Edit the channel label. 1. button. 2. Auto Scan Search channels automatically. Press the left /right direction button to show the edit menu. When use the Channel No option or directly locate the channel by the number button/CH+/- Show/Hide Hide the unwanted channels. DTV Signal Display the DTV signal intensity. 12...
Instruction Manual
Page 19
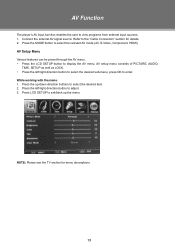
... view programs from external input sources. 111 Connect the external AV signal source. Warm NOTE: Please see the TV section for details 222 Press the MODE button to select the relevant AV mode (AV, S-Video, Component, HDMI) AV Setup Menu Various features can be preset through the AV menu. •• Press the LCD SETUP button to enter. Refer to the "Cable Connection" section for menu descriptions 13 AV Function The player's AV input function enables the user...
... view programs from external input sources. 111 Connect the external AV signal source. Warm NOTE: Please see the TV section for details 222 Press the MODE button to select the relevant AV mode (AV, S-Video, Component, HDMI) AV Setup Menu Various features can be preset through the AV menu. •• Press the LCD SETUP button to enter. Refer to the "Cable Connection" section for menu descriptions 13 AV Function The player's AV input function enables the user...
Instruction Manual
Page 20
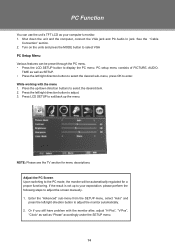
See the "Cable Connection" section. 222 Turn on the units and press the MODE button to select VGA PC Setup Menu Various features can use the unit's TFT LCD as your expectation, please perform the following steps to adjust the screen manually . 111 Enter the "Advanced" sub-menu from the SETUP menu, select "Auto" and press the left/right direction button to display the PC menu. PC setup menu consists of PICTURE, AUDIO, TIME as...
See the "Cable Connection" section. 222 Turn on the units and press the MODE button to select VGA PC Setup Menu Various features can use the unit's TFT LCD as your expectation, please perform the following steps to adjust the screen manually . 111 Enter the "Advanced" sub-menu from the SETUP menu, select "Auto" and press the left/right direction button to display the PC menu. PC setup menu consists of PICTURE, AUDIO, TIME as...
Instruction Manual
Page 22
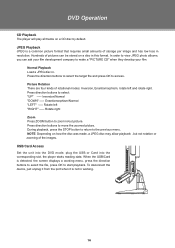
... a disc in /out picture. Rotate right Zoom Press ZOOM button to start playback. JPEG Playback JPEG is not in . When the USB/Card is detected, the screen displays a working . 16 Normal Playback Load a JPEG disc in working menu, press the direction buttons to select the file, press OK to zoom in this format. DVD Operation CD Playback The player will play all tracks on...
... a disc in /out picture. Rotate right Zoom Press ZOOM button to start playback. JPEG Playback JPEG is not in . When the USB/Card is detected, the screen displays a working . 16 Normal Playback Load a JPEG disc in working menu, press the direction buttons to select the file, press OK to zoom in this format. DVD Operation CD Playback The player will play all tracks on...
Instruction Manual
Page 23
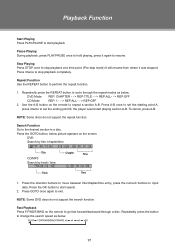
... Mode REP: 1 - - > REP:ALL - - > REP:OFF 222 Use the A-B button on the screen. Repeatedly press the button to change the search speed as below picture appears on the remote to stop playback at a time point. (Pre-stop playback completely. Playback Function Start Playing Press PLAY/PAUSE to start playback Pause Playing During playback, press PLAY/PAUSE once to hold playing, press it again to input...
... Mode REP: 1 - - > REP:ALL - - > REP:OFF 222 Use the A-B button on the screen. Repeatedly press the button to change the search speed as below picture appears on the remote to stop playback at a time point. (Pre-stop playback completely. Playback Function Start Playing Press PLAY/PAUSE to start playback Pause Playing During playback, press PLAY/PAUSE once to hold playing, press it again to input...
Instruction Manual
Page 25
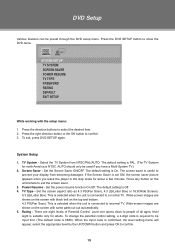
... button to people of Parental Control. Set the power resume function On.Off. Level one opens discs to confirm. 333 To exit, press DVD SETUP again. DVD Setup Various features can be input first. (The default code is 8888). SYSTEM SETUP TV SYSTEM SCREEN SAVER POWER RESUME TV TYPE PASSWORD RATING DEFAULT EXIT SETUP While working with some parts cut out automatically. 555 Rating - To change the parental control setting, a 4-digit code is required to be preset through the DVD setup menu...
... button to people of Parental Control. Set the power resume function On.Off. Level one opens discs to confirm. 333 To exit, press DVD SETUP again. DVD Setup Various features can be input first. (The default code is 8888). SYSTEM SETUP TV SYSTEM SCREEN SAVER POWER RESUME TV TYPE PASSWORD RATING DEFAULT EXIT SETUP While working with some parts cut out automatically. 555 Rating - To change the parental control setting, a 4-digit code is required to be preset through the DVD setup menu...
Instruction Manual
Page 26
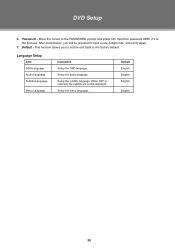
... not be required to input a new 4-digit code, and verify again. 777 Default - Move the cursor to the factory default. After confirmation, you to set the unit back to the PASSWORD prompt and press OK. Language Setup Item OSD Language Audio Language Subtitle Language Menu Language Instruction Setup the OSD language. Setup the audio language. When OFF is the first use. DVD Setup 666 Password - Default English English English English...
... not be required to input a new 4-digit code, and verify again. 777 Default - Move the cursor to the factory default. After confirmation, you to set the unit back to the PASSWORD prompt and press OK. Language Setup Item OSD Language Audio Language Subtitle Language Menu Language Instruction Setup the OSD language. Setup the audio language. When OFF is the first use. DVD Setup 666 Password - Default English English English English...
Instruction Manual
Page 27
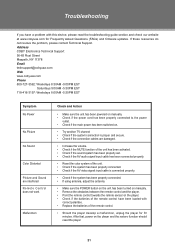
... AV video signal input cable is connected properly. •• Check if the system has been properly connected. •• If using antenna, adjust the antenna. •• Make sure the POWER button on the unit has been turned on manually. •• Remove the obstacles between the remote control and the player. •• Point the remote control towards the remote sensor on the player and the restore function should reset the player. 21 Troubleshooting...
... AV video signal input cable is connected properly. •• Check if the system has been properly connected. •• If using antenna, adjust the antenna. •• Make sure the POWER button on the unit has been turned on manually. •• Remove the obstacles between the remote control and the player. •• Point the remote control towards the remote sensor on the player and the restore function should reset the player. 21 Troubleshooting...


