
User Manual
Page 2
... lightning flash with arrowhead symbol within an equilateral triangle is intended to alert the user to the presence of uninsulated "dangerous voltage" within an equilateral triangle is intended to alert the user to the presence of important operation and servicing instructions in the ears or hearing loss, discontinue use of personal stereos played at high volume. WARNING: Handling the cords...
... lightning flash with arrowhead symbol within an equilateral triangle is intended to alert the user to the presence of uninsulated "dangerous voltage" within an equilateral triangle is intended to alert the user to the presence of important operation and servicing instructions in the ears or hearing loss, discontinue use of personal stereos played at high volume. WARNING: Handling the cords...
User Manual
Page 5
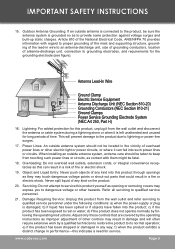
... result in a risk of other controls may result in performance-this product from touching such power lines or circuits, as opening or removing covers may touch dangerous voltage points or shout-out parts that are covered by following conditions: a) when the power-supply or plug is damaged; d) if the product does not operate normally by the operating instructions as improper adjustment of fire...
... result in a risk of other controls may result in performance-this product from touching such power lines or circuits, as opening or removing covers may touch dangerous voltage points or shout-out parts that are covered by following conditions: a) when the power-supply or plug is damaged; d) if the product does not operate normally by the operating instructions as improper adjustment of fire...

User Manual
Page 7
... 512MB Flash Memory • 1.8" TFT LCD Full-color display • Plays Music, Video, Photos and Text • Plays Digital Music from most online stores and subscription services** • Music library groups music files by album name, artist name, song title, genre, year and playlist • Integrated FM Radio and Recorder • Voice recording through an integrated microphone • View photos and slideshows while enjoying your music collection • USB 2.0 high-speed transfers * Music Service must support Windows Media DRM(WMDRM...
... 512MB Flash Memory • 1.8" TFT LCD Full-color display • Plays Music, Video, Photos and Text • Plays Digital Music from most online stores and subscription services** • Music library groups music files by album name, artist name, song title, genre, year and playlist • Integrated FM Radio and Recorder • Voice recording through an integrated microphone • View photos and slideshows while enjoying your music collection • USB 2.0 high-speed transfers * Music Service must support Windows Media DRM(WMDRM...
User Manual
Page 8
... INSTRUCTIONS 4 FEATURES...5 TABLE OF CONTENTS...6 PACKAGE CONTENTS...8 POWERING YOUR PLAYER...9 Charging the Battery...9 \Turning Your Player On/Off...9 Locking/Unlocking Your Player's Keys (Hold 9 Resetting Your Player...10 LOCATION OF CONTROLS...11 Top View...11 Front View...11 Side View...11 DISPLAY OVERVIEW...12 BASIC OPERATIONS...13 Using the Touchpad Controls 13 Using the Controls to Navigate 13 Main Menu Overview...13 Smart Menu Options...14 Browsing/Playback...14 Volume...15 EQ (Equalizer)...15 Repeat...
... INSTRUCTIONS 4 FEATURES...5 TABLE OF CONTENTS...6 PACKAGE CONTENTS...8 POWERING YOUR PLAYER...9 Charging the Battery...9 \Turning Your Player On/Off...9 Locking/Unlocking Your Player's Keys (Hold 9 Resetting Your Player...10 LOCATION OF CONTROLS...11 Top View...11 Front View...11 Side View...11 DISPLAY OVERVIEW...12 BASIC OPERATIONS...13 Using the Touchpad Controls 13 Using the Controls to Navigate 13 Main Menu Overview...13 Smart Menu Options...14 Browsing/Playback...14 Volume...15 EQ (Equalizer)...15 Repeat...

User Manual
Page 9
...Required for Windows 98 SE Only 24 Connecting to a Computer...25 USB-MTP Mode...25 USB-MSC Mode...26 Transferring Files...26 USB-MTP Mode...27 USB-MSC Mode...27 Disconnecting from a Computer 28 USB-MTP Mode...28 USB-MSC Mode...28 Build Music Library (USB-MSC Mode Only 28 VIDEO CONVERSION...29 Installation...29 Converting Video...29 WINDOWS MEDIA PLAYER...31 Windows Media Player 9 (WMP9 31 Music File Transfers...31 Windows Media Player 10 (WMP10 32 Music File Transfers...32 Creating Playlists...33 Automatic Windows Media Playlist Synchronization 35 TROUBLESHOOTING...38 SPECIFICATIONS...40...
...Required for Windows 98 SE Only 24 Connecting to a Computer...25 USB-MTP Mode...25 USB-MSC Mode...26 Transferring Files...26 USB-MTP Mode...27 USB-MSC Mode...27 Disconnecting from a Computer 28 USB-MTP Mode...28 USB-MSC Mode...28 Build Music Library (USB-MSC Mode Only 28 VIDEO CONVERSION...29 Installation...29 Converting Video...29 WINDOWS MEDIA PLAYER...31 Windows Media Player 9 (WMP9 31 Music File Transfers...31 Windows Media Player 10 (WMP10 32 Music File Transfers...32 Creating Playlists...33 Automatic Windows Media Playlist Synchronization 35 TROUBLESHOOTING...38 SPECIFICATIONS...40...
User Manual
Page 11
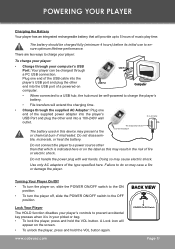
... this device may result in your player: • Charge through a PC USB connection. Do not disassemble, incinerate, or heat the battery. Use only AC adapters of music play time. The battery should be charged through your player's controls to charge the player's battery. • File transfers will extend the charging time. • Charge through the supplied AC Adapter: Plug one end of fire or electric shock. Plug one end of the supplied power adapter into the player's USB...
... this device may result in your player: • Charge through a PC USB connection. Do not disassemble, incinerate, or heat the battery. Use only AC adapters of music play time. The battery should be charged through your player's controls to charge the player's battery. • File transfers will extend the charging time. • Charge through the supplied AC Adapter: Plug one end of fire or electric shock. Plug one end of the supplied power adapter into the player's USB...

User Manual
Page 15
... confirm. • Press the MENU button to return to change the way music sounds on your MP3, WMA or WAV audio files. Equalizer The digital Equalizer presets allow you to the Music Playing mode without saving. The Playing Setting options are : Normal, Repeat One, Folder, Repeat Folder, Repeat All, Random and Introl. Press again to chagne the order in random order. Repeat Adjust the Repeat Mode settings to pause the playback. • Press track.
... confirm. • Press the MENU button to return to change the way music sounds on your MP3, WMA or WAV audio files. Equalizer The digital Equalizer presets allow you to the Music Playing mode without saving. The Playing Setting options are : Normal, Repeat One, Folder, Repeat Folder, Repeat All, Random and Introl. Press again to chagne the order in random order. Repeat Adjust the Repeat Mode settings to pause the playback. • Press track.

User Manual
Page 17
.... Menu Setting While in which tracks are played. The menus are : Normal, Repeat One, Folder, Repeat Folder, Repeat All, Random and Introl. • Press or to select a Repeat option and press to confirm. • Press the MENU button to return to the Video Playback pause mode without saving. Delete Enter Delete menu to delete video files from your player. Video Controls • To play video files (AMV) loaded on your player. • Confirm Delete all video tracks loaded on your player. •...
.... Menu Setting While in which tracks are played. The menus are : Normal, Repeat One, Folder, Repeat Folder, Repeat All, Random and Introl. • Press or to select a Repeat option and press to confirm. • Press the MENU button to return to the Video Playback pause mode without saving. Delete Enter Delete menu to delete video files from your player. Video Controls • To play video files (AMV) loaded on your player. • Confirm Delete all video tracks loaded on your player. •...

User Manual
Page 22
... headphone cord as a preset. 1. Page 22 Coby Electronics Corporation press • Preset: Listen to lower frequencies. Tune to the station you can tune into stations manually(Normal) or by using preset stations(Preset). • Press to 20 station presets: 01-20). Select and confirm "Save" from the Menu Setting menu, and press to save up to enter Preset tuning modes. Menu Setting Press the MENU button to delete. The options are Save, Record, Delete, Delete All...
... headphone cord as a preset. 1. Page 22 Coby Electronics Corporation press • Preset: Listen to lower frequencies. Tune to the station you can tune into stations manually(Normal) or by using preset stations(Preset). • Press to 20 station presets: 01-20). Select and confirm "Save" from the Menu Setting menu, and press to save up to enter Preset tuning modes. Menu Setting Press the MENU button to delete. The options are Save, Record, Delete, Delete All...

User Manual
Page 27
... type, LCD set your player's Recording Quality. SETTINGS MODE Enter the SETTINGS mode to set , Language, Power off, Replay mode, Online Device, Online Mode, Memory info, Firmware version, Firmware upgrade, Disk Format and Exit. Press the VOL button to select which date or time field to adjust. • For the date, the fields are Year, Month, and Date (from left to right). • For the time, the fields are : Voice record, WAV record and MP3 record. Press or...
... type, LCD set your player's Recording Quality. SETTINGS MODE Enter the SETTINGS mode to set , Language, Power off, Replay mode, Online Device, Online Mode, Memory info, Firmware version, Firmware upgrade, Disk Format and Exit. Press the VOL button to select which date or time field to adjust. • For the date, the fields are Year, Month, and Date (from left to right). • For the time, the fields are : Voice record, WAV record and MP3 record. Press or...

User Manual
Page 28
... the MENU button to the SETTINGS menu without saving. Online mode Set the Online mode with Multi Device, Normal Only or Encrypted Only. Replay mode Set the replay mode within Media Device and USB Disk when you connect the player to the Power off setting menu without saving. • Sleep time Set the duration of time that your player will shut off after the preset time is idle. Online Device Set the Online Device within Manual replay and Auto replay. SETTING MODE Power off 28 Set the Off time...
... the MENU button to the SETTINGS menu without saving. Online mode Set the Online mode with Multi Device, Normal Only or Encrypted Only. Replay mode Set the replay mode within Media Device and USB Disk when you connect the player to the Power off setting menu without saving. • Sleep time Set the duration of time that your player will shut off after the preset time is idle. Online Device Set the Online Device within Manual replay and Auto replay. SETTING MODE Power off 28 Set the Off time...
User Manual
Page 30
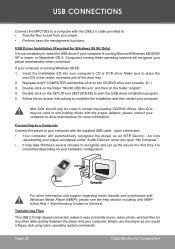
... MY COMPUTER and double-click on -screen instructions to recognize and set up the device the first time it easy to your computer with Windows Media Player (WMP), please see the help section including wiht WMP (Click Help > Synchronizing Content to and from your computer's CD or DVD drive. Make sure to start the USB driver installation program. 5. Double-click on the SETUP icon (SETUP.EXE) to place the mini...
... MY COMPUTER and double-click on -screen instructions to recognize and set up the device the first time it easy to your computer with Windows Media Player (WMP), please see the help section including wiht WMP (Click Help > Synchronizing Content to and from your computer's CD or DVD drive. Make sure to start the USB driver installation program. 5. Double-click on the SETUP icon (SETUP.EXE) to place the mini...
User Manual
Page 31
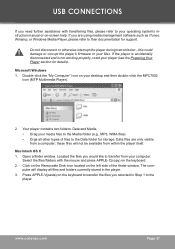
... -screen help. this could damage or corrupt the player's firmware or your player (see the Powering Your Player section for support. these files will display all other types of the finder window. Data files are using media management software such as iTunes, Winamp, or Windows Media Player, please refer to transfer the files you selected in the player. 3. If you are only visible from a computer; Your player contains two folders: Data and Media. • Drag your media files to the Media folder...
... -screen help. this could damage or corrupt the player's firmware or your player (see the Powering Your Player section for support. these files will display all other types of the finder window. Data files are using media management software such as iTunes, Winamp, or Windows Media Player, please refer to transfer the files you selected in the player. 3. If you are only visible from a computer; Your player contains two folders: Data and Media. • Drag your media files to the Media folder...
User Manual
Page 32
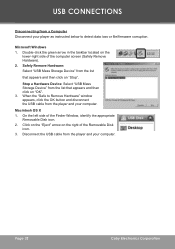
... arrow in the taskbar located on "OK". 3. When the "Safe to Remove Hardware" window appears, click the OK button and disconnect the USB cable from a Computer 32 Disconnect your player as instructed below to detect data loss or file/firmware corruption. Microsoft Windows 1. Safely Remove Hardware: Select "USB Mass Storage Device" from the list that appears and then click on the lower-right side of...
... arrow in the taskbar located on "OK". 3. When the "Safe to Remove Hardware" window appears, click the OK button and disconnect the USB cable from a Computer 32 Disconnect your player as instructed below to detect data loss or file/firmware corruption. Microsoft Windows 1. Safely Remove Hardware: Select "USB Mass Storage Device" from the list that appears and then click on the lower-right side of...

User Manual
Page 33
... Page 33 Your player supports AMV files with the following specifications: • 160 x 128 resolution at 15 frames per second (fps) Installation Please refer to your player for playback. Set the start and end point. Click When the conversion is complete, copy the converted files to the Installation CD for playback on the MP-C7052. Find and select the video files to set the start and end point...
... Page 33 Your player supports AMV files with the following specifications: • 160 x 128 resolution at 15 frames per second (fps) Installation Please refer to your player for playback. Set the start and end point. Click When the conversion is complete, copy the converted files to the Installation CD for playback on the MP-C7052. Find and select the video files to set the start and end point...
User Manual
Page 36
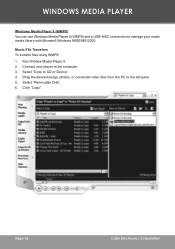
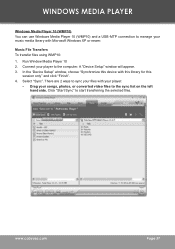
Drag the desired songs, photos, or converted video files from the PC to CD or Device". 4. Page 36 Coby Electronics Corporation WINDOWS MEDIA PLAYER Windows Media Player 9 (WMP9) 36 You can use Windows Media Player 9 (WMP9) and a USB-MSC connection to manage your player to the computer 3. Music File Transfers To transfer files using WMP9: 1. Select "Copy to the left pane. 5. Select "Removable Disk". 6. Connect your music media library with Microsoft Windows 98SE/ME/2000. Click "Copy". Run Window Media Player 9 2.
Drag the desired songs, photos, or converted video files from the PC to CD or Device". 4. Page 36 Coby Electronics Corporation WINDOWS MEDIA PLAYER Windows Media Player 9 (WMP9) 36 You can use Windows Media Player 9 (WMP9) and a USB-MSC connection to manage your player to the computer 3. Music File Transfers To transfer files using WMP9: 1. Select "Copy to the left pane. 5. Select "Removable Disk". 6. Connect your music media library with Microsoft Windows 98SE/ME/2000. Click "Copy". Run Window Media Player 9 2.
User Manual
Page 37
... Run Window Media Player 10 2. A "Device Setup" window will appear. 3. Select "Sync". WINDOWS MEDIA PLAYER Windows Media Player 10 (WMP10) You can use Windows Media Player 10 (WMP10) and a USB-MTP connection to manage your music media library with your player: • Drag your songs, photos, or converted video files to the sync list on the left hand side. Click "Start Sync" to the computer. Connect your files with Microsoft Windows XP or newer. There are 2 ways to sync your player to start transferring the selected files. In the 'Device Setup" window, choose...
... Run Window Media Player 10 2. A "Device Setup" window will appear. 3. Select "Sync". WINDOWS MEDIA PLAYER Windows Media Player 10 (WMP10) You can use Windows Media Player 10 (WMP10) and a USB-MTP connection to manage your music media library with your player: • Drag your songs, photos, or converted video files to the sync list on the left hand side. Click "Start Sync" to the computer. Connect your files with Microsoft Windows XP or newer. There are 2 ways to sync your player to start transferring the selected files. In the 'Device Setup" window, choose...
User Manual
Page 40
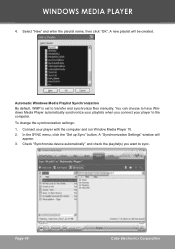
... your player to transfer and synchronize files manually. WINDOWS MEDIA PLAYER 4. Automatic Windows Media Playlist Synchronization By default, WMP is set to the computer. To change the synchronization settings: 1. In the SYNC menu, click the "Set up Sync" button. Page 40 Coby Electronics Corporation A "Synchronization Settings" window will be created. A new playlist will appear. 3. You can choose to have Windows Media Player automatically synchronize your playlists when you want to sync. Check "Synchronize device automatically" and check the playlist(s) you connect your...
... your player to transfer and synchronize files manually. WINDOWS MEDIA PLAYER 4. Automatic Windows Media Playlist Synchronization By default, WMP is set to the computer. To change the synchronization settings: 1. In the SYNC menu, click the "Set up Sync" button. Page 40 Coby Electronics Corporation A "Synchronization Settings" window will be created. A new playlist will appear. 3. You can choose to have Windows Media Player automatically synchronize your playlists when you want to sync. Check "Synchronize device automatically" and check the playlist(s) you connect your...
User Manual
Page 42
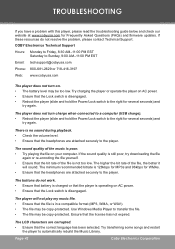
... the Lock switch is in a compatible format (MP3, WMA, or WAV). • The file may be copy-protected. TROUBLESHOOTING If you have a problem with this player, please rea4d2the troubleshooting guide below and check our website at www.cobyusa.com for WMAs. • Ensure that the license has not expired. If the sound quality is not too low. Use Windows Media Player to the player. Try transferring some songs and...
... the Lock switch is in a compatible format (MP3, WMA, or WAV). • The file may be copy-protected. TROUBLESHOOTING If you have a problem with this player, please rea4d2the troubleshooting guide below and check our website at www.cobyusa.com for WMAs. • Ensure that the license has not expired. If the sound quality is not too low. Use Windows Media Player to the player. Try transferring some songs and...

User Manual
Page 43
...; Reboot the player (slide and hold the Power/Lock switch to the Firmware Update section of this man- Files transferred in one mode will play my video file. • Ensure that the video file will not be seen when connected in another USB cable. • If you have connected the player through a USB hub, try connecting the player directly to my player but they are missing from the Music Library • Ensure that the file in a supported format (MP3...
...; Reboot the player (slide and hold the Power/Lock switch to the Firmware Update section of this man- Files transferred in one mode will play my video file. • Ensure that the video file will not be seen when connected in another USB cable. • If you have connected the player through a USB hub, try connecting the player directly to my player but they are missing from the Music Library • Ensure that the file in a supported format (MP3...

