Instruction Manual
Page 2
... manual for a long time, disconnect the plug from the remote. TF-TV1524/1923/2224 Serial No. To reduce the risk of time, disconnect the power and remove the batteries from the outlet. Power Supply: Connect one end of the supplied power cord to the power jack on the rear of the unit. Power Management: •• Before plugging the power cord into the AC outlet, make...
... manual for a long time, disconnect the plug from the remote. TF-TV1524/1923/2224 Serial No. To reduce the risk of time, disconnect the power and remove the batteries from the outlet. Power Supply: Connect one end of the supplied power cord to the power jack on the rear of the unit. Power Management: •• Before plugging the power cord into the AC outlet, make...
Instruction Manual
Page 3
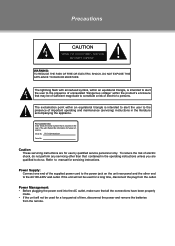
... radiate radio frequency energy and, if not installed and used in the manual. Do not make any interference received, including interference that to which the receiver is no guarantee that interference will not occur in Subpart B of Part 15 of the FCC rules. Precautions FCC Statement: This device complies with the limits for Class B digital devices, pursuant to Part 15...
... radiate radio frequency energy and, if not installed and used in the manual. Do not make any interference received, including interference that to which the receiver is no guarantee that interference will not occur in Subpart B of Part 15 of the FCC rules. Precautions FCC Statement: This device complies with the limits for Class B digital devices, pursuant to Part 15...
Instruction Manual
Page 4
... outlet, try reversing the direction of the product and to ensure reliable operation of the plug. Use a damp cloth for long periods of other hazards. Use of time. Use only with them , paying particular attention to replace the obsolete outlet. This will only fit into such power lines or circuits. Refer all servicing to operate from battery power or other electric light...
... outlet, try reversing the direction of the product and to ensure reliable operation of the plug. Use a damp cloth for long periods of other hazards. Use of time. Use only with them , paying particular attention to replace the obsolete outlet. This will only fit into such power lines or circuits. Refer all servicing to operate from battery power or other electric light...
Instruction Manual
Page 5
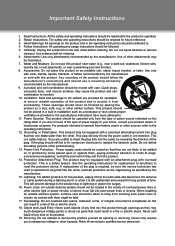
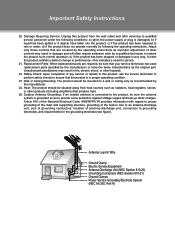
... National Electrical Code, ANS/NFPA 70 provides information with regard to proper grounding of the mast and supporting structure, grounding of the lead-in any service or repairs to this indicates a need for the grounding electrode (see figure). c) if the product has been exposed to grounding electrodes, and requirements for service. 2222 Replacement Parts: When replacement parts are covered by...
... National Electrical Code, ANS/NFPA 70 provides information with regard to proper grounding of the mast and supporting structure, grounding of the lead-in any service or repairs to this indicates a need for the grounding electrode (see figure). c) if the product has been exposed to grounding electrodes, and requirements for service. 2222 Replacement Parts: When replacement parts are covered by...
Instruction Manual
Page 7
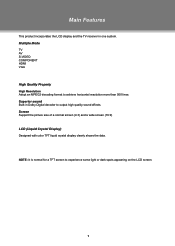
Multiple Mode TV AV S-VIDEO COMPONENT HDMI VGA High Quality Property High Resolution Adopt an MPEG2 decoding format to experience some light or dark spots appearing on the LCD screen. 1 Screen Support the picture size of a normal screen (4:3) and a wide screen (16:9) LCD (Liquid Crystal Display) Designed with color TFT liquid crystal display clearly shows the data. Superior sound Built-in one system. NOTE...
Multiple Mode TV AV S-VIDEO COMPONENT HDMI VGA High Quality Property High Resolution Adopt an MPEG2 decoding format to experience some light or dark spots appearing on the LCD screen. 1 Screen Support the picture size of a normal screen (4:3) and a wide screen (16:9) LCD (Liquid Crystal Display) Designed with color TFT liquid crystal display clearly shows the data. Superior sound Built-in one system. NOTE...
Instruction Manual
Page 8
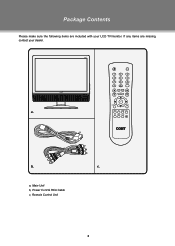
a, Main Unit b, Power Cord & RCA Cable c, Remote Control Unit 2 If any items are included with your dealer. c. b. a. Package Contents Please make sure the following items are missing, contact your LCD TV/monitor.
a, Main Unit b, Power Cord & RCA Cable c, Remote Control Unit 2 If any items are included with your dealer. c. b. a. Package Contents Please make sure the following items are missing, contact your LCD TV/monitor.

Instruction Manual
Page 9
... mountings to fix the unit on the wall. REMOTE SENSOR 3. TV ANTENNA 13. VOLUME-/+ 5. PC AUDIO IN 12. VIDEO IN 15. PHONE JACK 100mm 11. VGA IN 18. Take care when mounting, it may cause damage or serious injury should it from its fixture. SPEAKER 10. MENU 7. POWER INDICATOR 4. Unit View 4 15 6 7 28 9 3 1. CH-/+ 6. MODE 8. See the Specification page for...
... mountings to fix the unit on the wall. REMOTE SENSOR 3. TV ANTENNA 13. VOLUME-/+ 5. PC AUDIO IN 12. VIDEO IN 15. PHONE JACK 100mm 11. VGA IN 18. Take care when mounting, it may cause damage or serious injury should it from its fixture. SPEAKER 10. MENU 7. POWER INDICATOR 4. Unit View 4 15 6 7 28 9 3 1. CH-/+ 6. MODE 8. See the Specification page for...
Instruction Manual
Page 10
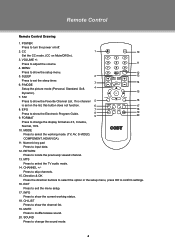
... menu setup. 17. EXIT Press to show the current working mode. (TV, AV, S-VIDEO, COMPONENT, HDMI,VGA). 11. P.MODE Setup the picture mode (Personal, Standard, Soft, 4 Dynamic). 15 7. Direction & OK Press the direction buttons to select the option in the setup menu, press OK to change the display format as 4:3, Cinema, Normal, 16:9. 10. SOUND Press to confirm settings. 16. RETURN Press to turn the power on/off. 2. Remote Control Remote Control Drawing 1. POWER...
... menu setup. 17. EXIT Press to show the current working mode. (TV, AV, S-VIDEO, COMPONENT, HDMI,VGA). 11. P.MODE Setup the picture mode (Personal, Standard, Soft, 4 Dynamic). 15 7. Direction & OK Press the direction buttons to select the option in the setup menu, press OK to change the display format as 4:3, Cinema, Normal, 16:9. 10. SOUND Press to confirm settings. 16. RETURN Press to turn the power on/off. 2. Remote Control Remote Control Drawing 1. POWER...
Instruction Manual
Page 11
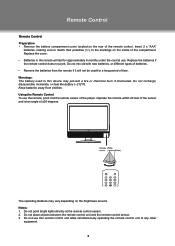
.... Do not recharge, disassemble, incinerate, or heat the battery (~212ºF). Do not mix old with new batteries, or different types of batteries. •• Remove the batteries from children. Using the Remote Control To use this device may vary depending on the rear of the compartment. Replace the batteries if the remote control does not work. Operate the remote within 20 feet of the sensor...
.... Do not recharge, disassemble, incinerate, or heat the battery (~212ºF). Do not mix old with new batteries, or different types of batteries. •• Remove the batteries from children. Using the Remote Control To use this device may vary depending on the rear of the compartment. Replace the batteries if the remote control does not work. Operate the remote within 20 feet of the sensor...
Instruction Manual
Page 12
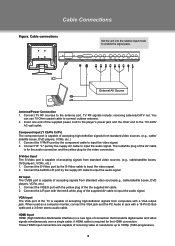
...the TV is capable of the supplied power cord to the player's power jack and the other end to input the audio signal. Cable connections Set the unit into the relative input mode to the antenna port. These HDMI ...red/white plug of connection that transmits digital audio and video signals simultaneously over a single cable. A HDMI cable is for the audio conneciton and the yellow plug for the HDMI connection. HDMI Input HDMI (High Definition Multimedia Interface) is a new type of the AV cable is required for the video connection. When used as a computer moniter, connect...
...the TV is capable of the supplied power cord to the player's power jack and the other end to input the audio signal. Cable connections Set the unit into the relative input mode to the antenna port. These HDMI ...red/white plug of connection that transmits digital audio and video signals simultaneously over a single cable. A HDMI cable is for the audio conneciton and the yellow plug for the HDMI connection. HDMI Input HDMI (High Definition Multimedia Interface) is a new type of the AV cable is required for the video connection. When used as a computer moniter, connect...
Instruction Manual
Page 13
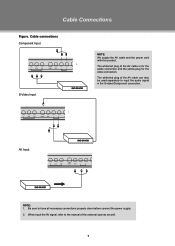
The white/red plug of the external sources as well. 7 AV Input NOTE: 111 Be sure to have all necessary connections properly done before connect the power supply. 222 When input the AV signal, refer to the manual of the AV cable can also be used separately to input the audio signal in the S-video/Component connection. Cable Connections Figure. Cable connections Component Input S-Video Input NOTE: We supply the AV cable and the power cord with this product. The white/red plug of the AV cable is for the audio connection and the yellow plug for the video connection.
The white/red plug of the external sources as well. 7 AV Input NOTE: 111 Be sure to have all necessary connections properly done before connect the power supply. 222 When input the AV signal, refer to the manual of the AV cable can also be used separately to input the audio signal in the S-video/Component connection. Cable Connections Figure. Cable connections Component Input S-Video Input NOTE: We supply the AV cable and the power cord with this product. The white/red plug of the AV cable is for the audio connection and the yellow plug for the video connection.
Instruction Manual
Page 14
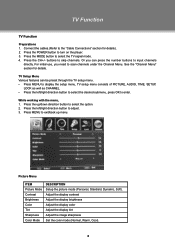
... Picture Menu ITEM Picture Mode Contrast Brightness Color Tint Sharpness Color Mode DESCRIPTION Setup the picture mode (Personal, Standard, Dynamic, Soft). See the "Channel Menu" section for details). 222 Press the POWER button to turn on the player. 333 Press the MODE button to scan channels under the Channel Menu. For initial use, you can be preset through the TV setup menu. •• Press MENU to display the setup menu, TV setup menu consists of PICTURE, AUDIO, TIME, SETUP, LOCK as...
... Picture Menu ITEM Picture Mode Contrast Brightness Color Tint Sharpness Color Mode DESCRIPTION Setup the picture mode (Personal, Standard, Dynamic, Soft). See the "Channel Menu" section for details). 222 Press the POWER button to turn on the player. 333 Press the MODE button to scan channels under the Channel Menu. For initial use, you can be preset through the TV setup menu. •• Press MENU to display the setup menu, TV setup menu consists of PICTURE, AUDIO, TIME, SETUP, LOCK as...
Instruction Manual
Page 15
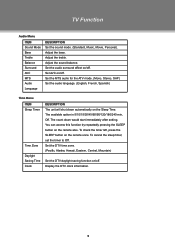
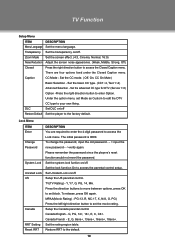
... SLEEP button on the remote also. Set the MTS audio for the ATV mode. (Mono, Stereo, SAP) Set the audio language. (English, French, Spanish) Time Menu ITEM Sleep Timer Time Zone Daylight Saving Time Clock DESCRIPTION The unit will shut down would start immediately after setting. TV Function Audio Menu ITEM Sound Mode Bass Treble Balance Surround AVC MTS Audio Language DESCRIPTION Set the sound mode. (Standard, Music, Movie, Personal). Set AVC on /off . Display the DTV clock information...
... SLEEP button on the remote also. Set the MTS audio for the ATV mode. (Mono, Stereo, SAP) Set the audio language. (English, French, Spanish) Time Menu ITEM Sleep Timer Time Zone Daylight Saving Time Clock DESCRIPTION The unit will shut down would start immediately after setting. TV Function Audio Menu ITEM Sound Mode Bass Treble Balance Surround AVC MTS Audio Language DESCRIPTION Set the sound mode. (Standard, Music, Movie, Personal). Set AVC on /off . Display the DTV clock information...
Instruction Manual
Page 16
... Mode - Please remember the password since the players's reset function would not revert the password. There are required to enter the 4-digit password to access the Lock menu. To change the password, input the old password - - > input the new password- - >verify again. Y, Y7, G, PG, 14, MA. Set the rating region table. PG-13, R, NC-17, X, N/A, G, PG) Press the left/right direction button to access the parental control setup. Restore RRT to set...
... Mode - Please remember the password since the players's reset function would not revert the password. There are required to enter the 4-digit password to access the Lock menu. To change the password, input the old password - - > input the new password- - >verify again. Y, Y7, G, PG, 14, MA. Set the rating region table. PG-13, R, NC-17, X, N/A, G, PG) Press the left/right direction button to access the parental control setup. Restore RRT to set...
Instruction Manual
Page 17
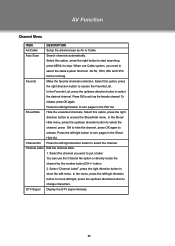
... or directly locate the channel by the number button/CH+/- Press OK to set it as Air or Cable. Press the left /right button to select the cable system first from AUTO, STD, IRC and HRC before scaning. Select the channel you need to turn pages in the FAV list. button. 2. Press the left /right button to access the Favorite List. Favorite Make the...
... or directly locate the channel by the number button/CH+/- Press OK to set it as Air or Cable. Press the left /right button to select the cable system first from AUTO, STD, IRC and HRC before scaning. Select the channel you need to turn pages in the FAV list. button. 2. Press the left /right button to access the Favorite List. Favorite Make the...
Instruction Manual
Page 18
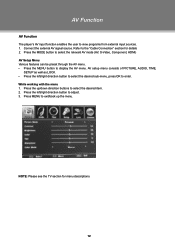
... The player's AV input function enables the user to display the AV menu. AV setup menu consists of PICTURE, AUDIO, TIME, SETUP as well as LOCK. •• Press the left /right direction button to adjust. 333 Press MENU to exit/back up /down direction buttons to select the desired item. 222 Press the left /right direction button to select the desired sub-menu, press OK to the "Cable Connection" section for menu...
... The player's AV input function enables the user to display the AV menu. AV setup menu consists of PICTURE, AUDIO, TIME, SETUP as well as LOCK. •• Press the left /right direction button to adjust. 333 Press MENU to exit/back up /down direction buttons to select the desired item. 222 Press the left /right direction button to select the desired sub-menu, press OK to the "Cable Connection" section for menu...
Instruction Manual
Page 19
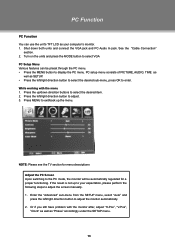
...'s monitor. 111 Shut down direction buttons to select the desired item. 222 Press the left/right direction button to adjust. 333 Press MENU to enter. PC setup menu consists of PICTURE, AUDIO, TIME as well as SETUP. •• Press the left /right direction button to the PC mode, the moniter will be preset through the PC menu. •• Press the MENU button to display the PC menu. While working with the...
...'s monitor. 111 Shut down direction buttons to select the desired item. 222 Press the left/right direction button to adjust. 333 Press MENU to enter. PC setup menu consists of PICTURE, AUDIO, TIME as well as SETUP. •• Press the left /right direction button to the PC mode, the moniter will be preset through the PC menu. •• Press the MENU button to display the PC menu. While working with the...
Instruction Manual
Page 20
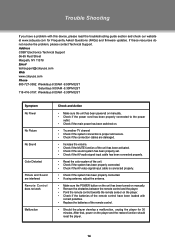
... been properly connected. •• If using antenna, adjust the antenna. •• Make sure the POWER button on the unit has been turned on manually. •• Remove the obstacles between the remote control and the player. •• Point the remote control towards the remote sensor on the player and the restore function should reset the player. 14 Address COBY Electronics Technical Support 56-65...
... been properly connected. •• If using antenna, adjust the antenna. •• Make sure the POWER button on the unit has been turned on manually. •• Remove the obstacles between the remote control and the player. •• Point the remote control towards the remote sensor on the player and the restore function should reset the player. 14 Address COBY Electronics Technical Support 56-65...
Instruction Manual
Page 21
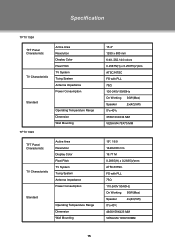
Specification TFTV 1524 TFT Panel Characteristic TV Charactoristic Active Area Resolution Display Color Pixel Pitch TV System Tuing System Antenna Impedance Power Consumption Standard TFTV 1923 Operating Temperature Range Dimension Wall Mounting TFT Panel Characteristic TV Charactoristic Active Area Resolution Display Color Pixel Pitch TV System Tuing System Antenna Impedance Power Consumption Standard Operating Temperature Range Dimension Wall...
Specification TFTV 1524 TFT Panel Characteristic TV Charactoristic Active Area Resolution Display Color Pixel Pitch TV System Tuing System Antenna Impedance Power Consumption Standard TFTV 1923 Operating Temperature Range Dimension Wall Mounting TFT Panel Characteristic TV Charactoristic Active Area Resolution Display Color Pixel Pitch TV System Tuing System Antenna Impedance Power Consumption Standard Operating Temperature Range Dimension Wall...
Instruction Manual
Page 22
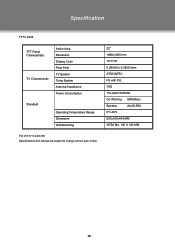
Specification TFTV 2224 TFT Panel Characteristic TV Charactoristic Active Area Resolution Display Color Pixel Pitch TV System Tuing System Antenna Impedance Power Consumption Standard Operating Temperature Range Dimension Wall Mounting 22" 1680x1050 mm 16.77 M 0.282(H) x 0.282(V)mm ATSC/NTSC FS with PLL 75Ω 110-240V 50/60Hz On Working 60W(Max) Speaker 2x(4Ω,5W) 0ºc-40ºc 527x167x444 MM VESA M4, 100 X 100 MM P/N: 907-FV15-2400-00R Specifications and manual are subject to change without prior notice. 16
Specification TFTV 2224 TFT Panel Characteristic TV Charactoristic Active Area Resolution Display Color Pixel Pitch TV System Tuing System Antenna Impedance Power Consumption Standard Operating Temperature Range Dimension Wall Mounting 22" 1680x1050 mm 16.77 M 0.282(H) x 0.282(V)mm ATSC/NTSC FS with PLL 75Ω 110-240V 50/60Hz On Working 60W(Max) Speaker 2x(4Ω,5W) 0ºc-40ºc 527x167x444 MM VESA M4, 100 X 100 MM P/N: 907-FV15-2400-00R Specifications and manual are subject to change without prior notice. 16


