
Instruction Manual
Page 2
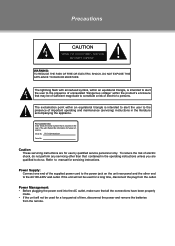
... sure that is located on the unit rear panel and the other than that may be used for a long time, disconnect the plug from the remote. The exclamation point within an equilateral triangle is intended to alert the user to the presence of uninsulated "dangerous voltage" within an equilateral triangle, is...
... sure that is located on the unit rear panel and the other than that may be used for a long time, disconnect the plug from the remote. The exclamation point within an equilateral triangle is intended to alert the user to the presence of uninsulated "dangerous voltage" within an equilateral triangle, is...
Instruction Manual
Page 8
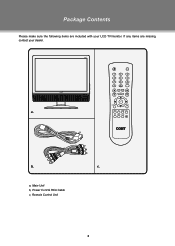
Package Contents Please make sure the following items are missing, contact your LCD TV/monitor. a. c. a, Main Unit b, Power Cord & RCA Cable c, Remote Control Unit 2 If any items are included with your dealer. b.
Package Contents Please make sure the following items are missing, contact your LCD TV/monitor. a. c. a, Main Unit b, Power Cord & RCA Cable c, Remote Control Unit 2 If any items are included with your dealer. b.

Instruction Manual
Page 9
... may cause damage or serious injury should it from its fixture. PHONE JACK 100mm 11. AUDIO IN((R/L) 14. TFT SCREEN 2. VOLUME-/+ 5. Unit View 4 15 6 7 28 9 3 1. REMOTE SENSOR 3. CH-/+ 6. SPEAKER 10. VIDEO IN 15. TFTV1923 Rear Cabinet) 16. COMPONENT IN 17. HDMI 19. See the Specification page for VESA informaiton. 3
... may cause damage or serious injury should it from its fixture. PHONE JACK 100mm 11. AUDIO IN((R/L) 14. TFT SCREEN 2. VOLUME-/+ 5. Unit View 4 15 6 7 28 9 3 1. REMOTE SENSOR 3. CH-/+ 6. SPEAKER 10. VIDEO IN 15. TFTV1923 Rear Cabinet) 16. COMPONENT IN 17. HDMI 19. See the Specification page for VESA informaiton. 3
Instruction Manual
Page 10
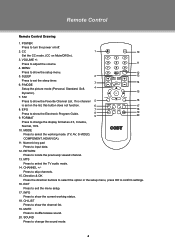
... the sleep timer. 3 14 6. RETURN Press to skip channels. 15. Press to locate the previously viewed channel. 13. EXIT Press to adjust the volume. 11 4. Remote Control Remote Control Drawing 1. Press to exit the menu setup. 17. MODE Press to show the current working mode. (TV, AV, S-VIDEO, COMPONENT, HDMI,VGA). 11...
... the sleep timer. 3 14 6. RETURN Press to skip channels. 15. Press to locate the previously viewed channel. 13. EXIT Press to adjust the volume. 11 4. Remote Control Remote Control Drawing 1. Press to exit the menu setup. 17. MODE Press to show the current working mode. (TV, AV, S-VIDEO, COMPONENT, HDMI,VGA). 11...
Instruction Manual
Page 11
... at an angle of ±30 degrees. 7 s MODE RETURN The operating distance may present a fire or chemical burn if mistreated. Remote Control Remote Control Preparation •• Remove the battery compartment cover located on the inside of the compartment. Replace the cover. •• Batteries.... 5 Do not mix old with new batteries, or different types of the remote control. Using the Remote Control To use the remote, point it will last for a long period of time. Replace the batteries if the remote control does not work. Insert 2 x "AAA" batteries, making sure to ...
... at an angle of ±30 degrees. 7 s MODE RETURN The operating distance may present a fire or chemical burn if mistreated. Remote Control Remote Control Preparation •• Remove the battery compartment cover located on the inside of the compartment. Replace the cover. •• Batteries.... 5 Do not mix old with new batteries, or different types of the remote control. Using the Remote Control To use the remote, point it will last for a long period of time. Replace the batteries if the remote control does not work. Insert 2 x "AAA" batteries, making sure to ...
Instruction Manual
Page 15
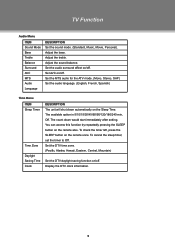
Adjust the treble. You can access this function by repeatedly pressing the SLEEP button on the remote once. To check the timer left, press the SLEEP button on the remote also. Display the DTV clock information. 9 Set the audio surround effect on the Sleep Time. Set the MTS audio for the ATV mode...
Adjust the treble. You can access this function by repeatedly pressing the SLEEP button on the remote once. To check the timer left, press the SLEEP button on the remote also. Display the DTV clock information. 9 Set the audio surround effect on the Sleep Time. Set the MTS audio for the ATV mode...
Instruction Manual
Page 20
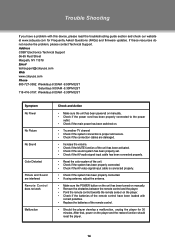
... check our website at www.cobyusa.com for 30 minutes. If these resources do not resolve the problem, please contact Technical Support. Address COBY Electronics Technical Support 56-65 Rust Street Maspeth, NY 11378 Email [email protected] Web www.cobyusa.com Phone 800-727-3592: Weekdays 8:30AM...00AM -5:30PM EST 718-416-3197: Weekdays 8:00AM -5:30PM EST Symptom No Power No Picture No Sound Color Distorted Picture and Sound are interfered Remote Control does not work Malfunction Check and Action •• Make sure the unit has been powered on manually. •• Check if the...
... check our website at www.cobyusa.com for 30 minutes. If these resources do not resolve the problem, please contact Technical Support. Address COBY Electronics Technical Support 56-65 Rust Street Maspeth, NY 11378 Email [email protected] Web www.cobyusa.com Phone 800-727-3592: Weekdays 8:30AM...00AM -5:30PM EST 718-416-3197: Weekdays 8:00AM -5:30PM EST Symptom No Power No Picture No Sound Color Distorted Picture and Sound are interfered Remote Control does not work Malfunction Check and Action •• Make sure the unit has been powered on manually. •• Check if the...


