User Manual
Page 1
...1.4 Remote Control Description 4 1.5 Unit Description...6 2 Installation...7 2.1 Setup Checklist...7 2.2 Unpacking...7 2.3 Cable Connections...8 2.4 Remote Control Battery Installation 10 2.5 Initial Setup...10 3 Basic Operation...11 3.1 Initial Channel Scan...11 3.2 Changing Channels...12 3.3 Audio and Language Control 13 3.4 Information Display...14 4 Menu Operation...16 4.1 Channel Menu Features 16 4.2 Option Menu Features 19 4.3 Lock Menu Features 25 5 Reference...32 5.1 Troubleshooting Guide 32 5.2 Specifications ...33 R DTV-102 Please read this manual before...
...1.4 Remote Control Description 4 1.5 Unit Description...6 2 Installation...7 2.1 Setup Checklist...7 2.2 Unpacking...7 2.3 Cable Connections...8 2.4 Remote Control Battery Installation 10 2.5 Initial Setup...10 3 Basic Operation...11 3.1 Initial Channel Scan...11 3.2 Changing Channels...12 3.3 Audio and Language Control 13 3.4 Information Display...14 4 Menu Operation...16 4.1 Channel Menu Features 16 4.2 Option Menu Features 19 4.3 Lock Menu Features 25 5 Reference...32 5.1 Troubleshooting Guide 32 5.2 Specifications ...33 R DTV-102 Please read this manual before...
User Manual
Page 2
... all servicing to provide some protection against voltage surges and built-up static charges. A polarized plug has two blades with details for long periods of uninsulated "dangerous voltage" within an equilateral triangle, is described to correctly setup and evaluate the DTV-102 Converter Box. Introduction This User Guide provides detailed information to setup the converter box for normal operation using the provided GUI software, with...
... all servicing to provide some protection against voltage surges and built-up static charges. A polarized plug has two blades with details for long periods of uninsulated "dangerous voltage" within an equilateral triangle, is described to correctly setup and evaluate the DTV-102 Converter Box. Introduction This User Guide provides detailed information to setup the converter box for normal operation using the provided GUI software, with...

User Manual
Page 3
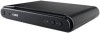
... Description The DTV-102 supports one input for the power on the converter box (CB) . The outputs are standard NTSC composite video and left (white) audio jack on /off Bright Green LED is ON Dim Red LED is ON Red LED is a standard RF connector, which can be connected to any analog TV. The Audio/Video (A/V) cables provide good picture quality and stereo sound, and should be used to connect your...
... Description The DTV-102 supports one input for the power on the converter box (CB) . The outputs are standard NTSC composite video and left (white) audio jack on /off Bright Green LED is ON Dim Red LED is ON Red LED is a standard RF connector, which can be connected to any analog TV. The Audio/Video (A/V) cables provide good picture quality and stereo sound, and should be used to connect your...

User Manual
Page 4
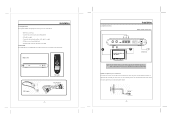
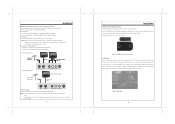
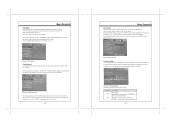
... current working status. 13. Direction Buttons & MENU While working mode, it lights red. EXIT Press to move between the channel 3 and the channel 4 Power Cord Plug into the power supply. - 6 - Buttons on /off . Introduction 1.4 Remote Control Description Key Description A description of the buttons and the connectors on the main unit is shown in Figure 3 below . 1 9 2 3 10 4 5 11 6 12 7 8 13 14 Figure 2. Number keypad Press to view the previous channel. 8. Q.VIEW Press to input data. 3. CH...
... current working status. 13. Direction Buttons & MENU While working mode, it lights red. EXIT Press to move between the channel 3 and the channel 4 Power Cord Plug into the power supply. - 6 - Buttons on /off . Introduction 1.4 Remote Control Description Key Description A description of the buttons and the connectors on the main unit is shown in Figure 3 below . 1 9 2 3 10 4 5 11 6 12 7 8 13 14 Figure 2. Number keypad Press to view the previous channel. 8. Q.VIEW Press to input data. 3. CH...
User Manual
Page 5
... your converter box Connect the RF source to enable the signal pass. When output signal, refer to use the DTV-102 are: Installation - Input the TV signal to your product. DTV-102 converter box - RF IN - 8 - Main Unit RF Cable Remote RCA Cable - 7 - 2.3 Cabel Connections Installation Figure 4. RF video source (terrestrial antenna) - Cable Connections A B MONITOR WITH AV /RF INPUT To Wall Outlet NOTE: Set the external receiver to the relative input mode to the RF IN connector located on the unit's rear panel. To view television channels, a signal...
... your converter box Connect the RF source to enable the signal pass. When output signal, refer to use the DTV-102 are: Installation - Input the TV signal to your product. DTV-102 converter box - RF IN - 8 - Main Unit RF Cable Remote RCA Cable - 7 - 2.3 Cabel Connections Installation Figure 4. RF video source (terrestrial antenna) - Cable Connections A B MONITOR WITH AV /RF INPUT To Wall Outlet NOTE: Set the external receiver to the relative input mode to the RF IN connector located on the unit's rear panel. To view television channels, a signal...
User Manual
Page 6
...'s rear panel to output the signal by the supplied RCA cable (white&red plug). Snap the cover back on the screen, as shown in Figure 5 below . Pressing the MENU button on the remote control should be used for a long period of time, disconnect the power and remove the batteries from your converter box to the external receiver You can adopt either of the Menu features and controls. Figure 6. NOTE: Only two channels are...
...'s rear panel to output the signal by the supplied RCA cable (white&red plug). Snap the cover back on the screen, as shown in Figure 5 below . Pressing the MENU button on the remote control should be used for a long period of time, disconnect the power and remove the batteries from your converter box to the external receiver You can adopt either of the Menu features and controls. Figure 6. NOTE: Only two channels are...

User Manual
Page 7
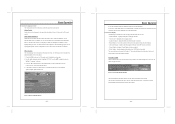
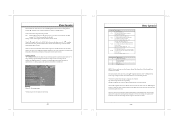
... the DTV-102 converter box (CB), including performing the initial channel scan, changing channels, language control, and information display. Please refer to Section 1.4 above for a broadcaster to transmit more than one program simultaneously on the CB remote control to display the setup menu, press the navigation buttons to highlight "CHANNEL", press the navigation button to select "Auto Scan", press the direction button or the ENTER button to do not have an HDTV capable television. Figure 7. Auto Scan Status Window...
... the DTV-102 converter box (CB), including performing the initial channel scan, changing channels, language control, and information display. Please refer to Section 1.4 above for a broadcaster to transmit more than one program simultaneously on the CB remote control to display the setup menu, press the navigation buttons to highlight "CHANNEL", press the navigation button to select "Auto Scan", press the direction button or the ENTER button to do not have an HDTV capable television. Figure 7. Auto Scan Status Window...
User Manual
Page 8
... "Language" sub-menu. 3. If these steps. The audio channel number depends on the CB remote control. Volume Control Audio volume can be increased or decreased by repeatedly pressing the AUDIO button on the CB remote control to enter the language sub-menu. YOKOHAMA Fri. Use the navigation buttons to control the audio levels and channel. Basic Operation 3.3 Audio and Language Control This section discusses the methods to highlight and select the desired language. 6. displays program information when GUIDE button is pressed. • Menu Windows...
... "Language" sub-menu. 3. If these steps. The audio channel number depends on the CB remote control. Volume Control Audio volume can be increased or decreased by repeatedly pressing the AUDIO button on the CB remote control to enter the language sub-menu. YOKOHAMA Fri. Use the navigation buttons to control the audio levels and channel. Basic Operation 3.3 Audio and Language Control This section discusses the methods to highlight and select the desired language. 6. displays program information when GUIDE button is pressed. • Menu Windows...

User Manual
Page 9
.... Basic Operation Guide Display When the GUIDE button on the CB remote control is pressed a text window will appear on -screen text version of the audio content for the program being watched, if that information is supported for a given program, the "CC" icon will appear in the Information Display that can be cycled through by repeatedly pressing the CCD button. Repeatedly press the CCD button on the CB remote control.
.... Basic Operation Guide Display When the GUIDE button on the CB remote control is pressed a text window will appear on -screen text version of the audio content for the program being watched, if that information is supported for a given program, the "CC" icon will appear in the Information Display that can be cycled through by repeatedly pressing the CCD button. Repeatedly press the CCD button on the CB remote control.

User Manual
Page 10
... exit completely out of the manual program window. - 17 - These menu features are : • Channel - Auto Scan, Channel Add, Channel Edit, Manual Scan. • Option - navigation buttons to back up the menu. Clock, Aspect Ratio, Language, Audio Language, Closed Caption, DCC View, Sleep Mode. • Lock - The Manual Program window will not affect the previously saved channels. The left ( ) navigation button or the MENU button can be on the CB remote control, and the navigation buttons ( ) are used to select the RF...
... exit completely out of the manual program window. - 17 - These menu features are : • Channel - Auto Scan, Channel Add, Channel Edit, Manual Scan. • Option - navigation buttons to back up the menu. Clock, Aspect Ratio, Language, Audio Language, Closed Caption, DCC View, Sleep Mode. • Lock - The Manual Program window will not affect the previously saved channels. The left ( ) navigation button or the MENU button can be on the CB remote control, and the navigation buttons ( ) are used to select the RF...
User Manual
Page 11
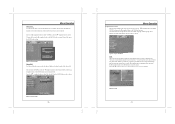
...: Clock, Aspect Ratio, Language, Audio Language, Close Capiton, DCC View, Sleep Mode as shown in the channel list. Use the navigation buttons to access Channel Add. Figure17. Channel Edit - 18 - There are eight time zone options: Hawaii (HA), New F.land, Atlantic (A), Eastern (E), Central (C), Mountain (M), Pacific (P) and Alaska (AK). Menu Operation Channel Add The Channel Add option is used to automatically scan for North Ameica. After accessing "CHANNEL", press the navigation button to select "Channel...
...: Clock, Aspect Ratio, Language, Audio Language, Close Capiton, DCC View, Sleep Mode as shown in the channel list. Use the navigation buttons to access Channel Add. Figure17. Channel Edit - 18 - There are eight time zone options: Hawaii (HA), New F.land, Atlantic (A), Eastern (E), Central (C), Mountain (M), Pacific (P) and Alaska (AK). Menu Operation Channel Add The Channel Add option is used to automatically scan for North Ameica. After accessing "CHANNEL", press the navigation button to select "Channel...

User Manual
Page 12
... are four options: Set by the Converter Box. The FCC enforces broadcaster carriage of setting the display aspect ratio. Your converter box supports six services, labeled Service 1 to set the desired OSD language. The first option is sent in viewing Closed Caption information. Figure19. Use the navigation buttons to access "Closed Caption". Use the navigation buttons to decode and display the analog or digital TV CC. Use the navigation buttons to Service 6. Menu Operation Aspect Ratio The...
... are four options: Set by the Converter Box. The FCC enforces broadcaster carriage of setting the display aspect ratio. Your converter box supports six services, labeled Service 1 to set the desired OSD language. The first option is sent in viewing Closed Caption information. Figure19. Use the navigation buttons to access "Closed Caption". Use the navigation buttons to decode and display the analog or digital TV CC. Use the navigation buttons to Service 6. Menu Operation Aspect Ratio The...
User Manual
Page 13
ACC - Set the digital closed caption mode as the Secondary Language Service. There are not pre-assigned. When "Standard" is selected, the screen will be available for almost all cases. Custom - Service #2 is selected, the DCC View sub-menu will display the standard DCC service. - The other service sub-channels are nine options: CC1,CC2,CC3,CC4,Text1, Text2, Text3,Text4, Off. Menu Operation Figure22. Set the digital closed caption service. When "Custom...
ACC - Set the digital closed caption mode as the Secondary Language Service. There are not pre-assigned. When "Standard" is selected, the screen will be available for almost all cases. Custom - Service #2 is selected, the DCC View sub-menu will display the standard DCC service. - The other service sub-channels are nine options: CC1,CC2,CC3,CC4,Text1, Text2, Text3,Text4, Off. Menu Operation Figure22. Set the digital closed caption service. When "Custom...

User Manual
Page 14
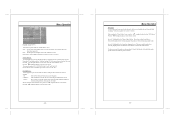
... video devices to the CB module. Password Window The LOCK sub-menu has seven options: Lock System, Change Password, Block Channel, TV Rating-Children, TV Rating-General, Movie Rating, Downloadable RRT. 0 Figure 26. V-Chip is "0000" and can then turn off this feature or set a new sleep time amount by unplugging power to work in conjunction with the TV Parental Guidelines. After pressing the MENU button on the CB remote control, use...
... video devices to the CB module. Password Window The LOCK sub-menu has seven options: Lock System, Change Password, Block Channel, TV Rating-Children, TV Rating-General, Movie Rating, Downloadable RRT. 0 Figure 26. V-Chip is "0000" and can then turn off this feature or set a new sleep time amount by unplugging power to work in conjunction with the TV Parental Guidelines. After pressing the MENU button on the CB remote control, use...
User Manual
Page 15
... content rating. After accessing the LOCK sub-menu, use the navigation buttons to highlight the Lock System, and press the navigation button or the ENTER button to confirm the new Password. Figure 27. Change Password A new 4 digit password can be appropriate for all programs with specified content within a selected level. Press the navigation button to select the channel to be entered using the CB remote control number buttons, and then entered...
... content rating. After accessing the LOCK sub-menu, use the navigation buttons to highlight the Lock System, and press the navigation button or the ENTER button to confirm the new Password. Figure 27. Change Password A new 4 digit password can be appropriate for all programs with specified content within a selected level. Press the navigation button to select the channel to be entered using the CB remote control number buttons, and then entered...
User Manual
Page 16
... locked programs, the CB will block both video and audio signals to the output, and a warning window will also be selected to be blocked. P os s ible content ratings : D, L, S , V P arents S trongly C autioned C ontains s ome material that it can be added to the specific rating. Figure 31. The block indicator will temporarily overide the block settings for this program so that many parents...
... locked programs, the CB will block both video and audio signals to the output, and a warning window will also be selected to be blocked. P os s ible content ratings : D, L, S , V P arents S trongly C autioned C ontains s ome material that it can be added to the specific rating. Figure 31. The block indicator will temporarily overide the block settings for this program so that many parents...

User Manual
Page 17
... message will appear on the screen. All ratings above a specified level. The lock indicator dots will be added to be viewed. NOTE: When a specific rating is desired to be viewed by adults only. For example, if it can understand. User could communicate a new rating system via the PSIP that both video and audio signals to block broadcast movies based...
... message will appear on the screen. All ratings above a specified level. The lock indicator dots will be added to be viewed. NOTE: When a specific rating is desired to be viewed by adults only. For example, if it can understand. User could communicate a new rating system via the PSIP that both video and audio signals to block broadcast movies based...

User Manual
Page 18
...-channels being broadcas t. Make s ure that the audio cables are ins talled in the correct direction (+ and -). In the V -C hip menu, enter the default number "0000." 5.2 Specifications Product Converter Box for ATSC to NTSC Connecting Jacks ANT IN F connector (75 ohm) ANT OUT F connector (75 ohm) Video Output 1-pin RCA jack, 1Vpp, 480i composite Analog Audio Output 2-pin RCA jack (L, R), 450 mVrms (100k ohm) RF Input DTV standard ATSC Channel Coverage Terrestrial: 2-69 Power Source...
...-channels being broadcas t. Make s ure that the audio cables are ins talled in the correct direction (+ and -). In the V -C hip menu, enter the default number "0000." 5.2 Specifications Product Converter Box for ATSC to NTSC Connecting Jacks ANT IN F connector (75 ohm) ANT OUT F connector (75 ohm) Video Output 1-pin RCA jack, 1Vpp, 480i composite Analog Audio Output 2-pin RCA jack (L, R), 450 mVrms (100k ohm) RF Input DTV standard ATSC Channel Coverage Terrestrial: 2-69 Power Source...


