
User Manual
Page 1
COBY Electronics Corp. 56-65 Rust Street Maspeth, NY 11378 www.cobyusa.com www.ecoby.com DP860/862 8″ Widescreen Digital Photo Frame with Multimedia Playback DP860 DP862 INSTRUCTION MANUAL Please read this manual carefully before operation
COBY Electronics Corp. 56-65 Rust Street Maspeth, NY 11378 www.cobyusa.com www.ecoby.com DP860/862 8″ Widescreen Digital Photo Frame with Multimedia Playback DP860 DP862 INSTRUCTION MANUAL Please read this manual carefully before operation
User Manual
Page 2
...digital devices, pursuant to wide slot of the equipment. Do not open the cabinet. CAUTION: To prevent electric shock, match wide blade of plug to Part 15 of the FCC rules. These limits are designed to radio communications. Connect the equipment into an outlet on , the user is connected. - DP860/DP862...the instructions, may not cause harmful interference, and (2) This device must accept any changes or modifications to hearing loss. This equipment generates, uses and can lead to the equipment unless otherwise specified in a residential installation. ...
...digital devices, pursuant to wide slot of the equipment. Do not open the cabinet. CAUTION: To prevent electric shock, match wide blade of plug to Part 15 of the FCC rules. These limits are designed to radio communications. Connect the equipment into an outlet on , the user is connected. - DP860/DP862...the instructions, may not cause harmful interference, and (2) This device must accept any changes or modifications to hearing loss. This equipment generates, uses and can lead to the equipment unless otherwise specified in a residential installation. ...
User Manual
Page 5
Top View Left View Right View Front View Rear View Remote Control SLIDESHOW MODE Slideshow PHOTO MODE Photo Mode Screen Photo View Zoom Rotation Changing View MOVIE MODE Video List Screen Video Controls MUSIC MODE Music List Music Playback Screen Music Controls CALENDAR 25 Date & Clock Screen 25 FILE MANAGER 26 File List 26 Deleting / Copying a File 26 27 System Setup 27 Photo Setup 28 Calendar Setup 28 Video Setup 29 Music Setup 29 30 30 KICKSTAND 31 32 33 35 18 18 19 19 20 20 20 20 21 21 22 23 23 24 24
Top View Left View Right View Front View Rear View Remote Control SLIDESHOW MODE Slideshow PHOTO MODE Photo Mode Screen Photo View Zoom Rotation Changing View MOVIE MODE Video List Screen Video Controls MUSIC MODE Music List Music Playback Screen Music Controls CALENDAR 25 Date & Clock Screen 25 FILE MANAGER 26 File List 26 Deleting / Copying a File 26 27 System Setup 27 Photo Setup 28 Calendar Setup 28 Video Setup 29 Music Setup 29 30 30 KICKSTAND 31 32 33 35 18 18 19 19 20 20 20 20 21 21 22 23 23 24 24
User Manual
Page 6
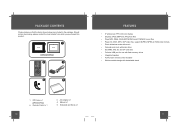
... Frame x 1 (DP860/DP862) 2. AC Adapter x 1 4. Kickstand and Screw x 1 • 8" widescreen TFT LCD color display • Displays JPEG, BMP and JPG photo files • Plays MP3, WMA, OGG,ADPCM-WAV and PCM-WAV music files • Plays AVI, MOV, MP4, 3GP video files, support MJPEG, MPEG-4, H264 video formats. • Photo slideshow mode with music • Calendar and clock with alarm timer • SD, MMC, MS, xD, and CF card slots • Full-size USB port for use with flash memory drives...
... Frame x 1 (DP860/DP862) 2. AC Adapter x 1 4. Kickstand and Screw x 1 • 8" widescreen TFT LCD color display • Displays JPEG, BMP and JPG photo files • Plays MP3, WMA, OGG,ADPCM-WAV and PCM-WAV music files • Plays AVI, MOV, MP4, 3GP video files, support MJPEG, MPEG-4, H264 video formats. • Photo slideshow mode with music • Calendar and clock with alarm timer • SD, MMC, MS, xD, and CF card slots • Full-size USB port for use with flash memory drives...
User Manual
Page 7
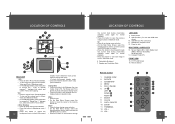
... calendar mode. 4. Secure Digital (SD) / Multi Media Card (MMC) / Memory Stick (MS) / XD-Picture (XD) 14. MENU 5. CLOCK 9. VOL + 13. Down • Press for down the volume level in photo (full-screen) display mode/ slideshow mode, press again to start / stop photo slideshow. 3. USB Full-Size ( For use with USB flash drives) 10. Headphone / Earphone Jack 12. Compact Flash (CF) FRONT VIEW 15. 8″ TFT LCD Screen 16. UP LEFT DOWN RIGHT 7. " dialogue box, select and confirm Yes to start copying. CHANGE VIEW 2. SLIDESHOW...
... calendar mode. 4. Secure Digital (SD) / Multi Media Card (MMC) / Memory Stick (MS) / XD-Picture (XD) 14. MENU 5. CLOCK 9. VOL + 13. Down • Press for down the volume level in photo (full-screen) display mode/ slideshow mode, press again to start / stop photo slideshow. 3. USB Full-Size ( For use with USB flash drives) 10. Headphone / Earphone Jack 12. Compact Flash (CF) FRONT VIEW 15. 8″ TFT LCD Screen 16. UP LEFT DOWN RIGHT 7. " dialogue box, select and confirm Yes to start copying. CHANGE VIEW 2. SLIDESHOW...
User Manual
Page 8
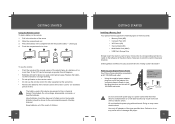
... Media Card (MMC) • USB Flash Storage Drive Simply insert the memory card of your Digital Picture Frame Your Picture Frame should be connected to an AC 100-240V wall outlet. • Using the supplied power adapter, plug one year under typical usage. Doing so may cause a fire or damage the player. 15 Do not handle the power plug with the positive side ( + ) facing up 4. GETTING STARTED Using the Remote Control To load a battery in use...
... Media Card (MMC) • USB Flash Storage Drive Simply insert the memory card of your Digital Picture Frame Your Picture Frame should be connected to an AC 100-240V wall outlet. • Using the supplied power adapter, plug one year under typical usage. Doing so may cause a fire or damage the player. 15 Do not handle the power plug with the positive side ( + ) facing up 4. GETTING STARTED Using the Remote Control To load a battery in use...
User Manual
Page 9
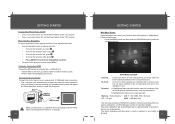
... card USB: USB flash drive You can save pictures on the Memory ( built-in the corresponding slot and is pressed. 17 see File Manager section for use. Upon connection: • Your computer will appear as a demo slideshow. Connecting to a Computer Connect the photo frame to your photo frame off, set the Power Switch to the "On" position. • To turn your photo frame on the power, your photo frame will display the " Main Menu " screen shown below. • Press the MENU button...
... card USB: USB flash drive You can save pictures on the Memory ( built-in the corresponding slot and is pressed. 17 see File Manager section for use. Upon connection: • Your computer will appear as a demo slideshow. Connecting to a Computer Connect the photo frame to your photo frame off, set the Power Switch to the "On" position. • To turn your photo frame on the power, your photo frame will display the " Main Menu " screen shown below. • Press the MENU button...

User Manual
Page 10
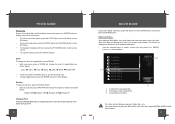
Current Memory Device The Photo List will display supported Photo files, only. An image file is set to Thumbnail in Photo Setup, See SETUP section.) PHOTO MODE SCREEN • To display a photo (full screen), use the direction buttons to select a thumbnail and press the ENTER button to confirm. 2 1 PHOTO ̻̀͆̾͘͏ ͇̾̈́̾̽ ̼̾̓̓ 3 1. Information of the Seleted image file. 3. Your photo frame can display baseline...
Current Memory Device The Photo List will display supported Photo files, only. An image file is set to Thumbnail in Photo Setup, See SETUP section.) PHOTO MODE SCREEN • To display a photo (full screen), use the direction buttons to select a thumbnail and press the ENTER button to confirm. 2 1 PHOTO ̻̀͆̾͘͏ ͇̾̈́̾̽ ̼̾̓̓ 3 1. Information of the Seleted image file. 3. Your photo frame can display baseline...
User Manual
Page 11
... the memory device for 100% display. FLODER A FLODER B FLODER C FLODER D 1 MOVIE FILE A MOVIE FILE B MOVIE FILE C MOVIE FILE D 1. Your photo frame can play your photo frame will change the level of the selected File. 3. Rotation To rotate the picture, press the Rotate button. • Each successive press of ROTATE will display supported Video files, only. A video file is being selected. 2. Information of magnification as shown below . PHOTO MODE Photo View Select a thumbnail from the Main Menu screen and...
... the memory device for 100% display. FLODER A FLODER B FLODER C FLODER D 1 MOVIE FILE A MOVIE FILE B MOVIE FILE C MOVIE FILE D 1. Your photo frame can play your photo frame will change the level of the selected File. 3. Rotation To rotate the picture, press the Rotate button. • Each successive press of ROTATE will display supported Video files, only. A video file is being selected. 2. Information of magnification as shown below . PHOTO MODE Photo View Select a thumbnail from the Main Menu screen and...
User Manual
Page 12
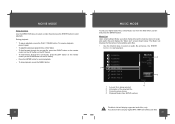
... MENU button. 22 MUSIC MODE To play digital MP3, WMA and OGG audi.o files 23 To resume playback, press it again. • To adjust the volume level, press the VOL- MOVIE MODE Video Controls Use the DIRECTION keys to select a video file and press the ENTER button to start playback. FLODER A FLODER B FLODER C FLODER D 1 MUSIC FILE A MUSIC FILE B MUSIC FILE C MUSIC FILE D MUSIC MUSIC FILE A 2 4MB ARTIST TRACK'S NAME ALBUM 5/16 3 Repeat 4 1. Current memory device. 4. Playback Mode ( See SETUP...
... MENU button. 22 MUSIC MODE To play digital MP3, WMA and OGG audi.o files 23 To resume playback, press it again. • To adjust the volume level, press the VOL- MOVIE MODE Video Controls Use the DIRECTION keys to select a video file and press the ENTER button to start playback. FLODER A FLODER B FLODER C FLODER D 1 MUSIC FILE A MUSIC FILE B MUSIC FILE C MUSIC FILE D MUSIC MUSIC FILE A 2 4MB ARTIST TRACK'S NAME ALBUM 5/16 3 Repeat 4 1. Current memory device. 4. Playback Mode ( See SETUP...
User Manual
Page 13
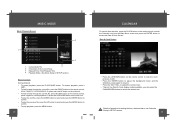
... RIGHT button on the remote control to view the next / previous month. • Press the ENTER button to pause the background music and the slideshow, press again to select the desired one. Current Audio File 4 2. Elapsed Time / Total Playback Time 4. Details of the Current Song. 3. Playback Mode ( See Music Setup in SETUP section. 25 Music Controls During playback: • To pause playback, press the PLAY/PAUSE button. Date & Clock Screen Jan...
... RIGHT button on the remote control to view the next / previous month. • Press the ENTER button to pause the background music and the slideshow, press again to select the desired one. Current Audio File 4 2. Elapsed Time / Total Playback Time 4. Details of the Current Song. 3. Playback Mode ( See Music Setup in SETUP section. 25 Music Controls During playback: • To pause playback, press the PLAY/PAUSE button. Date & Clock Screen Jan...
User Manual
Page 14
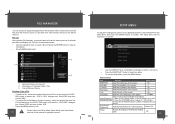
... memory device for playback controls SETUP MENU To adjust the settings and options of your photo frame will be displayed on screen. FLODER A PHOTO VIDEO 1 VVD MUSIC FILE A MUSIC FILE B LYH55144. VVD LYH55156. VVD MOVIE FILE C File Manager VVD 2 3FILES 2021/12/25 08:01 4/36 3 1. Selected Folder in memory. Current Memory Device Deleting / Copy a File • To delete a file, select the unwanted file from the File List and press the COPY / DEL button to access the " COPY/DEL" dialogue box. Please refer to the Photo Mode, Music Mode...
... memory device for playback controls SETUP MENU To adjust the settings and options of your photo frame will be displayed on screen. FLODER A PHOTO VIDEO 1 VVD MUSIC FILE A MUSIC FILE B LYH55144. VVD LYH55156. VVD MOVIE FILE C File Manager VVD 2 3FILES 2021/12/25 08:01 4/36 3 1. Selected Folder in memory. Current Memory Device Deleting / Copy a File • To delete a file, select the unwanted file from the File List and press the COPY / DEL button to access the " COPY/DEL" dialogue box. Please refer to the Photo Mode, Music Mode...
User Manual
Page 15
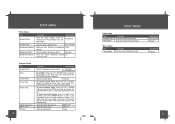
...select the number of slideshow 5Sec. photos. Sets the photo slideshow effect. Sets the Alarm Tone Alarm 1 Sets Snooze Mode Once 28 SETUP MENU Video Setup Display Ratio Sets the Video display ratio. Sets the Alarm Frequency Mon to adjust. SETUP MENU Photo Setup Display Mode Display Ratio Slideshow Duration Slideshow Effect Slideshow Repeat Sets the photo display mode for entering the Photo Mode from the Slideshow Main Menu. Random Sets the photo slideshow repeat On function on/off Calendar Setup Display Mode Date Clock Mode Clock Time Alarm Time Alarm Frequency Alarm Tone...
...select the number of slideshow 5Sec. photos. Sets the photo slideshow effect. Sets the Alarm Tone Alarm 1 Sets Snooze Mode Once 28 SETUP MENU Video Setup Display Ratio Sets the Video display ratio. Sets the Alarm Frequency Mon to adjust. SETUP MENU Photo Setup Display Mode Display Ratio Slideshow Duration Slideshow Effect Slideshow Repeat Sets the photo display mode for entering the Photo Mode from the Slideshow Main Menu. Random Sets the photo slideshow repeat On function on/off Calendar Setup Display Mode Date Clock Mode Clock Time Alarm Time Alarm Frequency Alarm Tone...

User Manual
Page 16
Headphones CONNECTION 2350 Using the Kickstand 1 KICKSTAND Attach the kickstand to the DP frame. 2 Turn the screw to the right to tighten the kickstand. 31
Headphones CONNECTION 2350 Using the Kickstand 1 KICKSTAND Attach the kickstand to the DP frame. 2 Turn the screw to the right to tighten the kickstand. 31
User Manual
Page 17
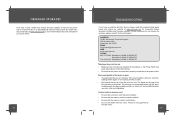
... player does not turn on. • Make sure the unit has been powered on your photo frame. 32 TROUBLESHOOTING If you have a problem with this DP frame. 33 The sound quality of the music is not too low. They are not supported by this device, please read the troubleshooting guide below and check our website at www.cobyusa.com for Frequently Asked Questions (FAQs) and firmware updates. loading...
... player does not turn on. • Make sure the unit has been powered on your photo frame. 32 TROUBLESHOOTING If you have a problem with this DP frame. 33 The sound quality of the music is not too low. They are not supported by this device, please read the troubleshooting guide below and check our website at www.cobyusa.com for Frequently Asked Questions (FAQs) and firmware updates. loading...

User Manual
Page 18
... player will not play my music file. • Ensure that the file is no sound. • Ensure that the volume level of the DP frame has been set to a reasonable level by the remote control or the volume buttons on the top panel of this manual for detailed instructions. 34 SPECIFICATIONS Display Type Display Resolution Memory Audio Format Support Video Format Support Photo Format Support USB Host Audio Output Power Supply Rechargeable Built-in lithium battery Calendar...
... player will not play my music file. • Ensure that the file is no sound. • Ensure that the volume level of the DP frame has been set to a reasonable level by the remote control or the volume buttons on the top panel of this manual for detailed instructions. 34 SPECIFICATIONS Display Type Display Resolution Memory Audio Format Support Video Format Support Photo Format Support USB Host Audio Output Power Supply Rechargeable Built-in lithium battery Calendar...


