Administration Guide
Page 3
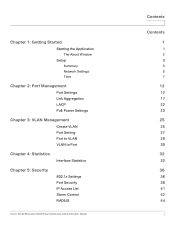
Chapter 1: Getting Started Starting the Application The About Window Setup Summary Network Settings Time Chapter 2: Port Management Port Settings Link Aggregation LACP PoE Power Settings Chapter 3: VLAN Management Create VLAN Port Setting Port to VLAN VLAN to Port Chapter 4: Statistics Interface Statistics Chapter 5: Security 802.1x Settings Port Security IP Access List Storm Control RADIUS Cisco Small Business SLM Smart Switches Administration Guide Contents Contents 1 1 2 3 3 5 7 12 12 17 22 23 25 25 27 28 30 32 32 36 36 38 41 42 44 1
Chapter 1: Getting Started Starting the Application The About Window Setup Summary Network Settings Time Chapter 2: Port Management Port Settings Link Aggregation LACP PoE Power Settings Chapter 3: VLAN Management Create VLAN Port Setting Port to VLAN VLAN to Port Chapter 4: Statistics Interface Statistics Chapter 5: Security 802.1x Settings Port Security IP Access List Storm Control RADIUS Cisco Small Business SLM Smart Switches Administration Guide Contents Contents 1 1 2 3 3 5 7 12 12 17 22 23 25 25 27 28 30 32 32 36 36 38 41 42 44 1
Administration Guide
Page 4
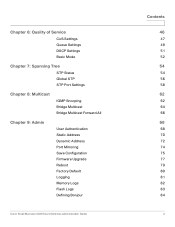
Chapter 6: Quality of Service CoS Settings Queue Settings DSCP Settings Basic Mode Chapter 7: Spanning Tree STP Status Global STP STP Port Settings Chapter 8: Multicast IGMP Snooping Bridge Multicast Bridge Multicast Forward All Chapter 9: Admin User Authentication Static Address Dynamic Address Port Mirroring Save Configuration Firmware Upgrade Reboot Factory Default Logging Memory Logs Flash Logs Defining Bonjour Cisco Small Business SLM Smart Switches Administration Guide Contents 46 47 49 51 52 54 54 56 58 62 62 64 66 68 68 70 72 74 75 77 79 80 81 82 83 84 2
Chapter 6: Quality of Service CoS Settings Queue Settings DSCP Settings Basic Mode Chapter 7: Spanning Tree STP Status Global STP STP Port Settings Chapter 8: Multicast IGMP Snooping Bridge Multicast Bridge Multicast Forward All Chapter 9: Admin User Authentication Static Address Dynamic Address Port Mirroring Save Configuration Firmware Upgrade Reboot Factory Default Logging Memory Logs Flash Logs Defining Bonjour Cisco Small Business SLM Smart Switches Administration Guide Contents 46 47 49 51 52 54 54 56 58 62 62 64 66 68 68 70 72 74 75 77 79 80 81 82 83 84 2
Administration Guide
Page 5
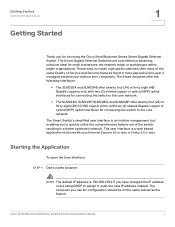
... user interface is 192.168.1.254. These easy-to assign it, enter the new IP address instead. Cisco Small Business SLM Series Smart Switches Administration Guide 1 The computer you use for connecting the switch to quickly utilize the comprehensive feature-set of Service and Security features found in a better optimized network. NOTE The...
... user interface is 192.168.1.254. These easy-to assign it, enter the new IP address instead. Cisco Small Business SLM Series Smart Switches Administration Guide 1 The computer you use for connecting the switch to quickly utilize the comprehensive feature-set of Service and Security features found in a better optimized network. NOTE The...
Administration Guide
Page 6
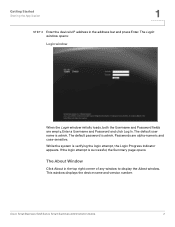
... Login window opens: Login window When the Login window initially loads, both the Username and Password fields are alpha-numeric and case-sensitive. Cisco Small Business SLM Series Smart Switches Administration Guide 2 If the login attempt is admin. The About Window Click About in the address bar and press Enter. The default...
... Login window opens: Login window When the Login window initially loads, both the Username and Password fields are alpha-numeric and case-sensitive. Cisco Small Business SLM Series Smart Switches Administration Guide 2 If the login attempt is admin. The About Window Click About in the address bar and press Enter. The default...
Administration Guide
Page 7
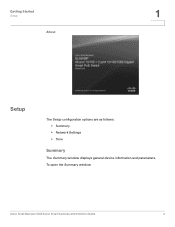
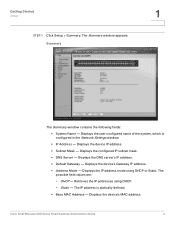
To open the Summary window: Cisco Small Business SLM Series Smart Switches Administration Guide 3 Getting Started Setup 1 About Setup The Setup configuration options are as follows: • Summary • Network Settings • Time Summary The Summary window displays general device information and parameters.
To open the Summary window: Cisco Small Business SLM Series Smart Switches Administration Guide 3 Getting Started Setup 1 About Setup The Setup configuration options are as follows: • Summary • Network Settings • Time Summary The Summary window displays general device information and parameters.
Administration Guide
Page 8
Displays the device IP address. • Subnet Mask - The possible field values are: - Displays the device's MAC address. Cisco Small Business SLM Series Smart Switches Administration Guide 4 Displays the configured IP subnet mask. • DNS Server - DHCP - Getting Started Setup STEP 1 Click Setup > Summary. Displays the DNS server's IP address. &#...
Displays the device IP address. • Subnet Mask - The possible field values are: - Displays the device's MAC address. Cisco Small Business SLM Series Smart Switches Administration Guide 4 Displays the configured IP subnet mask. • DNS Server - DHCP - Getting Started Setup STEP 1 Click Setup > Summary. Displays the DNS server's IP address. &#...
Administration Guide
Page 9
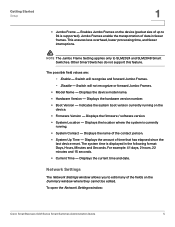
...The system time is currently running on the device. • Firmware Version - To open the Network Settings window: Cisco Small Business SLM Series Smart Switches Administration Guide 5 This ensures less overhead, lower processing time, and fewer interruptions. Displays the firmware / software version.... • System Location - Jumbo Frames enable the transportation of up to SLM2024 and SLM2048 Smart Switches. Enables Jumbo Frames on the Summary window where they cannot be edited. Displays the current time and date. Disable - Getting ...
...The system time is currently running on the device. • Firmware Version - To open the Network Settings window: Cisco Small Business SLM Series Smart Switches Administration Guide 5 This ensures less overhead, lower processing time, and fewer interruptions. Displays the firmware / software version.... • System Location - Jumbo Frames enable the transportation of up to SLM2024 and SLM2048 Smart Switches. Enables Jumbo Frames on the Summary window where they cannot be edited. Displays the current time and date. Disable - Getting ...
Administration Guide
Page 10
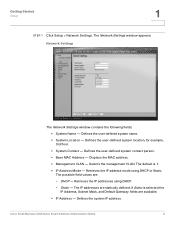
...; Management VLAN - The possible field values are statically defined. Retrieves the IP addresses using DHCP or Static. DHCP - The IP addresses are : - Cisco Small Business SLM Series Smart Switches Administration Guide 6 Defines the user-defined system location, for example, 3rd floor. • System Contact - The Network Settings window appears: Network Settings The...
...; Management VLAN - The possible field values are statically defined. Retrieves the IP addresses using DHCP or Static. DHCP - The IP addresses are : - Cisco Small Business SLM Series Smart Switches Administration Guide 6 Defines the user-defined system location, for example, 3rd floor. • System Contact - The Network Settings window appears: Network Settings The...
Administration Guide
Page 11
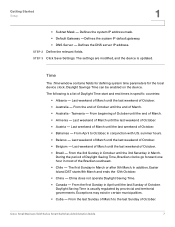
... October. • Australia - From the end of October until the last weekend of March. • Australia - From the 3rd Sunday in March. Cisco Small Business SLM Series Smart Switches Administration Guide 7 Defines the DNS server IP address. STEP 2 Define the relevant fields. The settings are modified, and the device is usually regulated...
... October. • Australia - From the end of October until the last weekend of March. • Australia - From the 3rd Sunday in March. Cisco Small Business SLM Series Smart Switches Administration Guide 7 Defines the DNS server IP address. STEP 2 Define the relevant fields. The settings are modified, and the device is usually regulated...
Administration Guide
Page 12
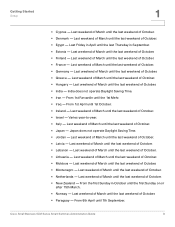
... Zealand - From 1st Farvardin until the last weekend of March until the 1st Mehr. • Iraq - Last weekend of October. • Montenegro - Cisco Small Business SLM Series Smart Switches Administration Guide 8 Last weekend of March until the last weekend of October. • Denmark - Last weekend of March until the last weekend of...
... Zealand - From 1st Farvardin until the last weekend of March until the 1st Mehr. • Iraq - Last weekend of October. • Montenegro - Cisco Small Business SLM Series Smart Switches Administration Guide 8 Last weekend of March until the last weekend of October. • Denmark - Last weekend of March until the last weekend of...
Administration Guide
Page 13
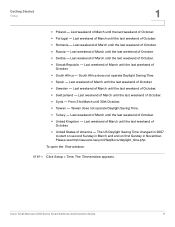
... in March and end on first Sunday in November. From 31st March until the last weekend of March until 30th October. • Taiwan - Cisco Small Business SLM Series Smart Switches Administration Guide 9 Last weekend of March until the last weekend of October. • Sweden - Last weekend of March until the last weekend...
... in March and end on first Sunday in November. From 31st March until the last weekend of March until 30th October. • Taiwan - Cisco Small Business SLM Series Smart Switches Administration Guide 9 Last weekend of March until the last weekend of October. • Sweden - Last weekend of March until the last weekend...
Administration Guide
Page 14
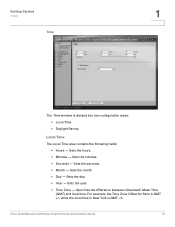
Sets the month. • Day - Sets the seconds. • Month - Specifies the difference between Greenwich Mean Time (GMT) and local time. Cisco Small Business SLM Series Smart Switches Administration Guide 10 For example, the Time Zone Offset for Paris is GMT +1, while the local time in New York is divided into two configuration...
Sets the month. • Day - Sets the seconds. • Month - Specifies the difference between Greenwich Mean Time (GMT) and local time. Cisco Small Business SLM Series Smart Switches Administration Guide 10 For example, the Time Zone Offset for Paris is GMT +1, while the local time in New York is divided into two configuration...
Administration Guide
Page 15
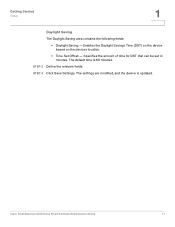
The default time is updated. Cisco Small Business SLM Series Smart Switches Administration Guide 11 Getting Started Setup 1 Daylight Saving The Daylight Saving area contains the following fields: • Daylight Saving - The settings are modified, and the device is 60 minutes. Specifies the amount of time for DST that can be set in minutes. Enables the Daylight Savings Time (DST) on the device based on the devices location. • Time Set Offset - STEP 3 Click Save Settings. STEP 2 Define the relevant fields.
The default time is updated. Cisco Small Business SLM Series Smart Switches Administration Guide 11 Getting Started Setup 1 Daylight Saving The Daylight Saving area contains the following fields: • Daylight Saving - The settings are modified, and the device is 60 minutes. Specifies the amount of time for DST that can be set in minutes. Enables the Daylight Savings Time (DST) on the device based on the devices location. • Time Set Offset - STEP 3 Click Save Settings. STEP 2 Define the relevant fields.
Administration Guide
Page 16
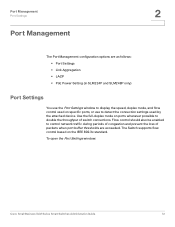
Flow control should also be enabled to detect the connection settings used by the attached device. The Switch supports flow control based on ports whenever possible to double the throughput of packets when port buffer thresholds are as follows: &#... specific ports, or use to control network traffic during periods of congestion and prevent the loss of switch connections. To open the Port Settings window: Cisco Small Business SLM Series Smart Switches Administration Guide 12 Port Management Port Settings 2 Port Management The Port Management configuration options are exceeded....
Flow control should also be enabled to detect the connection settings used by the attached device. The Switch supports flow control based on ports whenever possible to double the throughput of packets when port buffer thresholds are as follows: &#... specific ports, or use to control network traffic during periods of congestion and prevent the loss of switch connections. To open the Port Settings window: Cisco Small Business SLM Series Smart Switches Administration Guide 12 Port Management Port Settings 2 Port Management The Port Management configuration options are exceeded....
Administration Guide
Page 17
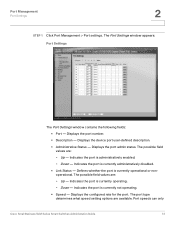
... currently not operating. • Speed - Down - The possible field values are available. Indicates the port is administratively enabled. - Port speeds can only Cisco Small Business SLM Series Smart Switches Administration Guide 13 The Port Settings window appears: Port Settings The Port Settings window contains the following fields: • Port - Defines whether the...
... currently not operating. • Speed - Down - The possible field values are available. Indicates the port is administratively enabled. - Port speeds can only Cisco Small Business SLM Series Smart Switches Administration Guide 13 The Port Settings window appears: Port Settings The Port Settings window contains the following fields: • Port - Defines whether the...

Administration Guide
Page 18
... Interface with Crossover (MDIX) status on the port. Copper - Indicates the port has a fiber optic port connection. • LAG - Cisco Small Business SLM Series Smart Switches Administration Guide 14 Use for hubs and switches. - The possible field values are : - Indicates the port is disabled. Full indicates that the interface supports transmission between the...
... Interface with Crossover (MDIX) status on the port. Copper - Indicates the port has a fiber optic port connection. • LAG - Cisco Small Business SLM Series Smart Switches Administration Guide 14 Use for hubs and switches. - The possible field values are : - Indicates the port is disabled. Full indicates that the interface supports transmission between the...

Administration Guide
Page 19
... Status - Displays whether the port is currently operational or non-operational. Indicates the port has a copper port connection and displays the copper speed. - Cisco Small Business SLM Series Smart Switches Administration Guide 15 Port Management Port Settings Port Configuration 2 • The Port Configuration window includes the following fields: • Port - The possible...
... Status - Displays whether the port is currently operational or non-operational. Indicates the port has a copper port connection and displays the copper speed. - Cisco Small Business SLM Series Smart Switches Administration Guide 15 Port Management Port Settings Port Configuration 2 • The Port Configuration window includes the following fields: • Port - The possible...
Administration Guide
Page 20
... flow control abilities to start the negotiation process. Indicates that all port speeds and Duplex mode settings will be advertised by the port. Cisco Small Business SLM Series Smart Switches Administration Guide 16 The port type determines what speed setting options are : - Displays the Auto Negotiation status on the port. Max Capability...
... flow control abilities to start the negotiation process. Indicates that all port speeds and Duplex mode settings will be advertised by the port. Cisco Small Business SLM Series Smart Switches Administration Guide 16 The port type determines what speed setting options are : - Displays the Auto Negotiation status on the port. Max Capability...
Administration Guide
Page 21
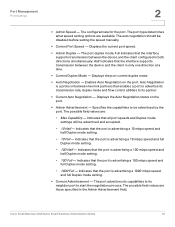
... Half Duplex mode. • Current Back Pressure - STEP 2 Define the relevant fields. STEP 3 Click Save Settings. Cisco Small Business SLM Series Smart Switches Administration Guide 17 Displays the Back Pressure mode on the port. Enables or disables flow control or enables the auto negotiation... The Back Pressure mode is connected) advertises its capabilities to the port to which this port is used to ensure that when a hub or switch is updated. The neighbor port (the port to start the negotiation process. • Back Pressure - Port Management Link Aggregation 2 • ...
... Half Duplex mode. • Current Back Pressure - STEP 2 Define the relevant fields. STEP 3 Click Save Settings. Cisco Small Business SLM Series Smart Switches Administration Guide 17 Displays the Back Pressure mode on the port. Enables or disables flow control or enables the auto negotiation... The Back Pressure mode is connected) advertises its capabilities to the port to which this port is used to ensure that when a hub or switch is updated. The neighbor port (the port to start the negotiation process. • Back Pressure - Port Management Link Aggregation 2 • ...

Administration Guide
Page 22
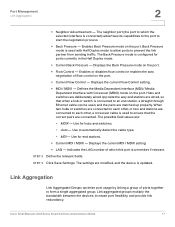
... window contains the following fields: • LAG - LAGs offer a dramatic increase in bandwidth for configured LAGs. The device supports up the LAG. eth1000m Cisco Small Business SLM Series Smart Switches Administration Guide 18 To open the Link Aggregation window: STEP 1 Click Port Management > Link Aggregation. Displays the LAG ID number. • Description...
... window contains the following fields: • LAG - LAGs offer a dramatic increase in bandwidth for configured LAGs. The device supports up the LAG. eth1000m Cisco Small Business SLM Series Smart Switches Administration Guide 18 To open the Link Aggregation window: STEP 1 Click Port Management > Link Aggregation. Displays the LAG ID number. • Description...


