User Guide
Page 3
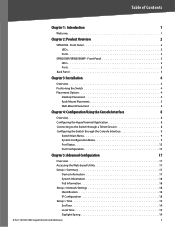
... Chapter 4: Configuration Using the Console Interface 8 Overview 8 Configuring the HyperTerminal Application 8 Connecting to the Switch through a Telnet Session 8 Configuring the Switch through the Console Interface 9 Switch Main Menu 9 System Configuration Menu 9 Port Status 15 Port Configuration 15 Chapter 5: Advanced Configuration 17 Overview... > Time 19 Set Time 19 Local Time 19 Daylight Saving 19 8-Port 10/100/1000 Gigabit Switch with Webview ii Front Panel 2 LEDs 2 Ports 2 SRW2008P/SRW2008MP - Table of Contents Chapter 1: Introduction 1 Welcome 1 Chapter 2:...
... Chapter 4: Configuration Using the Console Interface 8 Overview 8 Configuring the HyperTerminal Application 8 Connecting to the Switch through a Telnet Session 8 Configuring the Switch through the Console Interface 9 Switch Main Menu 9 System Configuration Menu 9 Port Status 15 Port Configuration 15 Chapter 5: Advanced Configuration 17 Overview... > Time 19 Set Time 19 Local Time 19 Daylight Saving 19 8-Port 10/100/1000 Gigabit Switch with Webview ii Front Panel 2 LEDs 2 Ports 2 SRW2008P/SRW2008MP - Table of Contents Chapter 1: Introduction 1 Welcome 1 Chapter 2:...
User Guide
Page 4
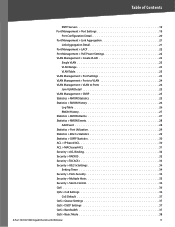
... Settings 36 CoS Default 37 QoS > Queue Settings 37 QoS > DSCP Settings 37 QoS > Bandwidth 37 QoS > Basic Mode 38 8-Port 10/100/1000 Gigabit Switch with Webview iii
... Settings 36 CoS Default 37 QoS > Queue Settings 37 QoS > DSCP Settings 37 QoS > Bandwidth 37 QoS > Basic Mode 38 8-Port 10/100/1000 Gigabit Switch with Webview iii

User Guide
Page 5
... Via HTTP 54 Backup 54 Admin > Firmware Upgrade 54 Admin > Reboot 55 Admin > Factory Defaults 55 Admin > Server Logs 55 8-Port 10/100/1000 Gigabit Switch with Webview iv
... Via HTTP 54 Backup 54 Admin > Firmware Upgrade 54 Admin > Reboot 55 Admin > Factory Defaults 55 Admin > Server Logs 55 8-Port 10/100/1000 Gigabit Switch with Webview iv
User Guide
Page 6
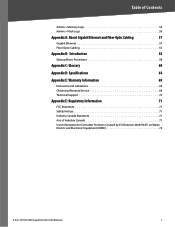
... User Information for Consumer Products Covered by EU Directive 2002/96/EC on Waste Electric and Electronic Equipment (WEEE 72 8-Port 10/100/1000 Gigabit Switch with Webview v
... User Information for Consumer Products Covered by EU Directive 2002/96/EC on Waste Electric and Electronic Equipment (WEEE 72 8-Port 10/100/1000 Gigabit Switch with Webview v
User Guide
Page 7
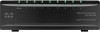
...100/1000 RJ-45 ports and 2 shared MiniGBIC slots. •• SRW2008P 8-port 10/100/1000 Ethernet Switch with Webview The rich management functionality of the WebView switches includes SNMP, RMON, Telnet, and HTTP Management options, allowing you to expand and grow your network securely. ... Chapter 1 Introduction Chapter 1: Introduction Welcome This guide covers three product models. •• SRW2008 8-port 10/100/1000 Ethernet Switch with data traffic allowing them each to operate if one of the links break. Extensive QoS features makes the solution ideal for fixed...
...100/1000 RJ-45 ports and 2 shared MiniGBIC slots. •• SRW2008P 8-port 10/100/1000 Ethernet Switch with Webview The rich management functionality of the WebView switches includes SNMP, RMON, Telnet, and HTTP Management options, allowing you to expand and grow your network securely. ... Chapter 1 Introduction Chapter 1: Introduction Welcome This guide covers three product models. •• SRW2008 8-port 10/100/1000 Ethernet Switch with data traffic allowing them each to operate if one of the links break. Extensive QoS features makes the solution ideal for fixed...
User Guide
Page 8
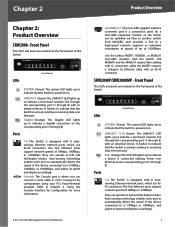
...up to indicate a Gigabit connection on . They can be uplinked via fiber to indicate that port. It flashes to another switch. Ports 1-8 The Switch is a connection point for configuration using your PC's HyperTerminal program. Refer to Chapter 4: Using the Console Interface for Configuration ...for more information. 8-Port 10/100/1000 Gigabit Switch with an attached device. Use the Linksys MGBT1, MGBSX1, or MGBLH1 mini-GBIC modules with 8 autosensing, Ethernet network ports, which...
...up to indicate a Gigabit connection on . They can be uplinked via fiber to indicate that port. It flashes to another switch. Ports 1-8 The Switch is a connection point for configuration using your PC's HyperTerminal program. Refer to Chapter 4: Using the Console Interface for Configuration ...for more information. 8-Port 10/100/1000 Gigabit Switch with an attached device. Use the Linksys MGBT1, MGBSX1, or MGBLH1 mini-GBIC modules with 8 autosensing, Ethernet network ports, which...
User Guide
Page 9
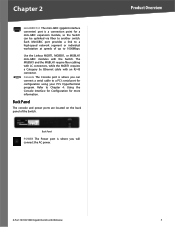
... Configuration for configuration using your PC's HyperTerminal program. Back Panel POWER The Power port is a connection point for a mini-GBIC expansion module, so the Switch can connect a serial cable to a PC's serial port for more information. Chapter 2 miniGBIC1/2 The mini-GBIC (gigabit interface converter) port is where ... MGBSX1 and the MGBLH1 require fiber cabling with LC connectors, while the MGBT1 requires a Category 5e Ethernet cable with the Switch. Console The Console port is where you will connect the AC power. Use the Linksys MGBT1, MGBSX1, or MGBLH1 mini-GBIC ...
... Configuration for configuration using your PC's HyperTerminal program. Back Panel POWER The Power port is a connection point for a mini-GBIC expansion module, so the Switch can connect a serial cable to a PC's serial port for more information. Chapter 2 miniGBIC1/2 The mini-GBIC (gigabit interface converter) port is where ... MGBSX1 and the MGBLH1 require fiber cabling with LC connectors, while the MGBT1 requires a Category 5e Ethernet cable with the Switch. Console The Console port is where you will connect the AC power. Use the Linksys MGBT1, MGBSX1, or MGBLH1 mini-GBIC ...
User Guide
Page 10
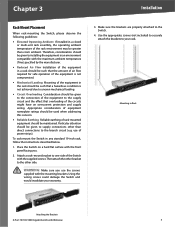
...in a standard-sized, 19-inch 8-Port 10/100/1000 Gigabit Switch with Webview 4 Desktop Placement 1. Connect the Switch to network devices according to the Switch. Attach the rubber feet to physically install the Switch, either set the Switch on its four rubber feet for rack-mount placement, or horizontally...ways to the recessed areas on a desktop near an AC power source. 3. The following guidelines: •• Make sure that the Switch is accessible and that the cables can be connected easily. •• Keep cabling away from sources of electrical noise, power lines, and...
...in a standard-sized, 19-inch 8-Port 10/100/1000 Gigabit Switch with Webview 4 Desktop Placement 1. Connect the Switch to network devices according to the Switch. Attach the rubber feet to physically install the Switch, either set the Switch on its four rubber feet for rack-mount placement, or horizontally...ways to the recessed areas on a desktop near an AC power source. 3. The following guidelines: •• Make sure that the Switch is accessible and that the cables can be connected easily. •• Keep cabling away from sources of electrical noise, power lines, and...
User Guide
Page 11
...connections other side. use the screws supplied with Webview 5 Mounting in Rack Attaching the Brackets 8-Port 10/100/1000 Gigabit Switch with the mounting brackets. Particular attention should be greater than direct connections to your warranty. 3. Use the appropriate screws ...to uneven mechanical loading. •• Circuit Overloading Consideration should be given to the connection of the equipment to the Switch. 4. Appropriate consideration of equipment nameplate ratings should be used when addressing this concern. •• Reliable Earthing Reliable ...
...connections other side. use the screws supplied with Webview 5 Mounting in Rack Attaching the Brackets 8-Port 10/100/1000 Gigabit Switch with the mounting brackets. Particular attention should be greater than direct connections to your warranty. 3. Use the appropriate screws ...to uneven mechanical loading. •• Circuit Overloading Consideration should be given to the connection of the equipment to the Switch. 4. Appropriate consideration of equipment nameplate ratings should be used when addressing this concern. •• Reliable Earthing Reliable ...
User Guide
Page 12
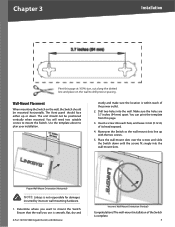
... Wall-Mount Orientation (Horizontal) NOTE: Linksys is within reach of the power outlet. 2. Wall-Mount Placement When mounting the Switch on the wall to mount the Switch. Make sure the holes are 3.7 inches (94 mm) apart. Chapter 3 Installation Print this page. 3. The wall-mount installation of its head exposed. ... mounted. Insert a screw into each hole, and leave 3 mm (0.12 in) of the Switch is smooth, flat, dry and 8-Port 10/100/1000 Gigabit Switch with the two screws. 5. Maneuver the Switch so the wall-mount slots line up or down until the screws fit snugly into the wall...
... Wall-Mount Orientation (Horizontal) NOTE: Linksys is within reach of the power outlet. 2. Wall-Mount Placement When mounting the Switch on the wall to mount the Switch. Make sure the holes are 3.7 inches (94 mm) apart. Chapter 3 Installation Print this page. 3. The wall-mount installation of its head exposed. ... mounted. Insert a screw into each hole, and leave 3 mm (0.12 in) of the Switch is smooth, flat, dry and 8-Port 10/100/1000 Gigabit Switch with the two screws. 5. Maneuver the Switch so the wall-mount slots line up or down until the screws fit snugly into the wall...
User Guide
Page 13
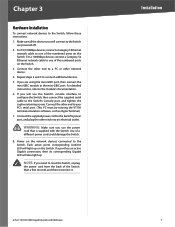
...network cable to the mini-GBIC port. If you are powered off. 2. If you use the Switch's console interface to configure the Switch, then connect the supplied serial cable to the Switch are using the mini-GBIC port, then connect the mini-GBIC module to one of the numbered ...ports on the network devices connected to a PC or other network device. 4. Wait a few seconds and then reconnect it. 8-Port 10/100/1000 Gigabit Switch with the Switch. Repeat steps 2 and 3 to the module's documentation. 6. Connect the other end into an electrical outlet. NOTE: If you will light up . If...
...network cable to the mini-GBIC port. If you are powered off. 2. If you use the Switch's console interface to configure the Switch, then connect the supplied serial cable to the Switch are using the mini-GBIC port, then connect the mini-GBIC module to one of the numbered ...ports on the network devices connected to a PC or other network device. 4. Wait a few seconds and then reconnect it. 8-Port 10/100/1000 Gigabit Switch with the Switch. Repeat steps 2 and 3 to the module's documentation. 6. Connect the other end into an electrical outlet. NOTE: If you will light up . If...
User Guide
Page 14
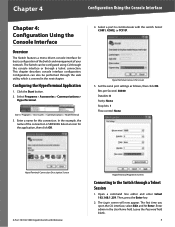
..., or TCP/IP. Leave the Password field blank. 8 Select a port to communicate with Webview HyperTerminal Properties Screen Connecting to the Switch through the web utility, which is SRW2008. HyperTerminal Connect To Screen 5. Then, press the Enter key. 2. Enter admin in the...Second: 38400 Databits: 8 Parity: None Stop bits: 1 Flow control: None HyperTerminal Connection Description Screen 8-Port 10/100/1000 Gigabit Switch with the switch. Configuring the HyperTerminal Application 1. The Login screen will now appear. In the example, the name of your network. Set the serial...
..., or TCP/IP. Leave the Password field blank. 8 Select a port to communicate with Webview HyperTerminal Properties Screen Connecting to the Switch through the web utility, which is SRW2008. HyperTerminal Connect To Screen 5. Then, press the Enter key. 2. Enter admin in the...Second: 38400 Databits: 8 Parity: None Stop bits: 1 Flow control: None HyperTerminal Connection Description Screen 8-Port 10/100/1000 Gigabit Switch with the switch. Configuring the HyperTerminal Application 1. The Login screen will now appear. In the example, the name of your network. Set the serial...
User Guide
Page 15
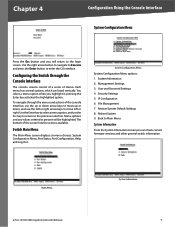
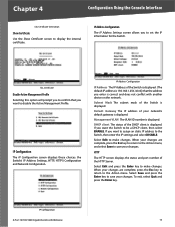
...the CLI interface. You select a menu option when you can check current firmware versions and other general switch information. System Configuration Menu System Configuration Menu options: 1. Switch Main Menu The Main Menu screen displays six menu choices: System Configuration Menu, Port Status, Port ...Configuration, Help, and Log Out. Main Menu 8-Port 10/100/1000 Gigabit Switch with Webview System Information 9 Each menu has several options, which are listed vertically. The bottom of the screen lists the actions...
...the CLI interface. You select a menu option when you can check current firmware versions and other general switch information. System Configuration Menu System Configuration Menu options: 1. Switch Main Menu The Main Menu screen displays six menu choices: System Configuration Menu, Port Status, Port ...Configuration, Help, and Log Out. Main Menu 8-Port 10/100/1000 Gigabit Switch with Webview System Information 9 Each menu has several options, which are listed vertically. The bottom of the screen lists the actions...
User Guide
Page 16
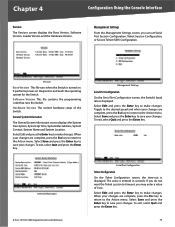
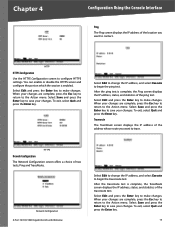
...return to make changes. Management Settings Serial Port Configuration On the Serial Port Configuration screen, the Switch's baud rate is displayed. General Information 8-Port 10/100/1000 Gigabit Switch with Webview Serial Port Configuration Telnet Configuration On the Telnet Configuration screen, the time-out is ...and when your changes. To exit, select Quit and press the Enter key. 10 Versions Boot Version This file runs when the Switch is entered in seconds. Select Edit and press the Enter key to save your changes. Management Settings From the Management Settings screen...
...return to make changes. Management Settings Serial Port Configuration On the Serial Port Configuration screen, the Switch's baud rate is displayed. General Information 8-Port 10/100/1000 Gigabit Switch with Webview Serial Port Configuration Telnet Configuration On the Telnet Configuration screen, the time-out is ...and when your changes. To exit, select Quit and press the Enter key. 10 Versions Boot Version This file runs when the Switch is entered in seconds. Select Edit and press the Enter key to save your changes. Management Settings From the Management Settings screen...
User Guide
Page 17
.... Select Edit and press the Enter key to the Action menu. To exit, select Quit and press the Enter key. 8-Port 10/100/1000 Gigabit Switch with Webview 11
.... Select Edit and press the Enter key to the Action menu. To exit, select Quit and press the Enter key. 8-Port 10/100/1000 Gigabit Switch with Webview 11
User Guide
Page 18
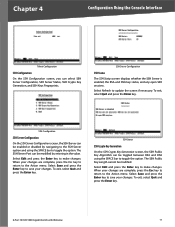
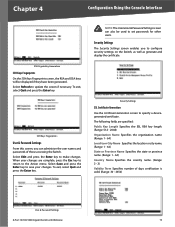
...user names and passwords of days certification is valid. (Range: 30 - 3650) User & Password Settings 8-Port 10/100/1000 Gigabit Switch with Webview 12 Chapter 4 Configuration Using the Console Interface SSH Crypto Key Generation SSH Keys Fingerprints On the SSH Keys Fingerprints screen, ...users. Select Refresh to make changes. Security Settings SSL Certificate Generation Use the Certificate Generation screen to configure security settings on the Switch, as well as generate and display the certificate. To exit, select Quit and press the Enter key. The following fields are...
...user names and passwords of days certification is valid. (Range: 30 - 3650) User & Password Settings 8-Port 10/100/1000 Gigabit Switch with Webview 12 Chapter 4 Configuration Using the Console Interface SSH Crypto Key Generation SSH Keys Fingerprints On the SSH Keys Fingerprints screen, ...users. Select Refresh to make changes. Security Settings SSL Certificate Generation Use the Certificate Generation screen to configure security settings on the Switch, as well as generate and display the certificate. To exit, select Quit and press the Enter key. The following fields are...
User Guide
Page 19
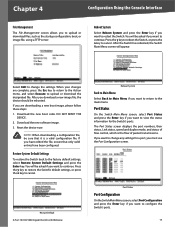
...client is correct and does not conflict with Webview 13 Management VLAN The VLAN ID number is displayed. DHCP client The status of the Switch is 192.168.1.254.) Verify that you want to assign an static IP address to save your changes are complete, press the Esc ...certificate. If you want to make changes. To exit, select Quit and press the Enter key. IP Configuration 8-Port 10/100/1000 Gigabit Switch with another device on the network. SSL Certificate Disable Active Management Profile Selecting this option will prompt you to confirm that the address you ...
...client is correct and does not conflict with Webview 13 Management VLAN The VLAN ID number is displayed. DHCP client The status of the Switch is 192.168.1.254.) Verify that you want to assign an static IP address to save your changes are complete, press the Esc ...certificate. If you want to make changes. To exit, select Quit and press the Enter key. IP Configuration 8-Port 10/100/1000 Gigabit Switch with another device on the network. SSL Certificate Disable Active Management Profile Selecting this option will prompt you to confirm that the address you ...
User Guide
Page 20
... press the Enter key. Traceroute The TraceRoute screen displays the IP address of two tests, Ping and TraceRoute. Network Configuration 8-Port 10/100/1000 Gigabit Switch with Webview Select Edit to change the IP address, and select Execute to the Action menu. When your changes.
... press the Enter key. Traceroute The TraceRoute screen displays the IP address of two tests, Ping and TraceRoute. Network Configuration 8-Port 10/100/1000 Gigabit Switch with Webview Select Edit to change the IP address, and select Execute to the Action menu. When your changes.
User Guide
Page 21
... status information for a port, you must use the Port Configuration screen. If you want to the main menu. Press the y key to restore the Switch's default settings, or press the n key to upload or download the designated file. Download the new boot code. Restore Default 8-Port 10/100/1000... Gigabit Switch with Webview Reboot System Back to Main Menu Select Back to Main Menu if you want to return to continue. NOTE: When downloading a configuration ...
... status information for a port, you must use the Port Configuration screen. If you want to the main menu. Press the y key to restore the Switch's default settings, or press the n key to upload or download the designated file. Download the new boot code. Restore Default 8-Port 10/100/1000... Gigabit Switch with Webview Reboot System Back to Main Menu Select Back to Main Menu if you want to return to continue. NOTE: When downloading a configuration ...
User Guide
Page 22
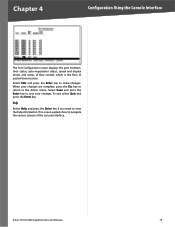
..., auto-negotiation status, speed and duplex mode, and status of flow control, which is the flow of the console interface. 8-Port 10/100/1000 Gigabit Switch with Webview 16 Select Save and press the Enter key to save your changes are complete, press the Esc key to return to navigate the...
..., auto-negotiation status, speed and duplex mode, and status of flow control, which is the flow of the console interface. 8-Port 10/100/1000 Gigabit Switch with Webview 16 Select Save and press the Enter key to save your changes are complete, press the Esc key to return to navigate the...


