
Hardware Installation Guide
Page 49
...2-1 or 2-Slot Network Modules, page 2-24 • Installing Other Accessories on Cisco access routers. CH A P T E R 2 Installing Cisco Network Modules in Cisco Access Routers This chapter provides information you or others could fall over them. Note Recommendations and..., and includes the following sections: • Recommended Practices for Cisco Network Modules, page 2-1 • Installing Cisco Network Modules in Cisco Access Routers, page 2-5 • Removing or Replacing Cisco Network Modules for Cisco Access Routers, page 2-18 • Installing Cisco Interface Cards in 1-
...2-1 or 2-Slot Network Modules, page 2-24 • Installing Other Accessories on Cisco access routers. CH A P T E R 2 Installing Cisco Network Modules in Cisco Access Routers This chapter provides information you or others could fall over them. Note Recommendations and..., and includes the following sections: • Recommended Practices for Cisco Network Modules, page 2-1 • Installing Cisco Network Modules in Cisco Access Routers, page 2-5 • Removing or Replacing Cisco Network Modules for Cisco Access Routers, page 2-18 • Installing Cisco Interface Cards in 1-
Hardware Installation Guide
Page 50
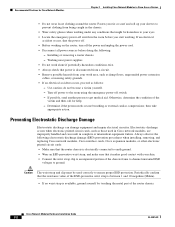
...; Wear an ESD-preventive wrist strap, and make sure that the resistance value of the ESD-preventive wrist strap is between 1 and 10 megohms (Mohm). • If no wrist strap is disconnected from a circuit. • Remove possible hazards from being caught in the... electrostatic discharge damage (ESD) prevention procedures when installing, removing, and replacing Cisco network modules, Cisco interface cards, Cisco expansion modules, or other electronic printed circuit cards: • Make sure that the router chassis is electrically connected to the room using the emergency power-off ...
...; Wear an ESD-preventive wrist strap, and make sure that the resistance value of the ESD-preventive wrist strap is between 1 and 10 megohms (Mohm). • If no wrist strap is disconnected from a circuit. • Remove possible hazards from being caught in the... electrostatic discharge damage (ESD) prevention procedures when installing, removing, and replacing Cisco network modules, Cisco interface cards, Cisco expansion modules, or other electronic printed circuit cards: • Make sure that the router chassis is electrically connected to the room using the emergency power-off ...

Hardware Installation Guide
Page 51
...the metal object to install or replace this equipment. Translations of this product should be handled according to all national laws and regulations. For systems with all hardware procedures involving Cisco network modules for Cisco access routers. Safety Warnings for Cisco Network Modules The following safety ... maintenance guidelines apply to Cisco network modules: • Keep the router chassis area clear and dust-free during and after installation. • If you remove the chassis cover for any reason, store it in a safe place. • Do not perform any action that creates ...
...the metal object to install or replace this equipment. Translations of this product should be handled according to all national laws and regulations. For systems with all hardware procedures involving Cisco network modules for Cisco access routers. Safety Warnings for Cisco Network Modules The following safety ... maintenance guidelines apply to Cisco network modules: • Keep the router chassis area clear and dust-free during and after installation. • If you remove the chassis cover for any reason, store it in a safe place. • Do not perform any action that creates ...

Hardware Installation Guide
Page 66
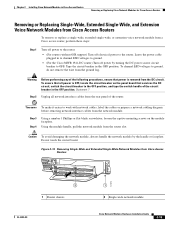
... Replacing Cisco Network Modules for Cisco Access Routers This section describes removal and replacement procedures for Cisco network modules used in Cisco access routers, and contains the following subsections: • Removing or Replacing Single-Wide, Extended Single-Wide, and Extension Voice Network Modules from Cisco Access Routers • Removing or Replacing Double-Wide and Extended Double-Wide Network Modules in Cisco Access Routers • Replacing...
... Replacing Cisco Network Modules for Cisco Access Routers This section describes removal and replacement procedures for Cisco network modules used in Cisco access routers, and contains the following subsections: • Removing or Replacing Single-Wide, Extended Single-Wide, and Extension Voice Network Modules from Cisco Access Routers • Removing or Replacing Double-Wide and Extended Double-Wide Network Modules in Cisco Access Routers • Replacing...
Hardware Installation Guide
Page 67
... Cisco Network Modules in Cisco Access Routers Removing or Replacing Cisco Network Modules for Cisco Access Routers Removing or Replacing Single-Wide, Extended Single-Wide, and Extension Voice Network Modules from Cisco Access Routers To remove or replace a single-wide, extended single-wide, or extension voice network module from Cisco Access Routers WO SERIAL ASYNC 15 11 14 10 13 9 12 8 15 11 14 10...
... Cisco Network Modules in Cisco Access Routers Removing or Replacing Cisco Network Modules for Cisco Access Routers Removing or Replacing Single-Wide, Extended Single-Wide, and Extension Voice Network Modules from Cisco Access Routers To remove or replace a single-wide, extended single-wide, or extension voice network module from Cisco Access Routers WO SERIAL ASYNC 15 11 14 10 13 9 12 8 15 11 14 10...

Hardware Installation Guide
Page 68
..., open the levers on locating additional hardware documentation. Leave the power cable plugged in Cisco Access Routers To remove or replace a double-wide or extended double-wide network module, perform these steps: Step 1 Step 2 Turn off electrical power to the router. The network module faceplate moves away from the network module. Step 3 Using your fingers...
..., open the levers on locating additional hardware documentation. Leave the power cable plugged in Cisco Access Routers To remove or replace a double-wide or extended double-wide network module, perform these steps: Step 1 Step 2 Turn off electrical power to the router. The network module faceplate moves away from the network module. Step 3 Using your fingers...

Hardware Installation Guide
Page 69
... similar network modules: • Cisco 3660 routers • Cisco 3745 routers • Cisco 3845 routers Caution These Cisco access routers support OIR with similar network modules only. To avoid damage to the interface card and to board components. To replace a network module with OIR support from a Cisco access router, perform the following Cisco access routers support OIR for information on Cisco IOS software-related tasks...
... similar network modules: • Cisco 3660 routers • Cisco 3745 routers • Cisco 3845 routers Caution These Cisco access routers support OIR with similar network modules only. To avoid damage to the interface card and to board components. To replace a network module with OIR support from a Cisco access router, perform the following Cisco access routers support OIR for information on Cisco IOS software-related tasks...

Hardware Installation Guide
Page 70
... network interface cables from the previous network module. Step 5 Step 6 Step 7 Step 8 Step 9 Step 10 Remove the network module as shown in Cisco Access Routers" sections. Confirm that the network module LEDs come on, and that the Active/Ready LEDs on the front ...4 Unplug all interfaces available on page 2-7.) Connect the cables removed from the network module. Removing or Replacing Cisco Network Modules for Cisco Access Routers Chapter 2 Installing Cisco Network Modules in Cisco Access Routers Step 1 Step 2 Initiate a console session with your specific network module.
... network interface cables from the previous network module. Step 5 Step 6 Step 7 Step 8 Step 9 Step 10 Remove the network module as shown in Cisco Access Routers" sections. Confirm that the network module LEDs come on, and that the Active/Ready LEDs on the front ...4 Unplug all interfaces available on page 2-7.) Connect the cables removed from the network module. Removing or Replacing Cisco Network Modules for Cisco Access Routers Chapter 2 Installing Cisco Network Modules in Cisco Access Routers Step 1 Step 2 Initiate a console session with your specific network module.

Hardware Installation Guide
Page 71
...service network module console session using the procedure described in the "Installing Cisco Network Modules in Cisco Access Routers" section on page 2-19. To perform online removal of a Cisco application and service network module and insertion of disks without proper shutdown can... from the SE-netmodule prompt: SE-netmodule# copy running configuration for Cisco Access Routers Caution Online removal of a replacement, follow these steps with the following command: Router# service-module service-engine slot/port session Trying 10.10.10.1, 2129 ... Step 2 Step 3 Step 4 Step 5 Step 6...
...service network module console session using the procedure described in the "Installing Cisco Network Modules in Cisco Access Routers" section on page 2-19. To perform online removal of a Cisco application and service network module and insertion of disks without proper shutdown can... from the SE-netmodule prompt: SE-netmodule# copy running configuration for Cisco Access Routers Caution Online removal of a replacement, follow these steps with the following command: Router# service-module service-engine slot/port session Trying 10.10.10.1, 2129 ... Step 2 Step 3 Step 4 Step 5 Step 6...

Hardware Installation Guide
Page 75
...until you are ready to connect cabling to the network module. Chapter 2 Installing Cisco Network Modules in Cisco Access Routers" section on page 2-5) before connecting the network module to the network. Replace the GBIC with a similar model, or continue with the GBIC installed. Step 5... the aperture of Cisco Network Modules for Cisco Access Routers." Timesaver If installing the GBIC in a loose network module, install the network module (see the Cisco Network Modules and Interface Cards Regulatory Compliance and Safety Information document. To remove a GBIC, perform the following steps:...
...until you are ready to connect cabling to the network module. Chapter 2 Installing Cisco Network Modules in Cisco Access Routers" section on page 2-5) before connecting the network module to the network. Replace the GBIC with a similar model, or continue with the GBIC installed. Step 5... the aperture of Cisco Network Modules for Cisco Access Routers." Timesaver If installing the GBIC in a loose network module, install the network module (see the Cisco Network Modules and Interface Cards Regulatory Compliance and Safety Information document. To remove a GBIC, perform the following steps:...

Hardware Installation Guide
Page 79
... choose the media type in a separate bag). Connecting Ethernet Ports If an Ethernet port offers both ports, the 10BASE-T connection is identified in software by replacing the AUI port slide latch with the slide-latch connector of the module or the 10BASE-T (RJ-45) connector next to it directly to the.... Port 0 offers a choice of an AUI or 10BASE-T interface. These ports do not need to an Ethernet transceiver. Port 1 uses 10BASE-T only. OL-2485-20 Cisco Network Modules Hardware Installation Guide 3-3
... choose the media type in a separate bag). Connecting Ethernet Ports If an Ethernet port offers both ports, the 10BASE-T connection is identified in software by replacing the AUI port slide latch with the slide-latch connector of the module or the 10BASE-T (RJ-45) connector next to it directly to the.... Port 0 offers a choice of an AUI or 10BASE-T interface. These ports do not need to an Ethernet transceiver. Port 1 uses 10BASE-T only. OL-2485-20 Cisco Network Modules Hardware Installation Guide 3-3

Hardware Installation Guide
Page 126
...of one or two primary rate ISDN lines. Cisco T1/E1 channelized PRI network modules with G.703 (NM-1CE1T1-PRI and NM-2CE1T1-PRI) replace the following network modules: • 1-port... (AIM) connector allows for DB-15, BNC, and other connector types. Each port supports 100/120-ohm balanced and 75-ohm unbalanced termination, and features RJ-48C connectors and cable accessories ...PRI) and 2-port T1/E1 channelized PRI network modules with G.703 Modular Access Router Cisco 26xx Cisco 26xxXM Cisco 2691 Cisco 3620 Cisco 3631 Cisco 3640 NM-1CE1T1-PRI No Yes Yes No Yes No NM-2CE1T1-PRI...
...of one or two primary rate ISDN lines. Cisco T1/E1 channelized PRI network modules with G.703 (NM-1CE1T1-PRI and NM-2CE1T1-PRI) replace the following network modules: • 1-port... (AIM) connector allows for DB-15, BNC, and other connector types. Each port supports 100/120-ohm balanced and 75-ohm unbalanced termination, and features RJ-48C connectors and cable accessories ...PRI) and 2-port T1/E1 channelized PRI network modules with G.703 Modular Access Router Cisco 26xx Cisco 26xxXM Cisco 2691 Cisco 3620 Cisco 3631 Cisco 3640 NM-1CE1T1-PRI No Yes Yes No Yes No NM-2CE1T1-PRI...

Hardware Installation Guide
Page 141
... 7 Connecting ISDN PRI Network Modules Online Insertion and Removal with a Cisco PRI Network Module (Cisco 3660 and Cisco 3745 Only) Online Insertion and Removal with a Cisco PRI Network Module (Cisco 3660 and Cisco 3745 Only) Some Cisco modular access routers allow you to replace network modules without switching off the router or affecting the operation of ISDN PRI network modules cannot...
... 7 Connecting ISDN PRI Network Modules Online Insertion and Removal with a Cisco PRI Network Module (Cisco 3660 and Cisco 3745 Only) Online Insertion and Removal with a Cisco PRI Network Module (Cisco 3660 and Cisco 3745 Only) Some Cisco modular access routers allow you to replace network modules without switching off the router or affecting the operation of ISDN PRI network modules cannot...

Hardware Installation Guide
Page 144
Cisco Network Modules Hardware Installation Guide 8-2 OL-2485-20 Note For the NM-HD-1V, NM-HD-2V, and NM-DS-2VE network modules, DSPs are on-board and are not field-replaceable units (FRUs). The intrabuilding cable must be shielded and the shield must be grounded at both ends. 4-,... 8-, and 48-Channel High-Density Voice Network Modules Chapter 8 Connecting Voice Network Modules Figure 8-1 1-Slot 2-Channel...
Cisco Network Modules Hardware Installation Guide 8-2 OL-2485-20 Note For the NM-HD-1V, NM-HD-2V, and NM-DS-2VE network modules, DSPs are on-board and are not field-replaceable units (FRUs). The intrabuilding cable must be shielded and the shield must be grounded at both ends. 4-,... 8-, and 48-Channel High-Density Voice Network Modules Chapter 8 Connecting Voice Network Modules Figure 8-1 1-Slot 2-Channel...

Hardware Installation Guide
Page 145
... these voice network modules, see Table 1-2 on Cisco 2600 series, Cisco 3600 series, and Cisco 3700 series routers. When used in Figure 8-6. Chapter 8 Connecting Voice Network Modules 60-Channel High-Density Voice Network Module Note The NM-HD-1V, NM-HD-2V, and NM-HD-2VE network modules replace the NM-1V and NM-2V network...
... these voice network modules, see Table 1-2 on Cisco 2600 series, Cisco 3600 series, and Cisco 3700 series routers. When used in Figure 8-6. Chapter 8 Connecting Voice Network Modules 60-Channel High-Density Voice Network Module Note The NM-HD-1V, NM-HD-2V, and NM-HD-2VE network modules replace the NM-1V and NM-2V network...

Hardware Installation Guide
Page 147
...avoid damaging the HDV network module, avoid using excessive force when you remove or replace PVDMs. Figure 8-8 PVDM Orientation Alignment holes 22953 OL-2485-20 Connector edge Polarization notch Cisco Network Modules Hardware Installation Guide 8-5 Caution To avoid damaging ESD-sensitive components, observe...facing the right side of the chassis. Chapter 8 Connecting Voice Network Modules Figure 8-7 PVDM Slot Locations 43210 60-Channel High-Density Voice Network Module 22955 PVDM slots PVDM Orientation PVDMs are installed with a polarization notch to ensure proper orientation and...
...avoid damaging the HDV network module, avoid using excessive force when you remove or replace PVDMs. Figure 8-8 PVDM Orientation Alignment holes 22953 OL-2485-20 Connector edge Polarization notch Cisco Network Modules Hardware Installation Guide 8-5 Caution To avoid damaging ESD-sensitive components, observe...facing the right side of the chassis. Chapter 8 Connecting Voice Network Modules Figure 8-7 PVDM Slot Locations 43210 60-Channel High-Density Voice Network Module 22955 PVDM slots PVDM Orientation PVDMs are installed with a polarization notch to ensure proper orientation and...

Hardware Installation Guide
Page 155
...the NM-HDV2 network module, avoid using excessive force when you remove or replace PVDM2 modules. Caution To avoid damaging ESD-sensitive components, observe all ESD ...Connector edge Alignment notch Polarization notch Cisco Network Modules Hardware Installation Guide 8-13 Figure 8-17 PVDM2 Module Slot Locations 32 10 95199 PVDM2 Module Orientation PVDM2 modules... are installed with the connector edge down, the polarization notch near the back of the chassis. Chapter 8 Connecting Voice Network Modules IP Communications High...
...the NM-HDV2 network module, avoid using excessive force when you remove or replace PVDM2 modules. Caution To avoid damaging ESD-sensitive components, observe all ESD ...Connector edge Alignment notch Polarization notch Cisco Network Modules Hardware Installation Guide 8-13 Figure 8-17 PVDM2 Module Slot Locations 32 10 95199 PVDM2 Module Orientation PVDM2 modules... are installed with the connector edge down, the polarization notch near the back of the chassis. Chapter 8 Connecting Voice Network Modules IP Communications High...

Hardware Installation Guide
Page 162
... To avoid damaging electrostatic discharge (ESD)-sensitive components, observe all ESD precautions when handling MICA modules. Cisco Network Modules Hardware Installation Guide 9-4 OL-2485-20 To remove, replace, or install a MICA module, you remove or replace MICA modules. To avoid damaging the network module or the MICA module, avoid excessive force when you...
... To avoid damaging electrostatic discharge (ESD)-sensitive components, observe all ESD precautions when handling MICA modules. Cisco Network Modules Hardware Installation Guide 9-4 OL-2485-20 To remove, replace, or install a MICA module, you remove or replace MICA modules. To avoid damaging the network module or the MICA module, avoid excessive force when you...

Hardware Installation Guide
Page 167
...to you at the right. Tilting the MICA module toward you . (See Figure 9-7.) Rock it into a Socket H10872 OL-2485-20 Cisco Network Modules Hardware Installation Guide 9-9 Chapter 9 Connecting Digital Modem Network Modules Adding 6-Port MICA Modules to a Digital Modem Network Module Installing ...6-Port MICA Modules To install new or replacement MICA modules, follow these steps: Step 1 Orient the digital modem network module so that the alignment holes line up with the ...
...to you at the right. Tilting the MICA module toward you . (See Figure 9-7.) Rock it into a Socket H10872 OL-2485-20 Cisco Network Modules Hardware Installation Guide 9-9 Chapter 9 Connecting Digital Modem Network Modules Adding 6-Port MICA Modules to a Digital Modem Network Module Installing ...6-Port MICA Modules To install new or replacement MICA modules, follow these steps: Step 1 Orient the digital modem network module so that the alignment holes line up with the ...

Hardware Installation Guide
Page 168
Push the module into place until you finish installing MICA modules, replace the digital modem network module in the router chassis, following these steps: Step 1 Step 2 Align the network module with the connector on the motherboard. 9-10 Cisco Network Modules Hardware Installation Guide OL-2485-20 Adding 6-Port MICA Modules to a Digital Modem Network Module...
Push the module into place until you finish installing MICA modules, replace the digital modem network module in the router chassis, following these steps: Step 1 Step 2 Align the network module with the connector on the motherboard. 9-10 Cisco Network Modules Hardware Installation Guide OL-2485-20 Adding 6-Port MICA Modules to a Digital Modem Network Module...

