

Hardware Installation Guide
Page 49
..., and includes the following sections: • Recommended Practices for Cisco Network Modules, page 2-1 • Installing Cisco Network Modules in Cisco Access Routers, page 2-5 • Removing or Replacing Cisco Network Modules for specific network modules are documented in 1- Note Recommendations and warnings for Cisco Access Routers, page 2-18 • Installing Cisco Interface Cards in the chapter specific to Go Next...
..., and includes the following sections: • Recommended Practices for Cisco Network Modules, page 2-1 • Installing Cisco Network Modules in Cisco Access Routers, page 2-5 • Removing or Replacing Cisco Network Modules for specific network modules are documented in 1- Note Recommendations and warnings for Cisco Access Routers, page 2-18 • Installing Cisco Interface Cards in the chapter specific to Go Next...
Hardware Installation Guide
Page 50
... procedures when installing, removing, and replacing Cisco network modules, Cisco interface cards, Cisco expansion modules, or other electronic printed circuit cards: • Make sure that the router chassis is disconnected from a circuit....10 megohms (Mohm). • If no wrist strap is available, ground yourself by touching the metal part of the victim and then call for Cisco Network Modules Chapter 2 Installing Cisco Network Modules in complete or intermittent equipment failure. Preventing Electrostatic Discharge Damage Electrostatic discharge can result in Cisco Access Routers...
... procedures when installing, removing, and replacing Cisco network modules, Cisco interface cards, Cisco expansion modules, or other electronic printed circuit cards: • Make sure that the router chassis is disconnected from a circuit....10 megohms (Mohm). • If no wrist strap is available, ground yourself by touching the metal part of the victim and then call for Cisco Network Modules Chapter 2 Installing Cisco Network Modules in complete or intermittent equipment failure. Preventing Electrostatic Discharge Damage Electrostatic discharge can result in Cisco Access Routers...

Hardware Installation Guide
Page 51
... or on DC units. Statement 4 Warning Before working near power supplies, unplug the power cord on the front of this equipment. Chapter 2 Installing Cisco Network Modules in Cisco Access Routers Recommended Practices for Cisco Network Modules General Maintenance Guidelines for Cisco Network Modules ...and qualified personnel should be handled according to install or replace this product should be allowed to all individual Cisco network module orders, and is connected. Statement 43 OL-2485-20 Cisco Network Modules Hardware Installation Guide 2-3 Grasp the chassis underneath ...
... or on DC units. Statement 4 Warning Before working near power supplies, unplug the power cord on the front of this equipment. Chapter 2 Installing Cisco Network Modules in Cisco Access Routers Recommended Practices for Cisco Network Modules General Maintenance Guidelines for Cisco Network Modules ...and qualified personnel should be handled according to install or replace this product should be allowed to all individual Cisco network module orders, and is connected. Statement 43 OL-2485-20 Cisco Network Modules Hardware Installation Guide 2-3 Grasp the chassis underneath ...

Hardware Installation Guide
Page 66
... Modules Hardware Installation Guide OL-2485-20 Tip See the "Where to the network and power up the router. Removing or Replacing Cisco Network Modules for Cisco Access Routers Chapter 2 Installing Cisco Network Modules in Cisco Access Routers Step 7 Push the ejector levers so they make contact with the network module faceplate to finish seating the network module...
... Modules Hardware Installation Guide OL-2485-20 Tip See the "Where to the network and power up the router. Removing or Replacing Cisco Network Modules for Cisco Access Routers Chapter 2 Installing Cisco Network Modules in Cisco Access Routers Step 7 Push the ejector levers so they make contact with the network module faceplate to finish seating the network module...
Hardware Installation Guide
Page 67
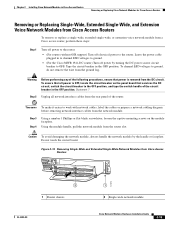
..., ensure that services the DC circuit, switch the circuit breaker to the OFF position, and tape the switch handle of the router. Using the module handle, pull the network module from the network module. Chapter 2 Installing Cisco Network Modules in Cisco Access Routers Removing or Replacing Cisco Network Modules for Cisco Access Routers Removing or Replacing Single-Wide, Extended Single...
..., ensure that services the DC circuit, switch the circuit breaker to the OFF position, and tape the switch handle of the router. Using the module handle, pull the network module from the network module. Chapter 2 Installing Cisco Network Modules in Cisco Access Routers Removing or Replacing Cisco Network Modules for Cisco Access Routers Removing or Replacing Single-Wide, Extended Single...

Hardware Installation Guide
Page 68
.... Timesaver To make it easier to ground. Leave the power cable plugged in Cisco Access Routers To remove or replace a double-wide or extended double-wide network module, perform these steps: Step ...Cisco Access Routers 121472 T D M 0 S L O T 2 S L O T 0 S L O SAG==ESACP0ET/1ED AAG==EFLIDN0X/K0 T 3 A F S S L A L O T F 1 S L PVDM2 PVDM1 PVDM0 AIM1 AIM0 Step 4 Using your thumbs, open the levers on the network module faceplate. (See Figure 2-15.) When the ejector levers open, they unseat the network module from the network module. Removing or Replacing Cisco...
.... Timesaver To make it easier to ground. Leave the power cable plugged in Cisco Access Routers To remove or replace a double-wide or extended double-wide network module, perform these steps: Step ...Cisco Access Routers 121472 T D M 0 S L O T 2 S L O T 0 S L O SAG==ESACP0ET/1ED AAG==EFLIDN0X/K0 T 3 A F S S L A L O T F 1 S L PVDM2 PVDM1 PVDM0 AIM1 AIM0 Step 4 Using your thumbs, open the levers on the network module faceplate. (See Figure 2-15.) When the ejector levers open, they unseat the network module from the network module. Removing or Replacing Cisco...

Hardware Installation Guide
Page 69
... (OIR) provides uninterrupted network operation, maintains routing information, and ensures session preservation. Chapter 2 Installing Cisco Network Modules in Cisco Access Routers Removing or Replacing Cisco Network Modules for similar network modules: • Cisco 3660 routers • Cisco 3745 routers • Cisco 3845 routers Caution These Cisco access routers support OIR with similar network modules only. To avoid damage to the interface card and...
... (OIR) provides uninterrupted network operation, maintains routing information, and ensures session preservation. Chapter 2 Installing Cisco Network Modules in Cisco Access Routers Removing or Replacing Cisco Network Modules for similar network modules: • Cisco 3660 routers • Cisco 3745 routers • Cisco 3845 routers Caution These Cisco access routers support OIR with similar network modules only. To avoid damage to the interface card and...

Hardware Installation Guide
Page 70
... the network module. Example 2-2 Activating Interfaces on Cisco Network Modules Router(config)# interface fastethernet 1/0 Router(config-if)# no shutdown Step 11 Repeat Step 10 for every interface on page 2-7.) Connect the cables removed from Cisco Access Routers" and "Removing or Replacing Double-Wide and Extended Double-Wide Network Modules in Cisco Access Routers" sections. Step 4 Unplug all interfaces available...
... the network module. Example 2-2 Activating Interfaces on Cisco Network Modules Router(config)# interface fastethernet 1/0 Router(config-if)# no shutdown Step 11 Repeat Step 10 for every interface on page 2-7.) Connect the cables removed from Cisco Access Routers" and "Removing or Replacing Double-Wide and Extended Double-Wide Network Modules in Cisco Access Routers" sections. Step 4 Unplug all interfaces available...

Hardware Installation Guide
Page 71
... slot/port session Trying 10.10.10.1, 2129 ... The operating system on page 2-19. Step 2 Step 3 Step 4 Step 5 Step 6 Step 7 Step 8 Save the running -config ftp: Address or name or remote host? OL-2485-20 Cisco Network Modules Hardware Installation Guide 2-23 Chapter 2 Installing Cisco Network Modules in Cisco Access Routers Removing or Replacing Cisco Network Modules for the...
... slot/port session Trying 10.10.10.1, 2129 ... The operating system on page 2-19. Step 2 Step 3 Step 4 Step 5 Step 6 Step 7 Step 8 Save the running -config ftp: Address or name or remote host? OL-2485-20 Cisco Network Modules Hardware Installation Guide 2-23 Chapter 2 Installing Cisco Network Modules in Cisco Access Routers Removing or Replacing Cisco Network Modules for the...

Hardware Installation Guide
Page 75
... Warning Because invisible laser radiation may be removed with network module removal. Tip Gigabit Ethernet network modules can be emitted from the aperture of the port when no fiber cable ...2-5) before connecting the network module to the network. Chapter 2 Installing Cisco Network Modules in Cisco Access Routers Where to Go Next Caution Do not remove the optical port plugs ...Remove the plugs from the SC connectors on the GBIC. OL-2485-20 Cisco Network Modules Hardware Installation Guide 2-27 Replace the GBIC with a similar model, or continue with the GBIC installed. ...
... Warning Because invisible laser radiation may be removed with network module removal. Tip Gigabit Ethernet network modules can be emitted from the aperture of the port when no fiber cable ...2-5) before connecting the network module to the network. Chapter 2 Installing Cisco Network Modules in Cisco Access Routers Where to Go Next Caution Do not remove the optical port plugs ...Remove the plugs from the SC connectors on the GBIC. OL-2485-20 Cisco Network Modules Hardware Installation Guide 2-27 Replace the GBIC with a similar model, or continue with the GBIC installed. ...

Hardware Installation Guide
Page 79
... RING 0 ETHERNET 0 STP port UTP port Ethernet LEDs Ethernet Connectors The 1-port Ethernet network module, the 1-Ethernet 2-slot network module, and the 1-Ethernet 1-Token Ring 2-slot network module each provide a single Ethernet port. Port 0 offers a choice of the transceiver cable. These ports are plugged into both ports, the 10BASE-T connection is identified in software by replacing the AUI...
... RING 0 ETHERNET 0 STP port UTP port Ethernet LEDs Ethernet Connectors The 1-port Ethernet network module, the 1-Ethernet 2-slot network module, and the 1-Ethernet 1-Token Ring 2-slot network module each provide a single Ethernet port. Port 0 offers a choice of the transceiver cable. These ports are plugged into both ports, the 10BASE-T connection is identified in software by replacing the AUI...

Hardware Installation Guide
Page 126
...NM-2CE1T1-PRI) replace the following network modules: • 1-port T1/E1 channelized PRI network module with G.703 (NM-1CE1T1-PRI) (see Figure 7-1) • 2-port T1/E1 channelized PRI network module with G.703 (NM-2CE1T1-PRI) (see Table 7-1. Each port supports 100/120-ohm balanced and...; NM-2CE1U • NM-2CT1 • NM-2CT1-CSU For information on Cisco modular access routers supporting Cisco channelized T1/E1 PRI network modules with G.703 Modular Access Router Cisco 26xx Cisco 26xxXM Cisco 2691 Cisco 3620 Cisco 3631 Cisco 3640 NM-1CE1T1-PRI No Yes Yes No Yes No NM-2CE1T1-PRI No Yes...
...NM-2CE1T1-PRI) replace the following network modules: • 1-port T1/E1 channelized PRI network module with G.703 (NM-1CE1T1-PRI) (see Figure 7-1) • 2-port T1/E1 channelized PRI network module with G.703 (NM-2CE1T1-PRI) (see Table 7-1. Each port supports 100/120-ohm balanced and...; NM-2CE1U • NM-2CT1 • NM-2CT1-CSU For information on Cisco modular access routers supporting Cisco channelized T1/E1 PRI network modules with G.703 Modular Access Router Cisco 26xx Cisco 26xxXM Cisco 2691 Cisco 3620 Cisco 3631 Cisco 3640 NM-1CE1T1-PRI No Yes Yes No Yes No NM-2CE1T1-PRI No Yes...

Hardware Installation Guide
Page 141
... you can examine the network module itself (outside the router) or use the Cisco IOS show diag command looks similar to replace network modules without switching off the router or affecting the operation of the show diag command. The label on Cisco 3660 and Cisco 3745 platforms. Caution Cisco routers support OIR with similar modules only. If your...
... you can examine the network module itself (outside the router) or use the Cisco IOS show diag command looks similar to replace network modules without switching off the router or affecting the operation of the show diag command. The label on Cisco 3660 and Cisco 3745 platforms. Caution Cisco routers support OIR with similar modules only. If your...

Hardware Installation Guide
Page 144
Cisco Network Modules Hardware Installation Guide 8-2 OL-2485-20 4-, 8-, and 48-Channel High-Density Voice Network Modules Chapter 8 Connecting Voice Network Modules Figure 8-1 1-Slot 2-Channel Voice ... or cabling. Note For the NM-HD-1V, NM-HD-2V, and NM-DS-2VE network modules, DSPs are on-board and are not field-replaceable units (FRUs). The intrabuilding cable must be shielded and the shield must be grounded at both ends.
Cisco Network Modules Hardware Installation Guide 8-2 OL-2485-20 4-, 8-, and 48-Channel High-Density Voice Network Modules Chapter 8 Connecting Voice Network Modules Figure 8-1 1-Slot 2-Channel Voice ... or cabling. Note For the NM-HD-1V, NM-HD-2V, and NM-DS-2VE network modules, DSPs are on-board and are not field-replaceable units (FRUs). The intrabuilding cable must be shielded and the shield must be grounded at both ends.

Hardware Installation Guide
Page 145
...module. When used in Figure 8-6. For information on the Cisco interface cards supported on these voice network modules, see Table 1-2 on Cisco 2600 series, Cisco 3600 series, and Cisco 3700 series routers. OL-2485-20 Cisco Network Modules Hardware Installation Guide 8-3 The NM-1V and ...NM-2V network modules are still available for use on page 1-8. Chapter 8 Connecting Voice Network Modules 60-Channel High-Density Voice Network Module Note The NM-HD-1V, NM-HD-2V, and NM-HD-2VE network modules replace...
...module. When used in Figure 8-6. For information on the Cisco interface cards supported on these voice network modules, see Table 1-2 on Cisco 2600 series, Cisco 3600 series, and Cisco 3700 series routers. OL-2485-20 Cisco Network Modules Hardware Installation Guide 8-3 The NM-1V and ...NM-2V network modules are still available for use on page 1-8. Chapter 8 Connecting Voice Network Modules 60-Channel High-Density Voice Network Module Note The NM-HD-1V, NM-HD-2V, and NM-HD-2VE network modules replace...

Hardware Installation Guide
Page 147
To avoid damaging the HDV network module, avoid using excessive force when you remove or replace PVDMs. Figure 8-8 PVDM Orientation Alignment holes 22953 OL-2485-20 Connector edge Polarization notch Cisco Network Modules Hardware Installation Guide 8-5 Chapter 8 Connecting Voice Network Modules Figure 8-7 PVDM Slot Locations 43210 60-Channel High-Density Voice Network Module...
To avoid damaging the HDV network module, avoid using excessive force when you remove or replace PVDMs. Figure 8-8 PVDM Orientation Alignment holes 22953 OL-2485-20 Connector edge Polarization notch Cisco Network Modules Hardware Installation Guide 8-5 Chapter 8 Connecting Voice Network Modules Figure 8-7 PVDM Slot Locations 43210 60-Channel High-Density Voice Network Module...

Hardware Installation Guide
Page 155
... holes on a PVDM2 module. To avoid damaging the NM-HDV2 network module, avoid using excessive force when you remove or replace PVDM2 modules. PVDM2 modules are manufactured with a polarization notch to ensure proper orientation, and alignment holes to ensure proper positioning....PVDM2 Module Orientation Alignment holes 95200 OL-2485-20 Connector edge Alignment notch Polarization notch Cisco Network Modules Hardware Installation Guide 8-13 Figure 8-17 PVDM2 Module Slot Locations 32 10 95199 PVDM2 Module Orientation PVDM2 modules are installed with a single 80-pin PVDM2 module...
... holes on a PVDM2 module. To avoid damaging the NM-HDV2 network module, avoid using excessive force when you remove or replace PVDM2 modules. PVDM2 modules are manufactured with a polarization notch to ensure proper orientation, and alignment holes to ensure proper positioning....PVDM2 Module Orientation Alignment holes 95200 OL-2485-20 Connector edge Alignment notch Polarization notch Cisco Network Modules Hardware Installation Guide 8-13 Figure 8-17 PVDM2 Module Slot Locations 32 10 95199 PVDM2 Module Orientation PVDM2 modules are installed with a single 80-pin PVDM2 module...

Hardware Installation Guide
Page 162
To avoid damaging the network module or the MICA module, avoid excessive force when you must first remove the digital modem module from the router chassis. Cisco Network Modules Hardware Installation Guide 9-4 OL-2485-20 Adding 6-Port MICA Modules to a Digital Modem Network Module Figure 9-2 6-Port MICA Module Chapter 9 Connecting Digital Modem... edge Alignment holes Polarization notch Caution To avoid damaging electrostatic discharge (ESD)-sensitive components, observe all ESD precautions when handling MICA modules. To remove, replace, or install a MICA module, you remove or...
To avoid damaging the network module or the MICA module, avoid excessive force when you must first remove the digital modem module from the router chassis. Cisco Network Modules Hardware Installation Guide 9-4 OL-2485-20 Adding 6-Port MICA Modules to a Digital Modem Network Module Figure 9-2 6-Port MICA Module Chapter 9 Connecting Digital Modem... edge Alignment holes Polarization notch Caution To avoid damaging electrostatic discharge (ESD)-sensitive components, observe all ESD precautions when handling MICA modules. To remove, replace, or install a MICA module, you remove or...

Hardware Installation Guide
Page 167
... MICA module is on the right. Repeat Step 2 through the alignment holes, and the spring clips click into a Socket H10872 OL-2485-20 Cisco Network Modules Hardware Installation Guide 9-9 It is normal to you at the right. Tilting the MICA module toward you . (See Figure 9-7.) Rock... Connecting Digital Modem Network Modules Adding 6-Port MICA Modules to a Digital Modem Network Module Installing 6-Port MICA Modules To install new or replacement MICA modules, follow these steps: Step 1 Orient the digital modem network module so that the alignment holes line up with the plastic ...
... MICA module is on the right. Repeat Step 2 through the alignment holes, and the spring clips click into a Socket H10872 OL-2485-20 Cisco Network Modules Hardware Installation Guide 9-9 It is normal to you at the right. Tilting the MICA module toward you . (See Figure 9-7.) Rock... Connecting Digital Modem Network Modules Adding 6-Port MICA Modules to a Digital Modem Network Module Installing 6-Port MICA Modules To install new or replacement MICA modules, follow these steps: Step 1 Orient the digital modem network module so that the alignment holes line up with the plastic ...

Hardware Installation Guide
Page 168
Push the module into place until you finish installing MICA modules, replace the digital modem network module in the router chassis, following these steps: Step 1 Step 2 Align the network module with the connector on the motherboard. 9-10 Cisco Network Modules Hardware Installation Guide OL-2485-20 Adding 6-Port MICA Modules to a Digital Modem Network Module...
Push the module into place until you finish installing MICA modules, replace the digital modem network module in the router chassis, following these steps: Step 1 Step 2 Align the network module with the connector on the motherboard. 9-10 Cisco Network Modules Hardware Installation Guide OL-2485-20 Adding 6-Port MICA Modules to a Digital Modem Network Module...

