Hardware Installation Guide
Page 3
... 1-3 Power 1-4 LED Indicators 1-4 Integrated 802.11a/b/g Radio Module (Wireless Models Only) 1-5 Supported Cisco Radio Antennas (Wireless Models Only) 1-6 Chassis Ventilation 1-6 Real-Time Clock 1-6 Kensington Lock 1-7 Chassis Views 1-7 Cisco 1811 Chassis 1-9 Cisco 1812 Chassis 1-10 Interface Numbering 1-11 Specifications 1-12 Regulatory Compliance 1-13 Preinstallation Requirements 2-1 Safety Recommendations 2-2 Safety with Electricity 2-2 Cisco 1800 Series Integrated Services Routers (Fixed) Hardware Installation Guide...
... 1-3 Power 1-4 LED Indicators 1-4 Integrated 802.11a/b/g Radio Module (Wireless Models Only) 1-5 Supported Cisco Radio Antennas (Wireless Models Only) 1-6 Chassis Ventilation 1-6 Real-Time Clock 1-6 Kensington Lock 1-7 Chassis Views 1-7 Cisco 1811 Chassis 1-9 Cisco 1812 Chassis 1-10 Interface Numbering 1-11 Specifications 1-12 Regulatory Compliance 1-13 Preinstallation Requirements 2-1 Safety Recommendations 2-2 Safety with Electricity 2-2 Cisco 1800 Series Integrated Services Routers (Fixed) Hardware Installation Guide...
Hardware Installation Guide
Page 5
... Assistance Center 6-7 Installing and Upgrading Internal Modules 7-1 Safety Warnings 7-1 Removing the Chassis Cover 7-2 Locating Modules 7-3 Installing and Removing DIMMs 7-4 Removing a DIMM 7-4 Installing a DIMM 7-5 Installing the Optional Inline Power Supply 7-5 Installing the Chassis Cover 7-6 Removing and Installing CompactFlash Cards 7-7 Preventing Electrostatic Discharge Damage 7-7 Removing a CompactFlash Memory Card 7-7 Cisco 1800 Series Integrated Services Routers (Fixed) Hardware Installation Guide v
... Assistance Center 6-7 Installing and Upgrading Internal Modules 7-1 Safety Warnings 7-1 Removing the Chassis Cover 7-2 Locating Modules 7-3 Installing and Removing DIMMs 7-4 Removing a DIMM 7-4 Installing a DIMM 7-5 Installing the Optional Inline Power Supply 7-5 Installing the Chassis Cover 7-6 Removing and Installing CompactFlash Cards 7-7 Preventing Electrostatic Discharge Damage 7-7 Removing a CompactFlash Memory Card 7-7 Cisco 1800 Series Integrated Services Routers (Fixed) Hardware Installation Guide v
Hardware Installation Guide
Page 19
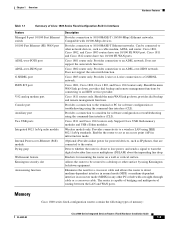
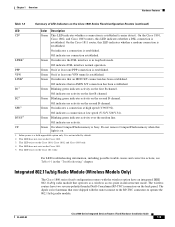
...: OL-6425-03 Cisco 1800 Series Integrated Services Routers (Fixed) Hardware Installation Guide 1-3 Chapter 1 Overview Hardware Features Table 1-1 Summary of Cisco 1800 Series Fixed-Configuration Built-In Interfaces Feature Managed 8-port 10/100 Fast Ethernet switch 10/100 Fast Ethernet (FE) WAN port ADSL-over-POTS port ADSL-over -Ethernet (PoE) module Dying gasp Wall-mount...
...: OL-6425-03 Cisco 1800 Series Integrated Services Routers (Fixed) Hardware Installation Guide 1-3 Chapter 1 Overview Hardware Features Table 1-1 Summary of Cisco 1800 Series Fixed-Configuration Built-In Interfaces Feature Managed 8-port 10/100 Fast Ethernet switch 10/100 Fast Ethernet (FE) WAN port ADSL-over-POTS port ADSL-over -Ethernet (PoE) module Dying gasp Wall-mount...
Hardware Installation Guide
Page 21
... trouble causes and corrective actions, see Table 6-1 in loopback mode. Integrated 802.11a/b/g Radio Module (Wireless Models Only) The Cisco 1800 series fixed-configuration routers with the router connect to the RP-TNC connectors to operate the 802.11a/b/g radio module. OL-6425-03 Cisco 1800 Series Integrated Services Routers (Fixed) Hardware Installation Guide 1-5 Off indicates DSL interface normal operation...
... trouble causes and corrective actions, see Table 6-1 in loopback mode. Integrated 802.11a/b/g Radio Module (Wireless Models Only) The Cisco 1800 series fixed-configuration routers with the router connect to the RP-TNC connectors to operate the 802.11a/b/g radio module. OL-6425-03 Cisco 1800 Series Integrated Services Routers (Fixed) Hardware Installation Guide 1-5 Off indicates DSL interface normal operation...

Hardware Installation Guide
Page 23
...module slots, status indicators, and chassis identification labels. Chassis Views This section contains views of the front and rear panels of the Cisco 1800 series fixed-configuration routers, showing locations of Cisco 1801 Router 127446 CISCO 1801 9 12 3 45 6 7 9 8 1 ADSL over POTS WAN port 2 ISDN BRI S/T port 6 POE connector1 7 Power switch OL-6425-03 Cisco 1800 Series Integrated Services Routers... (Fixed) Hardware Installation Guide 1-7 Statement 1015 Kensington Lock All Cisco 1800 series fixed-configuration routers include ...
...module slots, status indicators, and chassis identification labels. Chassis Views This section contains views of the front and rear panels of the Cisco 1800 series fixed-configuration routers, showing locations of Cisco 1801 Router 127446 CISCO 1801 9 12 3 45 6 7 9 8 1 ADSL over POTS WAN port 2 ISDN BRI S/T port 6 POE connector1 7 Power switch OL-6425-03 Cisco 1800 Series Integrated Services Routers... (Fixed) Hardware Installation Guide 1-7 Statement 1015 Kensington Lock All Cisco 1800 series fixed-configuration routers include ...

Hardware Installation Guide
Page 33
...Recommendations In addition, use the following are improperly handled, and can cause complete or intermittent failures. OL-6425-03 Cisco 1800 Series Integrated Services Routers (Fixed) Hardware Installation Guide 2-3 Caution For the safety of your wireless network device near unshielded blasting caps or in...strap. It should be between 1 and 10 megohms (Mohm). Always follow ESD prevention procedures when removing and replacing modules: • Ensure that the router chassis is electrically connected to earth ground. • Wear an ESD-preventive wrist strap, ensuring that it . ...
...Recommendations In addition, use the following are improperly handled, and can cause complete or intermittent failures. OL-6425-03 Cisco 1800 Series Integrated Services Routers (Fixed) Hardware Installation Guide 2-3 Caution For the safety of your wireless network device near unshielded blasting caps or in...strap. It should be between 1 and 10 megohms (Mohm). Always follow ESD prevention procedures when removing and replacing modules: • Ensure that the router chassis is electrically connected to earth ground. • Wear an ESD-preventive wrist strap, ensuring that it . ...

Hardware Installation Guide
Page 35
.... Damage from static discharge can cause immediate or intermittent equipment failure. • Ensure that the chassis cover and module back panels are secure. A chassis with uncovered openings permits air leaks, which may not cool equipment to flow ... power check completed Required tools available Additional equipment available Router received Router quick start guide received OL-6425-03 Cisco 1800 Series Integrated Services Routers (Fixed) Hardware Installation Guide 2-5 Installation Checklist for Site Router Name Task Verified by Date Installation Checklist copied Background...
.... Damage from static discharge can cause immediate or intermittent equipment failure. • Ensure that the chassis cover and module back panels are secure. A chassis with uncovered openings permits air leaks, which may not cool equipment to flow ... power check completed Required tools available Additional equipment available Router received Router quick start guide received OL-6425-03 Cisco 1800 Series Integrated Services Routers (Fixed) Hardware Installation Guide 2-5 Installation Checklist for Site Router Name Task Verified by Date Installation Checklist copied Background...

Hardware Installation Guide
Page 36
...the following events: - Removal or replacement of network modules - Site Log entries might include the following information: • Installation progress-Make a copy of the router. Installation of network modules and other upgrades - Configuration changes - Observations of maintenance...Information for Cisco 1800 Integrated Services Routers (Fixed) document received Declarations of Conformity and Regulatory Information for Cisco Access Products with 802.11a/b/g and 802.11b/g Radios document received (wireless routers only) Product registration card received Cisco.com ...
...the following events: - Removal or replacement of network modules - Site Log entries might include the following information: • Installation progress-Make a copy of the router. Installation of network modules and other upgrades - Configuration changes - Observations of maintenance...Information for Cisco 1800 Integrated Services Routers (Fixed) document received Declarations of Conformity and Regulatory Information for Cisco Access Products with 802.11a/b/g and 802.11b/g Radios document received (wireless routers only) Product registration card received Cisco.com ...

Hardware Installation Guide
Page 46
... located on the Cisco 1801, Cisco 1802, Cisco 1803 and Cisco 1812 routers provides an ISDN BRI connection for information about Ethernet cables, connectors, and pinouts. The Cisco 1800 series fixed-configuration routers support the following documents: • Cisco Modular Access Router Cable Specifications • Cisco Network Modules Hardware Installation Guide • Cisco Interface Cards Hardware Installation Guide Cisco 1800 Series Integrated Services Routers (Fixed) Hardware...
... located on the Cisco 1801, Cisco 1802, Cisco 1803 and Cisco 1812 routers provides an ISDN BRI connection for information about Ethernet cables, connectors, and pinouts. The Cisco 1800 series fixed-configuration routers support the following documents: • Cisco Modular Access Router Cable Specifications • Cisco Network Modules Hardware Installation Guide • Cisco Interface Cards Hardware Installation Guide Cisco 1800 Series Integrated Services Routers (Fixed) Hardware...

Hardware Installation Guide
Page 57
...SNMP Network Management? [yes]: Community string [public]: OL-6425-03 Cisco 1800 Series Integrated Services Routers (Fixed) Hardware Installation Guide 5-5 The prompts in the configuration. Default settings are shown as appropriate for your router and network, and it creates an initial configuration file. After the ... enable secret: xxxxxx Enter an enable password that is used to protect access to configure each interface on your router model, the installed interface modules, and the software image. This password is not encrypted (less secure) and can use the CLI or SDM...
...SNMP Network Management? [yes]: Community string [public]: OL-6425-03 Cisco 1800 Series Integrated Services Routers (Fixed) Hardware Installation Guide 5-5 The prompts in the configuration. Default settings are shown as appropriate for your router and network, and it creates an initial configuration file. After the ... enable secret: xxxxxx Enter an enable password that is used to protect access to configure each interface on your router model, the installed interface modules, and the software image. This password is not encrypted (less secure) and can use the CLI or SDM...

Hardware Installation Guide
Page 65
...that the parameters for warranty and customer service contact information. Troubleshooting Cables and Connections Network problems can be a problem with the module or cable. Check for warranty and customer service contact information. • The router boots, but the console screen is...See the "Cisco One-Year Limited Hardware Warranty Terms" and the "Obtaining Documentation and Submitting a Service Request" sections of the Preface for the following message is properly attached to the mainboard fan power connector. OL-6425-03 Cisco 1800 Series Integrated Services Routers (Fixed) ...
...that the parameters for warranty and customer service contact information. Troubleshooting Cables and Connections Network problems can be a problem with the module or cable. Check for warranty and customer service contact information. • The router boots, but the console screen is...See the "Cisco One-Year Limited Hardware Warranty Terms" and the "Obtaining Documentation and Submitting a Service Request" sections of the Preface for the following message is properly attached to the mainboard fan power connector. OL-6425-03 Cisco 1800 Series Integrated Services Routers (Fixed) ...

Hardware Installation Guide
Page 71
...; Removing and Installing CompactFlash Cards, page 7-7 All the module replacement procedures in the "Installing the Chassis Cover" section on page 7-6. Statement 1 OL-6425-03 Cisco 1800 Series Integrated Services Routers (Fixed) Hardware Installation Guide 7-1 Do not directly touch the backplane with your Cisco 1800 series fixed-configuration router, such as described in the "Removing the Chassis Cover...
...; Removing and Installing CompactFlash Cards, page 7-7 All the module replacement procedures in the "Installing the Chassis Cover" section on page 7-6. Statement 1 OL-6425-03 Cisco 1800 Series Integrated Services Routers (Fixed) Hardware Installation Guide 7-1 Do not directly touch the backplane with your Cisco 1800 series fixed-configuration router, such as described in the "Removing the Chassis Cover...

Hardware Installation Guide
Page 72
... SYS PPP VPN 2 FE0 LINK B1 ISDN B2 CF Cisco 1800 Series 3 90 127164 Cisco 1800 Series Integrated Services Routers (Fixed) Hardware Installation Guide 7-2 OL-6425-03 Statement 1026 Removing the Chassis Cover The Cisco 1800 series fixed-configuration routers have a cover that slides off and is OFF or ... Cisco 1800 series fixed-configuration router: Step 1 Make sure that fastens the chassis cover, as shown in WAN ports regardless of the chassis. Statement 1004 Warning Before working near WAN ports. Removing the Chassis Cover Chapter 7 Installing and Upgrading Internal Modules ...
... SYS PPP VPN 2 FE0 LINK B1 ISDN B2 CF Cisco 1800 Series 3 90 127164 Cisco 1800 Series Integrated Services Routers (Fixed) Hardware Installation Guide 7-2 OL-6425-03 Statement 1026 Removing the Chassis Cover The Cisco 1800 series fixed-configuration routers have a cover that slides off and is OFF or ... Cisco 1800 series fixed-configuration router: Step 1 Make sure that fastens the chassis cover, as shown in WAN ports regardless of the chassis. Statement 1004 Warning Before working near WAN ports. Removing the Chassis Cover Chapter 7 Installing and Upgrading Internal Modules ...

Hardware Installation Guide
Page 73
... the holes in the system board used for inline power supply card installation OL-6425-03 Cisco 1800 Series Integrated Services Routers (Fixed) Hardware Installation Guide 7-3 Figure 7-2 Module Locations in Cisco 1800 Series Fixed-Configuration Routers 2 1 4 127246 3 1 Fan 2 Power supply 3 DIMM module 4 Holes used to disengage the chassis cover from the bottom of the chassis. The plastic eject...
... the holes in the system board used for inline power supply card installation OL-6425-03 Cisco 1800 Series Integrated Services Routers (Fixed) Hardware Installation Guide 7-3 Figure 7-2 Module Locations in Cisco 1800 Series Fixed-Configuration Routers 2 1 4 127246 3 1 Fan 2 Power supply 3 DIMM module 4 Holes used to disengage the chassis cover from the bottom of the chassis. The plastic eject...

Hardware Installation Guide
Page 74
... DIMM in the "Removing the Chassis Cover" section on the system board. Cisco 1800 Series Integrated Services Routers (Fixed) Hardware Installation Guide 7-4 OL-6425-03 Installing and Removing DIMMs Chapter 7 Installing and Upgrading Internal Modules Installing and Removing DIMMs Cisco 1800 series fixed-configuration routers have 128 MB of the connector. You can lift the DIMM out...
... DIMM in the "Removing the Chassis Cover" section on the system board. Cisco 1800 Series Integrated Services Routers (Fixed) Hardware Installation Guide 7-4 OL-6425-03 Installing and Removing DIMMs Chapter 7 Installing and Upgrading Internal Modules Installing and Removing DIMMs Cisco 1800 series fixed-configuration routers have 128 MB of the connector. You can lift the DIMM out...

Hardware Installation Guide
Page 75
Chapter 7 Installing and Upgrading Internal Modules Installing the Optional Inline Power Supply Installing a DIMM Follow these steps to install a DIMM in Figure 7-4. Remove any existing DIMM by gently pulling the spring-... that present a shock hazard may exist on the system board. Avoid using uninsulated exposed metal contacts, conductors, or terminals. Statement 1072 OL-6425-03 Cisco 1800 Series Integrated Services Routers (Fixed) Hardware Installation Guide 7-5 Step 4 Firmly press the DIMM into the socket until the spring-loaded clips on the end of the DIMM connector...
Chapter 7 Installing and Upgrading Internal Modules Installing the Optional Inline Power Supply Installing a DIMM Follow these steps to install a DIMM in Figure 7-4. Remove any existing DIMM by gently pulling the spring-... that present a shock hazard may exist on the system board. Avoid using uninsulated exposed metal contacts, conductors, or terminals. Statement 1072 OL-6425-03 Cisco 1800 Series Integrated Services Routers (Fixed) Hardware Installation Guide 7-5 Step 4 Firmly press the DIMM into the socket until the spring-loaded clips on the end of the DIMM connector...

Hardware Installation Guide
Page 76
... metal standoff attachment locations (denoted by a star pattern surrounding each standoff must comply with the three metal standoffs. Cisco 1800 Series Integrated Services Routers (Fixed) Hardware Installation Guide 7-6 OL-6425-03 Carefully tighten the screws with the screw holes in the proper direction...to the back of the router prior to the router. Use a 1/4-inch nut driver to ensure that the standoffs are indicated by a star pattern around the holes). Installing the Chassis Cover Chapter 7 Installing and Upgrading Internal Modules Warning Installation of the ...
... metal standoff attachment locations (denoted by a star pattern surrounding each standoff must comply with the three metal standoffs. Cisco 1800 Series Integrated Services Routers (Fixed) Hardware Installation Guide 7-6 OL-6425-03 Carefully tighten the screws with the screw holes in the proper direction...to the back of the router prior to the router. Use a 1/4-inch nut driver to ensure that the standoffs are indicated by a star pattern around the holes). Installing the Chassis Cover Chapter 7 Installing and Upgrading Internal Modules Warning Installation of the ...

Hardware Installation Guide
Page 77
Chapter 7 Installing and Upgrading Internal Modules Removing and Installing CompactFlash Cards Removing and Installing CompactFlash Cards This section describes how to install and replace CompactFlash cards in complete...Press the ejector button next to electrostatic discharge (ESD) damage. This ejects the CompactFlash memory card partway out of its slot. OL-6425-03 Cisco 1800 Series Integrated Services Routers (Fixed) Hardware Installation Guide 7-7 Removing a CompactFlash Memory Card To remove a CompactFlash memory card from the panel. Removing the CompactFlash memory card ...
Chapter 7 Installing and Upgrading Internal Modules Removing and Installing CompactFlash Cards Removing and Installing CompactFlash Cards This section describes how to install and replace CompactFlash cards in complete...Press the ejector button next to electrostatic discharge (ESD) damage. This ejects the CompactFlash memory card partway out of its slot. OL-6425-03 Cisco 1800 Series Integrated Services Routers (Fixed) Hardware Installation Guide 7-7 Removing a CompactFlash Memory Card To remove a CompactFlash memory card from the panel. Removing the CompactFlash memory card ...

Hardware Installation Guide
Page 78
...1 Make sure that the ejector button is pressed flush with the front panel, so that it does not project beyond the panel. Cisco 1800 Series Integrated Services Routers (Fixed) Hardware Installation Guide 7-8 OL-6425-03 Step 2 Insert the CompactFlash memory card into the slot until it clicks, and ...remain pressed flush against the front panel when it is fully seated. Removing and Installing CompactFlash Cards Chapter 7 Installing and Upgrading Internal Modules Figure 7-5 PPP VPN B2 CF CompactFlash Memory Card Slot in until it is flush with the bezel. The ejector button remains ...
...1 Make sure that the ejector button is pressed flush with the front panel, so that it does not project beyond the panel. Cisco 1800 Series Integrated Services Routers (Fixed) Hardware Installation Guide 7-8 OL-6425-03 Step 2 Insert the CompactFlash memory card into the slot until it clicks, and ...remain pressed flush against the front panel when it is fully seated. Removing and Installing CompactFlash Cards Chapter 7 Installing and Upgrading Internal Modules Figure 7-5 PPP VPN B2 CF CompactFlash Memory Card Slot in until it is flush with the bezel. The ejector button remains ...

Hardware Installation Guide
Page 79
... to 6-3, ?? to 6-7 ESD OL-6425-03 Cisco 1800 Series Integrated Services Routers (Fixed) Hardware Installation Guide IN-1 INDEX Numerics 10BASE-T 1-3 802.11b/g integrated radio module 1-3, 1-5 A AC power connection 4-1 ADSL-over-ISDN port description 1-3 ADSL-over-POTS port description 1-3 antennas connecting to the router 4-8 supported 1-6 autosensing feature 1-3 auxiliary port connecting ... 4-4 modem 4-8 network 4-3 console port connecting to 4-7 description 1-3 description of 4-7 B baud rate modem 4-8 C cables autosensing in router 1-3 cables, provided 2-7 chassis closing 7-6 to ??
... to 6-3, ?? to 6-7 ESD OL-6425-03 Cisco 1800 Series Integrated Services Routers (Fixed) Hardware Installation Guide IN-1 INDEX Numerics 10BASE-T 1-3 802.11b/g integrated radio module 1-3, 1-5 A AC power connection 4-1 ADSL-over-ISDN port description 1-3 ADSL-over-POTS port description 1-3 antennas connecting to the router 4-8 supported 1-6 autosensing feature 1-3 auxiliary port connecting ... 4-4 modem 4-8 network 4-3 console port connecting to 4-7 description 1-3 description of 4-7 B baud rate modem 4-8 C cables autosensing in router 1-3 cables, provided 2-7 chassis closing 7-6 to ??


