Hardware Installation Guide
Page 33
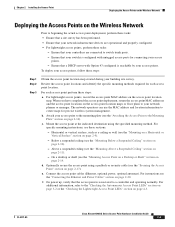
... page 2-10). - OL-8371-05 Cisco Aironet 1240AG Series Access Point Hardware Installation Guide 2-5 Review the access point locations and identify the specific mounting methods required for connecting your building site survey. d. Optionally secure the access point using the specified mounting method. Chapter 2 Installing the Access Point Deploying the Access Points on the Wireless Network Deploying the Access Points on the access point location map. Ensure that your...
... page 2-10). - OL-8371-05 Cisco Aironet 1240AG Series Access Point Hardware Installation Guide 2-5 Review the access point locations and identify the specific mounting methods required for connecting your building site survey. d. Optionally secure the access point using the specified mounting method. Chapter 2 Installing the Access Point Deploying the Access Points on the Wireless Network Deploying the Access Points on the access point location map. Ensure that your...

Hardware Installation Guide
Page 38
Mounting Below a Suspended Ceiling Chapter 2 Installing the Access Point Mounting Below a Suspended Ceiling Note To comply with recessed ceiling 3 tiles) 2-10 Cisco Aironet 1240AG Series Access Point Hardware Installation Guide OL-8371-05 Figure 2-4 T-Rail Mounting Parts 1 Suspended ceiling T-rail 4 mounting plate 2 T-rail clips 5 Keps nut (contains an attached lock washer) Plastic spacer (used with NEC code, a #10-24 grounding lug is provided on the mounting plate. You should review Figure 2-4 before beginning the mounting process.
Mounting Below a Suspended Ceiling Chapter 2 Installing the Access Point Mounting Below a Suspended Ceiling Note To comply with recessed ceiling 3 tiles) 2-10 Cisco Aironet 1240AG Series Access Point Hardware Installation Guide OL-8371-05 Figure 2-4 T-Rail Mounting Parts 1 Suspended ceiling T-rail 4 mounting plate 2 T-rail clips 5 Keps nut (contains an attached lock washer) Plastic spacer (used with NEC code, a #10-24 grounding lug is provided on the mounting plate. You should review Figure 2-4 before beginning the mounting process.