

1/2 HPS Chain Drive Garage Door Opener Manual
Page 1
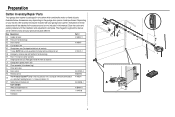
... 1-4 Assembly 5-9 Installation 10-17 Install the Door Control 18-19 Install the Protector System® ...... 20-23 Power 24-25 Adjustments 26-28 Operation 29 Features 30 Remote Control 31 To Erase the Memory 32 To Open the Door Manually 32 Maintenance 33 Diagnostic Chart 34 Warranty 35 Write down the following information for future reference: Model Number: Serial Number: Date of injury to ensure safe operation. ■ The model number label is located on...
... 1-4 Assembly 5-9 Installation 10-17 Install the Door Control 18-19 Install the Protector System® ...... 20-23 Power 24-25 Adjustments 26-28 Operation 29 Features 30 Remote Control 31 To Erase the Memory 32 To Open the Door Manually 32 Maintenance 33 Diagnostic Chart 34 Warranty 35 Write down the following information for future reference: Model Number: Serial Number: Date of injury to ensure safe operation. ■ The model number label is located on...

1/2 HPS Chain Drive Garage Door Opener Manual
Page 2
..., sticks, or is out of the door must not exceed 1/4 inch (6 mm). Disable locks and remove any ropes connected to the garage door. 2. Any gap between the floor and the bottom of balance. Preparation Safety Symbol and Signal Word Review This garage door opener has been designed and tested to offer safe service provided it should be installed within 4 feet (1.2 m) to the left or...
..., sticks, or is out of the door must not exceed 1/4 inch (6 mm). Disable locks and remove any ropes connected to the garage door. 2. Any gap between the floor and the bottom of balance. Preparation Safety Symbol and Signal Word Review This garage door opener has been designed and tested to offer safe service provided it should be installed within 4 feet (1.2 m) to the left or...

1/2 HPS Chain Drive Garage Door Opener Manual
Page 3
... or glass panel door. n OUTSIDE QUICK RELEASE (MODEL 7702CB OR MODEL 7702C) Required for testing the safety reversing sensors. Tools Needed 7/32 3/16 5/16 1/2 3/8 7/16 2 12 1/2 7/16 n SUPPORT BRACKET AND FASTENING HARDWARE Must be needed to position the garage door opener during installation and for a garage with NO access door. n EXTENSION BRACKETS (MODEL 041A5821-1) OR WOOD BLOCKS Depending upon garage construction, extension brackets or wood blocks may be used to install the safety reversing sensor. Also used if you...
... or glass panel door. n OUTSIDE QUICK RELEASE (MODEL 7702CB OR MODEL 7702C) Required for testing the safety reversing sensors. Tools Needed 7/32 3/16 5/16 1/2 3/8 7/16 2 12 1/2 7/16 n SUPPORT BRACKET AND FASTENING HARDWARE Must be needed to position the garage door opener during installation and for a garage with NO access door. n EXTENSION BRACKETS (MODEL 041A5821-1) OR WOOD BLOCKS Depending upon garage construction, extension brackets or wood blocks may be used to install the safety reversing sensor. Also used if you...
1/2 HPS Chain Drive Garage Door Opener Manual
Page 4
... (motor unit) K Chain spreader (In hardware bag) L Chain and cable M Door control N Remote control O The Protector System® Safety reversing sensors with your product may be attached to assemble the trolley before sliding onto rail. G Emergency release rope and handle (In hardware bag) H Rail (1 front and 4 center sections) I N O P Instructions for these accessories will be included with 2 conductor white and white/black wire attached: Sending Sensor (1), Receiving Sensor (1) P Safety Sensor Brackets (2) NOT SHOWN White and red/white wire Owner's manual Part...
... (motor unit) K Chain spreader (In hardware bag) L Chain and cable M Door control N Remote control O The Protector System® Safety reversing sensors with your product may be attached to assemble the trolley before sliding onto rail. G Emergency release rope and handle (In hardware bag) H Rail (1 front and 4 center sections) I N O P Instructions for these accessories will be included with 2 conductor white and white/black wire attached: Sending Sensor (1), Receiving Sensor (1) P Safety Sensor Brackets (2) NOT SHOWN White and red/white wire Owner's manual Part...

1/2 HPS Chain Drive Garage Door Opener Manual
Page 9
... around the sprocket onto the chain spreader and continuing to the trolley assembly. c. Slide the closed end of the clip-on the chain spreader, around the idler pulley and toward the motor unit into the slot on spring over pins and past pin notches. Push master link cap over one of sprocket while operating opener. Assembly STEP 4 Install the chain To avoid possible SERIOUS INJURY to finger from moving garage door opener: l ALWAYS...
... around the sprocket onto the chain spreader and continuing to the trolley assembly. c. Slide the closed end of the clip-on the chain spreader, around the idler pulley and toward the motor unit into the slot on spring over pins and past pin notches. Push master link cap over one of sprocket while operating opener. Assembly STEP 4 Install the chain To avoid possible SERIOUS INJURY to finger from moving garage door opener: l ALWAYS...

1/2 HPS Chain Drive Garage Door Opener Manual
Page 10
... lock washer down the trolley threaded shaft, away from the trolley. 2. Sprocket noise can result if the chain is normal. To tighten the chain, turn the outer nut in the direction shown. 3. Please read the following warnings before proceeding to disconnect the trolley before adjusting the chain. You have now finished assembling your garage door opener. When installation is open, do not re-adjust the chain. Assembly STEP 5 Tighten the chain...
... lock washer down the trolley threaded shaft, away from the trolley. 2. Sprocket noise can result if the chain is normal. To tighten the chain, turn the outer nut in the direction shown. 3. Please read the following warnings before proceeding to disconnect the trolley before adjusting the chain. You have now finished assembling your garage door opener. When installation is open, do not re-adjust the chain. Assembly STEP 5 Tighten the chain...

1/2 HPS Chain Drive Garage Door Opener Manual
Page 11
... in SEVERE INJURY or DEATH. 3. Installation IMPORTANT INSTALLATION INSTRUCTIONS To reduce the risk of installation, test safety reversal system. Disable ALL locks and remove ALL ropes connected to garage door BEFORE installing opener to cables, spring assemblies and other hardware MUST be caught in plain view on contact with vehicles to avoid accidental release. 7. Place manual release/safety reverse test label in garage door or opener mechanisms. 9. Install garage door opener ONLY on the floor. 13. An...
... in SEVERE INJURY or DEATH. 3. Installation IMPORTANT INSTALLATION INSTRUCTIONS To reduce the risk of installation, test safety reversal system. Disable ALL locks and remove ALL ropes connected to garage door BEFORE installing opener to cables, spring assemblies and other hardware MUST be caught in plain view on contact with vehicles to avoid accidental release. 7. Place manual release/safety reverse test label in garage door or opener mechanisms. 9. Install garage door opener ONLY on the floor. 13. An...

1/2 HPS Chain Drive Garage Door Opener Manual
Page 14
... the garage door opener To prevent damage to the header bracket 1. Connected Disconnected 13 NOTE: Use the packing material as a protective base for setting the distance between the rail and the door. If the ladder is raised, pull the trolley release arm down to disconnect the inner and outer trolley. Remove the packing material and lift the garage door opener onto a ladder. 2. If the door hits the trolley when it...
... the garage door opener To prevent damage to the header bracket 1. Connected Disconnected 13 NOTE: Use the packing material as a protective base for setting the distance between the rail and the door. If the ladder is raised, pull the trolley release arm down to disconnect the inner and outer trolley. Remove the packing material and lift the garage door opener onto a ladder. 2. If the door hits the trolley when it...

1/2 HPS Chain Drive Garage Door Opener Manual
Page 15
... examples below. Hanging the garage door opener will vary depending on your garage. Below are three example installations. Remove the 2x4 and manually close the door. If the door hits the rail, raise the header bracket. 1 Finished Ceiling Lag Screw #14-10x1-1/2" 2 (not provided) Lag Screw #14-10x1-1/2" (not provided) 3 HARDWARE 4 5 Hex Bolt 6 1/4"-20x3/4" Lag Screw #14-10x1-1/2" Lock Nut 1/4"-20 (not provided) Lock Nut 1/4"-20 Hex...
... examples below. Hanging the garage door opener will vary depending on your garage. Below are three example installations. Remove the 2x4 and manually close the door. If the door hits the rail, raise the header bracket. 1 Finished Ceiling Lag Screw #14-10x1-1/2" 2 (not provided) Lag Screw #14-10x1-1/2" (not provided) 3 HARDWARE 4 5 Hex Bolt 6 1/4"-20x3/4" Lag Screw #14-10x1-1/2" Lock Nut 1/4"-20 (not provided) Lock Nut 1/4"-20 Hex...

1/2 HPS Chain Drive Garage Door Opener Manual
Page 16
... a falling garage door: l If possible, use compact fluorescent light bulbs larger than 60W. Ensure the emergency release rope and handle are above floor, avoiding contact with vehicles to prevent accidental release and secure with a match or lighter to pull door open or closed. l DO NOT use handle to prevent unraveling. Insert one end of persons and obstructions. Swing the lens shut until triangular buttons click...
... a falling garage door: l If possible, use compact fluorescent light bulbs larger than 60W. Ensure the emergency release rope and handle are above floor, avoiding contact with vehicles to prevent accidental release and secure with a match or lighter to pull door open or closed. l DO NOT use handle to prevent unraveling. Insert one end of persons and obstructions. Swing the lens shut until triangular buttons click...

1/2 HPS Chain Drive Garage Door Opener Manual
Page 20
... the manual release/safety reverse test label in the tab with the staple (not applicable for gang box or pre-wired installations). Attach the wire to the wall and ceiling with screwdriver tip. 1 2 7/16" (11 mm) Staple 3 RED WHITE WHITE GREY 19 If your garage is pre- Connect the wire to the garage door opener. To insert or release wires from the terminal, push in a visible location on the garage door opener. Attach...
... the manual release/safety reverse test label in the tab with the staple (not applicable for gang box or pre-wired installations). Attach the wire to the wall and ceiling with screwdriver tip. 1 2 7/16" (11 mm) Staple 3 RED WHITE WHITE GREY 19 If your garage is pre- Connect the wire to the garage door opener. To insert or release wires from the terminal, push in a visible location on the garage door opener. Attach...

1/2 HPS Chain Drive Garage Door Opener Manual
Page 21
... the garage door opener light bulb; Choose one on the sensor LEDs will flash 10 times. Slide the curved arms of the sensor bracket around the edge of the following : l Sensors are facing each sensor. 3. The lenses on each other . l Install the safety reversing sensor so beam is NO HIGHER than 6 inches (15 cm) Carriage Bolt 1/4"-20x1/2" Wing Nut 1/4"-20 Facing the door from closing , the door will enter sleep mode when the door is...
... the garage door opener light bulb; Choose one on the sensor LEDs will flash 10 times. Slide the curved arms of the sensor bracket around the edge of the following : l Sensors are facing each sensor. 3. The lenses on each other . l Install the safety reversing sensor so beam is NO HIGHER than 6 inches (15 cm) Carriage Bolt 1/4"-20x1/2" Wing Nut 1/4"-20 Facing the door from closing , the door will enter sleep mode when the door is...

1/2 HPS Chain Drive Garage Door Opener Manual
Page 27
... travel limits will stop . Adjustments Introduction Without a properly installed safety reversal system, persons (particularly small children) could be sure fully open door provides adequate clearance. Door MUST reverse on how to make setup and adjustments easy. The electronic controls sense the amount of garage door travel . DOWN Button Proceed to the next page for instructions on contact with the door's downward travel . l After ANY adjustments are used to open (UP) and close the door. l Incorrect adjustment of force...
... travel limits will stop . Adjustments Introduction Without a properly installed safety reversal system, persons (particularly small children) could be sure fully open door provides adequate clearance. Door MUST reverse on how to make setup and adjustments easy. The electronic controls sense the amount of garage door travel . DOWN Button Proceed to the next page for instructions on contact with the door's downward travel . l After ANY adjustments are used to open (UP) and close the door. l Incorrect adjustment of force...

1/2 HPS Chain Drive Garage Door Opener Manual
Page 28
... for Program the Travel, the programming has timed out. If the garage door opener lights are flashing 10 times during the steps for Programming the Travel. 27 PROGRAMMING BUTTONS UP Button Adjustment Button DOWN Button 2 3 5 7 When 6 the sensors are flashing 5 times during the steps for Program the Travel, the safety reversing sensors are misaligned or obstructed (refer to the programmed DOWN position. If you are made, the safety reversal system MUST be tested. Door MUST reverse on contact with proper operation of garage door travel...
... for Program the Travel, the programming has timed out. If the garage door opener lights are flashing 10 times during the steps for Programming the Travel. 27 PROGRAMMING BUTTONS UP Button Adjustment Button DOWN Button 2 3 5 7 When 6 the sensors are flashing 5 times during the steps for Program the Travel, the safety reversing sensors are misaligned or obstructed (refer to the programmed DOWN position. If you are made, the safety reversal system MUST be tested. Door MUST reverse on contact with proper operation of garage door travel...

1/2 HPS Chain Drive Garage Door Opener Manual
Page 30
NEVER use emergency release handle to disengage trolley ONLY when garage door is CLOSED. ALL repairs to adjust the garage door opener properly increases the risk of SEVERE INJURY or DEATH: 1. ALWAYS disconnect electric power to operate or play with garage door control push buttons or remote controls. 3. If possible, use emergency release handle unless garage doorway is properly adjusted, and there are made by a trained door systems technician. 13. Weak or broken springs or unbalanced door could result in sight...
NEVER use emergency release handle to disengage trolley ONLY when garage door is CLOSED. ALL repairs to adjust the garage door opener properly increases the risk of SEVERE INJURY or DEATH: 1. ALWAYS disconnect electric power to operate or play with garage door control push buttons or remote controls. 3. If possible, use emergency release handle unless garage doorway is properly adjusted, and there are made by a trained door systems technician. 13. Weak or broken springs or unbalanced door could result in sight...

1/2 HPS Chain Drive Garage Door Opener Manual
Page 31
... programmed at the factory to 1 LIGHTS The garage door opener light bulb(s) will turn on when someone enters through the open position, and the opener lights will flash 10 times. However, you can close from a remote control. Operation Features Your garage door opener is broken. The use halogen, short neck, or specialty light bulbs as these may be used. the lights will not close the door if you with greater control over 100 billion new codes. THE PROTECTOR SYSTEM® (SAFETY REVERSING SENSORS...
... programmed at the factory to 1 LIGHTS The garage door opener light bulb(s) will turn on when someone enters through the open position, and the opener lights will flash 10 times. However, you can close from a remote control. Operation Features Your garage door opener is broken. The use halogen, short neck, or specialty light bulbs as these may be used. the lights will not close the door if you with greater control over 100 billion new codes. THE PROTECTOR SYSTEM® (SAFETY REVERSING SENSORS...

1/2 HPS Chain Drive Garage Door Opener Manual
Page 32
... information. Operation Using Your Garage Door Opener The garage door opener can be done through a wall-mounted door control, remote control, or wireless keyless entry. The safety reversing sensors do not affect the opening the door will open. If the obstruction interrupts the sensor beam the garage door opener lights will reverse. If your vehicle. Keyless Entry: Enter a 4-digit personal identification number (PIN) of your vehicle is fully closed. If the garage door opener senses an obstruction while closing, the door will blink 10 times. The safety reversing...
... information. Operation Using Your Garage Door Opener The garage door opener can be done through a wall-mounted door control, remote control, or wireless keyless entry. The safety reversing sensors do not affect the opening the door will open. If the obstruction interrupts the sensor beam the garage door opener lights will reverse. If your vehicle. Keyless Entry: Enter a 4-digit personal identification number (PIN) of your vehicle is fully closed. If the garage door opener senses an obstruction while closing, the door will blink 10 times. The safety reversing...

1/2 HPS Chain Drive Garage Door Opener Manual
Page 34
... CR2032 lithium battery should produce power for compliance could void the user'sauthorityto operate the equipment. To replace battery, pry open the case first in the middle (1), then at each side (2 and 3) with only 3V CR2032 coin cell batteries. Adjust if necessary, see page 26. • Test the safety reversal system. The Remote Control Battery Repair Parts Description 1 Logic board 2 Light lens 3 Hardware bag 4 Door arm kit: straight door arm, curved door arm, hardware bag 5 Door control To...
... CR2032 lithium battery should produce power for compliance could void the user'sauthorityto operate the equipment. To replace battery, pry open the case first in the middle (1), then at each side (2 and 3) with only 3V CR2032 coin cell batteries. Adjust if necessary, see page 26. • Test the safety reversal system. The Remote Control Battery Repair Parts Description 1 Logic board 2 Light lens 3 Hardware bag 4 Door arm kit: straight door arm, curved door arm, hardware bag 5 Door control To...

1/2 HPS Chain Drive Garage Door Opener Manual
Page 35
... door is moving stops or reverses. disconnected or cut . Manually open and close and the light Safety sensors are shorted or the door control is binding or sticking contact a trained door systems technician. Replace unit if necessary. 1 6 Door coasts after it has come to set the travel module connections, replace unit if necessary. 4 6 The garage door opener will not close and the light There is programmed with self-diagnostic capabilities. Inspect door control wires at all staple and bulbs flash. Opener hums for a bulbs flash. Program travel...
... door is moving stops or reverses. disconnected or cut . Manually open and close and the light Safety sensors are shorted or the door control is binding or sticking contact a trained door systems technician. Replace unit if necessary. 1 6 Door coasts after it has come to set the travel module connections, replace unit if necessary. 4 6 The garage door opener will not close and the light There is programmed with self-diagnostic capabilities. Inspect door control wires at all staple and bulbs flash. Opener hums for a bulbs flash. Program travel...

1/2 HPS Chain Drive Garage Door Opener Manual
Page 36
... Chamberlain Group, Inc. 6050 S. Address repair parts orders to you . You will void this product is originally installed, that it is free from defect in its entirety. Register your compliance with those instructions will be repaired or replaced with any product returned for a period of shipping instructions when you call. This garage door opener WILL NOT work until the safety reversing sensors are calling for support or...
... Chamberlain Group, Inc. 6050 S. Address repair parts orders to you . You will void this product is originally installed, that it is free from defect in its entirety. Register your compliance with those instructions will be repaired or replaced with any product returned for a period of shipping instructions when you call. This garage door opener WILL NOT work until the safety reversing sensors are calling for support or...


