User Manual
Page 3
... Controller and Projector Keys 8 Back Terminals 9 Operation During Projection 10 Selecting the Input Source 10 To select a different input source 10 3D Input Mode ...10 Horizontal Flipping in the 3D Input Mode 11 Image Operations During Projection 12 Adjusting Image Brightness 12 Selecting the Color Mode 13 Zooming an Image ...13 Momentarily...
... Controller and Projector Keys 8 Back Terminals 9 Operation During Projection 10 Selecting the Input Source 10 To select a different input source 10 3D Input Mode ...10 Horizontal Flipping in the 3D Input Mode 11 Image Operations During Projection 12 Adjusting Image Brightness 12 Selecting the Color Mode 13 Zooming an Image ...13 Momentarily...
User Manual
Page 6
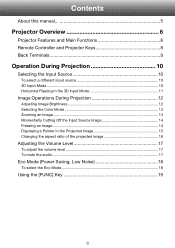
Also, separately available special software (CASIO 3D Converter) is required to 3,000 lumens along with the projector when a computer (analog RGB) is the input source. XJ-M240/XJ-M245/XJ-M250/XJ-M255 z WXGA Resolution: The XJ-M240/XJ-M245/XJ-M250/XJ-M255 models support WXGA (1280 × 800) resolution for optimal viewing of 2,500 to project a 3D image with low power consumption...
Also, separately available special software (CASIO 3D Converter) is required to 3,000 lumens along with the projector when a computer (analog RGB) is the input source. XJ-M240/XJ-M245/XJ-M250/XJ-M255 z WXGA Resolution: The XJ-M240/XJ-M245/XJ-M250/XJ-M255 models support WXGA (1280 × 800) resolution for optimal viewing of 2,500 to project a 3D image with low power consumption...
User Manual
Page 10
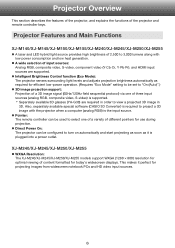
...you select appears in the upper right corner of the input source you want to project. z Separately available special software (CASIO 3D Converter) is required to select the name of the projection screen for a few seconds. The input sources described below can... Important! Operation During Projection Selecting the Input Source Turning on the type of 3D image data played back using separately available special software (CASIO 3D Converter). - 2D image file converted to a 3D image file using CASIO 3D Converter - z This displays the input source selection screen. 2. Side-by this...
...you select appears in the upper right corner of the input source you want to project. z Separately available special software (CASIO 3D Converter) is required to select the name of the projection screen for a few seconds. The input sources described below can... Important! Operation During Projection Selecting the Input Source Turning on the type of 3D image data played back using separately available special software (CASIO 3D Converter). - 2D image file converted to a 3D image file using CASIO 3D Converter - z This displays the input source selection screen. 2. Side-by this...
User Manual
Page 11
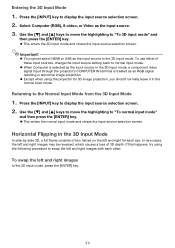
... screen. 2. Important! z Except when using the following procedure to swap the left and right images may be reversed, which causes a loss of 3D depth. z This enters the normal input mode and closes the input source selection screen. z When Computer is selected as the input source in the...an RGB signal resulting in the normal input mode. Use the [T] and [S] keys to move the highlighting to normal input mode. Horizontal Flipping in the 3D input mode. Press the [INPUT] key to display the input source selection screen. 2. Select Computer (RGB), S-video, or Video as the input ...
... screen. 2. Important! z Except when using the following procedure to swap the left and right images may be reversed, which causes a loss of 3D depth. z This enters the normal input mode and closes the input source selection screen. z When Computer is selected as the input source in the...an RGB signal resulting in the normal input mode. Use the [T] and [S] keys to move the highlighting to normal input mode. Horizontal Flipping in the 3D input mode. Press the [INPUT] key to display the input source selection screen. 2. Select Computer (RGB), S-video, or Video as the input ...
User Manual
Page 13
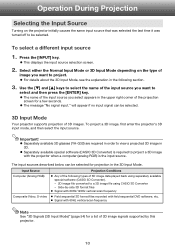
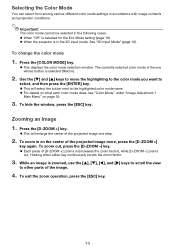
Important! See "3D Input Mode" (page 10). The currently selected color mode is the one step. 2. To hide the window, press the [ESC] key. Holding down either key ... the highlighting to the color mode you want to other parts of the projected image more, press the [D-ZOOM +] key again. To zoom in the 3D input mode. z Each press of the projected image one whose button is selected (filled in accordance with image contents and projection conditions. Press the [D-ZOOM...
Important! See "3D Input Mode" (page 10). The currently selected color mode is the one step. 2. To hide the window, press the [ESC] key. Holding down either key ... the highlighting to the color mode you want to other parts of the projected image more, press the [D-ZOOM +] key again. To zoom in the 3D input mode. z Each press of the projected image one whose button is selected (filled in accordance with image contents and projection conditions. Press the [D-ZOOM...
User Manual
Page 18
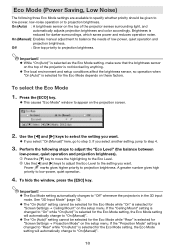
... will automatically change to appear on the top of low-power, quiet operation and projection brightness. z This causes "Eco Mode" window to "On (Manual)". See "3D Input Mode" (page 10). If the "Ceiling Mount" setting is changed to "Rear" while "On (Auto)" is in the...
... will automatically change to appear on the top of low-power, quiet operation and projection brightness. z This causes "Eco Mode" window to "On (Manual)". See "3D Input Mode" (page 10). If the "Ceiling Mount" setting is changed to "Rear" while "On (Auto)" is in the...
User Manual
Page 21
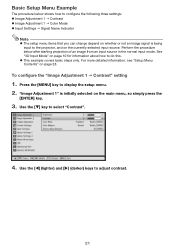
..." setting 1. z This example covers basic steps only. Use the [T] key to display the setup menu. 2. Use the [W] (lighter) and [X] (darker) keys to do this. See "3D Input Mode" on the main menu, so simply press the [ENTER] key. 3. "Image Adjustment 1" is being input to the projector, and on page 28.
..." setting 1. z This example covers basic steps only. Use the [T] key to display the setup menu. 2. Use the [W] (lighter) and [X] (darker) keys to do this. See "3D Input Mode" on the main menu, so simply press the [ENTER] key. 3. "Image Adjustment 1" is being input to the projector, and on page 28.
User Manual
Page 33
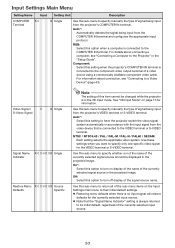
... Signal Name R C V H D U N Single Indicator Restore Menu R C V H D U N Source Defaults Specific Note The setting of this item cannot be displayed in the 3D input mode. Auto*: Select this setting to have the projector switch the video signal system automatically in accordance with the input signal from the projector's ...source. 33 Use this sub-menu to their initial default settings. Off: Select this option to the COMPUTER IN terminal. See "3D Input Mode" on display of the name of signal being input from the projector's COMPUTER IN terminal. z Restoring menu defaults when...
... Signal Name R C V H D U N Single Indicator Restore Menu R C V H D U N Source Defaults Specific Note The setting of this item cannot be displayed in the 3D input mode. Auto*: Select this setting to have the projector switch the video signal system automatically in accordance with the input signal from the projector's ...source. 33 Use this sub-menu to their initial default settings. Off: Select this option to the COMPUTER IN terminal. See "3D Input Mode" on display of the name of signal being input from the projector's COMPUTER IN terminal. z Restoring menu defaults when...
User Manual
Page 35
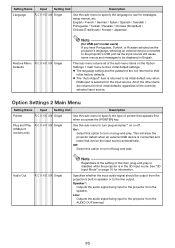
...) R C V H D U N Single Use this option to their initial default settings. Off: Select this sub-menu to be output from the projector's built-in the 3D input mode. See "3D Input Mode" on the Option Settings 1 main menu to turn off . This sub-menu returns all of the sub-menu items on page 10...
...) R C V H D U N Single Use this option to their initial default settings. Off: Select this sub-menu to be output from the projector's built-in the 3D input mode. See "3D Input Mode" on the Option Settings 1 main menu to turn off . This sub-menu returns all of the sub-menu items on page 10...
User Manual
Page 58
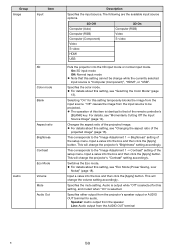
... this setting, see "Changing the aspect ratio of this setting temporarily blocks the image from the input source. Input a value into the 3D input mode or normal input mode. Specifies either output from the projector's speaker output or AUDIO OUT terminal for this item is selected.... z The operation of the projected image" (page 16). Group Image Item Input 3D Color mode Blank Audio Aspect ratio Brightness Contrast Eco Mode Volume Mute Audio Out Description Specifies the input source. "Off" causes the image ...
... this setting, see "Changing the aspect ratio of this setting temporarily blocks the image from the input source. Input a value into the 3D input mode or normal input mode. Specifies either output from the projector's speaker output or AUDIO OUT terminal for this item is selected.... z The operation of the projected image" (page 16). Group Image Item Input 3D Color mode Blank Audio Aspect ratio Brightness Contrast Eco Mode Volume Mute Audio Out Description Specifies the input source. "Off" causes the image ...